I like the fact that you didn't hide all the small mistakes you've made during the build, but shared them with us to help us make our own projects better... AND it turned out awesome too :)
Cool project! Small nitpick though, wouldnt you want the speakers on the side? Wouldnt having them on top make them too prone to being damaged by spillage? Edit: Plus you are slightly decreasing the surface area you can use as a table.
Spillage is a good point, but the surface area loss likely doesn’t matter much since it is just a party “coffee table”. If he had built it to be a dining table then the speaker placement would really effect usable surface area.
Considered it, but then realized I want to have the people on the porch enjoy the music, not my neighbors as I would be blasting it at their houses. And these are marine speakers, so spillage is no issue.
Cool table! If you do anything similar in the future, you should try a neat trick I discovered that works well for turning on LED strip lights: For my undercabinet lighting, I used a capacitive touch switch. They're fairly cheap, and just plug in. That part isn't the trick, though. I wrapped aluminum foil tape (used for HVAC ducting) around the case of the switch, then ran it to the edge of the cabinet, and put a 1 foot long strip along the edge. You can't see the switch and you just touch under the edge and the lights magically come on. The switch also works as a fader. I found out, there is a limit to how much tape you can use, as at some point (about 3 ft for me) the aluminum tape affects the capacitance of the switch.
Great project, Brad~! Nice to see that you included the footage of how you avoided disaster instead of letting it hit the cutting room floor~! Something like this might wind up on our deck. Thanks for the inspiration~!
This is the most well thought through RGB strip integration I have seen. - doesn't look shabby when it's off - functional and not all to distracting - looks awesome and fluidly when its sync to music Thanks for the inspiration!
That catching the edge of the frame on the clamp transition was great! I legitimately thought you had caught on something and were about to knock everything off your shelves at first! I've never seen a cut like that before. Very fun!
Agree with the person about the speakers being on top (spills) and also some kind of cool looking boxes to house the speakers for a bit more bass response. Nice job 👍
Very Very Cool! A lot of work but man what a beautiful table! Outstanding work and creativity, love the end result. Very clever all the way around! Thank you for posting, GREAT
Appreciate the video good sir. I'm a software engineer nerd who got into a lot of wood working so this was a great video for me. Love the epoxy cuts going down the sides as well. Also love that CNC machine you are using!
Nice project, it looks great! Those end grain mitre joint glue ups, I felt your pain. Been there, done that, same frustration. A boatbuilder friend gave me the answers; 1. Always wipe joint off with acetone first. 2. Tape joint edges to mask anything you don’t want epoxy on. 3. Prime joint faces with thinnish epoxy, about like unthinned varnish is just about ok, but definitely not thicker. Allow to go off until just curing but tacky to the finger. 4. Mix epoxy, then add either silica fibre or microballoons to achieve a smooth peanut butter consistency, or slightly thinner in a pretty close joint. Silica fibres tend to make a stronger joint but it’ll look more obvious where the glue line is exposed. 5. Clamp up, wipe off excess squeeze out and open a beer. 6. Peel tape as soon as squeeze out has stopped but before cure kicks off, extremely satisfying with a beer in hand. 😁 Hope that works for you, it has for me.
looks really nice, as long as you don't look at the bottom ;-) maybe a nice panel to cover everything up? (which you can remove if you need to fix things)
very good. I would round off all corners and edges because I have a thing about someone falling on sharp edges. Also, reinforce the underside just incase the table is used for spontaneous after hour activity 😊
Great project and build. The led effects look cool. I like the running lights, it needs one where it starts in the middle and runs outwards, like a dual water fall. Nice save with the frame. I think the frame makes the table look better from the sides, not just 3 mitred planks. You also have a nice flow of the frame around the electronics panel. I'm surprised that you didn't pocket hole from the frame to the leg panels. Wouldn't it of given some extra strength to the miter and tightened the glue joints?
Wow you’re amazing. What a beautiful pay-off for all that hard work! Love all those lights with the music. You have so many skills. Thank you for sharing them💕👏🏻
This turned out really cool. I need to make one of these for my back patio, when I get to my back patio renovation. Never seen those battery adapter things before and they are a great little tool. I will definitely be finding a reason to use some of those.
Early 80's cassettes came with a free rewinder...had a point on one end, and a soft rubbery end on the other.but i was happy when the power rewinder came standard with all tape decks. :-D
You should look into a way to place the LED strips from the top next time. They have a glue strip and that'll help you a bit. With my last (and so far only) project of that sort, I placed the LED strip in, put the wire through a tiny hole, and with some hot snot in the hole I could epoxy the whole thing into place. Sure, they can't be removed anymore, but that's the tradeoff for having this thing look that good.
This is really nice! Can you update on what playing time you get from those batteries? Curious if they would last a whole party or just an hour or two. An in depth follow up video about the electronic parts would definitely be interesting! Thanks for the great build video!
I can't really give you a definite answer but we could calculate the approximate consumption of the components: the D1 Mini is well below 100 mA (so let's just ignore it) and each of the LEDs (or rather LED-groups, but keep it to LEDs for now) of the WS2812b strip below 50 mA (50 mA is the maximum for full brightness). I'd suppose he uses the strip with 60 LEDs per meter and I think his wooden board was around 2 meters before he cut it, ie probably a maximum of 100 LEDs per column (there are four full-length columns and three with the bottle-cutout. Let's be generous and assume 600 LEDs. This would sum up to 600 LEDs * 50 mA per LED = 30 A. All those are at 5V. Now take the 20V battery with 6 Ah which provides (20V*6Ah=120Wh) 120 Watt-Hours of Energy. Typically, not all of this energy can be used (there are different processes where loss happens), so perhaps around 105 Wh are effectively usable, which would be 87.5% of the rating (I also implicitly added the loss for the step-down of the voltage from 20 V to 5 V, here). So, the battery provides 105 Wh, the LEDs use a maximum of 30A * 5V = 150 W. This would leave us with only 42 minutes of LED-fun (105 Wh / 150 W = 0.7 h). Now, you probably don't want to use the full brightness exclusively (it would be just a bright, white light strip). Each LED-group consists of three individual LEDs (red, green and blue) and you'll probably use a mix of them. So, instead of 50 mA for each LED-group you only use 30 mA (a 66% increase of battery-time up to 70 minutes). Additionally, not all LED-groups are on all the time (they are addressable, hence the D1 Mini), which can easily double or tripple your battery-time (or even further, depending on the LED-mode you program).
I love the entire concept of ”Let's see what happens” as the signal for going to the next step, because that's such a perfect representation of the maker experience. This was an awesome project and it came out looking incredible!!
Congratulations you have been selected among our shortlisted winners from our previous giveaway Contact the number above .....................................................
I love all these comments nitpicking your build/design because you have tons of experience and your decisions are very well-informed, and it isn't that serious to begin with because this is for your RUclips channel. It's like people think you're a beginner or something and would make these simple mistakes or that you hadn't considered something really obvious given how you're gonna use it.
Hi, great video. I have done a lot of diy, but the "trick" with the pocket hole is great. What type / size of screws is best to use ? I mean there is a risk using to long screws. 🙂
First time I've seen one of your videos..great stuff buddy I'm so jealous of your shop..man I love it. For me,a guy that does not have and probably never will have all those tools it does my heart good to know...you can still screw up..on camera..and have a great fix.. Thank you for this..cool project and cooler table Please don't dance again... Lol
My God Brad ... this had to be among the most entertaining videos you have done!! I found myself chuckling, laughing and even crying with happy tears when you got the LED's working (not really, I just wanted to sound sensitive). This really was a monster project with monster results ... You are the MAN!! Cheers Mate!


Wow! Blown away, the LED integration is incredible!
Thanks, dude!
The beer holder insert should have been wired for lights as well, with a clear bottom (at least) to light up the ice and the bottles with color, too.
@@nomicwave I agree, provided it didn’t lessen sound quality.
My thoughts exactly!!! Also having speakers with some LEDs aswell would have been nice
@@davidmontgomery9570 S (=smile)
I like the fact that you didn't hide all the small mistakes you've made during the build, but shared them with us to help us make our own projects better... AND it turned out awesome too :)
Cool project! Small nitpick though, wouldnt you want the speakers on the side? Wouldnt having them on top make them too prone to being damaged by spillage? Edit: Plus you are slightly decreasing the surface area you can use as a table.
had exactly the same thought, plus they'll fill up with crap pretty fast especially outside.
Or even flush mounted with some anti spillage material covering then
Spillage is a good point, but the surface area loss likely doesn’t matter much since it is just a party “coffee table”. If he had built it to be a dining table then the speaker placement would really effect usable surface area.
Maybe try sound exciters
Considered it, but then realized I want to have the people on the porch enjoy the music, not my neighbors as I would be blasting it at their houses. And these are marine speakers, so spillage is no issue.
Cool table! If you do anything similar in the future, you should try a neat trick I discovered that works well for turning on LED strip lights: For my undercabinet lighting, I used a capacitive touch switch. They're fairly cheap, and just plug in. That part isn't the trick, though. I wrapped aluminum foil tape (used for HVAC ducting) around the case of the switch, then ran it to the edge of the cabinet, and put a 1 foot long strip along the edge. You can't see the switch and you just touch under the edge and the lights magically come on. The switch also works as a fader. I found out, there is a limit to how much tape you can use, as at some point (about 3 ft for me) the aluminum tape affects the capacitance of the switch.
Braaaaaaad!!! Perfect. Good job. I don’t believe. Congratulations.
Thanks, dude!
Great project, Brad~! Nice to see that you included the footage of how you avoided disaster instead of letting it hit the cutting room floor~! Something like this might wind up on our deck. Thanks for the inspiration~!
glad it sparked some ideas for you
WOW!!!!! The day you posted this, Timberland is already sold out of those boots........BUMMER!!!!!! AWESOME BUILD!!!!!!!!
This is the most well thought through RGB strip integration I have seen.
- doesn't look shabby when it's off
- functional and not all to distracting
- looks awesome and fluidly when its sync to music
Thanks for the inspiration!
Thank you! I put a lot of time and effort into it, so I'm glad it came off well
That catching the edge of the frame on the clamp transition was great! I legitimately thought you had caught on something and were about to knock everything off your shelves at first! I've never seen a cut like that before. Very fun!
Agree with the person about the speakers being on top (spills) and also some kind of cool looking boxes to house the speakers for a bit more bass response. Nice job 👍
Awesome project man. Way to think outside the box with the white pigment.
Considering you’re a woodworker not a videographer. you do a phenomenal job with your video edits
Thank you, but all the credit goes to Chris our editor 😀
Very Very Cool! A lot of work but man what a beautiful table! Outstanding work and creativity, love the end result. Very clever all the way around! Thank you for posting, GREAT
Appreciate the support!
Appreciate the video good sir. I'm a software engineer nerd who got into a lot of wood working so this was a great video for me. Love the epoxy cuts going down the sides as well. Also love that CNC machine you are using!
Love the table Brad! Pretty cool seeing the lights working along with the music.
Thanks, Travis! 💪 💪
That turned out AWESOME......great job!!! You've got the coolest table ever!
Thank you, Lori! The kids LOVE it :)
That transition at 07:43 was nice!!!
Thanks, Jay. Chris is killing it on the edits!
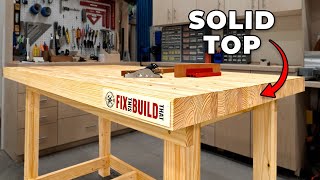
Nice project, it looks great!
Those end grain mitre joint glue ups, I felt your pain. Been there, done that, same frustration.
A boatbuilder friend gave me the answers;
1. Always wipe joint off with acetone first.
2. Tape joint edges to mask anything you don’t want epoxy on.
3. Prime joint faces with thinnish epoxy, about like unthinned varnish is just about ok, but definitely not thicker. Allow to go off until just curing but tacky to the finger.
4. Mix epoxy, then add either silica fibre or microballoons to achieve a smooth peanut butter consistency, or slightly thinner in a pretty close joint. Silica fibres tend to make a stronger joint but it’ll look more obvious where the glue line is exposed.
5. Clamp up, wipe off excess squeeze out and open a beer.
6. Peel tape as soon as squeeze out has stopped but before cure kicks off, extremely satisfying with a beer in hand. 😁
Hope that works for you, it has for me.
The project is awesome, and you are a delight to watch!
Glad you enjoyed it!
Yay, new video by my favorite woodworking channel
Hope you liked it!
Thanks for sharing that tip on how to glue the boards up. That was awesome for a beginner to know. I also like the epoxy and LEDs. That was cool.
Glad it helped, that's one a lot of people miss
I liked that tip too. Now if I can just remember it when I go to glue something up. 😂
Well, Brad, it's about time you have a sponsor I can relate to. Sam Adams! Cool table too. 🙂🍻
looks really nice, as long as you don't look at the bottom ;-) maybe a nice panel to cover everything up? (which you can remove if you need to fix things)
You are so cute dancing to the best! 😆 Love that project, you did a great job!!
😀🕺
That saw setup is simple, but brilliant!
Very cool project! Nice touch with the music. I mean... who doesn't love music with an ice cold Sam Adams!
very good. I would round off all corners and edges because I have a thing about someone falling on sharp edges. Also, reinforce the underside just incase the table is used for spontaneous after hour activity 😊
Yeah, That's bad ass. I can imagine the results of the final product made all the challenges worth it!
Thanks, Scott. It was definitely a labor of love. Kicked my butt for quite a while, lol
I thought the LEDs were gonna be too much, but it turned out amazing. Awesome table :)
Thanks!
@Lourdes My thought exactly. "Why mess it up with LE...wait a second!"
Great project and build. The led effects look cool. I like the running lights, it needs one where it starts in the middle and runs outwards, like a dual water fall.
Nice save with the frame. I think the frame makes the table look better from the sides, not just 3 mitred planks. You also have a nice flow of the frame around the electronics panel.
I'm surprised that you didn't pocket hole from the frame to the leg panels. Wouldn't it of given some extra strength to the miter and tightened the glue joints?
WOW, indeed! Great thinking outside the box-and table.
That is the definition of a cool build. Well Done 👍👍👍👍👍👍🔥🔥🔥
thanks!
Your enthusiasm makes me happy
Wow you’re amazing. What a beautiful pay-off for all that hard work! Love all those lights with the music. You have so many skills. Thank you for sharing them💕👏🏻
You're welcome!
ok, that was incredibly cool. wasn't digging the LED's until it synced to the music, but that's slick.
This turned out really cool. I need to make one of these for my back patio, when I get to my back patio renovation. Never seen those battery adapter things before and they are a great little tool. I will definitely be finding a reason to use some of those.
So awesome you had your daughter in the video to help.
AWESOME table. Like the way the music makes the lights change.
Best hosting iv seen man!! Great project!
Loved the wipe at 2:30 :D
Loved the transition as 2:33
That is fantastic, not just the end result but the journey to get you there. A pleasure to watch 🙂
Your videos make me more confident about doing bigger/more complex projects
Ok, the video was great and all, the table is neat and all, but that transition at 2:30 was next level, my friend!
Early 80's cassettes came with a free rewinder...had a point on one end, and a soft rubbery end on the other.but i was happy when the power rewinder came standard with all tape decks. :-D
until it popped the tape on you, lol
It turned out great.
thanks!
Loved the end result! Looks awesome!!!
Looks amazing! It's always fun to pull up your videos and watch you build something successfully after getting frustrated with issues in my own shop.
awesome table... sounds and lights.
You should look into a way to place the LED strips from the top next time. They have a glue strip and that'll help you a bit. With my last (and so far only) project of that sort, I placed the LED strip in, put the wire through a tiny hole, and with some hot snot in the hole I could epoxy the whole thing into place. Sure, they can't be removed anymore, but that's the tradeoff for having this thing look that good.
The LEDs or connections are likely to fail at some point, but also they get hot. Having the bottom open allows them some ventilation.
That's a pretty sweet table! Great job.
Looks like a Star Wars Empire wall design. Love it!
This is really nice! Can you update on what playing time you get from those batteries? Curious if they would last a whole party or just an hour or two. An in depth follow up video about the electronic parts would definitely be interesting! Thanks for the great build video!
I can't really give you a definite answer but we could calculate the approximate consumption of the components:
the D1 Mini is well below 100 mA (so let's just ignore it) and each of the LEDs (or rather LED-groups, but keep it to LEDs for now) of the WS2812b strip below 50 mA (50 mA is the maximum for full brightness). I'd suppose he uses the strip with 60 LEDs per meter and I think his wooden board was around 2 meters before he cut it, ie probably a maximum of 100 LEDs per column (there are four full-length columns and three with the bottle-cutout. Let's be generous and assume 600 LEDs. This would sum up to 600 LEDs * 50 mA per LED = 30 A. All those are at 5V.
Now take the 20V battery with 6 Ah which provides (20V*6Ah=120Wh) 120 Watt-Hours of Energy. Typically, not all of this energy can be used (there are different processes where loss happens), so perhaps around 105 Wh are effectively usable, which would be 87.5% of the rating (I also implicitly added the loss for the step-down of the voltage from 20 V to 5 V, here).
So, the battery provides 105 Wh, the LEDs use a maximum of 30A * 5V = 150 W. This would leave us with only 42 minutes of LED-fun (105 Wh / 150 W = 0.7 h).
Now, you probably don't want to use the full brightness exclusively (it would be just a bright, white light strip). Each LED-group consists of three individual LEDs (red, green and blue) and you'll probably use a mix of them. So, instead of 50 mA for each LED-group you only use 30 mA (a 66% increase of battery-time up to 70 minutes). Additionally, not all LED-groups are on all the time (they are addressable, hence the D1 Mini), which can easily double or tripple your battery-time (or even further, depending on the LED-mode you program).
Wow, Brad! So, so cool! Yeah. Now, your dancing really was the icing on top. 😂
Extreme;y well done, good sir.!.!.! GREAT JOB.!.!.!.!
Brad, you are such a geek! I love it! (and the reference to the cassette tape, although I'm more familiar with 8 tracks)
I am so much inspired by this idea. Gonna make one. Thank YOu!
Glad you enjoyed it!
I love the entire concept of ”Let's see what happens” as the signal for going to the next step, because that's such a perfect representation of the maker experience.
This was an awesome project and it came out looking incredible!!
The security footage was a cool touch. Nice save. U always you bring some funny with the build tips. Cool project as well.
That’s one cool table you made. Impressive design and well executed. Kudos!
That’s pretty cool, I like how it goes with the music
super cool table! I'm glad it all worked out
That is soooo cool! Great video thanks! 🇨🇦😊
Love the table, Brad. WOW.
Wow the video composition is tight as the wood! Pretty well done!!
Great video great woodworking great job good show
Nice LED table!
thanks!
nice build. half of woodworking is the ability to figure out how to fix your mistakes. I would love one of those t-shirts! we're can I get one?
you can grab one here: bit.ly/3NEh1Mv 👌
You can leave the white epoxy and back fill the epoxy channel with clear to make it strong.
Great works I need to upgrade mine now. Lol awesome
Thanks, James!
Wow this is amazing! You know, if the ice bucket was clear, the lights might shine through the ice. Just a thought. This is fantastic.
Mother of all customizations. Love from India
Congratulations you have been selected among our shortlisted winners from our previous giveaway Contact the number above .....................................................
The best part was when the LEDs got synced with the music 👌 very cool!
yep, it felt good to see it work!
Great Job. Very well done.
Thank you very much!
Dude...that looks sick. I have to build myself one.
That is super cool! I might try something like this.
I love all these comments nitpicking your build/design because you have tons of experience and your decisions are very well-informed, and it isn't that serious to begin with because this is for your RUclips channel. It's like people think you're a beginner or something and would make these simple mistakes or that you hadn't considered something really obvious given how you're gonna use it.
Truly Awesome!!!
thanks!
I love the little beer...errr... beverage fridge!! Where do I find one or is that a one off?
Awesome design Brad!! Always great videos.
thanks, dude!
Please do a video on how to retrofit a hidden toe kick drawer in existing kitchen cabinets. Thank you
Holy smokes!! Well done!
Absolutely fantastic project, love your presentation too, as always!
Really Really nice it looks awesome
2:31 didn't watch it fully, but WUT the transition there :D Checked 3 times :D
That is really Cool. Great job.
Love this! Would you ever consider doing a more in-depth tutorial on how to do the electronics part of the build?
Looks great! Maybe some thickened epoxy for the miters next time? That would work better to fill the gaps while still holding the joints strong.
"It kinda looks like a cassette tape ... if you know what that is."
I remember. Peppperidge Farm remembers too. :P
Now I'm craving a Milano
@@Fixthisbuildthat Oooh I'll take orange Milano and a bag of Chessmen. 😁
nice effect with the LEDs… and excellent beer in the tub…
you have good taste in beer. Interesting clip.
really cool project but I would have put the speakers hidden flush with the top.👌🏼👌🏼👌🏼👌🏼
You gotta work with what ou got sometimes
Hey my friend nice job.
Khalid from Indianapolis IN thank you for everything you do
You're welcome!
Very well done.
thank you!
Oh man do I want one of those! Nice work Brad
thanks, man!
Hi, great video. I have done a lot of diy, but the "trick" with the pocket hole is great. What type / size of screws is best to use ? I mean there is a risk using to long screws. 🙂
First time I've seen one of your videos..great stuff buddy
I'm so jealous of your shop..man I love it.
For me,a guy that does not have and probably never will have all those tools it does my heart good to know...you can still screw up..on camera..and have a great fix..
Thank you for this..cool project and cooler table
Please don't dance again...
Lol
What a GD delight! So fun
My God Brad ... this had to be among the most entertaining videos you have done!! I found myself chuckling, laughing and even crying with happy tears when you got the LED's working (not really, I just wanted to sound sensitive). This really was a monster project with monster results ... You are the MAN!! Cheers Mate!
Great work and fantastic editing on this, I loved the first wipe when you carried the glue up off