Это видео недоступно.
Сожалеем об этом.
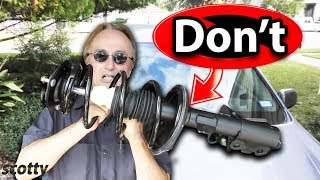
B5.5 4-Motion VW Passat Rear Shocks Replacement 1998-2005

HTML-код
- Опубликовано: 10 июл 2021
- How to remove and replace the rear shocks on the VW 4-Motion B5.5 Passat.
This modification may be applicable to The Volkswagen Passat 4-Motion of these years 1998 to 2005
//SUPPORT THE CHANNEL
Get CWB Merch and Custom Parts Here: craftyworkshop...
Support on Patreon: / craftyworkshopbuilds
//RELATED VIDEOS
Front Shocks Replacement - • VW B5.5 Passat How To ...
2.8L V6 Alternator Install - • B5.5 VW Passat 2.8L V6...
Coolant Temp Sensor Replacement - • Volkswagen B5/B5.5 2....
//TOOLS USED
Electric Ratchet - amzn.to/3kK3T9Y
Milwaukee Impact Driver - amzn.to/3hsZxW7
Strut Spring Compressor Tool - amzn.to/2UBrgLo
Pry Bar - amzn.to/3yJtR4x
13 mm Wrench - amzn.to/3icnka5
13mm 6-Point Socket - amzn.to/3hjBaIT
17mm 6-Point Socket - amzn.to/309gA6w
18 mm Wrench -amzn.to/3qXMXBm
18mm 6-Point Socket - amzn.to/3vRPKxk
8mm Hex Bit Socket - amzn.to/2HyPa3B
//CAMERA GEAR
○Primary Camera: Sony a6400 - amzn.to/2FYnAwb
○Lens: Sony E 18-55mm f/3.5-5.6 - amzn.to/3cpeN1Y
○Secondary Camera: GoPro HERO8 Black - amzn.to/301z2xV
○Primary Mic: Rode NT-USB-Mini - amzn.to/3x8ydkO
○Secondary Mic: BOYA by-MM1 - amzn.to/3kGS44w
○Light: VILTROX L116T - amzn.to/2RSqkh5
○Tripod: MACTREM CT62 - amzn.to/3i5aJp6
//STAY CONNECTED:
Instagram - / crafty.workshop.builds
Twitter - / craftyworkshopb
Facebook - / craftyworkshopbuilds
DISCLAIMER: Some links included in this description might be affiliate links. If you purchase a product I may receive a tiny commission. There is no additional charge to you! It costs you nothing but helps me big time in keeping these videos coming. Thank you for supporting my channel so I can continue to provide content.


I found this video helpful, however it should be noted that all fasteners with a green coating are single use "torque to yield" bolts, and should be replaced. Replacing foam bump stops is also advised, since they deteriorate and are inexpensive. Also, there are torque values for single-use bolts as follows:
Torque Specs
Sway bar mounts (inner) 15 lb/ft
Upper Shock mount bolts 33 lb/ft
Lower Shock Mount 52 lb/ft + 90 turn
All Inner Control Arm Bolts 70 lb/ft + 90 turn
All Outer Control Arm Bolts 70 lb/ft + 90 turn
Great additional resource!
My spring was broken so there was no trouble getting it out. but now I see what I have to remove to get the new one back. Thanks from Sweden.
Did you get it in? Same for me, I was able to remove the broken coil and shock. Now I undid everything to put it back in. It just seems to long and doesn't fit😢 can't seem to clear the bottom tab even with everything undone including the camber bolt (which took 25h to remove BTW)
@@MarcAndreLag Yes, I don´t remember exactly how, but I removed or loosened everything that would give me an extra cm.
I had the car on a lift so I had pretty good space.
I also remember that I forgot to tighten the nut on top of the shock,
So I drilled a large hole from inside to get a sprocket down and thought that maybe I should have started with a hole and remove the nut first ?
Don´t know if that would be a good idea...
This video helped but it was way harder than it looks. 😁
@@DS0T0 cool a glimmer of hope I'll ask for a friend to help after 3h my arms were very tired
I have a broken spring as well on my 4motion. This video should be just what I need to get the job done quickly and safely. Thanks, you’re the best!
I'm happy this video will be helpful for your Replacement. Thanks for watching, much respect 🙏🏾
Now that’s how you do a Tutorial my Brotha 👍
Great job !!!
I appreciate it! thanks for watching.
Well done and very professional! I'm very impressed with your mix of sound, narration and background work tracks. Listing your equipment and associated links is also a spectacular resource for others. Keep it up and looking forward to seeing more!
thanks! got KWs for the passat! 2004 4motion 5spd 1.8t for free just needed a fuel pump and new struts and control arms
Wow, good come up!
I have a 2004 passat 1.8t gls 4motion 5 speed, I love your channel. It's helping me refurbish the car, these are such well made durable cars.
Wow!!! Exactly the video I was looking for. If ever you can add to the title A6 C5 Quatro it could help others! Thank you very much
Glad it helped! Thanks for watching👍🏽
this is one of the best videos of its kind, hats off to you my good sir.
Much respect for the acknowledgement and thanks for watching!
Excellent U Great Easy Peasy Thanks for nice and clear movie
Regards and Please do some movie how set up lift kit to that car
Best of luck
Thanks for the great video, do you have any recommendations for lift kits for this model?
Great video and thx for recording it.
Did you have to remove any of the eccentric bolts?
Thank you,
Peter
I could got it done only with 3x18mm main bolts and nuts on both sides. Then 2x 13mm uper + 1x18mm lower shock bolts. Plus light adjuster sensor 10mm nut on left. Thank you for tips, it was helpful.
Much respect and thanks for watching!
Excellent job as always! Keep it up!
Much respect!
@5:39 - What is he applying to the shock parts with a brush? What parts is he applying this substance to?
Que amortiguador reemplazo al viejito aver si me pueden ayudar
Thanks!
Much respect! 💪🏽
Do u have the name or part number for those lower plate mounts lower where the spring sits on
Thank You !!!!
You're welcome!
I need a video of the rear axle getting replaced 👀
Nice video, thanks!
Much respect!
Hi there !
Do you know why should I hear knocking from the top of these if I just replaced almost everything on my 4motion Passat Variant? I mean , there are brand new shocks , springs, dust protectors and (!) Shock absorber mountings (!) on the top as well, obviously on both sides , all of them are new parts , not previously used. This noise has started to drive me mad on minor bumps too. I have never met a kind of problem like this during working on cars. Please help Sir, if You can. Thanks in advance.
Cheers
did you solve it? could it be the yellow bump stops were put in cone facing up instead of down? ruclips.net/video/_JQQBcFQHB8/видео.html
@@Neo48Hi mate !
The RIDEX shock absorbers unfortunately weren't worth it, that I replaced last summer. My yellow "bump stops" are new too, these cost almost nothing as new, and you should never retain the previously used pieces that's an important advice, when you change absorbers... these "sponge" material dust covers , that you mentioned ( They were in correct position in mine, no problem with them ). Then I wanted to try this BILSTEIN pair of them (seen in this video, I compared the OEM part number from this Crafty's video to my car parts dealer's list ) , but I realised that the reusable spring plates are missing from my suspension, both the rubber and the metal too... so the 2nd task was to get these back , I bought an Audi A6 C5 Quattro used suspension pair @ friendly cost , pulled out those plates from them, and made the whole project last weekend. Now I can say it's as silent as I would've recently come from a saloon, with the BILSTEIN shocks on the rear ...
Good job , it worths every working hour
Ps.: now I'm almost over the edge on the rear , with brand new upper and lower control arm bushings , in the inner side, and outer (around the whole wheel hub) as well.
Is there any place other than the dealer to buy the lower coil spring isolator pads????
I had to buy used shocks :(
Master!!!
Respect!
I undid everything last night my assembly seems to long and i just can't seem to clear the bottom tab
loosen the 2 lower control arm bushing bolts so the lower control arm can be dropped all the way without the bushing tension fighting against you. make sure to re-tighten them only with the suspension fully loaded in its resting position.
Thx
Good job guy
Much respect!
Lemar I need your help with my Mini! I sent you a email! I’d appreciate your help..
I sent you an email.