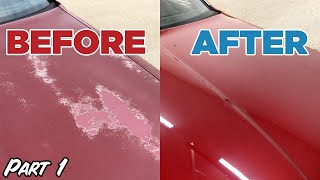
How to: Wet Sand + Polish Clear Coat Paint - Part 2

HTML-код
- Опубликовано: 7 фев 2025
- Last week I sanded and re-painted to repair the faded/flaking clear coat on the $350 Acura Legend. Today I'll show how to bring it to a mirror finish with wet sanding and polishing, to get the car looking as shiny as it did when it was brand new.
Products used:
Meguiars E-7200 sanding block: amzn.to/3EUotPo
3M Wetordry Sponge Pad #20: amzn.to/3ykdOv7
1200 grit sand paper: amzn.to/3m25ICm
1500 grit sand paper: amzn.to/3pSwjTv
2000 grit sand paper: amzn.to/3ynWlln
Meguiar's Ultra-Cut Compound, 32 oz: amzn.to/3mKsjUz
Meguiar's DMX6 DA Microfiber Xtra Cut Disc, 2 Pack: amzn.to/3Flx0uW
Meguiar's DMC6 DA Microfiber Cutting Disc, 2 Pack: amzn.to/3H18iR9
Griot's Garage 6" Random Orbital Polisher: amzn.to/3EqxL6q
(The above are affiliate links- I may receive a small compensation if you make a purchase. Thanks for supporting the channel!)
Related Videos:
How to: prep and re-clear damaged clear coat (Part 1)
• How to: Fix/Repair fad...
How to: Spray Automotive Paint in your Garage with Professional Results - Complete Guide! • How to: Spray Automoti...
How to Repair & Paint a Scratched Plastic Bumper - Easy Fix!
• How to Repair & Paint ...
I don't have Patreon or ask for donations but you can support the channel with some rad gear from my store: 6thgeargarage.c...
Follow Us:
Instagram: 6th_gear
6thGearGarage


I absolutely love how you don't gloss over your mistakes to make yourself look better. In fact, you look better by showing the mistakes you've made and showing how you've dealt with them. Anybody who's watched your videos, including myself, can now truely feel confident taking on these tasks. You show how to get by all the hurdles we'll inevitably have to jump over while we learn how to get better. The pro videos mainly show us how to hone in on the finest details for perfect results while you show us all the practical skills we really need to learn. It's great to see content like yours that's not all about the showmanship here on RUclips. Thank you for your very well made educational content.
Thanks! We've all made mistakes trying to do what professionals make look easy on screen... I figure I'd keep my videos honest because everyone can learn from a good mistake!
@@6thGearGarage I completely agree. That's the positive side of mistakes and failures. It's easy for us to become discouraged by our drawbacks because of what we lose in the process, however the knowledge we gain as a result often outweighs the losses and proves to be more valuable than if we did everything properly from the get-go.
That's why I think we shouldn't see mistakes as being taboo that need to be completely removed from videos because we feel they represent incompetence. I mean, who doesn't like a good blooper reel at the end of a movie?
So I'm glad that people like you and Tanner from Serpadesign, among a few others, retain the mistakes you make along the way in your how-to videos and talk about how you managed to fix them.
Gloss over ^^
After you polish your car how long will that last after it gets all whiteis from sanding?
@@tomislavtrgovac5439How or why would it get all "whiteis" from sanding? Why would it be sanded after polishing?
I hope you don't mind a suggestion. Next time, you should try putting an HVAC filter in one door and seal around it, then put a fan blowing out the other door. Also, you should keep your floor wet to prevent dust from being kicked up as you walk around the car.
I was gonna mention that too. Sure woulda helped earlier when his neighbor was mowing lawn....🤷🏻
I was gonna suggest a fine netting of some sort as well that would allow ventilation but keep some debris out too but what you said is better
No matter what painting in a garage you're going to have crap in your paint
@@hedgepethracing9590 build a plastic tent, top to bottom, clean the floor good with lots of water, a filter and a fan, 90% clean enviroment at home
I enjoy watching and learning do it yourself, thanks !
Dude!.... I don't even know you, but I'm so stinkin proud of you like you're my little brother or something. Amazing transformation!
This Chanel contains some of the best DIY automotive painting instructions on RUclips. While there are plenty of great videos, this one is in-depth & contains extremely simplistic instructions. The narration is absolutely professional and completely entertaining. The final results speaks for itself. I love how you had to remind yourself this car was not destined for SEMA, but honestly, this is an example of Show quality paint job viewers can achieve themselves at home. Absolutely Brilliant.
Thanks so much for this comment! It made my morning and reminds me that these videos make a difference and help so many👍
I worked in a lot of panel shops over the last 24 years as a detailer and had the finishing job. You've done a great job for an amature in a home garage. As an experienced person I always sanded down to 5000 grit to get the best finish in less time,. I also had the right power tools too. It just takes time to learn these things. I made some costly mistakes along the way. A trick I was taught to get rid of big runs in clear coat was to use a razor blade first ( be careful though ). Anyway I love your video's. Cheers Brother.
I would trust you with my car more than I would trust a commercial paint business. You’re amazing!
Just a suggestion from another RUclipsr page. Paint Society. When you mask for blending do what is call back masking. You tape your paper just below where you want to bend the back fold it to have a roll paper edge instead of a hard line. This is the first of your videos I had come across and I subscribed immediately. You are down to earth and show the good with the bad. I can't wait to watch other video's of yours.
Thanks for that tip! I learned about that after the fact and it will definitely make blending so much easier in the future. I'll probably paint my next vehicle in late 2024 if all projects stay on schedule. (and if I stop buying more projects lol)
You put alot of work due to conditions you cannot control. I like the way you overcame them and for doing this at home, your finished car came out better than some pros out there. I liked the way you dealt with the clear coat failures. After being quoted 3k for painting my truck with the sane similarities as your ACURA paint problems, I think I am going to go your route and try this in my garage. Good job
Thank you! With the price of body shops, I figured I'd have nothing to lose if I tried it myself. It just took me a lot longer!
After the 105 compound, switch to Meg's 205 polish for a deep luster on that paint. Then, for about another $25, you can hit it with Meg's spray-on graphene coating for even more depth, and a solid 6 months of protection before re-applying. Easy, cheap solution with good protection, and easier than a wax. Great work on that Legend! I remember installing stereo systems in those back in the early 1990s when I worked at a mobile sound shop in Va. Brings back memories.
Thanks, I always enjoy advice from professional detailers!
This was a great paint repair video. Thank you for taking the time to include us in your project. Well done 😎 👍 👍
I'm glad to see it helping others!
I've been following your instructions with my sons camry 1999. I made a mistake I sprayed primer all over the hood 😅 I think I was tired. You are amazing thank you!
Ha, we've all been there! I leave all my bloopers in my vids because they happen to everybody.
You and ChrisFix talk the same way haha. I'd crack up if I met someone at a bar and they talked this way. I understand it's for camera and for clarity of speech; it's just funny, like a news person talking or an old showtunes hollywood accent.
Depending how long I had been at the bar, you might not understand half of what I was saying =D But yeah it's 100% for clarity.
No joke! Meguiars is the big boss in detailing 😎
Yup I agree they are the best.
Superb job at keeping it real! You’re helping to teach me to not get so upset at myself for making mistakes. Like yourself, I always seem to figure a way to fix it. I just wish I could learn to jump over the part where I yell at myself, feel like an idiot and swear I’m the only one “this stupid”!! 😁. Thanks so much!
Thanks, Encountering problems and fixing them are part of DIY projects that many don't show in their videos. I also have to edit out swearing from time to time.
by far one of the best DIY paint jobs, with excellent explanations and demonstrations I have seen, much kudos, keep making these videos! Great for the average joe who wanna give it a go!
Thanks!
I could live with a paint job of your finished car. Very good job for doing it at home even with the slightest and mostly corrected mistakes. I have seen the same or even worst mistakes with so called pros charging thousands. Thanks for the video
You're welcome! Thanks for watching
Nice job! Thanks!
Wow, a lot of patience on a $350.00 car. But great video. I don't think people realize why a paint job is so expensive. even a cheap paint job takes a lot of work and elbow grease. I have an F-350 with flaking clear coat like this one and I want to have it painted. I am getting 10 to 15K bids which I could do but it would hurt. I am thinking about doing it myself and videos like this one get me excited to maybe start sanding!
I love that you left the mistakes and showed how to correct them because I like to do this kind of stuff, not ONLY because im cheap, but because i want to learn and mistakes are inevitable. I decided to color match my bike to my car using your video for reference and seem to have surprised myself despite my non ideal setup. Thank you so much
Glad it was helpful! Painting is a lot of work, but so rewarding to see the finished result and know you did it yourself!
Been struggling to find the motivation to paint again and this makes it all the worth. Nice work man
Glad to hear it!
As a person who does finish work in homes (cabinets/trim etc) and I know how I am with perfection, it's great to see the effort and quality you put into the last 2 video and then to see how the final product looks great! I'd have no problem paying you to do the same in garage body work knowing your attention to detail over the guy in a "professional" shop. Also "we" can use this information on other paint finish objects around the garage like on toolboxes...either was awesome job and you just got a new subscriber...can't wait to watch some of your other videos to see what the new projects you've done/working on!
Thanks, I’m not perfect and even make mistakes, but I like to share those as well and how to overcome them.
Cabnits .......rip ....those can be hell .
Just watched both parts, and I have to say this is an awsome abundance of diy advice and you did an awsome job for being in a garage
Thank you!
Great job and very helpful to us shadetree mechanics who want to keep our daily drivers looking their best.
Thanks 👍
You are the man! I love how you explain every aspect of these paint repairs. I just bought a jag XK8 2003 with some fading through the clear coat and you gave me the confidence to attempt to repair it. I’ll let you know how it goes.
Thank you! That's a beautiful car to repair... I hope it looks like new after you're done!
I've got three cars that need this done....one more than the other two. Thanks for the videos and tips on how not to panic.
Great job, man!! I recently, (last yr), did the same with an '01 Taurus with failing clear coat, (peeling, oxidizing) that I was trying to sell on. I used all the same steps/techniques except I didn't have an airless spray gun for the clear coat. I was forced to use rattle cans and got similar results... a few dirt specs, a bug or 2... (gnats, they're attracted to the sweet smell of paint, I believe), and of course, the dreaded orange peel! I have to say, it was killing me watching you expend all that time and "elbow grease" by hand-sanding all those large, flat panels like the hood and roof! When prepping/sanding, I saved a bunch of time/elbow grease by using a DA (Dual Action) 5" round DeWalt sander. It has a "hook & loop" sanding pad/paper attachment system, (Velcro). LOL! You can also buy all the diff grits of waterproof sanding "paper" with the Velcro system... (up to 3500 grit, I believe). If you have an O'Reilly Auto nearby, some stores have an automotive paint supply. You can buy matched OEM paint by giving them your make/model/yr, and paint code... the computer "dumbs down" the orig. paint appropriately adjusting for the yrs of UV damage/aging. (matched great, btw!!) They will also gladly sell you all the necessary prep/paint supplies, tools, etc. for prepping, painting, and polishing! I also purchased a "professional", 8" buffer/polisher... (also by DeWalt), on Amazon... (looks like a lg version of a grinder), and finally, I bought the 3M polishing kit which came with several diff polishing pads (Velcro), in diff colors for differing grits of polishing compounds, (of which, there are 3 grits, in diff color, qt. size bottles). It wasn't cheap, but is well worth it! Also included, 2 Lambs wool polishing pads for achieving a hi gloss finish. I also purchased the same type of foam, flexible, wet hand-sanding pads that you used, in diff grits for hand sanding the non-flat/ difficult areas that the DA is not equipped to handle, (w/o causing damage to the surface). Meaning, all the curves, body lines, edges and tight areas. I was very happy with the finished product as I achieved a near-factory finish for a fraction of what a pro would have charged. Although, I learned first-hand why the pros charge what they do! (as it IS very labor intensive!!). Thanks for making these very informative, well thought out videos!! Again, Great Job!!
Cheers!!
Steve G.
Thanks for all that info! I do plan on getting a DA after all of this sanding! Also, the computer adjusting for the years of UV fade is awesome- I'll remember that.
I can't believe how amazing those results are! You did a fantastic job and it's super helpful the way you cover how to touch up on mistakes.
Hi from Australia!, beautiful work mate!, the old Honda lives to fight another day!. Thanks for sharing!! Love your work.
Thanks 👍 This was a fun budget restoration!
I have a rust free 2004 red toyota tundra from california that I paid $2500 for that is mechanically great. The paint looks much like this Acura. Only one dent on the rear bumper!!! Hope it turns out close to your acura!!
I'll take California faded paint over Ohio body rust any day... good luck!
Years ago, I was in a car show at the Griot's facility in Washington. It's actually pronounced "gree-oats". It's commonly miss-pronounced. If you ever have a chance to visit there, it's worth the time. Some amazing cars in the showroom!
I'd say that's a real nice result for a home garage job. That was a ton of work but a drastic difference.
Wow. Great two part video, thorough well explained and very detailed thank you so much for taking the time to do this!
"it's a $350 car I'm not worried about the finish too much"
Proceeds to lay down a show finish anyhow😂
if you want to see a show car finish see ammo nyc black Porsche paint video
Polishing should be done after 3000 grit. You can quicken the process using 3M Trizact and pneumatic orbital tools.
Wow! What a good DIY, the explanation lives the beginners with no question,
To minimize orange peal, you need to set your regulator right according to your gun, your distance between your gun and the body should be aimed right as well as the straight gun handling while moving side to side.
As for the insects, it's a common problem on DIYs because of grass outside plus the paint smell it looks like insects likes it, so I use this Insects lights after painting, especially on afternoon through out the night, MAKE YOU DINT HAND IT STRAIGHT ABOVE THE CAR.
OTHERWISE, WELL DONE
Thanks! I needed to be closer to the hood and roof. I was a lot closer on the bumpers and they turned out much better.
I have watched and performed your whole process I have just about the same car mine came out almost as good as yours it took me about a month to complete and about $ 1,250.00 in paint and materials thank you for the step by step instructions.
Awesome video...I've been wrenching for 25 years....i think I'm going to try painting for fun now...i like your get down.
very true and honest to the point, I've seen "professional" shops that don't even close to your work so job well done 👍.
Thanks 👍
Just finished watching Parts 1 and 2. Amazing job brother. Great camera work, editing, and narration. And the fact that you left your mistakes in and showed how to fix them is priceless for us DIYers. I just bought a vehicle with mostly good paint but the plastic spoiler has some serious sun damage, peeling clear coat. I’ll have to smooth her down, repaint and new clear coat. Any tips on restoring plastic VS metal? Things to watch out for, etc?
The only thing to watch out for on plastic is that if you happen to sand through the primer down to the plastic, use an adhesion promoter, as I did when I was prepping the bumpers in part 1.
Awesome how to vid. I'm looking to bay an Armada that has clear coat issues...an advantage on getting the price down on the vehicle. But I really don't want to drive around looking like my SUV has psoriasis! This vid brings me confidence that I can bring the paint back to looking like sweet love! Thanks Man!
Bro I am amazed at your work your patience and humbleness is phenomenol.Please keep making other videos.God bless.
Thank you so much 😀
Great video,tons of patience,this guy would make a great vo-tec teacher
Auto body repair and paint 30 yrs.and I still learned a few things,thank you
This is so inspiring... as soon as I can set up my garage, I'll take on my old 03 automobile.
Thanks.
Absolutely awesome results dude I can’t believe how good you’ve made that look ! A very well done sir . 👌👍
Thank you very much!
Great helpful video. Thanks a lot. This will help me finish off my paint job that I’m stuck on with the wet sanding scratches.
3:21 I have a 2010 Subaru legacy sedan, 2.5L, it red in color and the clear coat has come off on the driver's door, and spots on the trunk lid and other places. After seeing your videos l might do this job myself rather than taking it to a body shop, thank you l have learned a lot.
absolutely stunning job mate, you did a pro job at home,. big props and thank you for the guide, im going to save this guide for later when i repaint my car. thanks mate.
BRAVOLINGUS !! This was a great diy showing many tips & tricks with including real life / real time b.s. happening.
You really scored on that great car. They are a timeless treasure.
ALSO- Those rims absolutely set the car off nicely.
Ive also had different brand rattle cans do the same thing you suffered through & its unacceptable in this day & age, considering their high cost per can.
I was glad to see zero bad reaction when you introduced that spraymax brand to the other clear brand, as that couldve been a whole other video. LOL
* keep it up the cool vids*
Hey man! Fun to see what one can do in a garage, and the result is good for what you have! But after painting for some years i could recommend a 35/50/50/50/ spraying technique with tape dry in-between coats. At around 15-20C temp. It might look ''orange-peely'' but due to it not cook drying it will flow out alot and make every garage paint job look alot deeper and more ''glossy'' And due to multiple coats of clear in one application you have a lot of clearl to play with 1200-1500 / polishing to get that good good.
@JAE 3MC Coat ''intensity'' Like how much material, 35% is a coverage where you still can see primer inbetween the color. A 50 is a ''orangepeely'' coat but when you apply 3 of them they build up and melt togheter. and then they flow out. A 100% coat is one that looks very flat and good, but is thinner in paint.
I picked up an ml500 that was sitting in arizona for 10 years with the same issues with the paint. I don't have a garage, but I figure with enough washing and sanding in between coats, I can make it look much better than it is now. Appreciate your videos on this.
I really appreciate your honesty and show us that sand marks are insisting even though you tried so hard, but in the end, good products like miror glaze 105 are solving problems like this. I will buy it for sure 😜. Greetings from Greece
Thanks, I try to keep it real. Encountering problems and fixing them are part of DIY projects that many don't show in their videos.
Great job! This is why taking your time and going the extra mile pays off! The wet sanding was helpful to me and polishing. Awesome!
I am impressed! Your second part is just as well done as the first one. You have a very entertaining delivery with plenty of details and excellent explanations. The fact that you address your mistakes and how to fix them is also quite impressive. You have done a very good job.
Glad you enjoyed it!
I have today finally finished the roof and hood clear coat stripping and laid down some primer where necessary ready for the top coat etc thanks to your brilliant video and explanations.I had so many doubts about doing this but you just have to try ,soooo pleased with the outcome looking forward to the top coat going on now . Bit cool in the UK at moment keep up the good work.
This was very helpful for me. Im a beginner and you expain everything so well and hit every detail that this seems more manageable now. Thank you so much.
Ditch the orbital and get a high speed(variable speed) buffer.
Wool pad for compound foam pad for polish
Saves a lot of time? If so, I'm in
@@6thGearGarage absolutely
Awsome job, Having same problem with clear coat will follow your pattern you answered all questions with money savings too. Great video.
An effective way to remove orange peel is to give the surface a light dusting with a contrasting color first. The guide coat will also end up in the "valleys" so when you sand it is easier to see when you reach the valleys and can stop sanding. If you do get runs, wait for it to cure and cover the area with bondo then sand down until bondo is gone. This helps you avoid sanding through the new clear and also shows you visually when youre done. When using an orbital or random orbit, make sure you dont stay too long in one area or you may create enough heat to scorch the clear coat. Another tip would be to use "uni-grit" paper to avoid those random scratches.
I've done a guide coat when sanding body filler to look for low spots/scratches... never thought to apply the concept to clear coat. Thanks for the tips!
Thank you for sharing. I have watched your videos over and over because I’m going to attempt to paint my truck. You have been great explaining every step and showing the areas that was messed up and how to fix them.
Thanks, I'm glad they are helping people do it themselves!
Love to see your progress wit this nice car. And finally some pretty good music in the background!
Thank you for the information 👍👍 great video
Glad it was helpful!
This worked PERFECT!!! Followed your exact advice (reluctantly) but WOW!!! Boat cover looks amazing!!!. GLASS FINISH. Thank Man!!!
Looks great! I need to do some touCh ups on my auto. Maguiars 205 would have removed the little bit of haze left by the 105. Would be very proud of the job.
Good to know... thanks!
Excellent video. The 105 looks like a great idea, I have had similar results on my jobs where I had to correct orange peel.
I was spraying from too far away which caused the orange peel.
Wish I would have seen this video a few years back. I have a 96 probe that was really sun faded on one side and the top. Laser Red. That color is known to fade to pink. Didn't think there was any hope for it so I sanded it down and primered it flat black. Stuff happened and I haven't been able to get it painted. But now I'm thinking of doing a colorshift wrap instead (might end up being cheaper too and no buffing afterwards required)
Red always fades the worst of any color from UV rays. Nice Mach 1!
Dude, you did good! Made the car come out like a pro! Happy for you on a job well done! 👍😎👌
great job all around the details and honesty about errors etc you give are great as well. ive done this same process and am learning along the way as well. the spot blender tip is a new one for me. yay! for my next one. i know tour hands must have been sore a few days after all of that sanding! i know mine were! lol
i hope yt sends you money for all the ads they play. obviously your doing a great job and many people watch and appreciate what your doung!
Thanks!!! I wet sanded an entire vehicle once and my fingers were bleeding through the finger prints!
Looks great! nobody is that critical. most don't even wash their car. It looks the best when it leaves the car lot, never looks the same after.
Excellent series.
I found you can fill divots with a little 2I clear and a small stick. Just fill it and wait a few days and sand it back.
When sanding runs I wrap the sandpaper over a deep socket say a 19 mm. This gives very hard localised pressure on the high point and a light pressure on the rest. Once the run has gone finish off with a normal block.
Excellent tip, thanks!
thank you 🙏,
I’ll try this on sun-faded side of my son’s car.
Dude!!!! I have a 1956 Apache. A booth/right equipment. I'd let you paint it any day! Amazing job👍
Man these two videos are awesome. Such a great job. Great narration as well. You should keep them going and make videos showing you fixing the trim and other stuff. Also I would’ve liked to have seen what difference the meguiers 205 would’ve made.
Thanks! I plan to document the rest of the restoration of this car, in between other projects of course. Right now it's in winter storage for a couple more months.
Where are you located?
I learn more watching your video than those professional shop youtuber combined 😂 THANKS
Great video mate. Finally a genuine paint job with the drama's you have doing things yourself and not in a booth.i think you did a nice job..and the budget was exactly what I'm looking at..
Take care thanks for sharing your experience..
I know your impatient to fix the runs, and I have done the same thing. But 3 or more months is much better depending on the clear. I even waited over a year. Most will level themselves out pretty nicely over time. If it's a customer's car it's different because you can't wait, but if you have the time, it's better and easier to wait
I never knew that... thanks!!
Wow!! Awesome job for a budget restoration!! Subscribed!!! Keep it coming
I use an actual buffer and whool pad for cutting and an orbital with polish for polishing
Wool pad works a lot faster. I should get one.
But not on a DA. It doesn't create enough heat
Fantastic results, well done!!
Thank you!
Love it bud...good job on explaining.. Exactly what I was wanting to know...my truck hood has water spots.. I'm gonna try the 1500 sand paper...and the McGyers...
Your video help me a lot
My dodge ram cherry red as spot of small rust upper of the windshield
So i did use the sand paper primer and paint but visible is not exact the same
The spot is visible
I will try your step sand and water 💦 that one i never know about 👍
Great, great job! Like me, doing mistakes and find the way to fix them! Nice video!
Thanks! 👍
Light Sanding With A Heavy Grit Saves You Killer Time Also Lubricants Mixed With Your Water Helps Keep Your Paper Cleaner To Keep it From Clogging
Great tips, thanks!!
You are a good teacher. Nice job.
Thanks! I like to show people that is isn't as hard as you might think.
AMAZING! Thank you, gonna use this as a guide I appreciate your time to make this series.
Glad it was helpful!
I love this, we are going to try it in class next week. Keep it real fam!
thank you 🙏 ,
I’ll try this on sun-faded side of my son’s car 👍
Clean your black trim with alcohol and then use liquid shoe polish, you will be amazed how that will accent the paint. I love painting and detailing, I've done it for years.
Thanks for that info!
Mink oil ok ? Or just polish
Absolutely awesome job it looks almost new again.
You should finish with the Meguires polishing compound for extra gloss.
Good great job and great products. Got a good game plan for us DIY people. Thanks for sharing.
Thanks for watching!
@@6thGearGarage If you will like and share my channel. Still in upstart mode on RUclips.
Id watch this on tv Weekly.😊
Thank you! I'm just happy to be doing what I love to do... working on old(er) vehicles.
just seen this....good job. Legit work and much props
Thank you!
I learn more from this guy than the pros.
Following up with 205 really enhances the gloss but not really necessary on all colors. Looks great.
Thank you for the instructional video, It does give me confidence to touch up a couple spots
Nice. I noticed a little trouble there with the Exacto knife. Try an Olfa knife with stainless steel snap-off blades - always a razor sharp point to work with.
great idea - thanks!
Great job on the car looks like a professional did it to me and you’re not even done yet! New subscriber here!
try using a red(maroon) scuffpad followed by a grey scuffpad next time. it will save you a lot of time sanding. The grey scuffpad is rated as 1500 grit. you could also end with a white scuffpad (3000). it works great for me and doesn't need much pressure or sanding.
Wow! Where are you located? I'm taking my car to you??? That's exactly what it needs!!! Great job!!!
Thanks! I'm in Ohio, but I'm always buried in projects.
Awesome job!!!!
One of the best 2 part diy videos ive seen. Job well done.
You remind me of Chris fix it 🤣
Foam pads help with blending clear coat also
Great tip, thanks!