Simple Dodge & Burn Technique in Photoshop - Sculpting the Face by Dodging & Burning [Easy & Fast]

HTML-код
- Опубликовано: 15 ноя 2017
- In this photoshop retouching tutorial, i will show you my special secret technique to add sculpture like dodge and burn effect to portraits in a Non-Destructive way. ►Download PSD file: photoshopdesire.com/simple-dod... ►Download photo to practice: www.flickr.com/photos/psdesir...
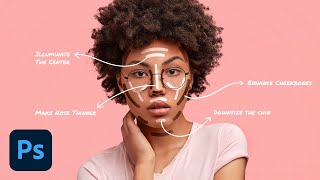
First what is dodging and burning, Dodging and Burning is an extremely powerful technique that can sculpt, contour, and enhance the details of your subject.
This is a very popular process that give prominence to the existing highlights and shadows in subject’s face, and gives the face lots of depth and dimension for a really pleasing look.
I take the extra time to do this to nearly every image I retouch, so for me, it’s almost like a “finishing step” that gives the image that extra depth.
This method requires a great deal of skill to improve a photo but i made it lot more simple and easier.
Ok let's get started.
First duplicate background image.
Rename the layer to "DODGE"
Change the layer blending to screen. This step lightens the overall image.
Now double click on the layer to open blending options.
Go to blend if section. The important slider here is Underlying Layer.
we need to minimize the lighten affect from the shadows.
and keep the affect on forehead, nose, cheek bone, chin etc.
So drag the black triangles to the right until you will see that the particular lighten areas are influenced.
see now we selected the specified highlight areas.
Now Hold Option or Alt Key clicking on the triangles splits them so you can feather the blending effect.
Keep an eye on the image and slowly drag the black handles to add depth to the highlights.
click ok to apply the changes.
Duplicate background layer again. Rename layer to BURN and move the layer to top.
Change the layer blending to MULTIPLY. This step darkens the overall image.
Now double click on the BURN layer to open blending options.
This time we need to minimize the darken affect from the highlights.
So drag the white triangles to the left until you will see that the particular influenced areas to appear.
Once we selected the specified shadow areas.
Again Hold Option or Alt Key clicking on the triangles splits them so you can feather the blending effect.
Keep an eye on the image and slowly drag the white handles to add depth to the shadows.
click ok to apply the changes.
We successfully lighten and darken particular areas and draw attention to areas of an image.
Now group the top two dodge and burn layer CTRL +G
We need to blend this group with the bottom original background layer.
So add layer mask by clicking the MASK icon.
Select the layer mask and go to image tab and choose apply image
Keep everything setting to default and click ok.
I'm keeping group opacity at 100% because i'm happy with result.
If necessary we can lower the group opacity to control the depth.
Now similarly enhance the lips and eyes
That's it. We're done.
►Check out all tutorial here : ruclips.net/user/photoshopdesi...
Realistic skin retouching using smart dodge & burn leveling techniques.
Contouring, stretching, reshaping body and facial features.
Skin tone correction, skin texture repair, gloss / matte effects.
Hair retouching, coloring and rebuilding details.
Image color corrections, color treatments, object / color changes.
Highlight and shadow detail recovery for over / underexposed images.
How to Contour Makeup in Photoshop - High End Retouching.
How to create flawlessly retouched skin with dodge & burn.
Professional Photo Retouching With Dodge And Burn blend-if sliders.
Dodging and Burning in Portrait Photography.
Thanks for watching our free Tutorials! If you enjoyed our video be sure to subscribe to our channel to receive free new videos.
►SUBSCRIBE: goo.gl/d31fld
Don't forget to COMMENT, LIKE and SHARE, to get more :)
Follow US - LET'S BE FRIENDS!
------------------------------------------
►Official Website: www.photoshopdesire.com
►FACEBOOK : / photoshopdesire
►GOOGLE+ : plus.google.com/+photoshopdes...
►Twitter : / psdesire
►Instagram: / photoshopdesire
Softwares Used:
----------------------------
Photoshop cc 2014, 2015, 2017
Photoshop cs5, cs6,
After Effects cs5
Camtasia Studio
Music:
------------
Montauk Point (RUclips Library)


![[BLACKSWAN] ‘Roll Up’ Official Music Video](http://i.ytimg.com/vi/ulvCwyKrwqw/mqdefault.jpg)


One of the best videos in this subject. The effects were very professional.
This tutorial is absolutely stunning and easy to follow. You're amazing. Thanks for sharing.
Simple narration, easily understandable steps, and one great tutorial, again! Thanks buddy!
Amazingly taught. Thank you for writing each and everything you do. It makes easy for a beginners.
This is the third Dodge and burn method I've seen in PS. This must be the best. Thanks for sharing! Just subscribed to get more knowledge
I had been looking for a video with clear step by step instructions with audio to do retouching. This video is the best bar none!
This is such a cool effect. I will be trying for sure! So amazingly mindblowing
This effects is mind blowing. I really enjoyed this
Your tutorials are always easy to process and quick. Thank you.
I gave it a try and I have to say it is really cool. It takes a bit of practice but the final result is just beautiful. Thanks a lot for sharing
Really helpful video. Thank you for this! I am so bad at Photoshop but with your help I now feel a little bit more proficient.
So easy to follow! No long talking around.Thannk you so much!
Excellent best dodge and burn tutorial i have seen simple very effective and editable well done
You're absolutely amazing at beauty photography & retouching 😍 love this tutorial too!
woww thats a great technique .. very easy to follow and well explained .
I really enjoying your video, Thank you for the step by step explanation, that was a big help for me to learn more technique, and the tools to use. Thank you for your sharing your video.
This video was incredibly helpful! You are a lifetime-saver! Thank you!
WOW! Dodge and Burn and I used to have serious problems together.. lol Thanks for making it lot easier!!
Brilliant! I have always struggled with dodge and burn. Thank you.
Holy snap!! i have seen this before but my goodness i love your technique more