How to: BMW E39 5 series Cabin Filter Replacement

HTML-код
- Опубликовано: 9 фев 2025
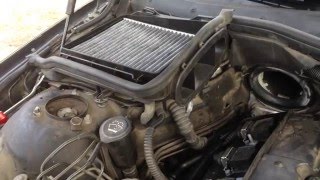
- How to change the cabin filters on a BMW E39 body style. Here I am working with a 1997 BMW 540i, first start by opening the hood. A plugged or dirty cabin filter will reduce air flow causing the ac not to work as well, strain the ventilation fan causing premature failure, and also create foul odours. Cabin filters should be replaced once a year or 15,000miles or 25,000km. As an added tip, my car is left hand drive so the master cylinder reservoir is located on the driver side under the cabin filter housing. This housing is removed by unclipping the duct by the pull tang, then rotating it upward on the firewall. Doesn’t matter which side, left or right, they both rotate upward to be removed. Then the housing unclips from a fastening point on top of the strut tower. The passenger side on the other hand has some fuses, relays, and computers hidden under that housing. #BMW #BMWe39 #BMW5series
Website: 4diyers.com
Patreon: / 4diyers
Facebook: / 4diyers
Google Plus: plus.google.co...
Twitter: / 4diyers
Instagram: / 4diyers
Tumblr: / 4diyers
Pintrest: / 4diyers
Tools/Supplies Needed:
-replacement cabin filters
-vacuum cleaner
-toothbrush
-clean cloth
-spray bottle of water
Procedure:
-the filter compartments are located at the rear of the engine bay, there is two filters in total, and if you notice that quick grip clamp, that is currently my hood prop as my one hood strut blew out
-remove the metal retaining clips on the front of the cover
-then pull the front side of the cover up and unclip the rear side
-the cap has two tabs on the backside which fit into slots on the lower plastic housing
-remove the old filter, try not to be too aggressive with it as there will be dirt and dust imbedded in it, so if you don’t disturb it too much, it should stay in place
-pull it up from the engine side first, there will be tabs that slide under a cutout in the lower plastic housing on the fender side
-when replacing the filter, I normally like to give the area a quick clean up with a vacuum cleaner first to remove any dirt or debris build up
-using a clean cloth and a spray bottle with water, give it a wipe down for a final clean
-install the new filter, ensure the flow is in the correct direction
-the flow arrows must be pointing up, the exterior air comes from the bottom around the base of the housing, flows through the filter, and the filters air goes though the ducts into the interior
-install the cover in reverse of removal
-clip the back tabs in place first, lower the front, and clip on the metal retaining bar
-for air filters I am using the charcoal version which helps eliminate exterior odours, but you can use regular filters, it’s your preference
Thank you to all those who watch my videos and support my content. Don't forget to subscribe to my channel for future tutorial videos and like my video if you found it helpful. New videos are always being uploaded every week!
© 4DIYers 2013
All Rights Reserved
No part of this video or any of its contents may be reproduced, copied, modified or adapted, without the prior written consent of the author.


Wow yours was way easier to replace than mine. I did it on my E36 and it took around 2 - 3 hours. It was inside the cabin.
My E32 was like that too.... Wasn't overly hard to get to, but trying to get everything lines up was a pain. This by far is the easiest cabin filter I've ever replaced.
Great work. Keep it up bro
Thank you :)
Another amazing video! :D
Thank you!
Can anyone tell me the part number for the cabin air filter?
Arrows need to point upward. Points the arrows down
No, they're pointing in the correct orientation when installed.