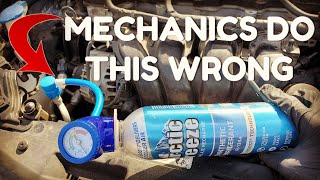
The low side port can be accessed with out removing anything. 1) Study images of of the low side port so you have a good idea of what you are trying to access. 2) Run left front wheel up on a car ramp so you will have room to work. 3) Lay on your right shoulder and by feel run your right hand up the back side of the accumulator. The port is on the top back side of the accumulator. 4) Once found unscrew and remove the dust cover. 5) Attach the low side fill line. This is not all that hard to do. I am glad I did it this way and you will be glad you saved time and effort by doing it this way also.
Thanks...I used to open up my hood, remove both the front grill and right headlamp before I could refill. And that was a lot of work for me. I now know better
I really wish they had just designed the thing better, and like most cars, placed the ports where you could just pop the hood and easily access them from there. Thank you for the comment and for watching!
I was having a hard time finding the low pressure fill until I watched your excellent, very informative video. Thank you so much! You helped me a great deal.
Omg thank you! This is very simple im a 50 year old woman & live alone i definitely subscribed! & gave the ole thumbs up! Btw You have a great sense of humor which that makes it fun😁 thanks so much!
My 2006 Ford focus had over 250,000 miles and is still running like a beauty. Just took it to the shop for a checkup, oil change, and new tires. I do need to do this ac thing tho
Hi there I tried what your video said to do and …….IT WORKS! Lol did it for my wife’s car, and you know what they say happy wife happy life! Thank you sir!
To future watchers you can do this without removing the fender shield if like me you have skinny arms. You can just lift the hood and remove your passenger side headlight and you can reach the valve from there.
Several things. A+. On the location. That's the whole reason I watched. But you've said a bit of information that's actually just incorrect.. That port is for the low pressure side. It is not under a vacuum.. It is just low pressure. It is recommended that you use a vacuum pump on the system prior to filling the system with Freon to eliminate moisture in the system as water boils in a vacuum. Next you cannot properly fill an AC system using the gauge. Each AC system has a measurement amount of freon that it requires to run properly That's usually listed on the AC refrigerant sticker on the front of the vehicle under the hood. Unless you empty the system completely and fill it up from zero there is no way to know how much freon you have added to the system. And because The entire AC system works by taking a gas and compressing it to a liquid and then allowing it to re-expand causing colder temperature, whether you have less amount or too much freon in the system you will still get the pressure is reading on that gauge especially on the low pressure side. Most AC systems only require one and a half to two and a half 12 oz cans of r134 freon. Without high dollar equipment to measure the amount of freon you're adding to that system your best bet is to just empty the system to zero and add one or two cans to get you as close to the amount that's required. Since 1 lb is 16 oz and one can is 12 oz you require a little over one can per pound of freon. For a system that requires 2 lb of freon that would Be over 2 cans but but less than 3.. As mentioned you are uncapable of measuring half a can properly using that device. So your best bet is to put in three cans total. Because you didn't pull to a vacuum first each can will not be drained completely, And because the system does not pull a vacuum each cam will still have a remaining amount of pressure in it when you are finished and the pressure equalizes with each can. That's by emptying three cans or 36oz. With the remaining freon leftover in each can it is more likely you are close to installing two pounds using three cans and that fill tool.. I can also tell you for a fact that your system will run a lot warmer and produce a lot warmer air if you have too much freon as opposed to too little in respects to having enough to keep the compressor turned on.. If your compressor does not turn on that means your system is too low on freon and has tripped the low pressure cut off switch. Or at least in this scenario as there are plenty of other issues that can cause air conditioning not to work. The reason why the AC gets cooler with less freon in the system is because the temperature of the outside air in relation to the pressure in the system relates directly to the temperature that the freon is able to achieve in said system. Less pressure means less work for the compressor which means less heat in total which means more efficient cooling. Some of the coldest air conditioning systems I have ever worked on were low on freon. it's not good for the compressor or the rest of the air conditioning system to run them low on freon but usually when they first start to leak they get even colder right before they stop working. With that being said the last thing I'm going to bring up and correct you on is the can being able to seal leaks. That is a bit of a misconception that freon companies tend to list on their cans. They put conditioners in there that helps keep the o-rings in better shape over time meaning that they help prevent or stop leaks in that respect but if your system is already leaking it will not repair your car system and stop it from leaking freon. Rather than buying freon they claims to stop leaks your best bet is to buy freon with dye and fill your system with that allowing it to run back out of the system.. When it does you can then repair the system correctly using a UV light to locate the source of the leak or take it to a qualified mechanic Who should then be able to track down the cause of the problem rather quickly. Then by pulling a vacuum on it and putting the correct amount of freon back in your car not only should it work for much longer but it will also get much colder.. And something else I'm going to bring up is that a lot of mechanics will also recommend that you replace the evaporator dryer canister on the AC system whenever refilling it as a lot of people believe that they go bad just because they're exposed to the moisture in the atmosphere However in my opinion if that was actually correct then just by installing it you would be exposing it to the moisture in the atmosphere bus rendering it useless.. Personally I have repaired and refilled hundreds of AC coolant systems in various vehicles without replacing said evaporator dryer canister and those systems have worked reliably for a long time after that. As mentioned before by pulling a vacuum on the system you are able to remove moisture as water boils in a vacuum. So in my opinion just by pulling the vacuum on said system you are removing the moisture from that evaporator, And therefore it should not be rendered useless just because it was exposed to atmosphere. For any of those you who have questions feel free to ask otherwise I hope this helps.
Thank you...this is great information, and I learned quite a bit from it. I appreciate the comments, and I had seriously wondered about the ability to stop leaks that several manufacturers claim for these products.
Great info, but for people like me who do not want/can not afford to pay a shop $200-$500 for proper AC recharge on a throw away vehicle that is almost 20 years old, this is perfectly fine. As long as the pump is working correctly. I would highly recommend getting a can with a gauge and leak sealer. We recharged my nieces 2001 Dodge neon summer of 2019 and its still blowing cold today despite having over 230k
@@dsteward85 Like I said in my comment, you're better off buying a can with dye, instead of sealer. With the high pressures in that system, the oring conditioner they put in the cans won't fix a real leak in the system. As for the cost of doing it yourself, you can buy a cheap set of gauges on amazon for around $35, and a vacuum pump for $60... So if you spend another $20 on a few cans of Freon, you can fill your system correctly for under $150... And, once you own the gauges and pump, you OWN them.. So next time, you can just buy the cans and away you go... Or help out a friend, or make some money on the side.. However you go about it, buying the pump and gauges is def worth the investment if you're a DIY'er that likes fixing AUTO AC... The pump also comes in handy for leak checking. Pull a good vacuum for 30mins, then wait... See if your gauges loose the vacuum or not. If they do, check where its leaking using an UV light, and fix the problem correctly.. Remember, R134 is safer than R12 for the environment, but still does damage, so every can that's leaked takes its toll as well.. Finally, something else people don't realize is that a properly working AC System will put out 40 Degree F air at the Center Dash Vent when the system is on recirculate... Even a 5 degree change to 45, is enough that you're system will feel like its getting cold, but on a REALLY hot day, it'll take FOREVER to cool off your car or truck...
Thank you so much for your tutorial, you made it extremely helpful and easy to understand. A life changer and life savior, especially in the hellish climate of S. FL.
Such a deal!! Your step-by-step really worked well, and it was so easy to do! I figured out you don't need to turn the wheels to the left. Just turn the wheels to the right, and then remove both the 9/32 head screw and the Torx head fastener. (Just put a Torx tool into a 1/4" socket with ratchet, and you'll be able to do it!) Regardless, thanks so much for posting this video!
@@HowSkills hey, I just bought one of these beaters and was wondering where the heck the charge port was and your video is greatly appreciated!! One and only thing..... It's 5.5 mm not 9/32” but I got it. Thanks again for making RUclips a useful tool instead of a brainwashing propaganda site
They for sure didn't do us any favors with the placement of that port. Fortunately, they eventually moved it up under the hood on newer models. Probably got tired of hearing all the griping!
Nice video, very grateful to you! My Ford Focus 2006 Duratec Mazda 2 liters just like yours, with only 37500 miles drips a drop of oil per week through the cover interface with the Halla Climate Control (HCC-YS4H-AA) 1S7H-19D629-CD compressor body. Here in Brazil, Ford ended its activities, parts are expensive and information are scarce. I was not able to know from the manufacturer what the exact volume of PAG 46 lubricant was for a possible compressor repair. The new compressor alone would pay around $ 400 here. Paulo of the State of São Paulo, Brazil.
I agree. My headlights are fastened with just the 2 top bolts and not the side ones. I had to take the headlights out to replace them and discovered I could access the AC port easily while they were out. With a little juggling it's only the 2 bolts to take the headlights out.
the camera work is just amazing what type of camera did you use? I have a 03 ford focus 2.3 wagon and I said the same thing ford could have done so much better on the location on the low side this makes no sense thank you for the video
I used a Sony Handycam that's five years old and has been a great video camera. Probably going to replace it soon for something that shoots 4K, but this camera has done an incredible job for me.
Excellent video! Very well done. I appreciate the comments about the safety glasses and I understand your comment about Ford putting the port in a difficult place.
Thank you for your guide how to add Freon to a Ford Focus. I have a 2007 Ford Focus I need to add Freon in. I’ll let u know how it went n acouple days . From Arizona ..
Hold on how is it possible for you to remove the hose from the can first and then from the low side ? Wouldnt the refrigerant shoot out the hose ? Should it not be removed from the low side then the can ? ?? That can really scree someone who is watching this video .. just want to clarify that , unless there is some kind of check valve on the hose ! Please let Me know.. thanks for the informative video .. just confused on the the hose removal..
Okay so I’m having an issue.. my 2008 Ford Focus se heater works well.. my a/c however would not work.. it would just blow out air but nothing cold.. my mechanic told me to get a new a/compressor due to my previous one being broken (not turning anymore) Bought the compressor and had my mechanic put it in.. he also recharged my a/c completely.. and realized my unit wasn’t holding the gas (refrigerant in) He then noticed that my unit was leaking somewhere… If you guys have any info or suggestions .. what else could it be.. (before I bought the car, it had been in Nevada so some parts of the car were frozen and needed upgrades) should I just replace my a/c unit parts or should I get new o ring gaskets?? I have an appointment with Firestone to check my a/c but if some of you have an understanding in that area I would greatly appreciate any feedback
I'm praying 🙏 I can do this!! Just learning how "real" mechanics have been "bending me over" screwing me!! But no tools!! 🤔. No enjoyment either giving my $$ to them!! Wish me luck...
Definitely will wish you good luck! There’s definitely a time and a place to take your vehicle to a mechanic, but I love doing the things I’m able to do myself and saving a lot of money in the process.
@@HowSkills my mechanic said there is a leak on the hose line, he recommended that I don’t use leak sealer, what should I do? Is it hard to change the hose?
Hello it was a bit of a pain compared to most of them it did work fine thank you for the tips i really had to search to find the low pressure plug , why make the high presser pug so easy accessible all ass backward Ford.
Hi Stan: Just came across your video. I have a 2007 Ford Fusion SEL. Do you thin this will work on my model too? Thanks for your feedback, I know you are not a mechanic.
Looks to me like it's an even easier process for your vehicle. The recharge port is under the hood near the back of the engine compartment on the passenger side. Once you connect to that port the other steps would be similar. I found some videos on how to do it that looked like they should be good information for you. Here's one: www.carcarekiosk.com/video/2006_Ford_Fusion_SE_3.0L_V6/air_conditioner/recharge_freon
No, fortunately they changed it in 2008 and moved it up under the hood on the passenger side. Should be somewhere near the windshield washer fluid filler tube.
@@sweatydripz3587 Not sure, unless it’s a problem with a blend door actuator that controls what air goes where. May not be directing the air where it needs to go.
Sounds like you definitely need your A/C system recharged. The procedure for your vehicle should be basically the same as what is shown in this video if you want to do it yourself. Otherwise, take it to a mechanic and let them take care of this for you.
You just contaminated your a/c system with air from the empty hose on the can. Should have had hose hooked to can first then pushed button to try and fill hose with freon and purge air out of the hose.. That setup might not even purge the hose? Not good to contaminate your system.
There’s so many instructions that don’t come with your camp to tell you what you did wrong but I won’t go there. There’s so many variables why you should not use that pressure temperature chart. It’s one of the main reasons I have customers come in with burnt up compressors or clutch or blown out front shaft seal by using those cans and the pressure temperature chart. Not to mention when you buy one of those cans that already have the lubricant and other ingredients added to it you’re refrigerant is it gas or vapor that slowly leaks out but leaves behind a solid liquid oil and every time you keep topping off you keep adding in Oil eventually having a severe over oil charge what causes other mechanical problems. When the customer comes in and is told it’s going to be $2000 to replace the condenser replace the compressor flush out the system replace the accumulator they say I didn’t know they didn’t tell me that on RUclips this would eventually happen. This is when I feel sorry for the customer because they watched RUclips.
gamerboy 0777 this is the problem, someone just make stuff up without even solid back ground or knowledge. Or the consequences of what it will do to someone. Saying do at your own risk does not make it better. I get customer who watch RUclips and think that is a method to follow because it look simple. And never get to see the failures later.
TheNormalKai #1: Use only pure refrigerant with no additives. #2: Completely recover refrigerant down to zero #3: pull a vacuum down to roughly 500 µm. Add refrigerant by weight only to the under hood sticker that indicates the quantity.


Thank you so much for this video! I'm a girl and was able to recharge my own AC because of this video! It's blowing ice cold now ❄️😀❄️
Awesome! Glad to hear it helped.
WORLDS FSSTEST DRAGRACER IS A GIRL - Kitty O'Neil
@@HowSkills So, one can is necessary right? Even if mine is low
It's 2024! This video is still helping us all! 😀Thank you!
Glad to hear it…I was hoping it would do some good!
@@HowSkills I just recharged my '03 Focus Wagon and saved your video for future reference. Thanks again!
Will this work for Fiesta 2005 model?
The low side port can be accessed with out removing anything. 1) Study images of of the low side port so you have a good idea of what you are trying to access. 2) Run left front wheel up on a car ramp so you will have room to work. 3) Lay on your right shoulder and by feel run your right hand up the back side of the accumulator. The port is on the top back side of the accumulator. 4) Once found unscrew and remove the dust cover. 5) Attach the low side fill line. This is not all that hard to do. I am glad I did it this way and you will be glad you saved time and effort by doing it this way also.
Thanks...I used to open up my hood, remove both the front grill and right headlamp before I could refill. And that was a lot of work for me.
I now know better
I really wish they had just designed the thing better, and like most cars, placed the ports where you could just pop the hood and easily access them from there. Thank you for the comment and for watching!
JEESUS CHRIST
I was having a hard time finding the low pressure fill until I watched your excellent, very informative video. Thank you so much! You helped me a great deal.
Crazy place for Ford to put it!
Omg thank you! This is very simple im a 50 year old woman & live alone i definitely subscribed! & gave the ole thumbs up! Btw You have a great sense of humor which that makes it fun😁 thanks so much!
Excellent Tutorial. No a word spoken that was not necessary. You are a great teacher. Great videos. Thank you.
I appreciate your saying that, and thank you for taking the time to watch it.
I have a 2007 focus hatchback in perfect condition and 92k miles, I love it. Your video helped me, thanks.
Great to hear! I know our 2005 Focus has been a really reliable car, which is think is typical.
Mine is a 2005 and still going strong! Thanks for the help
Me too lol
I'll check this on my hatchback 1999 Focus, because I'm planning a 500+ miles trip with it soon
My 2006 Ford focus had over 250,000 miles and is still running like a beauty. Just took it to the shop for a checkup, oil change, and new tires. I do need to do this ac thing tho
Hi there I tried what your video said to do and …….IT WORKS! Lol did it for my wife’s car, and you know what they say happy wife happy life! Thank you sir!
Lol! Can definitely relate to the need to keep the wife happy…glad it worked for both your sakes!
To future watchers you can do this without removing the fender shield if like me you have skinny arms. You can just lift the hood and remove your passenger side headlight and you can reach the valve from there.
Yup, I’ve heard that works well!
@@HowSkills thank you for posting the video
Just an FYI if you remove 2 10mm bolts for the headlight, pop it out the port is right out in the open.
Did this on a 2001 Focus, same procedure on 2007. I take the RF wheel off though just for easier access. Good info, thx for the video.
Taking the wheel off would make it a lot easier. Good advice!
I find it much easier just removing the headlight
Several things. A+. On the location. That's the whole reason I watched. But you've said a bit of information that's actually just incorrect..
That port is for the low pressure side. It is not under a vacuum.. It is just low pressure. It is recommended that you use a vacuum pump on the system prior to filling the system with Freon to eliminate moisture in the system as water boils in a vacuum. Next you cannot properly fill an AC system using the gauge. Each AC system has a measurement amount of freon that it requires to run properly That's usually listed on the AC refrigerant sticker on the front of the vehicle under the hood. Unless you empty the system completely and fill it up from zero there is no way to know how much freon you have added to the system. And because The entire AC system works by taking a gas and compressing it to a liquid and then allowing it to re-expand causing colder temperature, whether you have less amount or too much freon in the system you will still get the pressure is reading on that gauge especially on the low pressure side. Most AC systems only require one and a half to two and a half 12 oz cans of r134 freon. Without high dollar equipment to measure the amount of freon you're adding to that system your best bet is to just empty the system to zero and add one or two cans to get you as close to the amount that's required. Since 1 lb is 16 oz and one can is 12 oz you require a little over one can per pound of freon. For a system that requires 2 lb of freon that would Be over 2 cans but but less than 3.. As mentioned you are uncapable of measuring half a can properly using that device. So your best bet is to put in three cans total. Because you didn't pull to a vacuum first each can will not be drained completely, And because the system does not pull a vacuum each cam will still have a remaining amount of pressure in it when you are finished and the pressure equalizes with each can. That's by emptying three cans or 36oz. With the remaining freon leftover in each can it is more likely you are close to installing two pounds using three cans and that fill tool..
I can also tell you for a fact that your system will run a lot warmer and produce a lot warmer air if you have too much freon as opposed to too little in respects to having enough to keep the compressor turned on.. If your compressor does not turn on that means your system is too low on freon and has tripped the low pressure cut off switch. Or at least in this scenario as there are plenty of other issues that can cause air conditioning not to work. The reason why the AC gets cooler with less freon in the system is because the temperature of the outside air in relation to the pressure in the system relates directly to the temperature that the freon is able to achieve in said system. Less pressure means less work for the compressor which means less heat in total which means more efficient cooling. Some of the coldest air conditioning systems I have ever worked on were low on freon. it's not good for the compressor or the rest of the air conditioning system to run them low on freon but usually when they first start to leak they get even colder right before they stop working. With that being said the last thing I'm going to bring up and correct you on is the can being able to seal leaks. That is a bit of a misconception that freon companies tend to list on their cans. They put conditioners in there that helps keep the o-rings in better shape over time meaning that they help prevent or stop leaks in that respect but if your system is already leaking it will not repair your car system and stop it from leaking freon. Rather than buying freon they claims to stop leaks your best bet is to buy freon with dye and fill your system with that allowing it to run back out of the system.. When it does you can then repair the system correctly using a UV light to locate the source of the leak or take it to a qualified mechanic Who should then be able to track down the cause of the problem rather quickly. Then by pulling a vacuum on it and putting the correct amount of freon back in your car not only should it work for much longer but it will also get much colder.. And something else I'm going to bring up is that a lot of mechanics will also recommend that you replace the evaporator dryer canister on the AC system whenever refilling it as a lot of people believe that they go bad just because they're exposed to the moisture in the atmosphere However in my opinion if that was actually correct then just by installing it you would be exposing it to the moisture in the atmosphere bus rendering it useless..
Personally I have repaired and refilled hundreds of AC coolant systems in various vehicles without replacing said evaporator dryer canister and those systems have worked reliably for a long time after that. As mentioned before by pulling a vacuum on the system you are able to remove moisture as water boils in a vacuum. So in my opinion just by pulling the vacuum on said system you are removing the moisture from that evaporator, And therefore it should not be rendered useless just because it was exposed to atmosphere. For any of those you who have questions feel free to ask otherwise I hope this helps.
Thank you...this is great information, and I learned quite a bit from it. I appreciate the comments, and I had seriously wondered about the ability to stop leaks that several manufacturers claim for these products.
Great info, but for people like me who do not want/can not afford to pay a shop $200-$500 for proper AC recharge on a throw away vehicle that is almost 20 years old, this is perfectly fine. As long as the pump is working correctly. I would highly recommend getting a can with a gauge and leak sealer. We recharged my nieces 2001 Dodge neon summer of 2019 and its still blowing cold today despite having over 230k
@@dsteward85 Like I said in my comment, you're better off buying a can with dye, instead of sealer. With the high pressures in that system, the oring conditioner they put in the cans won't fix a real leak in the system. As for the cost of doing it yourself, you can buy a cheap set of gauges on amazon for around $35, and a vacuum pump for $60... So if you spend another $20 on a few cans of Freon, you can fill your system correctly for under $150... And, once you own the gauges and pump, you OWN them.. So next time, you can just buy the cans and away you go... Or help out a friend, or make some money on the side.. However you go about it, buying the pump and gauges is def worth the investment if you're a DIY'er that likes fixing AUTO AC... The pump also comes in handy for leak checking. Pull a good vacuum for 30mins, then wait... See if your gauges loose the vacuum or not. If they do, check where its leaking using an UV light, and fix the problem correctly.. Remember, R134 is safer than R12 for the environment, but still does damage, so every can that's leaked takes its toll as well..
Finally, something else people don't realize is that a properly working AC System will put out 40 Degree F air at the Center Dash Vent when the system is on recirculate... Even a 5 degree change to 45, is enough that you're system will feel like its getting cold, but on a REALLY hot day, it'll take FOREVER to cool off your car or truck...
Thank you so much for your tutorial, you made it extremely helpful and easy to understand. A life changer and life savior, especially in the hellish climate of S. FL.
You’re welcome and I’m glad it helped. You definitely need good A/C down there!
Thanks Stan. My father was clueless as to where to add a can of refridgerant. Hopefully, this video will help him out so we can have A/C in our car.
Yeah fords are dumb, they have to make everything complicated. Most vehicles you can access the low side port from the top of the engine
@bulletz202 exactly. Our car we had before, it most definitely was easier to access. We can thank GM for that.
Thank you for showing this! I have to do this on my mom's car and now I know how to get to the port.
Great! Glad it helped, and thanks for watching.
One of the best step by step videos I've seen in a while!
I appreciate the comment. Thanks for watching!
Best explanation how to do it and safety as well. Thank you.
Such a deal!! Your step-by-step really worked well, and it was so easy to do! I figured out you don't need to turn the wheels to the left. Just turn the wheels to the right, and then remove both the 9/32 head screw and the Torx head fastener. (Just put a Torx tool into a 1/4" socket with ratchet, and you'll be able to do it!) Regardless, thanks so much for posting this video!
I’m about to try this! Haven’t had COLD air conditioning in my car ever so I’m excited 🤩
It’s so good when you feel that cold air come at you after you’ve done without it for a long time! Congratulations on being willing to do it yourself.
Thank you for this video! I don’t know a thing about cars and this was able to get me blowing cold again.
Great to hear that! It's a great feeling to save money by doing it yourself, isn't it?
Awesome video brother!!! Your way is a million times easier than the last video I watched!! I’m so thankful I found it! Extremely helpful!!!!
Top notch step by step video! Thank you!
I appreciate not having to take off the tire. Thanks.
I know what you mean...I’m glad there’s enough room in the wheel well to do this. Saves a lot of time and trouble.
@@HowSkills hey, I just bought one of these beaters and was wondering where the heck the charge port was and your video is greatly appreciated!! One and only thing..... It's 5.5 mm not 9/32” but I got it. Thanks again for making RUclips a useful tool instead of a brainwashing propaganda site
Sorry, 7mm
Worked great to access the port from under the car.
Thank you! I couldnt find the low side to save my life. Why so hard to fix, ford, im lookin at you.
I know! Almost every other manufacturer figures out how to put it up top under the hood.
Huge help for me today. It’a as if they want you to go to your mechanic instead. Thanks
They for sure didn't do us any favors with the placement of that port. Fortunately, they eventually moved it up under the hood on newer models. Probably got tired of hearing all the griping!
Thank you. This worked perfectly. I had to use ALOT to charge the AC to where I needed it to be.
Awesome - glad it worked good for you! Your system must’ve been almost empty.
Thank you for your video!
This is one of the best videos I have ever seen.
Great job!!! Anything you can do to save money is a good thing!!!!
Thanks! I’m all for saving money!
Nice video, very grateful to you! My Ford Focus 2006 Duratec Mazda 2 liters just like yours, with only 37500 miles drips a drop of oil per week through the cover interface with the Halla Climate Control (HCC-YS4H-AA) 1S7H-19D629-CD compressor body. Here in Brazil, Ford ended its activities, parts are expensive and information are scarce. I was not able to know from the manufacturer what the exact volume of PAG 46 lubricant was for a possible compressor repair. The new compressor alone would pay around $ 400 here. Paulo of the State of São Paulo, Brazil.
I’m very glad it helped, and I didn’t know that Ford had ended their activities there. That’s too bad. Thank you very much for watching.
Thanks, I looked and looked for that low pressure port.
Ford was really good at hiding it!
Man thanks for the set by step video.
Glad it helped!
All you have to do is take the right headlight off and you can get right to it. I just did it
I agree. My headlights are fastened with just the 2 top bolts and not the side ones. I had to take the headlights out to replace them and discovered I could access the AC port easily while they were out. With a little juggling it's only the 2 bolts to take the headlights out.
Hi Stan ! Great video. Thanks for the info !
You’re very welcome - hope it helped!
Clear instructions and video definitely recommend.
I’m glad to hear it helped, and thanks for watching!
Excellent tutorial!
Thank you - I hope it helped you out!
Thank you I followed everything worked like a charm.
Well what do you know? It worked!
Thanks a lot
A fine video with excellent information. And thanks for that chart!
I hope it helped make the job easier!
the camera work is just amazing what type of camera did you use? I have a 03 ford focus 2.3 wagon and I said the same thing ford could have done so much better on the location on the low side this makes no sense thank you for the video
I used a Sony Handycam that's five years old and has been a great video camera. Probably going to replace it soon for something that shoots 4K, but this camera has done an incredible job for me.
Thank you for this video it helped me a lot your friend from Stuttgart Arkansas
Screw ford lol. This was a very well put together video. Thanks
They did everybody dirty when they put that port there, but at least they felt bad and moved it in later models.
Great video!
Excellent Tutorial. Like!
This was a great video, thanks!
Glad it was helpful. Thanks for watching!
good job
muy buen video saludos desde mexico
¡De nada! ¡Y gracias por ver el vídeo!
Ty for sharing this im gonna make a video of me trying to do this tomorrow 🫶🏻🫶🏻
Do u know how much Freon is needed on a empty system ?
Excellent video! Very well done. I appreciate the comments about the safety glasses and I understand your comment about Ford putting the port in a difficult place.
Thanks for watching! Fortunately, Ford moved the port up under the hood in later models of the Focus.
Thank you for your guide how to add Freon to a Ford Focus. I have a 2007 Ford Focus I need to add Freon in. I’ll let u know how it went n acouple days . From Arizona ..
Good luck...you got this!
worked great had to put acanand half into hit the target
You just turn the wheel to the left it's behind passenger tire
Genial!! Muy claro!! Que vivan los subtítulos!! Thanks.
De nada! Thank you for watching!
Very well done!! Thank you.
Thanks for taking the time to watch it!
Easier way is to simply. Remove like 4 screws slide light out. Then it’s right there on top that way you don’t need to go on the ground or anything.
What 4 screws
Hold on how is it possible for you to remove the hose from the can first and then from the low side ? Wouldnt the refrigerant shoot out the hose ? Should it not be removed from the low side then the can ? ?? That can really scree someone who is watching this video .. just want to clarify that , unless there is some kind of check valve on the hose ! Please let
Me know.. thanks for the informative video .. just confused on the the hose removal..
This brand of refrigerant has a can that is controlled by the button on top of it, only releasing refrigerant when it's pushed, so it worked out good.
Great video! Thank you.
Thank you for watching, and I hope it helped!
Thank you sir
You're welcome...I hope it helped!
Awesome Video, helped a lot
Glad it helped!
Thank you so much posting this video
Excellent video thanks
You're very welcome, and I hope it helped!
Gracias por la alluda
De nada!
Thanks!! I couldn't find any ports on this car, super stupid Ford design!
Agreed...very poor design on this model year. They did correct it in later models, but why did they ever think this was a good idea?!?
Thank you, sir.
Okay so I’m having an issue.. my 2008 Ford Focus se heater works well.. my a/c however would not work.. it would just blow out air but nothing cold.. my mechanic told me to get a new a/compressor due to my previous one being broken (not turning anymore)
Bought the compressor and had my mechanic put it in.. he also recharged my a/c completely.. and realized my unit wasn’t holding the gas (refrigerant in)
He then noticed that my unit was leaking somewhere…
If you guys have any info or suggestions .. what else could it be.. (before I bought the car, it had been in Nevada so some parts of the car were frozen and needed upgrades) should I just replace my a/c unit parts or should I get new o ring gaskets??
I have an appointment with Firestone to check my a/c but if some of you have an understanding in that area I would greatly appreciate any feedback
Thank you so much you save alot of maney today ifix my ac
Really glad I could help!
Good job,.,...,yes now I know what you know....thanx
Thank you very much for watching!
where can I get this chart ?
I'm praying 🙏 I can do this!! Just learning how "real" mechanics have been "bending me over" screwing me!! But no tools!! 🤔. No enjoyment either giving my $$ to them!! Wish me luck...
Definitely will wish you good luck! There’s definitely a time and a place to take your vehicle to a mechanic, but I love doing the things I’m able to do myself and saving a lot of money in the process.
My compressor is turning on and off what is the problem?
That could be from not enough refrigerant.
@@HowSkills my mechanic said there is a leak on the hose line, he recommended that I don’t use leak sealer, what should I do? Is it hard to change the hose?
Hello it was a bit of a pain compared to most of them it did work fine thank you for the tips i really had to search to find the low pressure plug , why make the high presser pug so easy accessible all ass backward Ford.
I know, come on Ford! Almost every other car maker figured this out, but it couldn't be done on the Focus?
Is it on the driver side or passenger side?
It's on the passenger side.
Thanks
I hope it helped!
Thanks my guy.. great advice.. worked perfect..
Awesome…glad to hear that!
thanks and it helped.
Nice…glad it helped out!
Thanks!
No problem! I hope it helped!
hello! What is the size of the connector that connects to the air conditioning tank?
Hi Stan: Just came across your video. I have a 2007 Ford Fusion SEL. Do you thin this will work on my model too? Thanks for your feedback, I know you are not a mechanic.
Looks to me like it's an even easier process for your vehicle. The recharge port is under the hood near the back of the engine compartment on the passenger side. Once you connect to that port the other steps would be similar. I found some videos on how to do it that looked like they should be good information for you. Here's one:
www.carcarekiosk.com/video/2006_Ford_Fusion_SE_3.0L_V6/air_conditioner/recharge_freon
@@HowSkills thanks so much & stay healthy & safe
how did it come out and how long did the a/c stay cold for?
It turned out well. The A/C is still working great and putting out very cold air. Doing this made a big difference.
Cómo saber si es el compresor ? Gracias
Is that where low side port is for 08 focus too?
No, fortunately they changed it in 2008 and moved it up under the hood on the passenger side. Should be somewhere near the windshield washer fluid filler tube.
@@HowSkills I have a 08 put freon and it seems to be that my passenger side is colder then the driver. Any idea why?
@@sweatydripz3587 Not sure, unless it’s a problem with a blend door actuator that controls what air goes where. May not be directing the air where it needs to go.
@@HowSkills hmmm possibly but air flow is same strong on both sides just not has cold on driver
They really go out of their way to design these Cars for DIY Maintenance
I'm happy anytime there's something like this I can do myself and save a little money!
My air comes out hot I have Ford Focus 05 zx3 manual car
Sounds like you definitely need your A/C system recharged. The procedure for your vehicle should be basically the same as what is shown in this video if you want to do it yourself. Otherwise, take it to a mechanic and let them take care of this for you.
Stan Cravens I saw that they have oils too for the ac
im missing a cap on mine and maybe another piece to it anybody else had a problem like thati have a 07 ford focus
Me gustaría en traducción a español
WTF FORD!
I have a 2002 and it is somewhat of a hassle to charge the ac. “Not one of Fords better ideas”
Their better idea was to change the port’s location in later models to under the hood! Much, much easier.
You just contaminated your a/c system with air from the empty hose on the can. Should have had hose hooked to can first then pushed button to try and fill hose with freon and purge air out of the hose.. That setup might not even purge the hose? Not good to contaminate your system.
There’s so many instructions that don’t come with your camp to tell you what you did wrong but I won’t go there. There’s so many variables why you should not use that pressure temperature chart. It’s one of the main reasons I have customers come in with burnt up compressors or clutch or blown out front shaft seal by using those cans and the pressure temperature chart. Not to mention when you buy one of those cans that already have the lubricant and other ingredients added to it you’re refrigerant is it gas or vapor that slowly leaks out but leaves behind a solid liquid oil and every time you keep topping off you keep adding in Oil eventually having a severe over oil charge what causes other mechanical problems. When the customer comes in and is told it’s going to be $2000 to replace the condenser replace the compressor flush out the system replace the accumulator they say I didn’t know they didn’t tell me that on RUclips this would eventually happen. This is when I feel sorry for the customer because they watched RUclips.
So...did you not hear when he said both "I'm not a mechanic" and "Do this at your own risk"?
gamerboy 0777 this is the problem, someone just make stuff up without even solid back ground or knowledge. Or the consequences of what it will do to someone. Saying do at your own risk does not make it better. I get customer who watch RUclips and think that is a method to follow because it look simple. And never get to see the failures later.
t lech Okay,so what should we do then guy.You have a lot of negative things to say,but no solutions👀
TheNormalKai #1: Use only pure refrigerant with no additives. #2: Completely recover refrigerant down to zero #3: pull a vacuum down to roughly 500 µm. Add refrigerant by weight only to the under hood sticker that indicates the quantity.
Why are you mad? The man clearly stated he wasn't a mechanic and do work at your own risk
Ford allways make pieces allwais make hard for the mechanics
Yeah, thanks for nothing Ford! At least they changed the placement of the port on later models so you could access it from under the hood.
Stupid ford design.
Yeah...exactly.