Build a Floating Deck

HTML-код
- Опубликовано: 31 июл 2024
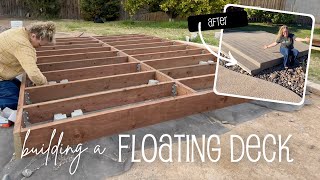
- Are you wanting to create a backyard oasis? Why not start with a deck? Today, I am sharing how I built a floating deck on the ground, and better yet, I am sharing all the steps to help you build a floating deck for your backyard oasis. Watch the video to see all the details on building a deck (freestanding deck), or visit my website to read the step-by-step guide.
0:00 Intro
1:33 Create a Plan
2:49 Prepare the Foundation
4:59 Build the Outside Frame
8:52 Install the Remaining Joist
12:05 Install any Additional Supports
13:23 Apply Sealant Tape
13:53 Install Fascia
15:22 Create a Picture Frame Border
18:05 Install the Deck Boards
21:18 How Much Did It Cost?
See the blog post for the step-by-step tutorial:
www.twofeetfirst.net/build-fl...
OTHER MENTIONS:
TuffBlock Website: bit.ly/3wzrUKl
Trex Install Instructions: www.trex.com/trex-owners/cust...
*You can use the discount code: MEGAN to get 10% off a 24 pack of TuffBlocks from the TuffBlock website.* bit.ly/3wzrUKl
Check out the tools/materials we used below! 👇
TOOLS & MATERIALS (affiliate):
- composite decking (we used Trex Enhance in Rocky Harbor): homedepot.sjv.io/GjA0VE
- TuffBlocks: amzn.to/3Yk7wa2
- 2”x6” pressure-treated lumber: homedepot.sjv.io/3P7vNv
- 3” exterior screws (can be used with pressure-treated lumber): homedepot.sjv.io/mgnPmD
- hidden fastener: homedepot.sjv.io/NKNMqO
- deck screws that match the decking
- landscape edge guard: homedepot.sjv.io/YgdMaO
- gravel
- weed barrier fabric
- joist tape: homedepot.sjv.io/jW19dn
- joist hangers: homedepot.sjv.io/JrJkWa
- angled joist hangers (if needed): homedepot.sjv.io/x9ngdk
- hanger screws: homedepot.sjv.io/x9ngdk
- #60 grit sandpaper (optional)
- miter saw
- jigsaw
- drill
- level
- square
- sliding t-bevel: amzn.to/3AAcaGl
- tape measure
- pencil
- clamps
- orbital sander (optional)
- wheelbarrow
- shovel
- rake
- tamper (optional)
- safety glasses
- face mask (for dust)
- ear protection
___
DON’T FORGET TO SUBSCRIBE
Subscribe: bit.ly/subscribeTwoFeetFirstyo...
___
FOLLOW ME:
Blog: www.twofeetfirst.net
Instagram: / twofeetfirst
Facebook: / twofeetfirst
Pinterest: / twofeetfirst
___
Watch My Most Recent Uploads:
bit.ly/twofeetfirstrecentvideos
MUSIC: (affiliate)
Soundstripe: soundstripe.com?fpr=twofeetfirst
___
SUPPORT THIS CHANNEL:
shop.twofeetfirst.net/
Thanks for watching! - Megan
**DISCLAIMER: Some links are affiliate links or referral links for your convenience. It is a way I earn advertising commissions by advertising or linking to certain products and/or services. Read my full disclosure policy here: www.twofeetfirst.net/disclosu....
TwoFeetFirst participates in various affiliate programs, including the Amazon Services LLC Associates Program, as an Amazon Associate, I earn from qualifying purchases.**  Хобби
Хобби


Thks starting to level tuff blocks tomorrow 12x 12 floating deck, good vid good instructions
Thanks for the great video, I'm planning a similar deck with Tuffblocks and this is really useful. Your deck looks awesome and well built. One small correction, according to the Tuffblock installation guide, the maximum span between each Tuffblock (center to center) is 60 inches, not 50.
wow great work well done very inspiring