Excellent video! Just what I was looking for prepping for replacement of the door checks on a 2010 Corolla. Your explanation and detail are refreshing and to the point. The rivets holding the speakers in are not what I would have guessed either.
Thanks man, I just took off all my panels from this video, I'm going to wash them and repaint them to black, for some reason I have the biege one. I want black interior
I would use a vinyl paint especially for things just like this. It will adhere to the vinyl much better than other paint. Make sure you clean your services very good and let them dry
Que bueno!!! thanks a lot, from chile, AND do you know how to remove the plastic front panel for to reach de transmission sistem of wires and plastics gears because they are not working...lossen or cutting wires...) (como llegar hasta los cables que desde el dial de regulacion de aire de calefaccion hasta los engranajes de plastico de atras que están desajustados )
Instead of releasing the door lock and open lever assembly in its entirety, the individual steel cables/linkages can be taken out one at a time. Just slide the plastic neck out of the main assembly, ease the ball knob at the end off the actual lever. Less risk of breaking any clips, just make sure not to get the grease all over yourself.
I had to replace the weather outside striping on my 2010.When I removed the old strip a peice of plastic on the front fell into the door. do you know what it was?


Dear God, someone who actually has attention to detail and understands how to teach. I thought I was the only one.
Thank you so much for this comment. This started my day off good. Thanks for checking out the video!
BRO!! THANK YOU SO DAM MUCH!!! finally somebody who actually teaches me how to do it right instead of teleporting to random steps
So welcome! Thanks for watching
This is one of the best instructional videos Ive seen, thanks for going slow and explaining each step!
You are very welcome! So glad I was able to help
Excellent video! Just what I was looking for prepping for replacement of the door checks on a 2010 Corolla. Your explanation and detail are refreshing and to the point.
The rivets holding the speakers in are not what I would have guessed either.
Thank you so much. I fairly easy process, but I always want to speak clearly and explain everything the best I can. Thank you for watching
Thank you for the excellent tutorial. Very helpful as I was replacing the side mirror. Appreciate it!
Very welcome and I'm glad I was able to help
Excellent vid. Took me about 15 mins. Easy job. Thank you!
Glad to be a help.
Hey glad to see that the button panel just comes right off, the buttons were loose so I have to hold them in place to hit the lock/unlock
Aftermarket replacements I'm sure are available
@righteousredneck777 it was just one of the pieces you put a screw in to hold the electronics on the panel, a bit of hot glue fixed it.
Thanks man all the way from Guyana 🇬🇾
Very welcome
Great video! Thanks, helped a lot.
Very welcome! So glad it helped
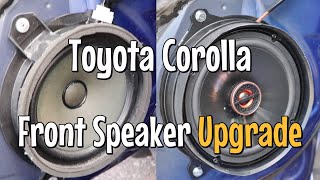
Thanks for the video! Especially on how to use the frame of the factory speaker to mount the new one. Clever and it worked perfectly!
It was spur of the moment. Worked perfect. Thanks a lot! Glad the video helped
@@righteousredneck777 Yep, I'm thankful that you took the time. Very grateful. :)
I like this guy, very informative. Unlike the others, thanks again 🙏🏾 ..
Hey, thank you very much. I try to go slow and EXPLAIN.
Thanks man, I just took off all my panels from this video, I'm going to wash them and repaint them to black, for some reason I have the biege one. I want black interior
I would use a vinyl paint especially for things just like this. It will adhere to the vinyl much better than other paint. Make sure you clean your services very good and let them dry
thank you for the upload. my planel was broken the plastic underneath. thx 👍
I hope it popped back on with no problem
Thank you! This video was definitely informative and very detailed.
Thank you so much
YES! Thank you man! I am just like you, screw that dumb silicone shit! This is much much better!
No problem man!
Thanks for the info. It was pretty easy to follow
Very welcome
Muy buen video, lastima que no muestran como se emplea la herramienta para desarmar,quizás lo hagan en ingles, pero yo no entiendo ese idioma.
Thanks Sr
Very welcome. I hope the video helped
Thank you sir!
Absolutely
Good video; thanks !!!
Very welcome. Thanks for watching.
@@righteousredneck777 I like the 777; kind of says it all "Brother"!
Thanks
Absolutely. Hope I was able to help a bit. Thank you for watching this video
Did you need to disconnect car battery or anything before doing this?
No,not at all.
Thanks for the video.
Very welcome
Que bueno!!! thanks a lot, from chile, AND do you know how to remove the plastic front panel for to reach de transmission sistem of wires and plastics gears because they are not working...lossen or cutting wires...)
(como llegar hasta los cables que desde el dial de regulacion de aire de calefaccion hasta los engranajes de plastico de atras que están desajustados )
Muey bueno! From Texas. No Sir, never done that yet on this car
Instead of releasing the door lock and open lever assembly in its entirety, the individual steel cables/linkages can be taken out one at a time. Just slide the plastic neck out of the main assembly, ease the ball knob at the end off the actual lever. Less risk of breaking any clips, just make sure not to get the grease all over yourself.
Thanks, how remove de AC panel to fix lights on dial on corolla 2009-2012 ?
Thank you!!!
Thank you! I hope I helped you
Is this for all doors correct?
Yes...will all pretty much come apart the same way.
Thanks man
bro ı wısh u would show moment of how to open remove door panel ıt wıll be letter
How do we call the black cover on the door
I had to replace the weather outside striping on my 2010.When I removed the old strip a peice of plastic on the front fell into the door. do you know what it was?
Possibly a clip for where the strip clipped onto. Not sure... would have to see
Thank you. It is more then I know before.
@@frankadams7238 anything I can do to help just let me know
10-4
Useful!
Thank you very much
How do you put it back on!!??!? Lol
Simply pops back into place. Little plastic grommets that hold it on
@@righteousredneck777 lol thanks.