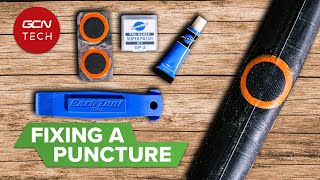
Fix A Puncture - Patch A Bike’s Inner Tube

HTML-код
- Опубликовано: 21 авг 2024
- Even if you only ever plan to fit new inner tubes it's useful to know how to patch a inner tube. You may have multiple punctures on one trip and a patch kit - which only weighs a few grammes - will help get home. It's also useful if you meet a rider without puncture tools whose inner tubes are a different size to the ones you carry. If you want to patch inner tubes for routine re-use the most efficient way is to store punctured inner tubes until you have a few and then process them together.
Subscribe to our videos: www.youtube.co...
Visit our website: www.madegood.c...
Visit our RUclips page: / madegoodorg
00:06 Step 1 - Clean And Dry the inner tube
If you used water to trace the hole make sure the inner tube is dry. Use fine sandpaper or an emery board to clean the area around the hole. Clean an area larger than the patch you intend to apply.
00:25 Step 2 - Spread The Cement
Smear a thin layer of rubber solution around the hole.
00:47 Step 3 - Wait
The cement is a solution. Don’t apply the patch until all the solvent has evapourated. If you sniff the layer of solvent you must smell only the rubber of the inner tube, not the alcohol solvent. The length of time this takes depends on the weather conditions it’s quicker in warm dry air, longer when it’s cold and wet.
00:56 Step 4 - Rediscover The Hole
If you’re not certain where the hole is pump a small amount of air into the inner tube to show where the air escapes
01:09 Step 5 - Apply The Patch
Peel the protective layer off the patch. If the patch has paper on one side and foil on the other it’s the foil that comes off. If it has paper and cellophane, it’s the paper. Apply the patch to layer of glue so the hole is centred under the patch.
01:33 Step 6 - Bond
Place the inner tube on a firm smooth surface and rub the patch onto the inner tube with a smooth implement. A tyre lever works well. This action encourages the patch to bond to the inner tube.
01:52 Step 7 - Remove The Backing
Fold the inner tube to crack the backing paper or cellophane and peel it off from the centre outwards. If you want to leave the backing on that’s no problem. The inner tube will work with it still on.
02:22 Step 8 - Dust
Dust the patch and surrounding area with fine dust or chalk. A patch kit often has a block of chalk to generate this dust but you can use any fine dust lying around. The dust neutralises the glue around the patch so that the inner tube won’t stick to the inside of the tyre.
Pro Tip
If this is a routine patch - as opposed to an emergency repair - hang the inner tube up overnight with enough air in to hold an ‘O’ shape. If they haven’t sagged to an ‘I’ by morning they are holding air and ready for re-use.
02:36 Step 9 - Roll
Roll the inner tubes carefully to force all the air out then fold with the valve on the inside and secure with a rubber band.
#BikeRepair #HowTo #BicycleMaintenance


![Eminem - Somebody Save Me (feat. Jelly Roll) [Official Music Video]](http://i.ytimg.com/vi/Vwa0HenQMi4/mqdefault.jpg)


Dude I’ve been fixing bikes forever! Always when patching couldn’t figure out how to keep that orange part of the patch to stay intact so, as many others, I’d just leave the plastic wrap and mount the tube with it. Thank you for this! I feel like I’ve discovered America!!
i liked this video, it answered every possible question in a plain and simple way.I suggest stopping at 3 mins though as the folding does get a bit tiresome
Thank you I love your detailed description on how to do it
This is a splendid, informative video that makes it easy to learn how to fix a tube. Thank you.
JesUSAves
No it isn't. The cellophane is there for a reason. Don't touch the glue.
Thanks
Thanks for showing how to roll the tube up, great as I didn't know the best way to do it👍
I've been getting quite a bit of slack for that whole process on an otherwise quite short video, but I thought it would be useful to see some one do it correctly. Glad you found it helpful.
Thanks! This is exactly what I was looking for!
Jolly good video...thanks & cheers from the states!
Thanks - some good tips in this video.
1:52 Peeling the backing paper off outwards seems to be the way to go. I actually tried the other way around, and failed the repair. So I had to start it all over again. Like he said in the video, you don't need to peel if off. I began leaving it on since then.
That's true. Same here, peeling it from the edge caused the orange border to roll up causing failure of the patch after I had reinserted it into the tire, it would've been better to have left it on. It wasn't scored in the center, I'd probably need to carefully scire it myself if I wanna peel from the center. I also noticed in my repair that the longer the clear backing paper remained on while the patch was being pressed to the tube by a heavy weight (e.g 5 minutes) the harder it was to remove, so you wanna remove it early or just leave it on.
The manufacturer of these patches specifically says not to remove the plastic. It's there to reduce friction. But hey, he has a British accent, so he must be smart. LOL
i feel relaxed too.
I love that half the video is just rolling the tube. In all seriousness, great vid, though.
love the way it is rolled back ..
I find the rolling up technique worth coming back for. I would put some talcum though.
Talcum's not a bad shout, Roy. I've had a fair bit of stick in these comments about including the whole of that rolling up technique, but I really thought people might find it useful. It's at the end after all, you can just stop watching if you want to, right? Anyway, glad you're on my side!
MadeGood.films there are some "know all's" under every DIY video. One wonders why they see videos of things they already know about. Perhaps they want some recognition which they don't otherwise get in life.
Very elegant
Nice DIY!
lol I fixed mine from failing 2 times and putting too much glue so the glue fixed the hole for me
you just need to put the part of the tyre you glued under heavy thing like a table or something like that and it will be done in less than a day
Harold Long: I used old tubes to "thorn proof" the tubes on my 10 speed and my wife's 10 speed in the 1970's. Currently, I ride the irrigation canals of San Joaquin Valley with "Slime" thorn proof tubes and an old tube as a liner in the 2.25 tires of my 7 speed Schwinn. When I first started riding the canals 2 years ago, had a flat tire every other day. After a month of that bullshit, went to current method and not one single flat tire since. However, I know nothing about how that method would work at speeds in excess of 15 mph on a racing bike. Only one way to find out.
P.S. I keep my tires inflated BEYOND recommend tire pressure -- they are damn near rock hard!
+David Turner Hey David, I hear you loud and clear. When I was a kid in Tucson (late 50s) I rode a beat up bike with balloon tires on trails through vacant lots and along irrigation ditches. I was forever getting punctures including punctures in my body. I once ran into a Palo Verde tree and drove one of those long thorns into my leg. My mom was really mad because of the huge circular blood stain on my pants leg. My brother would usually patch my bike up and I'd go at it again. Those were the days. Now because of medical issues I ride a Terra Trike here in NW Arkansas on beautiful concrete multi-use pathways. It doesn't get any better than this although I did clip a diamondback rattlesnake at high speed. Thanks for the post....Hal
+Harold Long When I said, "Use old tubes as liners . . ." I should have informed the reader to remove all patches from the old tube -- or use cheap new tubes as a liner (currently, I use very cheap new tubes as a liner by cutting out the stem and then spliting them down the middle -- and as I said, "No flat tires for nearly 2 years." Furthermore, every morning I ride 10 miles of irrigation canals that are not paved, and covered with broken glass or thorns from star thistle).
+David Turner Hello David. Your advice is indeed practical. If it's inexpensive and works then it's certainly worth a try. If my dad or brother had tried that on my bike when I was a kid I wouldn't have been yelled at nearly as much. ;-)
I also didn't like having to pick those sand burrs out of my socks. There was just no easy way to do it without suffering pain. And goat head thorns...oooowww. I don't miss either one of them.
I looked up the star thistle...wow! What a vicious looking thorn. I think you should get hazardous duty pay for where you ride. And glass is really, really dangerous especially for bike tires. Good luck on your rides!
+Harold Long For those of you who ride your bikes in the South-West where you encounter cacti here's a little tip for removing thorns from your flesh should you fall into one of the cactus plants or should you decide to pick a prickly pear: Use an ordinary razor to "shave" the thorns out. A disposable razor cuts hair because hair has roots -- thorns stuck in your flesh have no roots -- therefore, your disposable razor can pull thorns out by the dozens in one swipe. I know this first hand because where I ride there are lots of prickly pear cacti -- so I carry a disposable razor with me and whenever I find ripe fruit on the cacti then I scrape off the major thorns and ignore the glochids -- after I have consumed the fruit, then I get out my razor and shave the glochids out of my hands.
I've been repairing bike punctures for over thirty years. Suddenly in the past year or so I can't repair a single one. At least the past ten have completely failed with the last couple peeling straight off as soon as I finish letting them stand for a few minutes. I am completely at a loss as to why. Is it poor quality glue? Are the patches bad? I am doing everything the same way I've always done it. Completely baffled and frustrated. Anyway this video has a few handy extra tips so I'll follow them from now on.
@David Bull Same here David. I suspect it's down to the rubber solution going off. I got a decent-sized tube of Tiptop soluble from my LBS a few years ago. I noticed the solution started to go a bit rubbery straight from the tube after I'd had it a good while. I imagine it has a shelf life and is past it now. Time to dispose of it and buy a new tube. Thanks for reminding me to head to the bike shop tomorrow.
When does the super glue go on? After the rubber solution solvent has dissolved ? Thanks
....this was oddly relaxing. lol
Remove air completely before applying and pressing patch.
Hmmmmm what happens if I put the cement down and didn't wait for it to dry? I just put the glue down, waited like 10-15 seconds and applied. Then stepped on it for like 5 minutes lol
Shell Busey would say. " It's just that easy"
Can talcum powder be used as a replacement for ground chalk? Anyone tried this?
I just use the rubber solution. I don't patch it still holds. Let it dry your done.
I've never seen that work before.
To neutralize the glue, would corn starch (or even baby powder) work, instead of powdered chalk?
whatever powder you have the closest, even fine dirt.
Haha, the narrator sounds like Graham Gooch - ex Essex and England batsman!
I guess then everyone in England sounds like batman.
Can use the patch without glue? What type of glue I need to use
The 'glue' is actually a rubber solvent, so the tube actually bonds with the patch. So with a traditional patch, no you cannot use it without the glue/solvent. There are some modern patches that don't require solvent and work more like a sticky plaster, but I'm not sure how effective those are.
I thought that you are suppose to apply cement glue to both surfaces, isn't that the case?
No, just the tube.
were is the other part. I fill nuts.
roll it up
how soon can the tire be inflated and ridden on?
immediately .
+podzhopnik normally after patching, i have a smoke(opnly to make sure the glue has gone off), then assemble and inflate and im on my way.
FML !!!! the tin foil doesn't come off from the patch. Just the clear foil
Can I still use it as normal or should I get a replacement inner tube
A properly patched inner is good to ride on as normal. The patched part will be the strongest part of the tube.
and pass it
if it is hot and dry aprox how log do we have to wait
can we use fewuick glue
شارجہ میں کدر ملیگھ
"The cement is a solution (so) don't apply the patch til the solvent has evaporated" what the heck is that supposed to mean?
He means when it is tacky and the odor has diminished to where it isn't overwhelming. Basically when it goes from a runny liquid like state to a sticky gel-like substance similar to that on a letter with a credit card attached. Was that technical enough? 😛
Where can we buy this stuff?
I could have done without the final two minutes.
What???? If you sniff????
Seriously, that rolling of the tube footage at the end was totally unnecessary.
nGAhGENVH0Ul Then don’t watch that part. Others may find it helpful.
@@Cycle774 hmm, I don't even remember this video, so I have no idea what you're talking about nor am I gonna spend my time rewatching to make any sense of your comment.
Get a fold going
wtf with all the fiddling at the end, rubbish non informative
atyl1972 showing you how to roll it up.
+atyl1972 This tube could now become a spare tube. Removing the air then re-rolling for proper storage (folds of tube are around the stem to protect it and the rest of the tire) is very practical and wise. He really should have spoken to the reasons for doing it the way he did. I think he didn't because mechanics in general do things intuitively because they tend to think that everyone else automatically knows why they are doing it. Perhaps he'll remake the video sometime. I enjoyed and understood it.
it actually is pretty informative for first timers, but I would make a separate video and name it 'how to roll up spare inner tube' LOL
That's actually not a bad idea!
THE CELLOPHONE IS THERE FOR A REASON (TO REDUCE FRICTION ON THE PATCH) DO. NOT. REMOVE. IT.
Don't touch the glue either.
Do not use these methods. They suck.
Wow that sucked
Realey bad
I thought that you are suppose to apply cement glue to both surfaces, isn't that the case?
That's the way we do automotive patches after you peel the plastic covering off you apply a final coating of cement over the entire patch. I'd assume it'd be the same with an innertube as along as you wait a couple minutes for the cement to completely dry before installing it back on the tire