Это видео недоступно.
Сожалеем об этом.
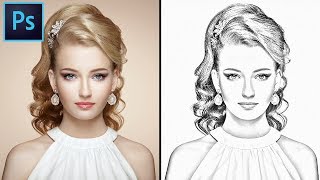
How To Create a Pencil Drawing From a Photo In Photoshop - Line Drawing Effect

HTML-код
- Опубликовано: 17 авг 2024
- Photoshop CC tutorial showing how to transform photos into pencil drawings.
If you have any questions please leave them below
or head over to this tutorial's page on our website:
Pencil Sketch Drawing Effect in Photoshop
photoshoptraini...
Subscribe + Like + Share + Comment = More Video Tutorials!
Thank you for watching!
===================================
LINKS
Website:
photoshoptraini...
Facebook:
/ photoshoptrainingchannel
Google +:
google.com/+Ph...
LinkedIn:
/ photoshop-training-cha...
Pinterest:
/ ptcpins
RUclips Channel:
/ photoshoptrainingch
This Video's RUclips Link:
• How To Create a Pencil...
RSS Feed:
feeds.feedburne...


Best Adobe Photoshop tutorial I've ever seen. Clear, concise, and informative. This man is a master/teacher.
Subscribe + Like + Share + Comment = More Video Tutorials!
Hey everyone. If you Add one more layer (by copying the Background layer) and move it to the front you can apply the lighten filter to give a colored pencil effect. This works really well if you have a balanced color palette and is an easy step for the desired effect. Other filters work too, depending on your palette, but I found that lighten gave it a more natural effect in line with the charcoal filter. This tutorial was super helpful!
+Dominic Wood Thanks for sharing!
Watched several tutorials on this subject. This is by far the best. Gives options for commands like pointing out alternative commands in menus. But most importantly, gives better end result.
Thanks JR, once again your video helped me quickly grasp the PS functions/capabilities. Your video strong point is that you explain in detail regarding the theory and what certain functions actually do instead only giving instruction to press a bunch of buttons without any understanding at all like other tutorial videos.
Awesome! Thank you, Adi!
You are a wonderful teacher, explaining each step AND the reason you do certain things. This makes it possible for your "pupils" to adjust your procedures as needed by their own images and their own desired results.
TechSupport100 Thank you! I really do appreciate your comments!
yes your tutorials are so helping, so smart and straight forward to the desired effect, thanks a lot for sharing your experience.
Thank you!
By far the best, most indept tutorial with all the keys to be used and short cuts and reason for using different filter. Well done and very BIG thank you!
aranab kumar You're welcome!
Really comprehensive. I found myself working along with you at first but then I stopped and watch you work. Thanks very much for sharing.
Thank You. One of the better "How to make a sketch effekt" tutorials I have seen here. Gives me a lot of inspiration :-)
You're welcome!
Just saw two of your tutorials and I look forward to more of your posts.
Thanks for not making it so complicated.
Ovdchicago1 You're welcome!
Absolute genius. The best "drawing" tutorial I've come across. Thanks.
+Brian Heller Thank you!!!
Great tutorial as always. I've watched and followed a few of these sketch tutorials on RUclips, and your tutorial offers a lot more detail with a very clear understanding of how to achieve the desired look. Thank you again, Jesus.
PERFECT!!! SUPER EASY TO FOLLOW!!
best tut for pencil draw effect i've seen, so far
***** Thanks!
Photoshop Training Channel Jesús, great tutorial... again! Congratulations!!! Gracias!
Aprendizzz2009 De Nada!
I love this tutorial & have watched it several times. Please do not remove this content!
Thank-you.
+David St Jean I won't! :)
The best Pencil Drawing Effect tutorial.
This is wayyy too helpful!! FR! Thanks a huge ton dude!!!
u created the best tutorial to achieve this effect :)
great work
Thank you!
One of the smartest Photoshop tutorial ive seen
+Alexandre Paradis Thank you!
great tutorial, I really liked the way you explained the whole tutorial with the shortcut keys and every tool & technique with patience. Thanks for sharing the info :)
Mohd Saqib You're welcome!
thank you - great tutorial
great tutorial very easy to follow and understand. I like adding the hand drawing to the image, nice touch. Thanks
You're welcome!
When I hit the the filter gallery, my picture has a blue gloss over it and when charcoal the image it then is just black with the blue glass, somewhat similar to the yellow tingle, how should I fix the issue?
I'm not sure what you mean. Maybe share a few screenshots.
This is succinct, thorough, and easy to follow. Thank you.
Very Good. Thanks.
This is exactly the tutorial that I wanted to find, thank you very much!
You're welcome!
Adorable 😘
👌👌👌👍👍
Beautiful
tutorial.. wounderful tutorial
wow...definitely learned something very useful thanks!
+Antonio Alcocer TM You're welcome!
Great tutorial - thanks for sharing this!
+Bruce Norman You're welcome!
best tutorial I've seen so far
+Yoseph Datu Thank you!
Very helpful tutorial. You explained it well. Thank you
You're welcome, Priyanka!
Thank you so much this helped a lot!!!! You saved my life
Thank you so so much..best tutorial ever!!!
You're welcome, Hansel!
thank you for your tutorials, your tutorials are so helping me.
Holy shit is this possibly the best tutorial on RUclips? Amazing work I am so impressed thanks for doing this!
Thanks!
Really helpful and i liked how you showed controls for mac also
+Myko Luis Thank you!
Definitely would give it a try
You didn't save my life, but I am still appreciative as I am using this for images in a book.
:)
Great video! Thanx a lot!
You're welcome!
Great tutorial. Thank you.
You're welcome, MSPiskin!
You deserve much subscribes.
👍🙂
Great tutorial
Sean Kalkreuth Thanks!
well done! thanks!
You're welcome!
Very well explained. You could be a teacher.
Brilliant! Still learning something new every day. :) Tank you!
***** Thank you!
Quick Tip: Another way to apply color: select new solid color and change the blend mode to overlay.
you can play with the opacity, and any further changes will be applied as well.
Barth Yup! Thanks!
Photoshop Training Channel Can you tell me how you download photoshop, and if you tell me that i will subscirbe for sure ;)
this is so good explained i understand everything. You got a like and follow. well done
Thank you!
highly professional
Thank you, Arsalan!
Wow! So cool! Thank you!
RPProductions You're welcome!
u tutorials rich! thanks so much
You're elcome!
Another great video, Jesús.
You´ve just saved my life! Thanks for this awesome tutorial.
You're welcome! :)
I am a subscriber and your tutorials help me tremendously. In this one all was going well until I hit the 3rd background copy and the charcoal sketch mode. My background went to black when I hit filter gallery and stayed there after I selected charcoal. I can't get the white background back. I've watched over and over and cannot figure out what I'm doing differently than the tutorial. PLEASE HELP!
Brilliant! Thank you :) This and variations of it will be so handy.
+David Adshade You're welcome!
Am using Adobe photoshop cc 2018, when I desaturated my picture, then go to filter gallery and select the charcoal the effect does not apply so what can I do. Thank you.
hi how do i bring back the color for some parts of a picture using this method? LIke i want the hands and face to be in color etc? Thanks
godspeedsiva1208 depends on the exact effect you want but you can start by setting the blend mode to color on the original layer then placing that on top of everything else.
It might be because I'm now using the updated Photoshop, but around 5:50, when I go to Filter > Charcoal, my entire photo turns red. I'm stuck on what to do?
el mejor vídeo de como hacer un dibujo en photoshop, gracias por enseñar
De nada!
Geek fact - Gaussian blur is pronounced 'Gawce-ian' - it's nothing to do with a cotton gauze fabric, as some people think. Carl Gauss, was the mathemetician who's algorithm is used for this blur. (I'll go an find a brown wool tank top and some tape for my glasses).
I did not know that. :)
More accurately - Gauss ( which rhymes with house ) + ian.
Hey what tablet do you happen to use?
baddy123 Wacom Pro Medium
What happened when i going to the option Charcoal my image is not come black/white color mode but i had been successfully done Desaturate? Do you have any solution?
Quality tutorial! Really well explained.
Simon Robinson Thank you!
How could I vectorise the final design so I can use it for cnc laser cut on acrylic
Thank you so much for easy to follow turorial. Question : what adjustment we should do for Digital tablet "LAG"pen "Delay" problem on photoshop cc 2014 ? Thank you sir
I'm not sure what the problem is there Sako TCHILINGIRIAN
thank you bro. i like your tutorial
This is why I subscribe to this channel.
Excellent instruction and explanation of the workflow.
Also the results of the techniques used in this tutorial achieve the most accurate feel of a pencil drawn sketch that I have seen to date here on RUclips.
Keep up the great work -- I look forward to learning and watching more. :-)
Brian Martin Thank you for your awesome comment!
Very useful! Well be exploring in the near future.
Colby Holmes Thanks!
thanks for the tut. just one question. when i apply charcoal it looks differnt for me. black is white, kinda inverted... why is this happening for me and not for you? using current photoshop cc 2014. tia!
aberoful Make sure your foreground color is black and background white.
aberoful Photoshop Training Channel im having this same problem, the background is white yet when the charcoal is applied it turns the whole image and background black, even following all step perfectly and having a white background
Thank you so much for a really informative and well explained tutorial. I managed to make this effect in one hour wheras it would have taken me like 20 hrs to draw it by hand lol
You're welcome!
That's pretty sneaky. I liked it. Good work, mang.
osmoregulatoryorgan Thanks!
Very beautiful drawing, Photoshop Training Channel love your art :)
+colorpaper princess (colorpaperprincess) Thanks!
5:50 when I hit charcoal, it turns image to yellow thingie?
+Mijo Đurđević Do you have black and white as your foreground and background color
My Background turns to black
Many Thx Mate!
Thank you! I'm a beginner but this really helped me so much! :)
Thanks for the awesome work!!
AkkKharka You're welcome!
Thank you for this amazing tutorial video
Ivor Carl Skrine You're welcome!
Thank you
What a great tutorial! I can't wait to try this myself, and then with my students. :)
Vickie Perri I hope they like it!
Really nice! Thanks for this.
Danny Joiner You're welcome!
hey man this is good keep it up
why, when I apply the Charcoal Filter my image is straight white. I tried inverting, and it was just straight black. I changed the blend mode to multiply anyway and when clicking the "eyeball" icon to turn the layer on or off, it makes no difference. It literally changed my layer to white. Is there a setting that is too high or too low below?? Thanks!
I was having the same problem.
Here is the solution that PTC provided:
Press D on the keyboard for black foreground color, and white background color. Then apply the filter.
Thanks for answering, Vanessa!
Thank you for the solution!! I actually eventually figured it out. But thanks again!! Great video and network of people helping each other out!
You're welcome!
Awesome, thanks a LOT for the wonderful lesson, you teach very well!! Now, everytime I use the charcoal effect my picture gets all blacked out... :( I think this effect only works if the picture doesnt have too much black mass on it.
Yes, that is correct. You may want to try adjusting the image before applying the filter to see if it helps.
Way late to the party, but is there any way to color on this after you finish? Like using the "sketch" as a guide?
I had the same question in mind
glory my teacher!
Marco Nasi lol, thank you!
oh man, this was amazing. thank you so much. #newsubscriber
You're welcome!
Really work
There are some very dark tones in the image I am trying to implement these effects on. Hence they are creating some very dark patches in the final image. Please suggest me a way to get rid of them
+Sibasish Mohanty Lighten the tones before you apply the effect. See if that helps.
Thank you ~ great vid!!
You're welcome!
Thank you very much for this tutor:))
best tutorial pencil drawing effect i have seen, and thanks you'r awesome :)
Thank you!
Thank you.
You're welcome, Hasny!
quick question: i have followed every step and up until the charcoal effect it worked well. however, once i apply the charcoal filter the image isn't nearly as black/dark as yours. mine seems to be totally washed out or very light. you can't really see the awesomness of the charcoal filter. what am i missing here?
great tutorial by the way!
'kay, seemed to have solved the problem. didn't know i need to have black/white colors for it to work properly. i just had the white and a really light grey...
Wing OK, I'm glad you figured it out!
real slow and easy to follow not like other tutorials that sound like rap verses
+samuel okoh lol. Thanks!
I liked it and it helped me but every image i choose its a bit too lighty and i dont like it , and i dont even know what to choose sometimes . When i watched your video i drew a eye and a bit around him . Can you recommend me a good image to edit ? I have a theme , to photoshop something 10-20 years in the future but idk what
well i know what you mean i´m as well not the Super Photoshop MultitaskingFull time Ninja but this is a bit toooo slow...
nice vaguely racist feedback
Anarchy_ Tect is the
Worked fine up until the charcoal filter step. When the preview part appears and you can play around with the sliders my picture was completely white. Didn't what I set the sliders to it's still completely white.
+happyraincloud9 Make sure your foreground color is black and your background color white.
I'm following step from the video, when step filter-filter gallery-sketch-charcoal, effect that i'm get is black..not like pencil that you show on tutorial...Why? i've been desaturate the image before...thanks
Very good! Thank You
You're welcome!
Gracias Jesus por compartir tus conocimientos !!!!!!!
kriz24maz De nada! Gracias por el comentario!
its a good tutorial, but it absolutely does not work if you have bad image quality, i tried to do that but it didnt look as clean at all and the charcoal effect made the image completely white with all different settings
The better the image that you start with is, the better the effect will look.