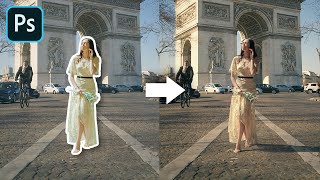
How To Make Realistic Shadows in Photoshop

HTML-код
- Опубликовано: 9 фев 2025
- Learn this Super-Simple way to create highly-realistic shadows in Photoshop!
By having realistic natural shadows in your composite, your subject will fit better within the scene make the entire image more cohesive.
Three of the most difficult things to get right when creating shadows are color, perspective, and shape. In this video, I'm going to show how to get all these right to create realistic shadows in Photoshop!
🎯 SUBSCRIBE to get more amazing Photoshop tutorials!
► www.youtube.co...
📘 INDEX - How To Make Realistic Shadows in Photoshop
00:45 - How others create a shadow
01:50 - The Problem with common techniques
03:28 - Shadow color
04:50 - Match Shadow Perspective
05:45 - Use Puppet Warp to distort the shadow
07:16 - Blur the Shadow
07:40 - Add a contact shadow
09:15 - Use the Gradient Tool to fade the shadow.
LINKS:
PTC Instagram
► / photoshoptrainingchannel
Match a Subject to a Background
► • How To Match a Subject...
Tutorial Images
► photoshoptrain...
Become an Adobe Stock Contributor:
► bit.ly/stock-co...
PTC Newsletter:
► ptcvids.com/sub...
FOLLOW ON:
Instagram:
► / photoshoptrainingchannel
Facebook Group:
► ptcvids.com/group
CREDITS
● Stock Images provided by stock.adobe.com
● Photoshop video tutorials by Jesus Ramirez
#PhotoshopTutorial #Photoshop #PTCvids


![Felix "Unfair" | [Stray Kids : SKZ-PLAYER]](http://i.ytimg.com/vi/Oswujxm2Ag0/mqdefault.jpg)

![How To Make Realistic Shadows in Photoshop [Technique That You Probably Don't Know]](/img/1.gif)
Working as a professional designer for 10 years, you videos are still super inspiring and helpful every single time!
You been working for 10 years and you still don’t know this 😑
@@adeemmohammed7908 leave him be
@@_ozark5969 why did you even respond it has been 2 months
@@adeemmohammed7908 I didn't see it until 2 months later. Understand?
@@_ozark5969 yeah but damn like you didn’t had to reply
I've been using Photoshop professionally for 15 years, and I never knew you could make your own pins on puppet warp! Holy smokes, this is going to come in handy all the time! Thank you!
I'm new to Photoshop & I really appreciate your videos. I also appreciate the people who take the time to comment. I think we can all learn a lot from each other. Thanks to you and everybody else for inspiring me & holding my hand as my skills grow.
I don't know what i'd do without your help!!!
Only thing I would add is to make the shadow a smart object first, then apply a bit more Gaussian blur. Then in the layer mask use the gradient to make the blur reduce as it gets closer to the subjects feet so it's gradually more blurry as the shadow falls away. 😉
Nice technique thanks
Agreed, how he miss that important feature
He did that in another video
@@rightalex7 They all leave important bits out of the tutorials......its so annoying...
You can also use "Iris blur" as an alternative to the gradient tool.
I like the tip on using Puppet Warp to fix the alignment issues!
Thank You!
I learned a bunch of useful hotkeys. Thanks!
You're welcome, John!
Khub valo laglo dada
I'm not the only one that says "Hi welcome back to the photoshop training channel, Im Jesús Ramirez" every time I watch a new ptc video am I?
I think you are 😄
Mr. Ramirez...Best Ps channel on youtube. Learned a lot with you. Thank you very much.
Dude, when it's you, I like before I watch it. And I am never wrong.
THIS HELPED ME SO MUCH. THANKS!
You're welcome!
Nice. The warp tool is a precious hint.
so helpful and easy super thanks 😍😍
You're welcome 😊
Most excellent school coming from keys of a person who didn't like schools. Thank you!
Your PS tutorials rock! Thank you.
The best shadows-methods I've ever seen. Bravo Jesus
I learned a few new tricks in watching this video, thank you!
This is great, Jesús! I never think of the puppet warp, but I will certainly use this now.
this was awesome, thanks!
You're welcome, Ran!
This helped with some shadows I had to add to a composite. Thanks so much!
Hey buddy you just won a new sub, your videos are amazing
Superb sir🥰🥰🥰🥰
Dude you are the best, I am so glad I came across your channel because I am new to Photoshop and I also subbed
Thank you, Blazecraft!
What a champ. Thanks.
Thank you so much for this. I don't know what I would do without you.
best! best! best!.............................Best helpful, effective, sincear, unselfish, real tutorial.Thank you for your hard industry for all without any benifit thinking.
You're welcome!
Another excellent training video. Thank you
You're such a great teacher! This tutorial is really helpful and I'll be able to make better shadows for my food pics. Thank you and keep up with the good work!
Very awesome, thank you so much!
Amazing...Learnt many things today: Layer mask, Blur filter, Puppet wrap and contact shadow...Thank you
Thanks bro, that's helpful
Thanks! I really enjoy your no nonsense instructional videos! Very helpful!
Brilliant Jesus....one of your best and easiest tutorials to follow but one one the most helpful - thank you very much.
Often adding shadows...now I can do it correctly!!!!
Some great tips here. Thank you.
realy helpful for me!!
thank you brooooo
Really great instructions.
Thank you Soo much. This video helped me a lot because I wasn't able to make shadows on PicsArt android version
Wonderful work for us to learn
Wonderful
Thank you, Hello!
Thank you! I also learn so many tips and tricks from you!
Awesome man
Thank you Jesus, as always you provided me with the help that I need! Keep them coming!
Just learned about Puppet Warp today, thanks!
Thank you!! One of the better ones I've seen lately :). Very helpful!
i APPRECIATE HOW THOROUGH AND EASY TO FOLLOW YOUR TUTORIALS ARE. THANK YOU.
Really helpful video! Thank you!
Thank you so much Jesus! As always informative and very useful! God bless and good luck man!
Really nice tricks
Thank you, Jesús! I learn something new from you all the time.
very helpful video, thanks
Thank you 😁
COOOOL ...SUPER COOL THNX
Finally i can create a shadow thank you
Very good!
lol the move trick is awesome!
Awesome tutorial! Love the way you orate! :)
Another superb tutorial. I learned something new with the eraser shortcut!
A Gr8 tutorial buddy
Wow, this is so much better. I am not a pro but watching you and a lot of practice will surely be the way. Thanks a lot for making these videos.
Awesome video .....Thank you for sharing .
wao great work. very informative
Super tutorial .. i like tutorial,
Great idea I think add a little bit blur effect
Wow Thanks so much sir, now I am more understanding
THANK YOU SOOOOOOO MUCH
Great Tutorial to finally get nice shadows. Thanks!
I always look into your channel whenever I have difficulties in Photoshop.
Thank you very much!
Excellent as usuall.
Thanx sir ❤❤❤
Amazing! Thank you so much!
That's pretty cool, great video.
imagine if we all had this video 5-6 years ago it'll solve and save us so much trouble
Thanks, Excellent, expect more
thank you! color in shadow, contact shadow and the use of gradient on shadow, what wonderful tips!
woooow so many skill
Thank you so much!!!!!!!
Awesome!
another page of photoshop bible by ptc. thanks lord of art
Thanks for the tutorial, but I would like to see shadow that is useful for composting. Multiple shadows interacting with each other from various objects, displacement of shadows as it goes over various objects, and going from floor to the wall etc. We need more advance realistic usage.
You're so informed, and I'd be thrilled if you slowed down and showed us step by step what you're actually selecting. I think to illustrate the typical guidance of tutorials you already had selections for layers, and I personally could not figure out where things were on the tools navigation ... I'm already lost, 2:30 in....
Awesome. I have been having problems with this. Thanks
Very helpful. Thank you sir.
excellent tutorial as always.
I believe the blur has to be gradual also, sharper near the person, blurrier as it goes away from it. May be tiltshift blur is a better option to use
Many thanks, great and informative tutorial
Good, thank you
TanQ so much Sir
Holy crap, I feel like an experienced photoshopper now 😂. This was helpful! THANK YOU!
There is a lot of wrong abd unrealistic stuff in the shadows
Thanks mate 👍
Very, very good tutorial, as usual.
Thank You Bro
Thank you Soo much
Great job, you are doing excellent job...
Very helpful, Thank you!
Pretty amazing work.. Everything looks so easy
great tutorial!
you are a pro thank u
i like to say u that u r my teacher