Awesome as always. I have to give you extra points for using additive Machining parts for a subtractive machining projects. Because you made the part, that make the parts, to make parts. Two thumbs up. This thing is going to be as precise as a Swiss watch. Great job.
Sometime, "OVERengineered" is just the right amount of engineering to throw at a problem. 😁 Beautiful work there mate. Personally, I'd have found it hard not to solve the problem by making a simple ball detent with a similar diameter to your finished unit, but then again, my solution wouldn't have been beautiful enough to warrant a display window to show off all the prettiness within. 😏 It's always satisfying to see someone implement a technically interesting mechanism. I'm almost getting the feeling that you might be a design engineer for your day job, but by night you retreat to your home workshop and make the intricate things you'd love to do at work, if it wasn't for management constantly saying "You've got to keep the parts count as low as possible". 😣
Amazing, as always. I'm gobsmacked by what the creator of this channel does with the most basic of home shop machine tools. It's proof that you don't need a Monarch lathe or full sized Bridgeport or Deckel milling machine to make quality parts. I've been a fan and a subscriber ever since I saw the first series of mini lathe upgrades. Proper job, mate.
That is a beautiful mechanism! Almost a piece of art! I like it very much. Someday I have to address this on my machine as well. Thanks for sharing, really relaxing to watch your videos!
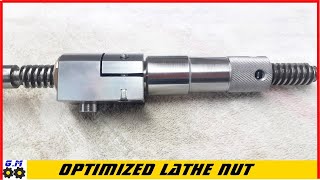
Very clever design ... and I think that a few people aren't realizing that the mechanism is always trying to close just that last bit by itself, no matter at what point you close the handle ... without this design, the operator has to 'feel' when the nut will close all the way, keeping pressure on the handle, and only then will a ball go into a detent recess ... what a beautiful job ...
It looks like you could have just as easily 3D printed every component except for the bearings and the springs. What type of filament did you use to print the housing?
I just cleaned things up, marked the position of the shaft where the ball sits, put a new dimple there and now it holds the half jaws securely. No looseness, no popping out.


That is one ridiculously over-engineered rotary tensioner. I absolutely love it! What a fantastic project👏
Thank you
Awesome as always. I have to give you extra points for using additive Machining parts for a subtractive machining projects.
Because you made the part, that make the parts, to make parts. Two thumbs up.
This thing is going to be as precise as a Swiss watch. Great job.
Sometime, "OVERengineered" is just the right amount of engineering to throw at a problem. 😁
Beautiful work there mate. Personally, I'd have found it hard not to solve the problem by making a simple ball detent with a similar diameter to your finished unit, but then again, my solution wouldn't have been beautiful enough to warrant a display window to show off all the prettiness within. 😏
It's always satisfying to see someone implement a technically interesting mechanism. I'm almost getting the feeling that you might be a design engineer for your day job, but by night you retreat to your home workshop and make the intricate things you'd love to do at work, if it wasn't for management constantly saying "You've got to keep the parts count as low as possible". 😣
Beautiful work, mechanism is now on the "clean" and serviceable side, good fusion between 3D and traditional fabrication, well done good sir!
Thank you
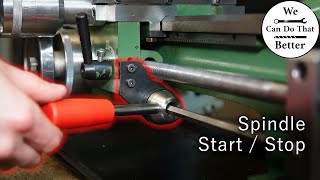
Can't really see this solved anything. You can see the halfnut still won't engage every time without jogging the carriage handle. Same old problem...
Amazing, as always. I'm gobsmacked by what the creator of this channel does with the most basic of home shop machine tools. It's proof that you don't need a Monarch lathe or full sized Bridgeport or Deckel milling machine to make quality parts. I've been a fan and a subscriber ever since I saw the first series of mini lathe upgrades. Proper job, mate.
That is a beautiful mechanism! Almost a piece of art! I like it very much. Someday I have to address this on my machine as well. Thanks for sharing, really relaxing to watch your videos!
Thank you! Great to hear from you
Но ведь там уже есть примитивный "узел" регулировки, зачем этот сложный механизм? Если только для контента...)))
Absolutely beautiful. A work of art. Thanks for sharing.
Fantastico, studiavo da diverso tempo il sistema per risolvere lo stesso problema, Grande idea !!!👍👍👍
What an obsurd amount of work for a detent
very pretty cinematography, as well!
That is a very unique idea and awesome workmanship
Excellent work!
Great work colleague!
that is so cool. I need one .. I would pay you $100.00 if you make me one ! I am serious..
What can we say ????? perfect engineering performed by a top master. Congrats!
impressive! Extremely good work!!
Phil
Thank you! Dima)
been here couple years or more,even l learn stuff, using modified mini lathe.
Very clever design ... and I think that a few people aren't realizing that the mechanism is always trying to close just that last bit by itself, no matter at what point you close the handle ... without this design, the operator has to 'feel' when the nut will close all the way, keeping pressure on the handle, and only then will a ball go into a detent recess ... what a beautiful job ...
This was like watching a cheap Timex being upgraded to a ROLEX😆
perfect workmanship
👏👏👏👏👏 Big golf clap!
Just love your channel
Cheers
Thank you
why make something simple when overcomplicated and overengineered also works fine :)
These minilathe upgrade videos are great
That is a piece of art right there 👌
Nice project. I doubt the plastic body will live long.
3D printing time is only 25 minutes)
👍👍😎👍👍
To dwudziestogroszówka w uchwycie tokarskim???😊
It looks like you could have just as easily 3D printed every component except for the bearings and the springs.
What type of filament did you use to print the housing?
Parabéns! É um jovem que pelas mãos parece ter em torno de 20 anos. Parabéns pela criatividade. O futuro te aguarda.
That's awesome, but I have a real hard time seeing 3D printed plastic parts on a machine lathe. Regardless, great job.
I just cleaned things up, marked the position of the shaft where the ball sits, put a new dimple there and now it holds the half jaws securely. No looseness, no popping out.
i like the idea of scribing the middle with the tool tip, as you know, by the center 'pip', if any, that the tool is exactly on the midline.
U can easily check, if your tooltip is on the middle, when u turn your spindle around 180° and draw another line. I do so also on my cnc lathes.
Уважаемые, резец уже выставляется по центру детали.
D mo not see what this’d mod is supposed to be doing ?
Cool!
id pay 300$ for one.
That's almost the price of a lathe))
Awesome! And 3D Printing ftw!
Thank you
Amazing! Do you have drawings?
Unfortunately I don't have drawings, only Stl of a plastic part
I don't suppose you have the measurements and gcode files for this do you
What a waste of engineering
Brilliant!
Немного усложнил но прикольная задумка
That is one clever lever. Cheers!
Damn good skils .
Nice Job. 👍👍👍👍👍👍👍
Thank you
You're Welcome.@@hammerland4028
Элегантно!
Super Qualität des Videos - wow
Отличная работа!
- почему так сложно?
- потому что я так могу
Так и есть, проще придумать не смог
Couldn't you just readjust the existing mechanism? Perhaps the detent of the lever was not optimally adjusted or the spring was too weak.
Needs more drawing board before commitment. Nice mechanism though, quite fancy.
Thank you
Hardworking 72 yrs old man making Popcorn in Sand #shorts #ashortaday #indianstreetfood
Nice. But I have to deduct points for using a 3D printer.
Thank you
Fancy
No rigidity. Plastics have no place there. 3D printed or not.