No DRO, no milling machine, no QCTP, no electric band saw, not a word. Man, you deserve my utmost respect. You definitely got talent. Certainly beyond many of us do. Congratulation for your creation and thanks for sharing.
1:45 +5 to respect! I really respect people approaching work rationally. Saving time, saving tooling life, sparing yourself the noise etc. Sometimes you've got to go in dirty.
I really like the different techniques you used in lieu of a Milling machine. I am building a new garage to be used as a workshop to keep my brain learning and have picked out a lathe but cant yet afford a mill. You have shown what can be achieved with a drill press and a lathe (and some cool if not a little bit crude additions and techniques).
I have been in exactly the same position and only recently was able to obtain a mill. Its fantastic to see how 99% of stuff can be done on a Lathe. They always say buy a lathe first, this is why :)
Outstanding work fella... love the flexible thinking you apply when doing an operation you don't have the proper tool for..... its what makes a person an engineer... much kudos to you friend
Man, watching the stuff you do with limited tools you have makes me ashamed at how little I can do with the comparably limitless equipment at my disposal. You have some serious skill and ingenuity.
That's super clever. Your work demonstrates that if you only have one machine tool, go with the lathe. I knew this, because it can make all kinds of mundane stuff, like spacers bushings and bearings, even shafts, with no special tooling. Those are things one would often like in exactly the right size. So you get utility right off the bat with a lathe. You: But wait! There's More! :)
Proper old school metalwork, you must be super happy with the way this came out! One change that might be useful is to machine a small recess into the carriage end of the aluminium adjuster knob to take a suitable wavy washer. This would ensure the adjuster and screw is always biased away from the carriage and remove any residual movement (though you did a great job with the fit).
Nicely done sir. I really like the design. Just a tip from an old man who has been doing this close to thirty years. Make sure you watch your backlash in adjustments (adjust the dial in the same direction / rotation). Keep up the great work!
Your (ab)use of the lathe as a milling machine is amazing and very creative. I have seen far worse results made by people with far more expensive machines.
Haha, thank you very much! :D Yes, it's a bit wild but if you have just this litle lathe you have to be creative to compensate the lack of a milling machine :)
@@WeCanDoThatBetter Yes, I agree. Many, many years ago I built a model of a steam locomotive just with my lathe. I also had to do all the milling on the lathe. Quite a challenge. Yes, you have to be creative, which is fun but also time consuming.
Just curious as to how you've decided that milling on a lathe is abuse... Milling attachments for lathes have been around since the 1890s... As a matter of fact, I hope to either build or rig one to my lathe, built in 1894.
@@trollforge I wrote "(ab)use" - so I certainly did not "decide" that it was an abuse. And my remarks wasn't meant as a negative critique - on the contrary: I appreciate creative use of machines as I clarified in my follow-up comment.
Seeing you do all these operations with nothing but a hobby lathe and a press drill is awesome... The first time I saw you milling on the drill press table I thought you were a madman, but you've opened my mind about what I can do in my own shop without ever needing to spend the (much needed in my tiny shop) space for a mill. The quality of your videos is good too. I like the format, and you make the clips just long enough for us viewers to understand what the operations and setup are with minimalist explanation. Keep at it. Your channel is inspiring and a testament that when there is a will, there is a way.
Enjoyed the reality of this video, hacksaw and files and bullying metal out with a drill 👍 So many mini-lathe videos where they are like "let's just pop over to the 5 axis CNC to finish off this part" 😂
My hat is off to you sir! Great job and I will be incorporating most if not all of the tools shown to utilize the lathe for milling purpose. Oops....just saw that I have already commented.......no biggie.......just reiterating (for the algorithm).
I will putting this into my project task, along with a bunch great ideas 💡 😀 for my new Lathe, showing up at the end of this month. Have a good weekend now.
Love what you manage to do with limited tooling, I'm started to believe you really can build a lathe only using a lathe. I was a little sad you broke down and brought a milling attachment 😀
Absolutely brilliant how you were able to utilize the mini lathe to perform many different functions..........I got many ideas from watching you make the carriage stop.......will be incorporating them into my mini lathe. Thank you for the upload.
Thanks, you have great ideas and excellent follow thru. You will do better on RUclips if you show the finished item first, not all the parts with the expectation people will blindly watch 18 min of all the work you put into it. Most will jump to the end and see the products then decide if watching you make it is worth the time, you have missed the opportunity. Filming is good, the work is very good you almost got it. Wish you the best and Cheers!
@@WeCanDoThatBetter if you can find a suitable wood band saw you could adapt it to metal cutting. Needs to be fairly robust as wood saws go and a DC motor with speed control will get you the torque and low speed needed. A diy power hacksaw is very doable though, they are kinda considered obsolete these days but they are cool and still useful to a hobbyist.
I'm a little sad you bought a milling attachment - some of my favorite parts of your videos were the cobbled together work holding solutions to use the lathe as a makeshift mill. As a fellow small lathe owner, I really admire your ingenuity and resourcefulness. I saw the carriage stop in another one of your videos and thought "where'd he get that, that's a lot nicer than the one I have". I should've known you made it.
Very nice! V1.2 update could be a spring loaded ball bearing detent for the dial. You could put the detents in the dial end and drill and tabe a hole in the aluminum body and hide it bed the screw gripper. Load a ball bearing, then a spring and seal it up with a grub screw. This way you could have the tactile feedback of the ball dropping in the detent at every 0, 5, 10, 15 and 20, etc. Regarding te screw sitting too low you could just sharpen it slightly.
Very nice stop you made, you say it sits a little low, I see it as not yet finished. Instead of remaking what about making a small foot you can attach to the end of the all thread that would offset and match the thickness of the cross slide. Once locktite was used to fix in place it would look intentional and finished. Just tossing an idea that may prevent a do over.
Thank you very much for your comment! Yes, that is a good idea. I will try to somehow adapt it to fit in the right height. To redo everything would be too much, that's right :)
@@WeCanDoThatBetter You are very welcome, I have a new mini that I am working through some of the build issues. Was impressed when I found some of your fixes, when I saw your too low height comment for the stop my first thought was maybe some kind of version of a left triangle shape could solve the height issue. You have got me wanting to work on my lathe but I am just recovering from back surgery so I need a good 8-10 weeks before I can go into my shop. So lots of time to see what others like yourself have dealt with and done. So far I managed to take apart the chuck clean and grind some of the bad casting, the difference in how much better the jaws function now is unbelievable.
0:27 parkside sponsoring? 😂😂 What a genius worker with limited tools. With more tools you could be chuck norris 😎 Wish I would have such amazing skills
Hi. I suggest you put some of the solution in another container because if you don't, you're going to spoil the original. min 16:08. Very nice work. Thanks for sharing.
Thanks for your advice. In my later projects I put a little bit of the bluing solution in a metal cap and used a little brush for applying it. This way I don't contaminate the solution.
Interessant zu sehen, daß du auch die gekordelte Mutter in eine Ausnehmung setzt. Deine Methode mit der Führung für die Schlagzahlen werd ich mir merken :-)
In der Tat, deine Ausführung hat mir sehr gut gefallen ;) Tolle Arbeit und eine gute Inspirationsquelle! Bei den Schlagzahlen habe ich erst gedacht, ich komme ohne Führung aus, aber habe schnell gemerkt, dass es verdammt schwierig ist ohne :) Zumal werde ich sie noch einmal brauchen :)
@@WeCanDoThatBetter Freut mich, daß ich dich inspirieren konnte :-) Wo hast du den süßen roten Klemmhebel her,????? So einen muß ich nachrüsten. Für die Teilung hab ich aus dem Durchmesser auf den Umfang gerechnet, unterteilt, auf Papier ausgedruckt, aufgeklebt, mit Körner markiert und mit kleinem Flachmeißel nachgezogen. Als Unterlage diente ein Bleiblock, eine Delle reingehämmert und fertig war die Unterlage. Meine Prioritäten bei der Konstruktion waren: schnell zu montieren und zu demontieren (Klemmhebel), Umgehung der Feder für die Keilnut daher Flügelschraube mit Zapfen, ohne weiteres Werkzeug (Schraubenschlüssel) zu bedienen und eigentlich - wollte ich ihn aus rostfreien Stahl machen . . . An einem Anschlag mit Revolverkopf konstuiere ich noch . . . I'm glad I was able to inspire you :-) Where did you get the cute red clamping lever, ????? I have to retrofit one of these. For the division I calculated from the diameter to the circumference, divided, printed out on paper, glued on, marked with grains and traced with a small flat chisel. A lead block was used as a base, a dent was hammered in and the base was ready. My priorities during the construction were: to assemble and disassemble quickly (clamping lever), bypassing the key for the keyway, therefore wing screw with pin, to operate without further tools (wrench) and actually - I wanted to make it out of stainless steel. . . I am still constructing a stop with a revolver head. . .
@@BLECHHAUS Ja, der kleine Hebel ist klasse. Es ist ein Klemmhebel von KIPP, den ich bei DOLD-Mechatronik (ebay) bestellt hab. Es gibt sie in verschiedenen Größen und Ausführungen. Die Teilung zu übertragen ist auch eine clevere Idee. Und ja, ein Revolveranschlag ist bestimmt auch eine coole Sache :) Ich frag mich nur, ob es nicht sehr kompliziert ist, alle Positionen exakt einzustellen.
@@WeCanDoThatBetter Klemmhebel von KIPP, danke, das hilft mir weiter. Also die Positionen sollten mit einer Kugel und Einrastlöchern funktionieren. Was mir am meisten zu denken gibt ist das Platzproblem links vom Anschlag zum Spindelstock hin . . .
awesome work that pal, im in the process of setting up a very small workshop and have brought myself a second hand mini lathe, what adjustable table are you using for your lathe? the one ive been lookin at is the cheapo one from temu or the like, it seems like a solid bit of kit in the vid
Great. I spent a lot of time yesterday and today making a much more primitive carriage stop, in the end it's not how I wanted it and will have to start again. Your video gives me the inspiration.. to do better! Can you tell where to get the handle? It looks different from the usual black ones.
I do not understand why that does not damage the driven spindle. I am aware of bigger machines that have a pin sticking out the carriage that, when run against the stop will decouple the carriage from the spindle. But how does this work here? My small hobbymat MD65 came with a carriage stop as well - however i never was brave enough to let the carriage run against it as long as i do not understand what will stop the carriage from being driven. My lathe does not have any split nut or something in the carriage, its just a plain brass nut.


![CHILE vs. BRASIL [1-2] | RESUMEN | ELIMINATORIAS SUDAMERICANAS | FECHA 9](http://i.ytimg.com/vi/5ObJt_71AYc/mqdefault.jpg)


-> Plans for the adjustable carriage stop are now available on Patreon: www.patreon.com/wecandothatbetter
No DRO, no milling machine, no QCTP, no electric band saw, not a word. Man, you deserve my utmost respect. You definitely got talent. Certainly beyond many of us do. Congratulation for your creation and thanks for sharing.
I agree very well done you can do wonderful things when you have a bit of knowledge a lathe and some basic tools
احسنت.شكرن
This guy own my respect! The things he've done with limited tools...it's amazing!
1:45 +5 to respect! I really respect people approaching work rationally. Saving time, saving tooling life, sparing yourself the noise etc. Sometimes you've got to go in dirty.
Thank you! :)
I really like the different techniques you used in lieu of a Milling machine. I am building a new garage to be used as a workshop to keep my brain learning and have picked out a lathe but cant yet afford a mill. You have shown what can be achieved with a drill press and a lathe (and some cool if not a little bit crude additions and techniques).
I have been in exactly the same position and only recently was able to obtain a mill. Its fantastic to see how 99% of stuff can be done on a Lathe. They always say buy a lathe first, this is why :)
I am impressed by the ingenuity you have to compensate for the lack of a milling machine. Just learning so much from your videos. Thanks & Congrats !
Thank you so much for your kind feedback! Happy to hear, you like my work.
Ich freu mich grad ungeheuerlich diesen Kanal hier gefunden zu haben. So viele tolle, interessante Videos! Vielen Dank!
Hi, vielen Dank für deinen netten Kommentar! Das freut mich sehr, dass dir meine Arbeit gefällt! :)
Outstanding work fella... love the flexible thinking you apply when doing an operation you don't have the proper tool for..... its what makes a person an engineer... much kudos to you friend
Thank you very much for your kind words!
Very very very pleased to see what kind of job Is possibile to do with basic or simple self made tools.
Bravo!!!!
Thank you very much! Yeah, it's may take some more time, but you can achieve a lot with those basic machines
Good to see this guy blowing up now. Im a new fan myself. Gives me hope that i dont need a whole shop to accomplish a task
Man, watching the stuff you do with limited tools you have makes me ashamed at how little I can do with the comparably limitless equipment at my disposal. You have some serious skill and ingenuity.
That's super clever. Your work demonstrates that if you only have one machine tool, go with the lathe. I knew this, because it can make all kinds of mundane stuff, like spacers bushings and bearings, even shafts, with no special tooling. Those are things one would often like in exactly the right size. So you get utility right off the bat with a lathe.
You: But wait! There's More! :)
Nice!
Someone get this guy a mill!
Cheers
Haha :D Thanks my friend!
Proper old school metalwork, you must be super happy with the way this came out! One change that might be useful is to machine a small recess into the carriage end of the aluminium adjuster knob to take a suitable wavy washer. This would ensure the adjuster and screw is always biased away from the carriage and remove any residual movement (though you did a great job with the fit).
Thank you very much for your kind comment! I really do appreciate that. The tip with the washer is good, thanks.
Thanks for sharing!! I'm gonna make one for my lathe soon!
Thanks and good luck!
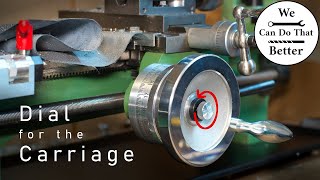
printed division scale
wow that's a really nice trick
haven't seen it before. Thanks for sharing
Nicely done sir. I really like the design. Just a tip from an old man who has been doing this close to thirty years. Make sure you watch your backlash in adjustments (adjust the dial in the same direction / rotation). Keep up the great work!
Thank you very much for your comment! And yes, it has some backlash, you have to keep that in mind, when using it :)
I watched some of your videos this evening and subbed right after.
You are a genius in creating solutions. Hats off.
Thank you very much!! I really do appreciate that.
I'm sorry that I could only hit the like button once. Very well done.
indeed a great Idea. Adaptable to other projects I think.
Absolutely awesome I hope I can have the patience to complete one when I get to it !!
Thank you very much! And good luck for your project
Your (ab)use of the lathe as a milling machine is amazing and very creative. I have seen far worse results made by people with far more expensive machines.
Haha, thank you very much! :D Yes, it's a bit wild but if you have just this litle lathe you have to be creative to compensate the lack of a milling machine :)
@@WeCanDoThatBetter Yes, I agree. Many, many years ago I built a model of a steam locomotive just with my lathe. I also had to do all the milling on the lathe. Quite a challenge. Yes, you have to be creative, which is fun but also time consuming.
Just curious as to how you've decided that milling on a lathe is abuse... Milling attachments for lathes have been around since the 1890s... As a matter of fact, I hope to either build or rig one to my lathe, built in 1894.
@@trollforge I wrote "(ab)use" - so I certainly did not "decide" that it was an abuse. And my remarks wasn't meant as a negative critique - on the contrary: I appreciate creative use of machines as I clarified in my follow-up comment.
A lathe is a milling machine on it’s side…… hadn’t really thought of that but although not ideal it clearly works for a hobbyist.
You think out of the box and have some great tips for us who don't. Thanks for sharing and take care.
Thank you very much for your kind words! Take care too
Beautiful work! I love how you employ your tools working with their strengths and avoiding any weaknesses.
Seeing you do all these operations with nothing but a hobby lathe and a press drill is awesome... The first time I saw you milling on the drill press table I thought you were a madman, but you've opened my mind about what I can do in my own shop without ever needing to spend the (much needed in my tiny shop) space for a mill.
The quality of your videos is good too. I like the format, and you make the clips just long enough for us viewers to understand what the operations and setup are with minimalist explanation.
Keep at it. Your channel is inspiring and a testament that when there is a will, there is a way.
I'm absolutely new to this .how you done all of this is amazing
Your videos are incredibly inspiring, thanks!
Amazing number of hacks and workarounds.
great job ! you can drill the center of the threaded rod and loctite there a ball from a ballscrew, solving the issue with the height also
Oh that's a great idea indeed. Thank you :)
@@WeCanDoThatBetter l
@@WeCanDoThatBetter
ll
l
L)
..
....
.
Llllllllll
Some useful improvisations there, well done.
Thank you very much my friend! :)
Enjoyed the reality of this video, hacksaw and files and bullying metal out with a drill 👍
So many mini-lathe videos where they are like "let's just pop over to the 5 axis CNC to finish off this part" 😂
Thank you very much! Now I have a bandsaw, this makes cutting off material much easier. But no 5 axis cnc planned at the moment ;)
My hat is off to you sir! Great job and I will be incorporating most if not all of the tools shown to utilize the lathe for milling purpose. Oops....just saw that I have already commented.......no biggie.......just reiterating (for the algorithm).
You have great ideas and the follow through. Great job. Cheers!
Thank you very much for your comment!! I really do appreciate that:)
Wow! That was an amazing job and done with so little. Your video production is top notch and macro focus was tack sharp.
Wow, so many brilliant machining ideas in one video, food for thought.
Thank you very much!
I will putting this into my project task, along with a bunch great ideas 💡 😀 for my new Lathe, showing up at the end of this month. Have a good weekend now.
Great to hear :) And have fun with your new lathe, you won't regret it:) Nice weekend too!
Love what you manage to do with limited tooling, I'm started to believe you really can build a lathe only using a lathe. I was a little sad you broke down and brought a milling attachment 😀
Great job! I like how You improvised with limited reasources and made precise and beautifull tool. I realy enjoyed the video.
Thank you very much for your kind comment! Happy to hear :)
Respect to you sir! You have amazing skill to make that with such minimal tool set. Well done. Subscribed!
Love this. You have done a great job with this really appreciate the time spent to make such an accurate adjustment dial. Well done !!!
Subscribed! Thanks for taking the time to share your work/methods. I'll be making your adjustable stop for my lathe!
Thank you very much for your kind comment and for subscribing! Good luck for your project. It's really a useful little thing.
Good job as always. We shared this video on our homemade tools forum this week :)
Thanks for your comment and thank you for sharing my video! :)
they must have been thinking of this video when they invented the phrase giter done... .subbed.. beautiful example.
Absolutely brilliant how you were able to utilize the mini lathe to perform many different functions..........I got many ideas from watching you make the carriage stop.......will be incorporating them into my mini lathe. Thank you for the upload.
Good to see milling on the lathe
Yes, with not too rought cuts it works fine :)
Cool little project. Very nicely done!
Thank you very much! :)
Thanks, you have great ideas and excellent follow thru. You will do better on RUclips if you show the finished item first, not all the parts with the expectation people will blindly watch 18 min of all the work you put into it. Most will jump to the end and see the products then decide if watching you make it is worth the time, you have missed the opportunity. Filming is good, the work is very good you almost got it. Wish you the best and Cheers!
Great job! Now you just need a DIY power hacksaw or a DIY scroll saw. Both are on my to-do list.
Hey thank you very much! I think building a bandsaw is a bit too much with my little machines :)
@@WeCanDoThatBetter if you can find a suitable wood band saw you could adapt it to metal cutting. Needs to be fairly robust as wood saws go and a DC motor with speed control will get you the torque and low speed needed.
A diy power hacksaw is very doable though, they are kinda considered obsolete these days but they are cool and still useful to a hobbyist.
Man! What a job!! 👍
Wow, and all done on the Lathe! That’s Amazing. Very Nice Work.
Thanks for your kind comment! :)
Awesome construction! Thanks for sharing the build.
Thank you very much!
5*s....work of art 👍
Thank you for your kind comment :)
Congratulations! Very good job!
Excellent work.
Thank you very much!
great work!👍If you got a lathe, you don't need a milling machine : ) Grüße aus Berlin
Das stimmt! Danke :)
Wonderful! Really impressive! Congratulations!
Thank you very much for your kind comment!
One of channels when i give thumbs up before watch the movie.
Amazing Job
Thank you so much! I really do appreciate your support!
fun project thanks for sharing
Thanks!
I love to watch your channel
You do a good job without a milling machine or bandsaw. Add a wide chamfer to end of threads for more clearance at the cross slide.
I'm a little sad you bought a milling attachment - some of my favorite parts of your videos were the cobbled together work holding solutions to use the lathe as a makeshift mill. As a fellow small lathe owner, I really admire your ingenuity and resourcefulness. I saw the carriage stop in another one of your videos and thought "where'd he get that, that's a lot nicer than the one I have". I should've known you made it.
Crazy respect to you man! Subscribed👍🏻
Thank you very much for your comment and for subscribing to my channel! I really do appreciate that :)
Absolutely wonderful!! A joy to watch
Thank you! I really do appreciate that :)
wow , nicely done
Thank you very much! :)
Very nice work. 👍🏻👍🏻
Thank you :)
Very nice!
V1.2 update could be a spring loaded ball bearing detent for the dial. You could put the detents in the dial end and drill and tabe a hole in the aluminum body and hide it bed the screw gripper. Load a ball bearing, then a spring and seal it up with a grub screw. This way you could have the tactile feedback of the ball dropping in the detent at every 0, 5, 10, 15 and 20, etc.
Regarding te screw sitting too low you could just sharpen it slightly.
Hi and thanks for your comment! That's a nice idea to consider, yes :)
Great job !
Thank you :)
Very nice stop you made, you say it sits a little low, I see it as not yet finished. Instead of remaking what about making a small foot you can attach to the end of the all thread that would offset and match the thickness of the cross slide. Once locktite was used to fix in place it would look intentional and finished. Just tossing an idea that may prevent a do over.
Thank you very much for your comment! Yes, that is a good idea. I will try to somehow adapt it to fit in the right height. To redo everything would be too much, that's right :)
@@WeCanDoThatBetter You are very welcome, I have a new mini that I am working through some of the build issues. Was impressed when I found some of your fixes, when I saw your too low height comment for the stop my first thought was maybe some kind of version of a left triangle shape could solve the height issue. You have got me wanting to work on my lathe but I am just recovering from back surgery so I need a good 8-10 weeks before I can go into my shop. So lots of time to see what others like yourself have dealt with and done. So far I managed to take apart the chuck clean and grind some of the bad casting, the difference in how much better the jaws function now is unbelievable.
Отличное приспособление и исполнение на высоте! Ждём новых проектов (;
Thanks :)
great idea, and very useful as well! I'm going to make one as well
Da hat sich wieder mal einer selbst übertroffen. 👍👍👍👍👍
Herzlichen Dank für das tolle Kompliment! Freut mich sehr :)
Really good result, well done
Thanks ;)
So fancy iam new at this way beyond me.
Nice tooling I liked it a lot,
Enjoyed every moment of this video,
Grab Love from Agra India
Suneel Kanda....
Thank you very much! I really do appreciate that!
Nice. Good job.
Thanks!
Wow very nice & so enjoyable to watch, thank you for sharing & your truly talented , thanks
Thank you very much for your kind comment! I really do appreciate that :)
Love this video
Thanks!
gracias por tu video . eres un artista¡¡
Awesome, I need to make one of those!
You should :) Thank you and good luck
What a beautiful job man😎😎😎
Thank you very much!!:)
0:27 parkside sponsoring? 😂😂
What a genius worker with limited tools. With more tools you could be chuck norris 😎
Wish I would have such amazing skills
Sehr schöne Arbeit!
Herzlichen Dank!
Nice work 👍👍👍
Thanks my friend! :)
excellent job
Thanks :)
The face on the vernier!!!!!!!!!!! 🤣🤣🤣
Brilliant!
Thank you!
Respekt!
Muss ich mir unbedingt auch bauen.
Danke Dir! :) Ja, das Teil ist bestimmt ein guter Helfer.
I love the unconvential innovation. What thread pitch did you use?
Hi. I suggest you put some of the solution in another container because if you don't, you're going to spoil the original. min 16:08. Very nice work. Thanks for sharing.
Thanks for your advice. In my later projects I put a little bit of the bluing solution in a metal cap and used a little brush for applying it. This way I don't contaminate the solution.
Good job 👍
Thank you very much!
@@WeCanDoThatBetter
Thanks for your interest💐💐
Love it!
Thank you :)
Very cool. At 10:38, I *felt* that. ;^(
Great job. You deserve a lot more sub’s.
Thank you very much! I hope, they'll come :)
Can you please make one for me, let me know if you want. Nice job and video. Thank you for sharing.
Interessant zu sehen, daß du auch die gekordelte Mutter in eine Ausnehmung setzt. Deine Methode mit der Führung für die Schlagzahlen werd ich mir merken :-)
In der Tat, deine Ausführung hat mir sehr gut gefallen ;) Tolle Arbeit und eine gute Inspirationsquelle! Bei den Schlagzahlen habe ich erst gedacht, ich komme ohne Führung aus, aber habe schnell gemerkt, dass es verdammt schwierig ist ohne :) Zumal werde ich sie noch einmal brauchen :)
@@WeCanDoThatBetter Freut mich, daß ich dich inspirieren konnte :-)
Wo hast du den süßen roten Klemmhebel her,????? So einen muß ich nachrüsten.
Für die Teilung hab ich aus dem Durchmesser auf den Umfang gerechnet, unterteilt, auf Papier ausgedruckt, aufgeklebt, mit Körner markiert und mit kleinem Flachmeißel nachgezogen. Als Unterlage diente ein Bleiblock, eine Delle reingehämmert und fertig war die Unterlage.
Meine Prioritäten bei der Konstruktion waren: schnell zu montieren und zu demontieren (Klemmhebel), Umgehung der Feder für die Keilnut daher Flügelschraube mit Zapfen, ohne weiteres Werkzeug (Schraubenschlüssel) zu bedienen und eigentlich - wollte ich ihn aus rostfreien Stahl machen . . .
An einem Anschlag mit Revolverkopf konstuiere ich noch . . .
I'm glad I was able to inspire you :-)
Where did you get the cute red clamping lever, ????? I have to retrofit one of these.
For the division I calculated from the diameter to the circumference, divided, printed out on paper, glued on, marked with grains and traced with a small flat chisel. A lead block was used as a base, a dent was hammered in and the base was ready.
My priorities during the construction were: to assemble and disassemble quickly (clamping lever), bypassing the key for the keyway, therefore wing screw with pin, to operate without further tools (wrench) and actually - I wanted to make it out of stainless steel. . .
I am still constructing a stop with a revolver head. . .
@@BLECHHAUS Ja, der kleine Hebel ist klasse. Es ist ein Klemmhebel von KIPP, den ich bei DOLD-Mechatronik (ebay) bestellt hab. Es gibt sie in verschiedenen Größen und Ausführungen. Die Teilung zu übertragen ist auch eine clevere Idee. Und ja, ein Revolveranschlag ist bestimmt auch eine coole Sache :) Ich frag mich nur, ob es nicht sehr kompliziert ist, alle Positionen exakt einzustellen.
@@WeCanDoThatBetter Klemmhebel von KIPP, danke, das hilft mir weiter.
Also die Positionen sollten mit einer Kugel und Einrastlöchern funktionieren. Was mir am meisten zu denken gibt ist das Platzproblem links vom Anschlag zum Spindelstock hin . . .
awesome work that pal, im in the process of setting up a very small workshop and have brought myself a second hand mini lathe, what adjustable table are you using for your lathe? the one ive been lookin at is the cheapo one from temu or the like, it seems like a solid bit of kit in the vid
Grandioso è utile, anche con un piccolo tornio si ottengono grandi progetti,una curiosità che cos'è quel liquido che usi per colorare di nero??
well done
Great. I spent a lot of time yesterday and today making a much more primitive carriage stop, in the end it's not how I wanted it and will have to start again. Your video gives me the inspiration.. to do better!
Can you tell where to get the handle? It looks different from the usual black ones.
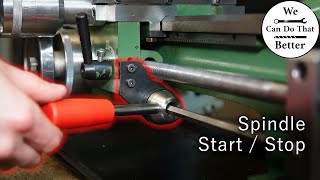
I do not understand why that does not damage the driven spindle. I am aware of bigger machines that have a pin sticking out the carriage that, when run against the stop will decouple the carriage from the spindle.
But how does this work here?
My small hobbymat MD65 came with a carriage stop as well - however i never was brave enough to let the carriage run against it as long as i do not understand what will stop the carriage from being driven.
My lathe does not have any split nut or something in the carriage, its just a plain brass nut.