Subway Tile Shower Time-lapse - Entire Project Start to Finish With Commentary

HTML-код
- Опубликовано: 27 сен 2018
- Here's how to remodel your shower/bathtub combo. This complete time-lapse will walk you through the entire process, from demolition of the old tile to installation of the new subway tile.
Here's what's included...
Remove old tile and drywall from around tub.
Remove old bathtub.
Level and flatten out the wall for tile.
Install a new bathtub.
Install new plumbing fixtures and mixing valve in shower.
Install new tub drain assembly.
Installation of kerdi-board, kerdi-band, and kerdi-fix
Building of a custom shower niches with mosaic tiles.
Waterproofing a shower before tile installation.
Spreading grout on the walls.
Planning the tile layout.
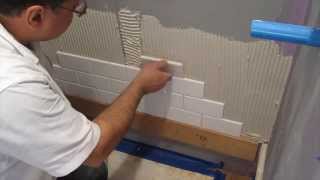
Installing the subway tile.
And finally grouting the subway tile.
This is the entire process of installing subway tile in your shower from start to finish sped up so you can see it all happen in just 30 minutes.
This is an amazing shower transformation and bathroom makeover.
More Videos On Tiling a Shower:
How to Tile a Shower - Step by Step: • The Complete Guide to ...
How to Grout Shower Tile - • How to grout subway ti...
How to Cut Tile - • 5 Ways to Cut Tile - E...  Хобби
Хобби


Hard work brother. I know the time you spent. Props to you.
Thank you so much for doing this time lapse. Way easier to watch when you are wanting a broad idea of how to do it which is exactly what we needed. Doing this in our shower in our school bus! 😂
Nice job. I see a few simple mistakes, but I'm sure this shower will last a lifetime.
Nice work! I learned recently that there is a special grout that is used with mosaic tile that does not allow it to sag after being stuck to the wall. Also a good idea to fill tub halfway full before applying silicone between wall and tub to account for the future movements.
Thanks for the tip.
Truly wish I saw this video prior to starting my bathroom Reno! This is great! I actually used cement board and redgard to waterproof it. This video is great
Thank you, it was one of the best videos I ever saw. Time laps idea is brilliant. On many occasions, a perfect DIY video is ruined by the unnecessary steps which are shown at normal speed.
good job! Great idea to have the whole project time-elapsed. Thanks!
From the lools of it. Excellent!!!
Great video! Would love to see more like these.
Thank you for these videos. Most detailed I’ve found.
Great job bro! Looks great!
Thanks for info on built in tile spacers. Good to know.
Best comprehensive shower tile install video on RUclips!
I’ve watched so many videos in the last few weeks preparing for my bathroom remodel.
What a waste of time. All I needed was this one video. AND you did everything correctly unlike a lot of others. Great video!
Awesome, thanks!
Excellent work young scholar
Great tips!! Thank you!
Nice clean results bro. 🤙🏽
You are very honest man
Great video
Wow! great video man. I've done the same, learning off youtube and I'm just about to start tiling. Never came across your video though this whole time which is a shame, but glad I finally did! Not a whole lot of videos start to finish like this, they are all split up for more views I'm assuming. Turned out great! I used this pre-made niche which yea def worth not having to do all extra water proofing.
Awesome! Thank you!
Great job! ... I see so many tile guys put the bottom tile that meets the tub right on top of it with no gap and then try to grout there. All that grout will pop out and like he says could crack a tile. You'll want to use flexible grout in the back two corners as well because those walls will move independently. ANSI standard for tile installation states that any two joining walls or any two dissimilar surfaces should have flexible (siliconized) grout.
you use a separate flexible grout just for that?
100% agree. Guess where I’m fixing a leak on my shower upstairs? There is a bench where outside corner forms from sitting area and wall area under legs. Where is other cracks? Outside corner where wall entry meets inside tiled wall.
@@wisconsinwoodsman1987 not surprised, see it a lot.
Brilliant video! Love the narration with very detailed descriptions of why you did the things you did. 👍🏻
Very informative video.
Great great great job! I am so admire your skills! I plan to remodel my bathroom, but I don’t know how to fix pipe. Hard to me.
Awesome vid
Nice video, I wish I worked half as neatly as you do. The Kerdi niche is a home run. the largest, 24" x 12" is inder $100 on Ebay or Amazon so I concur whole heartedly with your regret to make the niche custom. Important that people realize that UNMODIFIED thin set must be used when using Kerdi/ Shluter products. Thanks for a great effort.
Awesome video thank you so much
Glad you liked it!
Cool!!
Good video
The correct time to build the niche was after installing the tub and the backer board on the window wall. Then you could easier calculate where to place it so you could have whole tiles on top and bottom, and symmetrical pieces on the sides.
Type of camera is that man the quality is gorgeous
Great video, I enjoyed watching your entire process. You are a clean worker. Thanks for talking through it. Good reminder about the KERDI Band corners. How many hours to do the KERI Board and Banding?
I think it took me about a day total including setup and cleanup.
awesome
Nice video bud
Dude........I like you !! Subbed.
Now I have you and Bob Doyle (StarrTile) as my go to.........Thanks !!
Bob doyle sucks...
@@Louthemailman agreed 100%
Wow, the dedication. This is impressive. I wonder if I can do this.
Anyone Can, you'll be a lot slower, but who cares lol
Honestly this is not for every one trust me. Especially a bathroom that you need to get back up and running in a relativily short amount of time. You want to make sure that once the project is started that you can make it to completion and not have so many things in your life happening that this drags on and on and never gets finished.
Nice job...FYI, using white mortar helps to hide it in grout lines
thats not true he used the rite color thin set..gray thinset cause he is useing gray grout..
thanks
You're welcome!
Tell mr about it. Have to find so many videos and they contradict one another lol. Anyways good job brother. I think you should definitely do tile for your business
What kind of trim edging did you use for the shower niche? Good job man I learned a lot from your video
It is also made by Schluter.
Congratulations on a job well done! Normally I'm not keep on a dark grout color against like tiles but these look great, probably because how thin they are. Were these 1/16" wide lines?
Yes about that.
What did you do to fill the hole after removing that initial leveler ledger thing at the beginning?
What are your thoughts on using a porcelain grout with the subway tiles?
How long did it rake for you to finish this project?
Excellent job, just curious how long did that project take you from start to finish?
The whole bathroom took me about 2 months, but that wasn't full time. The bathtub and tile were at least half of that time.
Good video ! and how long did it take in real time to get 6 rows of subway tile ?
Any tricks/hints to cutting the the rondec for the borders around the niche?
Miter saw
Thanks for the video, I was surprised to see copper pipes being brushed and welded! Nicely done. I’ve done a handful of plumbing projects and the few times I came across copper pipe, I just cut it and used a shark bite to transfer to PVC or CPVC...I’ve never done a shower or bath though, have you ever used sharkbites? I was wondering what the report is about them in the trades community. They seem like a big time and energy saver. But maybe there is some kind of downfall I don’t know about...
$.10 vs $4.00 for one fitting. I'll stick with sweating copper.
Shark bites can be a time saver but the connection is not as trustworthy as a solder copper connection for example. Now of course the industry standard is pex which is also a big time saver as well. I think using the sharkbite where you are enclosing them behind tile is a risk that can come back to sharkbite ya.
Excellent video!!! Question: If using normal backer board, is it recommended to first install a vapor barrier behind it?
A vapor barrier isn't made to go behind tile. I would only recommend using materials designed for waterproofing showers.
@@StayHandy I believe he is talking about putting the vapor barrier behind the backer board, which I highly recommend.
If I had a minute for every time he said “time” in this video, I could remodel my shower lol.
Its really not that hard im remodeling my shower turning bathtub into stand up shower. But i did watch over 500 videos before i started.
Can you make a video explaining where to start the placement of your tile? I want to do my kitchen using white subway tiles 3x6. My L shaped kitchen measurements are 128 by 84 inches. Where do you suggest I start first? The inner corners or the end?
In my other tile shower video I go into more detail on that. Not sure if that will help but I recommend watching it.
Layout came out as should, especially you can see this in corners LOL :)
Shutoffs and access panel below your diverter? In my area this has to be d ok ne for it to be up to code.
Did these tiles have built in spacers?
Nice job. Where did you get the metal trim pieces that replaced the bull nose? Thx.
From the same place I bought the tile and other supplies. Schluter makes them.
Home depot and lowes both carry them in various styles and finished to match your metal fixtures
Ceramic wall tiles need a presoak in water if you use modified thinset.
That's the first time I've heard that. My tiles are still firmly on the wall several years later, and I live in a dry climate (Nevada).
First off, great video. Secondly, this is a bit ironic at 28:35 - "My aim is for you to watch ONE video ... but now you need to watch a dozen of my other videos" :)
Nice job, only comment is don’t screw ledger board into kerdi board without later patching with kerdi band
Kerri fix is more than enough
What state are you in ❓
Exactly what I'm doing ? Except I'm dismantlinghand rebuilding the entire room, floor, walls, bath, shower and tray, wash hand basin, toilet, electrics , ceiling, and radiator, tiles. For infor how long did it actually take you to do that job
It took me over a month, but I wasn't working on it full time.
Great job! Kerdi fix is NOT a sealant It is not waterproof it is a adhesive. Alot of people think it holds up like silicone and use it for a sealant This is not true Lots of people have tested this product and find it does not hold water??? Also watch Sal DiBlasis youtube video on "how" to make a custom niche with kerdi board. I did and made my own. Its actualy easy to do Thanks for a great video lesson
Was there any visible water damage after removing all the old unwaterproofed stuff off walls? And why not use a paintable rubber waterproofing membrane. Cheaper, faster easier maybe.
About how thick (tall) was the ledger you installed? Looks like you were leaving about 2-2.5 inches of space for that first row?
That was calculated based on where I wanted the grout lines to line up on the window and customer niche.
I am about to purchase subway tiles for my shower but my walls are not 100% flat. Some areas have a little over 1/8 gaps but nothing more. Should I need a leveling system or subway tiles will not be advisable. Thx.
What u mean to say is ur walls are not plum.. leveling sytem will not fix that
Hey man how long did this project take to complete? From start to finish
It took me 2 months, but I wasn’t working on it full time and I was filming it which slowed me down.
What is the mat you put behind what you’re soldering?
It’s a heat shield. You can pick them up anywhere that sells plumbing supplies.
Might want to look At Goboard for backer board cheaper same concept but faster
Agreed. Great stuff, 40% cheaper.
👍👍😉😉
Do you use same thin set as repairing seams with the band and attaching the tile to the wall?
Yes it is all schluter all set
@@StayHandy thank you great video by the way
Nice job...A few comments. If you used "ALL-SET", you used the wrong thinset for the kerdi band. You're supposed to use their *unmodified* thinset which is called "SET". The ALL-SET is supposed to be used for their Ditra product if you are installing the uncoupling membrane (Ditra) directly onto a plywood subfloor.
According to their manual it also looks like you might have added just a tad too much water to the thinset - it shouldn't be dripping like that but it shouldn't be sandy and dry either. It should have a creamy texture, not a watery one. And while small tiles like subway don't require backbuttering I would always backbutter to ensure proper coverage.
I like your 6 rows at a time suggestion. I also like what you said in the beginning of the video of how you learned how to do this stuff. That is exactly how I learned as well.
Also noticed you didn't use Kerdi-band on the top screws at 22:38. I know it's close to the top of the shower, but why risk it?
FYI next time you do a tub I would order something similar to this "Scratch Protection SP-01" that I bought to protect my tub. You paint it on, let it dry, and then it creates a thick film that protects the tub from dirt, grime, nails, mortar, etc.....It's not going to save you most likely if you drop a hammer or a LFT tile on its corner....but it will definitely give you some piece of mind. I got mine here www.protectiveproducts.com/products/scratch-protection.html and it was $67 shipped. Totally worth it in my opinion (not affiliated with them at all just trying to spread the knowledge).
Anyways, nice video bud!
All-set is fine and approved for Kerdi band for anyone else reading.
In reality some dripping occurs if mixed as per the directions on vertical surfaces. The fluid consistency of the thinset bonds the fleece of the kerdi band better so no harm. aplus it gets another layer of thinset over it when tiled so all good.
I don't see any problem not waterproofing the top screws. Unless he regularly sprays water in the ceiling. At which point he will have bigger problems.
Did you use any spacers for this? Seems they are just naturally butted against each other.
Spacers are built in to the tile.
Is there a special grout you use on the tiles?
No, just a non-sanded grout
Do you need spacers for subway tile?
If the tiles you buy do NOT have spacing tabs then you would need them. SOME tiles come with them, some do not.
A steel tub contracts and expands???????
All materials contract and expand with heat, some more than others of course.
Hi. Did you see any build up because of layers of schluter?
Yes, where multiple layers of the kerdi band overlapped there was a bit, but it is still manageable with a bit of extra thin set when laying tile.
Thank you for your reply. I imagine the larger the tile the easier it would be to fight the build up. What smallest size of tile do you recommend on the wall? Thanks
@@bennisim7949 It is actually reversed. The larger the tile, the more lippage you will deal with.
what kind of grout did you use?
Schluter all-set
Sorry, polyblend non-sanded grout. Delorean gray.
@@StayHandy do you still have to seal that grout?
Ok
why did you start the tile on the back wall instead of the sides?
It was the easiest and allowed me to line the sides up with the back wall.
It doesn't matter where you start as long as it follows your layout. It's usually based on preference.
Tonight I found out the hard way that Lowe’s subway tiles don’t have that built in spacer any longer. They are selling a different brand, not American Olean, that are much squarer and sit flat against each other, with zero natural space in between. Now I’ve got to stop my tile job and pick it up tomorrow after I get some tile spacers. Bummer.
That's what happens when you buy cheap crap from big box stores. Do yourself a favor and buy quality tile from a quality independent tile store. Cheaper usually doesn't yield better.
Whoops! Forgot the P-Trap for the tub drain!
All good until you put the top outside corners. Your sides go in before your top peace’s to waterproof properly
You are good and take time to learn how to do it.....you have talent for camera as well, ......also you mention the word schluter too many times......it sound like a infomercial to me....99% .... I hope they paid you well.......great job btw....anyway
Hi. Great video. You mentioned few times how important and time consuming to waterproof the backer boards and the notch and few minutes (weeks) later make holes on it with at least 6 screws:( Bad move.
Backer is supposed to go on top of the flange not over it.
No it's not. Two reasons.....It's supposed to overlap it so there is no seam. Any water that seeped behind a tile would wick over it, instead of into the seam where the backer would meet the flange. Many tile guys cut a small relief or rabbit joint into the edge of the backer so it overlaps and lies plumb. It's easy to do with Kerdi. You still leave an 1/8" or so gap between the tub and backer board. Second....that would leave at least a 3/4" gap where tile would have no mortar.
Why remove them just cut it out
Im not sure what you mean
All of that money on that system and you nail into. Lmao smh
How would you attach your ledger boards? I'd like to see the result without them. The system has screw holes all over it, but they get sealed. The ledger holes should be sealed before the last row of tile is installed. Even if not I highly doubt a problem will result. The number of horrible installs I've ripped out, some installed with mastic on sheet rock that miraculously didn't have water damage, don't compare with the quality of his install. Everybody is a RUclips critic because they watched some tile coaching videos....
Another armchair quarterback. I rip out dozens of bathrooms built in the 70's with tiles over plain sheetrock and the ones that don't have windows are bone dry. Shower walls around a tub typically get sprayed but not soaked. Today's standards use water proof or water resistant backer board and is the right way to do it, but around a tub it's so much more than you really need. You think a thin nail hole that has sealant over it that will not be exposed to standing water will cause an issue? Perfect example of someone who has some knowledge but not enough....