How to Layout Iron Baluster Spacing on Staircase - Wood Tread & Handrail Spindle Layout

HTML-код
- Опубликовано: 30 июн 2024
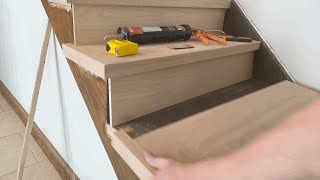
- In this video we go over how to layout baluster location and spacing on an open tread staircase. We talk about proper baluster location, proper baluster spacing, and transferring the location from the hardwood stair treads to the handrail.
Bullet Tilting Hollow Chisel Mortiser - www.cwimachinery.com/product/b... (MUST BE A TILT MORTISER)
Dewalt Compact Stand (for mortiser) - geni.us/kZPcl (Amazon)
Stabila Digital Level - geni.us/6krL (Amazon)
Digital Angle Gauge - geni.us/ChvGf (Amazon)
Baluster Layout Compass - geni.us/IEsK (Amazon)
Starret Combination Square - geni.us/uzOBYPU (Amazon)
PLS 180 Laser - geni.us/RBFB3XA (Amazon)
1/2" Hollow Chisel Bit - geni.us/WsPUSU (Amazon)
Rubber Mallet - geni.us/m3MEf9 (Amazon)
DEWALT DW872 14-Inch Multi-Cutter Saw - geni.us/sNAy (Amazon)
Dewalt Cordless Grinder - geni.us/SgiBz (Amazon)
Festool Sander - geni.us/6Vde (Amazon)
#14 x 2" Construction Lag Screw (For Handrail/Newel Fastener) - geni.us/050x (Amazon)
(0:00) Marking the tread and layout.
(2:13) Figuring the Spacing
(2:37) Making a Spacing Jig for the Treads
(5:18) Transferring Tread Baluster Location to the Handrail
(6:00) Avoiding Costly Mistakes
(8:49) How to Double Check to Ensure Correct Layout
My Favorite Tools - Insider Carpentry Amazon Site - www.amazon.com/shop/insider_c...
Support more content like this by becoming a PATREON SUPPORTER - / insider_carpentry
INSTAGRAM - insider_carpentry  Хобби
Хобби


![Roddy Ricch - 911 [Official Music Video]](http://i.ytimg.com/vi/5N3lAfydeWs/mqdefault.jpg)


Bullet Tilting Hollow Chisel Mortiser - www.cwimachinery.com/product/b... (MUST BE A TILT MORTISER)
Dewalt Compact Stand (for mortiser) - amzn.to/32R4W2m
Stabila Digital Level - amzn.to/2PRwVXV
Digital Angle Gauge - amzn.to/2Y0iaX7
Baluster Layout Compass - amzn.to/2OUr3Nf
Starret Combination Square - amzn.to/3f3ph75
PLS 180 Laser - amzn.to/30OMCnN
1/2" Hollow Chisel Bit - amzn.to/2OZDgjH
Rubber Mallet - amzn.to/3hDCq8m
DEWALT DW872 14-Inch Multi-Cutter Saw - amzn.to/2Em3mvb
Dewalt Cordless Grinder - amzn.to/2EiwXWd
Festool Sander - amzn.to/39sEoG1
#14 x 2" Construction Lag Screw (For Handrail/Newel Fastener) - amzn.to/2DdIben
How would you measure out for false tread end caps
20 years experience here in Stairs, spindles, and railings. Was taught by an old English carpenter and always love to learn more. You my friend are a master. Love these videos.
Every good joiner as something to teach you , no matter how many years experience you have under your belt
Wow, at this point 277K views and less than 4000 likes? Come on guys, it’s the minimum amount of a thank you for this guy. He’s a great teacher and I’m sure almost everyone watching picked up at least one useful tip.
Thank you Spencer for putting these videos together!
It's obvious this man makes a good living doing what he does. This level of craftsmanship and pride in work is damn rare in building trades and most anything for that matter these days. A true professional.
As a contractor and finish carpenter of a handful of years.
The placement of the newel on the layout of the baulesters is a slick move. Bravo
I'm impressed with your level of knowledge young man.
Really interesting video, again! The only thing I do a little different, is when I’m marking the center of the balusters from the end of the tread, I go from top to bottom with a straight edge. I’ve found that the lengths of the treads can vary a little throwing off perfect alignment on the bottom of the balusters. Keep making these videos. You’re a great teacher!
Found this video looking for instructions for replacing a section of wooden rail/banister and newels my dog chewed up as a puppy. I love the attention to detail and the simple double-checks like propping the rail to prevent sag from throwing the measurements off. It's that kind of extra, simple care a DIY guy like me needs to prevent mistakes. Thanks!
Love your work and attention to detail, it's obvious you really car about what you do and it shows.
Love everything you do...keep up the great work!
Framing square with painter's tape is the way I go. Layout three treads, ,check it, double check it, and roll. Worked for me so far.
I watched one of the videos on this channel on how to trim windows and doors. Loved that video. Balusters always sucked for me. Really appreciate this video. Dude is sharp.
Great explanations into explaining why to do things the way that we do . Some of the things I do that different is I usually stretch spindles to 4" center to center roughly on landings and stairs . To do that easy I measure with 2 foot level from 1st nosing to 3 nosing then divide by 5 so the treads go 2 3 2 3 . This allows it to match landing spacing easier . Less spindles is money saved and less effort . Only down side is you have to measure the spindle 1 by 1 . Also i always tape the underside of the rail for marking as well as it also helps resist chip out when drilling . Subscribed
Man this video is amazing and so helpful. I think you just saved me from completely buggering up my new stairs. Thanks!
Dude I have to thank you,, so I have a small business, it's supposed to be home repair but people keep asking me to do all kinds of stuff, building, designing, etc., so today I got called to come look at a job,, it's interior railings, just like what you're doing, I was totally not going to do the job but now I absolutely am going to try,,, first I am watching this video 3 times ,thanks again
This guy is so good at what he does, he is just next level
Yup i agree 👍
Great job. My biggest screw up was installing the balusters that died into the ceiling last. Historical house so ceiling was out of level in different directions on both sides so my cuts were short. Neither side swapped out worked. I ended up using a 1x4 with some matching cove molding used under the treads as a cap in between the ceiling and balusters. The home owner loved it and it really finished the stairs.
I'm glad you keep the newel post to baluster spacing the same as the spacing between the balusters; there's very little that irritates me more than seeing that first baluster either too close or too far away from the newel post. Great video 👍
I am completely a novice and hadn’t thought of the newel post and first baluster spacing. I mean, I did think of it in the manner as, it was too close to the baluster. I was just about to leave a gap because the newel post is covering up the step a bit too much. Now, I have to rethink this a bit. Dang. Thank You though! I can do this.
done a lot of stairs and use a laser constantly but I've never thought to use it for this. Often the simplest solutions are the best. No different here. Fantastic tip.BTW I recently switch from Dewalt nailers to RYobi.... I know what you're thinking but seriously their consistence of depth of drive and how little marring they leaving is unbelievable. I ended up switching all my finish nailers to ryobi.
That's an awesome trick with the laser. You learn something new everyday
Just save me a bunch of headache,, doing my first set of interior stairs rn and everything I was reading online didn't quite get it as exact as this. Big thanks and props brother
Man you are an inspiration!! Keep up the good work!!
I think you would like "Essential Craftsman" on RUclips. Your mannerisms kind of remind me of Scott (The Carpenter) and your attention to detail as well. He has the best "instructor voice" ever. You can tell he really cares about what he's talking about, just like I can tell that you do as well. Great video. I'll be doing a short run of stairs in my near future. Thanks for the tutorial!
I"m a big fan of the Essential Craftsman. I agree, he has the best, most soothing teaching voice out there. LOL I'm a subscriber and watch a lot of his videos. I still enjoy learning about the broader trades and I am able to pick up things I don't know from his videos. Great channel.
I will be making new treads and you have just showed me an awesome tool with your laser device on a better alignment of the hole for the baluster and the rail..
Excelent video
Very well done! Attention to the to details is everything
Nice video bro. I do the same type of carpentry you do up in Northern Ontario. I use many of the same techniques you do and I always appreciate great craftsmanship.
The best stair builders I know are Canadians. Great craftsman up there. A lot of what I am sharing in these videos on square mortising is stuff I picked up from watching Canadian guys on IG, no one does square mortising around here.
Thank you for this video I learned some tips. I would just mention the laser works really well if the thread is level.
im in the middle of a stairs installation wish i could have youyr next video. great job man.
Even with the sag problem, this video is excellent. The sag 'problem' turned out to be good. It gave us novices a 'teaching moment' and something to check when making our efforts. The difficulties in practice and in video presentation are enormous. Very nice work and very clear examples. I imagine this applies to all stairs inside and outside. Thanks for sharing.
Glad it was helpful!
Yep --- because unlike in most videos, everything isn't always "level and plumb" when you check.
Very generous, you are making us smarter.
I've been following you for the last 2 years now.. I'm guessing you're probably in your 30"s and for a young age you have a lot of knowledge and wisdom and I appreciate you taking the time to make these videos to teach the younger generation some of us old Carpenters as well... I know that making these videos is costing you money because it's taking away your production and production is time and time is money... I have a few questions if you don't mind... How are you mounting your newel post to your treads.. Thank you!
Man you are amazing I wish my work was half as good please keep the videos coming
Amazing work and instruction for beginners like me. Thanks
Great, clear videos. don't work with metal balusters but many things, tips and tricks still apply. Not aware of the Bullett benchtop mortiser. Wish I didn't pull trigger on Powermatic floor machine. But at 71 yrs of age probably couldn't manhandle the Bullett on site anyways. Just subscribed.
Really enjoy your videos! Very talented.
Great tips I appreciate you teaching your trade. Thanks very much
Dayummm that looked amazing!!!! 👏
That PLS 180 it's one of the best lasers I've ever owned. Very acure. I found out it works great when I set circular stairs. No need to do the whole lay out when installing the curved stringers. In line.
absolutely right - anybody can slam something together - real carpenters knows the measure of it -- excellent vid
Excellent video and great advice.
Great work Lewis 👍👍👏👏🇮🇪
Spencer. Lewis is his last name.
Very good presentation. Thank you.
I have seen carpenters lay rail up side down on stair then drill down
Great video.
Great advice 👍 and great video 👏
I love you’re channel!
Nice! Thanks for sharing!💜
Great work my friend .
Bro you helped me a lot and and your tips great, thank you very much
Great job making this video thanks !!!
Very thorough. Thank you
Nice job as usual.
My biggest stair screw up was in fact my very first stair job . I spent all day, a long day, on a straight rake run to the second floor. It was hot out so the front door was open. After admiring my work and patting myself on the back for what seemed like a job well done, I went to close the door and ......., it wouldn't close. I forgot to consider the door swing when mounting the newel and the door was hitting it. A long day became longer, as I had to remove the newel just to close the door. Needless to say, one day turned into two since I had to return to solve the issue.
Uhg. Those days are so discouraging.
@@InsiderCarpentry hello. Thank you for all the great videos! They are very helpful. I have a question. I am laying out my balusters and my run is 10” so I know my center point and spacing for each, but when I am calculating the balcony area and center points and spacing is a little larger than the treads. Is that ok to have them like that on the same staircase.
Just wondering why you didn’t have remove the hinge pins and call it?
Great video! Thanks!
Your a Pro ....coming from a custom home builder 30+ yrs still
Rail-guy since '94.... I clamp my longest level to the top of the rail to keep it straight (it keeps the marking area open for quicker work).
Thank you for posting this, I'm most curious to see how you did this.
Amazing video
This came at the perfect time
Bro. You have helped me so much. Thank you. You f’in rock!!
Ok, thx for video...but was so hoping to see the square mortiser in action in this vid etc... So, SUPER EXCITED for the next vid now, lol. But that’s okay, can be patient & wait....as gives me something to look forward to now.
Enjoying this “stair/railing/baluster” series & seeing the steps your performing along with those very handy tools.
Cheers✌🏼
You bet. I had planned to have this video and the next video all combined in one video but it was too long. So I broke it up.
Great job
Your video is very well done. I just Subscribed.
I do a lot of carpentry work but will probably never put in a railing like that. I do like to watch how things like this are done and possibly apply some of the things in what I do.
Glad to have you aboard. 👍👊
@@InsiderCarpentry Thank you.
Your a master carpenter my friend
Genius !!!! Thank you !!!!
Great video
Good job I going to learn from the perfect carpentry.
Have you ever laid the rail on top of the treads, between the post and just made all your marks with a speed square? That’s what I do when I can. Nice work.
Excellent video, lots of knowledge. Thank you. Do you have a video going over drilling the mortised holes on the railing?
Yes, I posted a few videos around the same time-frame as this video. Check that out.
Very nice! Gotta get me one of those lazers
You mean "Slow is smooth, smooth is fast." Lol. Great work, sir!
Hi Spencer. For the miter returns, I see where sometimes the tail end is return mitered to the skirtboard rather than be left at a 90. I'm doing my stairs and wondering if you ever do it that way? Really enjoy your videos.
This man is doing God's work
Would like a video on how to determine post and handrail heights
thanks, Spencer
Awesome work! I enjoy the tips and tricks to great carpentry. Any chance on showing the staircase build? I have seen the builds with false end caps, and hardwood stair treads and risers. It would be great to see how you built this stair case with hardwood open end caps.
I didn't take any video of the tread/riser/skirt install on this one, but I'm sure we'll cover it eventually in future videos.
@@InsiderCarpentry I'd be interested as well. I'm stuck doing a U-shaped stair using over the top railings and round newels and balusters because the sub doing that 1) was out of his league and would only do it the way he had for other simpler stairs 2) quit the job when asked to do it better. I am subscribed because I appreciate your attention to detail as well as your straight up knowledge. Thanks.
Excellent
Would love to see video of tread/riser install on this job.
awesome ....thank you.
My biggest stair screw up was the first time doing radius stairs and I kept re- drawing them out on the floor because the front door kept hitting the bottom tread. I finally got it to clear. Well, when I built them I built them on the wrong Mark's and the door hit the bottom tread anyway! Had to tare them down and build them again!
slow makes smooth, smooth makes fast...dude...do you race your car or bike on the track?! I tell all my friends this. Love the woodwork!!
Thanks for sharing!
Great experience,
Best tip -- leveling the handrail before marking! That one would be very easy to skip.
I am about to build a set of stairs with the same cast iron balusters. What size are your balusters here and the height of your handrail. The balusters I have are 44 inches, so I will have to cut them down. Great tip on where to set the knoll
post in regards to the spacing of the balusters.
Thanks for all you do,
Hi Lewis. Do you you the video for installing the mitered riser+skirtboard in this video? I'm really interested in learning how you did this masterpiece
My biggest stair screw up was that one time I had to build a set of steps for a double wide trailer set on a foundation. The opening was already cut and I laid out and cut a stringer. Well needless to say there wasn't enough headroom, so I had to adjust all the treads and risers to get 6'8". That is my stair screw up debaucle.
I also snap a chalk line top to bottom for my baluster line. Plumb down from the bullnose to the tread below all the way down the stair and connect all those lines. It makes all your balusters in a dead straight line. Instead of going off the tread return with a combo square. Treads might be slightly out of square and not perfectly straight to each other. Takes longer my way, that's the only downside.
Love your videos. Thanks for sharing and teaching. How much would you charge for Labor on a job like this or how would you go about charging?
I used my new laser to layout the ballasters on my last set of stairs .... i think it saved me at least an hour of labor
Hey,
Love the videos.
Quick question, my stair tread aren’t the same length, 10” to 10.25”
What is important to do here?
Keep the baluster spacing the same on the step, even between all the balusters, or line the balusters up with the riser.
You didn’t really explain or touch on this in your stair baluster video.
Thank you so much
Agree
Do you have a video of how you tied the risers to to exterior skirt board? Actually my exterior wall is half exposed, half closed. If you have some advice on how to tie that together
My biggest screw up was my first staircase i ever did oak treads and risers with an exposed stringer and i thought the simplest thing to do would be veneer the 2x12. 2 days after i applied the veneer the stringer cupped by every cut and bubbled the hell out of it. At this point of course the treads were applied with returns. Fair enough to say i was up shits creek.
Ganda maam
would have been good to see how you attached the newl posts and how you drilled all the holes on the railing.
Loved my pls 180, took it in to get it serviced and they took it away, but they gave me a new pls laser instead.
Great video! Thanks a bunch, you helped me set the balusters on my first handrail. Unfortunately the runs weren’t consistent 🫠
Do you still try to line up the balusters with the riser if the stairs are carpeted on a rake wall type application? Since the rake wall will have a cap board that sits above all the risers and treads, does it matter in that situation?
I double check the spacing on my handrails like that as well. Easy way to spot a mistake. I dont use a tape though. I use a divider(compass) Also for balcony layout a divider makes it so much quicker and theres not a more accurate way imo. Spacing will be perfect every time. I mark my center line with a pencil but a sharp divider with a little pressure applied will make divots for your drill to start in. I still go over the divots with a small pencil mark just to make them easier to see.
I often use a divider on the flats as well.
Thank you for the great channel and content. Is the intermediate newell post sized to maintain the same 2 13/16" spacing between the bluster above and below?
No, name size newel. The spacing around that newel is a little different. I basically just tried to pick what was going to work best with baluster spacing and handrail drops.
@@InsiderCarpentry you should do a video on how to do this if you don't have a laser. I place the handrail on the nose of the treads I don't have to worry about sagging then use a square to mark the rail. I also get the length of the rail this way I didn't see how got your length in this video. I noticed you didn't tell the center to center distance I know you add the size of your blaster to the spacing. This is the first time watching you if you have done before ignore everything I said
The main reason I don’t do it the way you mention is because I’m typically installing box newels that come with a 3/4” wrap at the bottom. So it doesn’t work to place the handrail in position between the newels due to the lower wrap protruding.
The measurement on the underside of the rail should be consistently longer when measuring on the angle. Not much longer but longer. Great video.