Hey bro just wanted to give you a huge thanks. I bought a non runner bike and your videos on the CV-40 got my 2001 dyna dialed in. The first successful ride I literally shed a tear of joy haha.
This is a true tutorial video. I really appreciate the time you took to make this video. Straight to the point with none of that 10 minute lecture or other BS. Thank you so much Aron!
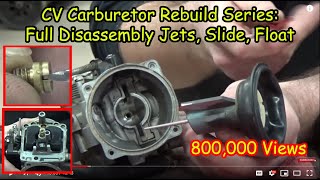
This is the detail I needed. While disassembling my CV40, a part fell off unnoticed and after I had found it, I had no idea where it was supposed to go, even after looking at the diagram of thr CV carb. Glad i watched the whole video too, there are.some.excellent pointers that helped me reassemble the carb.
@@aronsgarage834 I just found your videos yesterday and I setup my carb the same as you did about two months ago, 190 and 45. I'm using the stock needle with 3 brass shims which total 67 thou. The bike runs perfect no popping on decel and pulls very well with good gas milage. However my plugs are more white than tan. I tried setting my air fuel but couldn't find a sweet spot so I left it at 2 and 3/4 turns out. I need a new slide in my carb I'm not sure if this can cause a problem for the air fuel, I dont believe so. Looking forward to you next video on air fuel mixture maybe I'm missing something.
@@Eli-yh1iz assuming you also got high flow air cleaner and open exhaust, your mixture screw will have a sweet spot around 3. Mine is currently 3 and 1/8. I had it at 2 and 3/4 a few years ago and it was a bit lean. Anyway I’ll make the fine tuning video soon.
Awesome video! I ran across a rebuild project and had to buy an Amazon carb while I waited on rebuild parts. Of course, it spits slightly sometimes when you accelerate, but it’s also around 2 1/2 turns, 45/190. The factory cv 40 is the same set up. Do you think if I adjust the factory to 3 - 3 1/2 it would stop the spitting?
Thanks Jamey! Yes, you can easily go all the way up to 3 1/2. I’m currently at 3 1/4 and runs beautifully, but might go up to 3 1/2 to have better idle cold. Let me know how it turns out..
I finally got my rebuild parts in from CV Performance for my stock carb. I installed at 3.5 turns. It coughed and actually popped loudly in the carb as well as backfiring out of the pipes, worse than it did. I read where the loud pops maybe caused by excess fuel not being burned and actually igniting in the carb, so I backed off .25 turn and she his purring. I’ve test road it twice for about thirty mins, downshifting, revving slightly, and it doesn’t cough, sneeze, spit, or give me the middle finger. Thanks for your videos and thanks for your help in sorting this out! Greatly appreciated.
Aron what's the process you use to clean the outside of you carb bodies.? They look great! Ive been using a ultrasonic clean. The carb come out nicely clean but I'm thinking perhap I will need to possibly need to polish the outside to eliminate the inconsistency in color. Any suggestion?
I’ve noticed if I leave it in the ultrasonic cleaner for too long, it gets a bit discolored. I don’t do it for more than 20min now. Other than that before putting it in the cleaner, I go over it with a carb spray. It cleans it pretty well. Very strong stuff. I seem to remember I used a dremel tool with brass brush to polish up one of the carbs.
Have you worked out any combination of jetting for Sportster's? I'm about to start on a 83 XLX Sportster. It's a ironhead stock motor with low miles really nice shape. Found the bike a little while ago. Really nice shape.
I’m sure it looks real nice. I love the look of Sportsters. Never tuned one so only assuming similar setup would work (leaving the stock jets in and replace needle with the 88 Sportster one) Let me know how get on
Yes you can. Once I had my needle stuck open gas pouring out on the road. Popped the float bowl off, wiggled things to get the debris out, and back on the road within 5 min. Luckily only happened once over the years.
I am having a slight hesitation when cruising about 20mph to 30mph. acceleration is good, and all speeds when opening the throttle are good. Any pointers?
Sure :) They are 4mm bolts.3x8mm long for the accelerator pump housing, 4x 14mm for the float bowl, 4x16mm for the top cover. Well, I’d say 3x16mm and 1x20mm where you attach the throttle bracket. Plus you need one 5mm bolt which is 10mm long for securing the bracket on the side. Hope it helps
The bike I bought had been stored for 7 years took me 3 days to get it to fire finally was able to hear what was going on with it. Everything was upgraded but the carb.


Hey bro just wanted to give you a huge thanks.
I bought a non runner bike and your videos on the CV-40 got my 2001 dyna dialed in. The first successful ride I literally shed a tear of joy haha.
That’s awesome!! I’m happy for you. I remember when I got my 99 dyna 5 years ago and got it running properly. Such a joy.
This is a true tutorial video. I really appreciate the time you took to make this video. Straight to the point with none of that 10 minute lecture or other BS. Thank you so much Aron!
Thanks Kevin, really appreciate the feedback!
This is the detail I needed. While disassembling my CV40, a part fell off unnoticed and after I had found it, I had no idea where it was supposed to go, even after looking at the diagram of thr CV carb. Glad i watched the whole video too, there are.some.excellent pointers that helped me reassemble the carb.
I’m glad it helped, and thanks for the positive feedback.
Nice video, thanks.
I think the peening of the float pin is unnecessary, those two ears inside the float bowl will prevent the pin from falling out.
Great video bro! Thank you.
Most welcome!
The carb bowl has two aluminum raised walls next to the float bowl pin so it can’t come out once installed. 😊
Very true! Thanks for that 😀
@@aronsgarage834
No harm in the way you’re securing it. : )
Good videos.When will you be doing a video that shows you setting the air fuel mixture screw on a bike?
Thanks Eli. Next on my list now. Just waiting for a dry day here in the UK. Should be coming soon!
@@aronsgarage834
I just found your videos yesterday and I setup my
carb the same as you did about two months ago, 190 and 45. I'm using the stock needle with 3 brass shims which total 67 thou. The bike runs perfect no popping on decel and pulls very well with good gas milage. However my plugs are more white than tan. I tried setting my air fuel but couldn't find a sweet spot so I left it at 2 and 3/4 turns out. I need a new slide in my carb I'm not sure if this can cause a problem for the air fuel, I dont believe so. Looking forward to you next video on air fuel mixture maybe I'm missing something.
@@Eli-yh1iz assuming you also got high flow air cleaner and open exhaust, your mixture screw will have a sweet spot around 3. Mine is currently 3 and 1/8. I had it at 2 and 3/4 a few years ago and it was a bit lean. Anyway I’ll make the fine tuning video soon.
@@aronsgarage834 yep big sucker air filter and open exhaust is correct. I'll be watching for the tuning video. Thanks
Awesome video! I ran across a rebuild project and had to buy an Amazon carb while I waited on rebuild parts. Of course, it spits slightly sometimes when you accelerate, but it’s also around 2 1/2 turns, 45/190. The factory cv 40 is the same set up. Do you think if I adjust the factory to 3 - 3 1/2 it would stop the spitting?
Thanks Jamey! Yes, you can easily go all the way up to 3 1/2. I’m currently at 3 1/4 and runs beautifully, but might go up to 3 1/2 to have better idle cold. Let me know how it turns out..
I finally got my rebuild parts in from CV Performance for my stock carb. I installed at 3.5 turns. It coughed and actually popped loudly in the carb as well as backfiring out of the pipes, worse than it did. I read where the loud pops maybe caused by excess fuel not being burned and actually igniting in the carb, so I backed off .25 turn and she his purring. I’ve test road it twice for about thirty mins, downshifting, revving slightly, and it doesn’t cough, sneeze, spit, or give me the middle finger. Thanks for your videos and thanks for your help in sorting this out! Greatly appreciated.
Great to hear that you got it sorted out!
Aron what's the process you use to clean the outside of you carb bodies.? They look great! Ive been using a ultrasonic clean. The carb come out nicely clean but I'm thinking perhap I will need to possibly need to polish the outside to eliminate the inconsistency in color. Any suggestion?
I’ve noticed if I leave it in the ultrasonic cleaner for too long, it gets a bit discolored. I don’t do it for more than 20min now. Other than that before putting it in the cleaner, I go over it with a carb spray. It cleans it pretty well. Very strong stuff. I seem to remember I used a dremel tool with brass brush to polish up one of the carbs.
Have you worked out any combination of jetting for Sportster's? I'm about to start on a 83 XLX Sportster. It's a ironhead stock motor with low miles really nice shape. Found the bike a little while ago. Really nice shape.
I’m sure it looks real nice. I love the look of Sportsters. Never tuned one so only assuming similar setup would work (leaving the stock jets in and replace needle with the 88 Sportster one) Let me know how get on
So I can take the float bowl cover off and clean the needle without disassembling the carburetor
Yes you can. Once I had my needle stuck open gas pouring out on the road. Popped the float bowl off, wiggled things to get the debris out, and back on the road within 5 min. Luckily only happened once over the years.
Is this the same carb that would be on a 2006 sportster 1200 low? Excellent video as well. Carb work scares me lol
Thank you l. Yeah, it’s the same carb, just jetted differently by factory. Not that complicated, just take your time doing it :)
Awesome video, why didn't you take the float bowl apart and clean that jet?
Thanks! The accelerator jet? I do clean that with compressed air but I never take it out.
I am having a slight hesitation when cruising about 20mph to 30mph. acceleration is good, and all speeds when opening the throttle are good. Any pointers?
Are you running stock jets?
180 main and 45 lean jets. Had unknown jets in before cleaning and ran rich. Changed to stock. I am also at 6000 ft elevation@@aronsgarage834
I really would like those screw bolt sizes .. 😕
Sure :) They are 4mm bolts.3x8mm long for the accelerator pump housing, 4x 14mm for the float bowl, 4x16mm for the top cover. Well, I’d say 3x16mm and 1x20mm where you attach the throttle bracket. Plus you need one 5mm bolt which is 10mm long for securing the bracket on the side. Hope it helps
What thread for the bolts
4mm metric
@@aronsgarage834 thanks bro I rewatched this and finally got it. Been working on rebuilding my carb and this helped me out so much.
I’m pleased it was helpful.
The bike I bought had been stored for 7 years took me 3 days to get it to fire finally was able to hear what was going on with it. Everything was upgraded but the carb.
These carbs are really well built and work awesome if they are set up properly.