Animated Blood Cells in a Vein - Blender Geometry Nodes 3.1 for Scientists Tutorial
HTML-код
- Опубликовано: 19 июл 2024
- DownloadLink to this model:
blendersteve.gumroad.com/l/fv...
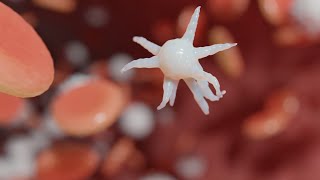
In this Geometry Nodes 3.1 tutorial, I'll show you how to represent animated blood cells or platelets flowing through a vein. You can control the speed of the red platelets with Geometry Nodes, as well as their number and rotation speed. The vein itself can be changed in shape and length by editing a path. The materials of the platelets and the vein are 100% procedural. This tutorial is part of the "Blender for Scientists" series.
00:00 Intro Geometry Nodes Animated Blood Cells
00:30 Modelling the Blood Cell
04:08 Blood Cell Material
06:00 Creating the Vein Path
07:16 Distribute the Blood Cells along the Vein Path
24:15 Creating the Vein
27:18 Vein Material  Кино
Кино


Love this! Please more medical stuff like this. Can't find too many medical stuff with blender. Thanks
thanks! can't find many good medical tutorials eather, hope I can create some more in the future
For those having problem in replicating the random distribution of rbc, you may set up translate instances node after instances on points and control it with a random value set to vector.
Insane, Thx for this tutorial, you are the best. :)
Good stuff! Thanks for sharing. The #frame method is slightly buggy sometimes, so there's a dedicated Scene Time node now that outputs frames/seconds.
ah! good to know! thank you for that!
Love this tutorial! Very helpful and easy to follow!
Thanks a lot for sharing. Exactly what I was looking for, not with bloodcells but the principle
Beautiful work, thanks Brother!!
Excellent video as always, thanks!
thanks!
Love this. I learned a lot... I did your example and works nice, but now would like to make a loop...I'm getting struggled with the loop in the roation...Tried lots of things but can't loop the rotation...I'll keep trying. Thanks for the tutorial.
Great stuff, much appreciated!
thank you!
This series could help so much thanks
welcome!
this channel is amazing i love it❤️
You got that right, brother (or sister, as may be)!
Thank you so much for this tutorial =D
welcome :-D
This channel is really good. Top quality
thx!
Amazing
Wow!! it´s a great tutorial and so well explained
Thanks!!!
thank you!
so helpful thank you buddy
Beast!
I have found something interesting messing about by myself. Try this to control the passage of the light down the curve and its brightness.
Duplicate both the 'Rbc moving along the path' and 'Distribute rbc' node blocks. In the former connect the Sample curve directly to the Set position node and don't connecting up any animation nodes,
In the latter include the Light object info rather than the Collection info. Connect the blocks to 'Object info on the left and the 'Join Geometry' on the right, (as for the original block pair). The factor on the sample curve now controls where on the curve the light sits. The count on the 'Curve to Points' node now controls brightness as this now just adds more lights in a single position.
Man! I've been thinking about doing this for school! but I've been holding back on learning geo nodes. Thanks for the huge inspiration boost!
@Symb0l1c Very true. I was just happy to see a geometry nodes tutorial that was so relevant for me :)
Hope your school project works out!
Excellent
Thanks for this! Great tutorial. Is there a way to vary the speed of the blood cells? As if they're being pumped through the vessel?
Another amazing geometry nodes tutorial. I had to create a scene like this probably 10 years ago, but manually animating each cell. It took hours, and now can be done in 30 minutes or less!
i think even back then u could've used particle system (ofc its hard to control and requires baking but wasn't it at least better than just manually doing each particle?)
16:38 Btw u could just simply add a "Translate Instances" + "Random Value" after your "Distribute Blood Cells" frame and that'd do the job much easier imo, nice tutorial anyway, keep it up!
beautiful men tks!
great tutorial, in version 3.1.2 how do you add those control parameters within the modifier area? I read that I had to find the group tab in N area but I dont see any group tab there, how do you do it? thank you :)
Hi, great tutorial! I have one question: how can I add new elements to the blood (e.g, nanorobots), but with varying quantities (there should be fewer nanorobots than red blood cells). Adding the new element to the Mikro objects collection adds them in equal amounts...
there Is a little hack to set up the camera. you can activate FPS (yes the game one) Mode for the camera or the viewport by clicking shift + ~ (the key just above tab) then left click to set the camera's new location
Cool, I will try that
Blenderium, i'm missing "~" on my kbs. How can i do that? Thanx
Nice!!! Can you add collisions to the bloodcells so they collide with other bloodcells? And also collision of the bloodcells with other particle cells in the vein? I want to have 2 streams completely colliding with each others. I can do it with the molecular+ addon but want to create it with geometry nodes. Please advice! Compliments for the medical animations!!!!
I like the outcome, but as I'm greedy I'd like to be able to avoid any overlapping rbc. Any ideas on how to do this?
hello this is great tutorial, but I was just having some texturing issues. when I use the "set material" node on the vein it doesn't show up. I've applied the same material so simple planes, and uv spheres and the material shows up just fine. I was just wondering if anyone has come across this issue in the past. Thank you so much!
hey man great tutorial, but what about if i want to put 2 or 3 diferente cell shapes?
can someone tell me why fraction node made them loop?
Can't edit driven number value, see graph editor for the driver setup. in 00:12:47
Awesome stuff. Can you make brain neurons next?
Hi, thank you! Yes, brain neurons are on my list, but I haven't gotten a satisfactory result yet where you could make a tutorial out of it.... but I'll keep trying!
thanks for great tutorial. i have a question. i stuck at vein material. i follow your steps and try apply material node but in geometry nodes it show only red color dont have any bump or noise on surface, so i try normal way make bevel depth curve and set that curve vein material it show correct noise material i want. so what do i missing in Geometry nodes to show vein material correct ?
Hi, that happens normally when you connect the "UV" Output instead of "Object" or "Generated". Did you try that?
@@blenderdude5050 ty. i change it to Generated and work now
@@hohzukipham8048 👍
This looks really cool! I have tried following along to your tutorial, but when I start the geometry nodes, the object doesn't appear&look like yours in the video. Do you have any suggestions?
Hmm, I need some more info: which object doesn't look like mine? At what point in the video does your geometry node output look different?
@@blenderdude5050 When I start one the curve to points and set position nodes. In your video, the cube looks opaque, in mine its only the outline in orange that's shown. I kept following the tutorial just to get a feel for the nodes, and while I initially got the red cells to rotate they don't flow along the vessel. Changing settings move things along the path but not when I hit the space bar or attempt to render.
@@prepaid9444 Hmm, hard to tell without seeing your node Setup... That "error" sounds not familiar to me, did not encounter that during the creating of the tutorial, sorry...
@@prepaid9444 Did you perhaps accidentally apply the Geometry Nodes modifier to the Nurbs Path instead of the Default Cube...?
@@blenderdude5050 The geometry nodes have the cube and modifiers under them in the hierarchy, but when I click on cube, both the vein and cube linked objects (rbc) are highlighted in yellow. Think I need to try flowing it all through again from scratch as I've linked something up wrong.
how did you make your cube transparent when you added it? after adding the 'set position' node, my cube looks very square and not as transparent as yours.
Hmm, good question... Does it somehow effect the result, that your point cubes are not translucent...? Or does the tutorial work?
@@blenderdude5050 The tutorial does work, and I’ve started everything from scratch because I was dealing with a bug as well that I didn’t know about, but another problem right now is when I press space for the cubes to move along the line, nothing is happening, I’ve got to the point where I framed the notes, the ‘’animate the blood cells’’ , and I checked if the nodes and the changes to them are the same as yours, and it matches, but still they don’t move, so I’m trying to check what I’ve missed
@@arinacolshatchi1166 Hi, really hard to tell without seeing your nodes in Detail... if you need it urgendly, there is also a downloadlink, if you want to invest 2 € ...
@@blenderdude5050 ah, thank you
Hi I want to buy your model ! Is there any material in it? And is it like your intro?
Hi, yes, it's exact the same model you saw in the intro. the materials are all included and 100% procedural!
How long did it take you to render in cycle and In evee I have tried and 1.5 hours gone by and 2 frames in cycles only
I have a 3060 graphics card - the whole intro movie sequence took about 3-4 hours I think...
You may want to check your cycle render settings (the camera icon). Turn on denoise and lower the number of max sample to 512.
Beveling doesnt work like you did in the video. I select the edges but then it only bevels the and lower face.
I really like your tutorials, you seem to find topics that everybody and his brother aren’t aware of. (Forgive the trailing preposition and the insensitive pronouns.)
I think i just bought this video on freepik
what ? :-)