Great decal tutorial Tony! Brings me back to my model race car building days, back in the 60's and 70's, when you could get a decent plastic model for about $5. I can't stress enough, how light the initial coats of clear need to be, after applying the decal! If you lay down an initial wet coat, the decal material will react! Back your spray can or spray gun, away! Go very light first few coats. Just enough to completely cover and seal the decal, then a nice wet coat to build up before the flat sanding begins again. Knowing this is for the double bound Tele, I'm surprised you didn't call it the "Red Rocker". Well done video Tony!
@@addictedtogear About to check out the Sunday show. Mom went to sleep earlier than usual, so I went out walking till almost midnight. And yesterday was just a busy day. (I've gained over 30lbs. in the past 2-1/2 years sitting her watching her, so I get out for a walk whenever I can.)
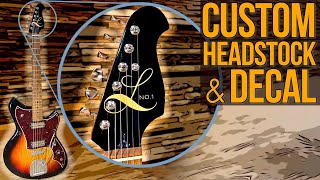
Great job Tony. One thing that I noticed was that even though you can't feel the edge of the waterslide, I could still see the edges in the light. Does that go away with wet sanding?
The reason why I was showing that in the light was to make people understand that you have to put down enough coats of lacquer to build up enough of a buffer layer so that you can then bring it down with wet sanding and make the edge disappear.
Hi Tony - thanks so much for your helpful videos! Quick question - I was planning on doing my neck (including the headstock) with a stain, oil and wax finish similar to what you demonstrated in an earlier video. My question is, if I want to do a headstock decal (which I do), will I have to use a lacquer finish on the headstock? Seems like I would since I think the decal would have trouble adhering to an oil finish and I wouldn't be able to build up the post-decal layers to hide the edges as you pointed out. Would a clear matte lacquer work over a stain finish? The body is going to be stain and oil as well, so I don't want a super shiny headstock looking mismatched! Any advice is welcome. Thanks again and you have a new subscriber!
If you are planning an oil and wax finish, then I would suggest going with a vinyl cutout logo or decal that can be applied over the wax and doesn’t need to be covered in Lacquer.


That was great. Thanks Tony, you just got another subscriber! Looking forward to the rest of the build
Great decal tutorial Tony!
Brings me back to my model race car building days,
back in the 60's and 70's, when you could get a decent plastic model for about $5.
I can't stress enough, how light the initial coats of clear need to be, after applying the decal!
If you lay down an initial wet coat, the decal material will react!
Back your spray can or spray gun, away!
Go very light first few coats.
Just enough to completely cover and seal the decal, then a nice wet coat to build up before the flat sanding begins again.
Knowing this is for the double bound Tele, I'm surprised you didn't call it the "Red Rocker".
Well done video Tony!
That’s a good name. I’ll have to use it on the next one. Thanks for the tips.
@@addictedtogear About to check out the Sunday show.
Mom went to sleep earlier than usual, so I went out walking till almost midnight.
And yesterday was just a busy day.
(I've gained over 30lbs. in the past 2-1/2 years sitting her watching her, so I get out for a walk whenever I can.)
I am definitely going to do this though I suck at art.
Looks great Tony
I can’t wait to see the results, it is looking great though, I’ll be waiting 😊😊😊😊😊😊😊🎉🎉🎉🎉🎉🎉🎉❤❤❤❤❤❤❤
:-) Thanks Tony 🙂
Great instructional video. Thank you!
Just what I was looking for Tony 👍but I’m dangerous with scissors 😬
Great stuff Tony…I have a guitar I need to do this to but I had no idea how to do it…this was a good one👍
Glad I could help! You can do it.
Looks really good. Nice job.
Very good video I must say.
Thanks!😎
Thank you for the support!
@@addictedtogear welcome brother 🤘😎
Can you put the decal on and not coat it on top? Will it last that way or will it peal off etc? Thanks
@@pickersgrip Fender did that for years. It will last if you are careful with it.
Would this work with a Poly Wipe On or would it raise the water decal?
You would have to pre-coat the watertslide decal before applying the Poly
Great job Tony. One thing that I noticed was that even though you can't feel the edge of the waterslide, I could still see the edges in the light. Does that go away with wet sanding?
The reason why I was showing that in the light was to make people understand that you have to put down enough coats of lacquer to build up enough of a buffer layer so that you can then bring it down with wet sanding and make the edge disappear.
@@addictedtogear thanks Tony. Totally get it now. I'm doing my own headstock on my evh Frankie and now I think I'm more comfortable doing it. Thanks
Hi Tony - thanks so much for your helpful videos! Quick question - I was planning on doing my neck (including the headstock) with a stain, oil and wax finish similar to what you demonstrated in an earlier video. My question is, if I want to do a headstock decal (which I do), will I have to use a lacquer finish on the headstock? Seems like I would since I think the decal would have trouble adhering to an oil finish and I wouldn't be able to build up the post-decal layers to hide the edges as you pointed out. Would a clear matte lacquer work over a stain finish? The body is going to be stain and oil as well, so I don't want a super shiny headstock looking mismatched! Any advice is welcome. Thanks again and you have a new subscriber!
If you are planning an oil and wax finish, then I would suggest going with a vinyl cutout logo or decal that can be applied over the wax and doesn’t need to be covered in Lacquer.
So its $51 for the laser paper and I need 1 logo that is 1”x1”. Anyone want to sell me 1 sheet of paper?
ugh you lost me at "lil rocker"