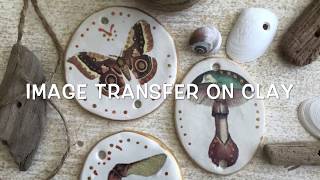
How To: Transfer an Image onto Polymer Clay | Make FIMO Clay Charms with Printed Pictures On

HTML-код
- Опубликовано: 26 авг 2024
- This video tutorial explains how to take a laser-printed image and transfer it onto the surface of polymer clay.
I walk you through the whole process for making clay charms, including tips on what NOT to do!
If you would like to see written instructions instead of a video, please visit my website:
www.rokolee.com...
Thanks for watching :)
P.S. The Mad Hatter image I used is from the original Alice in Wonderland book by Tenniel (it has recently been made copyright-free):
medium.com/alic...
_________________________________________________________
If you would like to browse craft products that I use in my videos or that I otherwise recommend, please take a look at my Amazon recommendations page:
www.amazon.co....
Note that this page contains affiliate links so I receive a small commission on any sales made through this page, thank you :)
If you would like to buy me a ‘coffee’ to support my channel, you can do so here:
ko-fi.com/G2G8...
Any support is hugely appreciated and helps me to cover websites fees, material costs and other expenses related to creating videos. Thanks very much!


your tone and the lack of background music make your video extremely relaxing
OMG.. Isn't that the truth...
She did such a professional job... love this gal... and her art...
it was great that you shared the "Don'ts" too. Thanks for the thoroughness!
Thank you for watching :)
You're kidding me- this looks so easy!!! I'm going to try it right away!!!
And that dome shape trick: so clever!!!
I really like how you shared all the different trials and results at the end. Lots of nice tips in general all thru the video. Thanks!
Thanks for your comment :) Glad you found it helpful
I know this is 5 years old, but I had to comment anyway. This has been the absolute best tutorial I have ever seen on any subject!! Thank you so much!!! ❤️
Aw thanks so much for your nice comment :)
Omg I have been doing this the HARD way!! Thank you so much for the video AND the extra tips of how to create more of a dome shape. I can't WAIT to get home and try this out.
So glad you found this helpful! I think the domed surface looks way better than flat personally :)
Is there anyway I can do this on colored clay? I want to transfer small colored letters to brown polymer clay but I'm not sure if the color will transfer well. Only seen it done with white clay.
Thank you for sharing not only the techniques but your mistakes and how to prevent them!! Great video🖤
Glad you liked it!
I tried this while I watched the second and third time, after trying 4 other methods this morning. The first four failed, of course, but yours worked with a fine line image. It was awesome! Now to go try with some that are more involved, more colorful. Thank you!
Yay! I hope the colourful image works just as well :)
Martha D they do- I've bone both with your method 👍🏾!!
is it work? :)
Great tutorial - I am about to get into the world of clay crafts - I have been making wooden, stone and acrylic pens, pencils etc on a lathe for a long time and am going to attempt making some polyclay pens. Although I won’t be making charms etc your video has given me some great tips and ideas which will undoubtedly come in useful. Thanks.
I'm glad you found the video helpful :) Putting polymer clay on a lathe is an interesting idea. My boyfriend has got his eyes on a lathe so if he gets one I might have to do some experimenting myself!
Rokolee DIY Get him the lathe!! If you do maybe I could give you a few tips lol!
Thank you for a clear and concise video. Instructions, materials, and video are perfectly executed! Thank you also for not playing music and having a lovely voice. Blessed be!
You're welcome, thanks for watching!
Thank you so much! What a beautiful technique. I’m so ready to try this thanks to you.
Thank you :D
Great instructions. Thankyou. You've given me confidence to make clay decals for my bedroom furniture.
Great tutorial- looks much easier than many of the other methods I've seen. I thought you could only use acetone with laser prints, so I'm glad to see water will also work. Thank you for showing the mishaps as well- it's good to learn from others' trials and errors. I'm wondering why you didn't remove the excess clay from around the charms before baking? It seems like a waste of all that clay, that could be used to make more charms.
DragonSlayer totally agree.
Thanks for your comment :)
You certainly could remove the excess clay...there's no real reason why I didn't do that - I guess I didn't want to risk disturbing the shape of the charms.
Ohhhhh you make it look so simple, I need to give this a try!! I've been looking at trying something that combined my love of clay and digital art, and this could be it, thank you!
Thanks for watching, glad you found it inspiring! :)
Great tutorial, really clear and easy to follow. My question is I am new to polymer clay and wondered why you baked the charms still with the excess clay in place, rather than removing them and just baking the charms? Doesn't the excess stick back to the charm? Sorry if this is a really basic question but like I said I am new to all this. Thank you
Thank-you :) Actually, you're quite right; I should have removed the excess clay before baking to prevent wasting that clay. Not sure why I didn't really...I might have just been distracted by the videoing! The clay didn't stick back onto the clay, but I would recommend removing excess clay before baking.
Rokolee DIY Thank you so much for the reply and yes makes sense now :-).
I wondered that too.
@@RokoleeDIY You might have missed a step, but it was a great, clear, concise and thorough video--the kind I like!
Great tutorial. Very easy to follow and understand. Love listening to you talk. Very relaxing. We just bought a laser printer so I am anxious to try this. Thanks for sharing all the tips and techniques.
Thank you very much 🙂 Have fun with the printer!
Excellent tutorial, I especially appreciated the tips at the end from your experience of flops. I cannot wait to try my hand at this technique. Thank you so much!!!
Thank you :D I'm glad you liked it!
Can't wait to try this! I've watched a lot of tutorials and your way looks the easiest by far. Thanks for the video!
Very well done video! Thorough in directions and "mistakes" to avoid.
Thanks 🙂
Thank you Rokolee DIY for ab awesome tutorial 👍
Thank you :D
Wonderful and I love how you didn’t natter on or use music (unfortunately, that’s often the case with so many YT vids...I end up turning the volume down or off and fast-forwarding or just moving on to something else). Your tips at the end are also very helpful, thanks so much!
Thank you very much :D
I am a beginner and I've seen people treat their clay like it's a baby. it's simple - get you some freezer paper burnish it on, done you have an image! Instant gratification. YOU are in charge of the clay. I found this out on my own, no one else has made a video about this. Freezer paper is found at the grocery store. And it works with an ink jet printer.
Some people use freezer paper(sorry you're not the first)- but find it doesn't provide as clear a transfer as other types. Regarding your comment about "treating clay like a baby"- I guess it depends on if you are going to be selling your creation or if it's just for fun. Professional clayrers tend to be more careful with finishing stages of the clay since it is going to be sold and there is an unwritten rule amongst them that you want your product to be as perfect as can be - sanded, polished if needed- with no "slapping" it at all.
Brilliant!! Thank you so much for sharing this, it looks fab, I have subscribed and will be watching your other videos. You also have a very good voice to listen to while giving instructions. Thank you also for all the helpful tips. Kind regards. Barbars.
Thank-you very much :)
WOW!! Why is your method not viral??? And great tips! Thank you for both! 😆
Haha I wish it was! Thanks very much :D
Wow, cheers for the video especially all of your trial and error messages..
No problem...thanks for watching :)
I loved your tutorial! Thanks for the tips! I'll try making charms like these tomorrow. Hope it goes well
Wow it's so easy but looks so professional! Thanks for sharing 🙏🙏🙏
Thanks :)
Extremely in-depth and helpful thank you 😊
Thank you :D
You have been SO helpful with all your hints at the end - thank you!!!
Glad it helped you :) Thanks for watching!
This is a terrific tutorial! I especially appreciate the tips and other suggestions. Thank you! 💜💜💜
Thanks very much!
Well described way to do this your video rocks girl. Tried it and it worked beautifully
So glad it worked well for you! Thanks for your comment :)
Can you suggest how to transfer images to both sides of the charm (two different images)? Thanks. Your instructions were great!!
Thanks :) I've thought about that before, and I think the only way would be to transfer the image to 2 identical pieces of clay, bake them, and then attach those pieces together back-to-back
Thank you for this I have been doing my transfers all wrong and can't wait to try your method.
I have looked at many RUclips video but this has been the best. short sweet and informative!!!!
Thank you!
I love this; can't wait to try it!!
I love this technique so simple and your explanation easy to follow and thank you for sharing your mistakes... saved me many hours I'm sure 😊
Thank-you! Glad it was helpful :)
Brilliant video! Thank you so much for sharing your tips. 💕
Found your video easy to understand and helpful thank you for sharing.
Thank you!
That is genious, and easy to do! Will try to do it. Hope it goes well 😇 Thank you very much for sharing that with us.
Thanks for your comment...I hope it works well for you!
Thank you for sharing this technique. Much appreciated.
Thank you this was a terrific video and the what not to do was very helpful.
Glad you found it helpful :) Thank you for your comment !
...also curious about you recommending laser printed images instead of inkjet. The other tutorials I saw said inkjet. I have both printers so perhaps I’ll experiment. ;-)
Please post more videos on image transferring onto polymer clay!
I have another video where I transfer an inkjet image using a printable acetate sheet - I've not had any luck with inkjet images and water. Good luck with your experimenting!
does it work with laser printing for you? for me not
شكرا جزيلا علي العمل الجميل
thank you very match for nice work
Thanks for this tutorial. God bless you 🙂🙏🏼❤️
Thank you!
Genius! Thank you from Vancouver, Canada
Thanks! :D
Thank you! And appreciate your tips on how to improve and what to avoid 🙂
You're welcome :)
Thank you very much.
You are welcome!
Very informative, with great tips! Well done, Thank You 😊
Thanks for watching!
Thank you..very well explained, great tips...you are awesome!!!
:D Aw thanks!
I've always want to know how to do it!! Thank you so much very hopeful tutorial 😍
Thanks :) Glad you like it
This was so helpful! Thank you!
You're welcome!
Thank you so much for this amazing tip! Your video was concise and great. What type of printer should we use though?
Thank you very much :) A laser printer must be used.
A great technique! Thank you so much for sharing. Appreciated the mistakes you included too. New subbie!
Thanks very much :D
Hi,
Can I ask if this the normal printing paper or special type fo the polymer clay ?
Just normal paper :)
Thank you for doing this video very much appreciated 💛
Glad you liked it :)
Another great video, thanks.
Thank you :)
Does this work on air dry clay? Very informative video thanks 😊
Hi! To be honest I don't know as I haven't tried it. I suspect it wouldn't work very well because of shrinkage but I could be wrong. If you try it please let me know :)
thank you so much this was so wonderful
Thank-you :)
Thank you very much for the tutorial
Thanks for watching!
You are talented thank you very much
Thank you :)
was the excess polymer easy to pull away after baking. Did you wait for it to cool? why didn't you pull excess away before baking?
Yes I waited for it to cool and it was easy to remove....but I should not have baked the excess clay - that was a mistake on my part - I should have removed it prior to baking so I could reuse :) oops
Bless you, it worked!
Brilliant! :)
what paper did you use please?
Hi! I just used regular printer/copier paper.
Thanks for your interest :)
M
When do you get rid of the excess clay around the edge of the charm and how?
Hi! You would remove the excess clay after you've used the cookie cutter to cut through the clay and removed the clingfilm (6:20) :)
Oh wow! I hope it works for me?
I hope it goes well for you :D
Thank you . I will remember that
Save those cut straw pcs as you can use a toothpick to make a hole (after carefully removing straw) to make a pony style bead. Before putting in the oven...use dye to make your colored beads
Good tip, thank you :)
OMG that's freaking genius!!!! I've been wanting to buy a bunch of pony beads, but the sets that have the pretty colours come in SUCH HUGE SIZES! And the ones that are smaller have ugly ass colours haha. So making my own would be freaking perfect!!! Thank you so much!!!
Que papel e esse você usou alguma coisa pra transferir a imagem???
Just regular white printer/copy paper :)
Apenas papel branco comum para impressora/cópia
Hi is is necessary to use only FIMO or could this technique be achieved on sculpey souffle?
I haven't personally tried it on Sculpey Souffle but I don't see why it wouldn't work :)
Great tutorial! Thanks so much :)
thanks for these awesome tips ^^
Thank you very much!
I just love this. But how does one know if one has an inkjet printer?
If you have to put inks into your printer (rather than toner) you have an inkjet printer :)
great video. Now I need to.get.a.lazer printer instead of my ink jet. I.do.want.to.try this
Thank you for sharing this well done video. I too appreciate the absence of music. The information you are imparting is entertaining enough. :-) Question please...can we use colored images that have been laser printed?
I have tried it with a few coloured images and although not a total disaster the colours were patchy, particularly in larger areas of colour. Thanks for watching :D
Found your channel. Great tutorial. I’m new to clay and transferring images. Can I ask what type of paper you printed the images on.
Thank you :) It's just regular printer/copier paper, nothing special
Loved your video! Lots of great tips. My question is why don't you pull the excess clay off before baking?
Truth is I should have done :) Oops! I think I was too focussed on documenting the process haha
LOL... since I am new to polymer clay, didn't know if there was a reason. I question everything! Thanks again...
Can I do this on regular air dry clay?
I haven't tried it on air dry clay, but someone in the comments did and said it didn't work :( If you do give it a try though please let me know how it goes!
Is there a trick to getting the color dark anmd saturated? My colors, even black, is too light :( Thanks in advance
Hmm, apart from having every line printed in black and using a high print quality, I'm not sure. You'll never get a black colour, only grey, but I'm not sure how you could make the grey darker sorry
Hi I love your video, the plastic wrap on clay to prevent sharp edges is great and I was wondering what kind of paper did you use for the print? Was it a regular white printer paper?
Thank you! Yes, regular white printer paper :)
Does it work on dried clay or air dry clay while still wet?Thanks!
LOVED your tutorial!❤
I doubt it would work on dried clay, but I have never tried it on air dry clay so I honestly don't know, sorry! If you try it, please let us know if it works :)
What if we dont put in the oven ??is there any other way to make it
I've only done this on polymer clay, which definitely needs an oven. I don't believe it works on air dry clay, but I've not tried it so maybe give it a go? :)
Great video! Can I use sculpey oven bake clay instead of fimo?
I haven't tried it so I can't say for sure, but I don't see why not!
This is something i want to get into, i dont know much, but can you only transfer things in black colour? is it not possible to transfer with different colours?
Hi! You can try with colour, but I found results were patchy/faded, and not crisp like the black lines. Thanks for watching :)
Hi, am I doing something wrong? Is there a special paper that you need to print on? I printed from a laser printer onto normal paper but the image did not transfer at all? Excellent video btw :)
Thanks :) Hmm, that's odd because I just used regular printer paper in a laser printer, no special paper or anything like that. Did you do an economical/fast print? As that may mean less ink, but I doubt that is the problem. Or maybe you used too little or too much water, or didn't leave it until it completely dried? And you're using polymer clay? So hard to troubleshoot when I can't see your process, but maybe it's one of those things. Sorry I can't be more help!
Is that a normal paper printed using a printing machine?
Yes just regular printer/copier paper, which is then printed on using a laser printer :)
Hi there, does this work with ink jet printed images please?
I'm afraid not, no. I have another video showing how I managed to use an inkjet printer to transfer an image, but laser prints are easier and more detailed:
ruclips.net/video/3lK0MgeGIDw/видео.html
Where did you get those super cool images and are they called transfers?
They are from here:
medium.com/alice-s-adventures-in-wonderland/sir-john-tenniel-s-classic-illustrations-of-alice-in-wonderland-2c3bbdca3a77
And I just laser-printed the images onto paper :)
Hi I have tried your steps one by one but when i put water over the clay before putting the image it was like dotes
So I put the image and wet it but it moved couple of times so i continued reviewing the tape again but it was failer the transfer was very bad. I used a laser printer and regular printing paper.
I am not sure why it did not transfer.
I will try again may be my printer paper is not good
Hmm I'm not sure without seeing...perhaps try putting a little water on with a brush and using that to spread it out a bit? Moving the transfer at all will blur the transfer unfortunately. I'm sorry it didn't work for you :(
Thanks for this tutorial. Does it have to be a black and white image or could you use a coloured image with this technique?
I've found black and white works so much better...I've found colours to be patchy with this technique. Thanks for watching :)
Hi there! I hope you see my comment even if the video is 4 years old. I wanted to know if you where using normal white printing paper? Thank you for such an informative video!!!
Thanks! Yes it's normal white printer paper :)
This looks great, but can you not remove the excess clay before baking so that you don't waste so much clay?
Yes, I should have removed the excess clay, not sure why I didn't!
Can you use printed napkins instead
There's a different method you can use for napkins, which you can see here:
ruclips.net/video/cjwFJ2ZxpgM/видео.html
My method wouldn't be suitable for napkins before the napkins wouldn't peel off cleanly when wet :)
hi , the image printed on regular paper or transfer paper ? and after drying u just take image on surface of clay or rubbing ?
Hi! It's regular white paper, nothing special, and you peel the paper off; don't rub it.
you print it on regular paper?
Yes :)
Can we do it on an air dry clay?
I don't think it does, but I actually haven't tried that myself. Sorry I can't help!
Wonderful tutorial - can't wait to try this!
Hi Rokolee! I’m new to your channel. Thanx so much for sharing your skills. Two questions. Is it possible to use alcohol on a color image? I want to try transferring a color image from a card sent to me onto the raw white clay. I don’t know if it will work but I want to try. Do you think it might help to dab alcohol instead of water on the clay and picture? Thanx
Unfortunately I haven't tried to use alcohol for this process, so I can't say for sure, but it's probably worth a try! I've found transferring colour difficult, although I had more luck transferring colour from an acetate sheet (which I also have a video about). Sorry I can't be more help. Thanks for watching :)
This is so clever , really looks awesome to make! But I don't have a laser printer :( Does the printed image needs to be "fresh"ly printed? Or can I go to a store with laser printer to print my pictures?
Thank you :) I had to get a friend to print my images too as I also don't have a laser printer! So yes, they don't need to be super 'fresh' prints. Happy crafting!
@@RokoleeDIY Thank you so much for your reply! ^^ I will try and find someone too or a store.