I did this on a 2013 TDI SEL. I did not remove the front end. Step one, disconnect battery terminal. Step two, remove splashguard underneath. Step three, remove fan guard from radiator. And place card board in its place. Step four, loosen fuel filter and fold up on top of engine. Step five, take off serpentine belt and remove from engine area. You don’t want to get antifreeze on it. Step six, pop bottom radiator hose off and drain into pan for reuse. Place plastic bag over radiator hose barb with rubber band. Step seven, remove the Heat exchanger from the throttlebody. Disconnect the two small hoses on the top and plug them. Remove the top radiator hose and let that follow the heat exchanger down the hole. Pull the heat exchanger down through the bottom, along with the hose that goes to the bottom of the radiator. Step eight, remove the bolts from the AC compressor, but do not remove the compressor. We just want it loose. Step nine, remove the bolts from the alternator. Use a screwdriver to pry the alternator towards the radiator. Remove the cables and connectors from the alternator. Step 10, remove the alternator down through the bottom using the cavity created by removing heat exchanger. Step 11 replace the alternator with new one. Add all connections to it before folding it into place.
yea that works too. one guy did it with the egr off. I think this was pretty easy the way I did it. the front end comes off very easily. Car is designed that way. thanks for the step by step it will help other people as well
@@TheJwebb7 NO IT IS NOT.....try service position. I didnt even remove the coolant. did the alternator in just over an hour. Some guys do service position with removing the whole front end and evacuating the AC in 20 minutes. Very easy to do.
Helpful tip!!! No jack needed to move bumper. Remove one bolt on each side of the bumper. Insert a long 1/4 socket extension bar onto the holes from the back side. Need at least 6 inches, longer is better. When you take out the other 6 bolts the bumper is now sitting on those extensions and you can slide the bumper assembly forward. No jack or additional people needed!!!
Thanks for the video. Just followed it to put a new alternator in an mk6 Jetta sportswagen. Some differences in taking the front off but otherwise saved me some time.
Thanks for the video it really helped seriously. Although I would like to add just one thing to make it super easy. The bolts to remove the front end I did/but didn't remove. I found a longer bolt with the same thread and replaced 1 bolt on the left and one on the right which allows you to have the clearance with out any worries about the bumper being removed or falling out etc. Just enough room
Great IDEA....longer bolt like a really long one for the engine mout would work 1 on each end. I didn not have any issues with it falling off the jack. only that way for about 10 minutes.
Oh yea for sure and so much easier physically. IT really probably took me an 1.5 hours to do the alternator which is not terrible. But yea it should be easier like the BRM....DId that one on the road in like 30 minutes.
Great video. Similar set up to my 2012 Skoda Octavia 1.TDI CAYC engine. That second bolt is almost impossible to see with the engine in the car. I can see it now with your engine out! Thanks.
Every time I work on my 2012 TDI all I can think of is how much I fucking hate Volkswagen engineers. Thaknks for making this video, almost no service information avaliable. About to embark on this now, wish me luck 😢
Ok I finally got the damn thing out. Had to take a break and get a low-profile 90* ratcheting screwdriver because the dumbasses at VW put the AC lines right in-front of the lower fan shroud bolts. Thus far I am probably about 5-6 hours in, but I honestly got stuck on removing the fan electrical connector for like an entire hour. Reinstall should be 2-3 hours tops. Thus far I have 1. Disconnected battery, removed wheel well and bottom shrouds. Use a drill bit to pin the belt tensioner open and remove the drive belt. 2. Removed Fan Shroud (pain in the ass). Use a right angle low-profile screwdriver and just force it in there. 3. I broke the fan electrical connector when removing it (fml), so avoid doing that, mine was basically stuck and would not move 4. Unbolt the 3 bolts on the AC Compressor 5. Remove the intake tube going into the throttle-body. One T30 in the middle, disconnect the boost sensor and it should slide out easily. Pipe going to the intercooler is easy, just a clip and hose clamp. 6. Remove alternator electrical leads, and remove the alternator bolts 7. Use a pry bar and a hammer to get the alternator off the mount and loose. 8. Pull the AC Compressor down,, and you can get shove the alternator down, and between the AC Compressor and Frame. Just enough clearance 9. I hate Volkswagen Engineers (by this point it is a requisite step). Going to be a PITA getting it back in but I think the hardest part is removal. I should be able to pack the fan electrical connector full of dielectric and just zip-tie it for security. One side is stabilized in the fan shroud clip, and the other side is hanging down.
Mike your rocking the Covid haircut like all us here in the UK! None of us have been allowed to get a haircut since before Christmas because of Covid restrictions! 😂 💇♂️
Yea for sure. You should have seen Mustie1.....Ha ha. then my barber kept the closed sign up....and the lights on.....Blinds shut.....It was like getting a drink during prohibition.... No open sign but they were open. ha ha. My barber says F...This. I got RENT....I tipped LARGE.....
Old video, I know... I followed this video and got the alternator out. Trying to line it up to install new one... That metal pipe(hose) that's directly under where the alternator sits.. Is there a trick to lining up and wedging the new one back in? Can't for the life of me get it to line up to pug the long bolts back in. I believe its that pipe that is blocking me. Don't want to undo the air conditioning... Any tips/tricks?
There is a sliding spacer in the alternator. I usually take a hammer and knock it back a little. This is on almost every make and model alternator. Before installing any alternator take a hammer and tap back the spacer so you have more room....NEXT TIME.
Keep using recommended synthetic 507 spec oil. Change the trans oil every 40k miles. Timing belt every around 100k. be prepared to change the flywheel. very soon.. listen for the shutter when you shut off the engine. Replace the CP4 fuel pump (aka HPFP) asap to a CP3.....Other than that the rest is pretty random the car body and suspension will go very long miles I am near 300 on all mine.
Is this the same for a 2015? EA288. Getting system voltage low and it seems like it has enough power to maintain itself when running but does not have the juice to restart it
@@edwinsarmiento5494 I had a bad battery. Not even a year old everstart Maxx from Walmart, which is the only batteries I buy. The one in my truck is like 7 years old and it starts up no problem in the cold WI mornings. I do still get the system voltage low when I read codes after a new battery which concerns me but it runs fine now.
@@widsm well damn must be nice I put in a new battery and my car is still acting up, its starting to look like a failing alternator, but thanks for the update and glad to hear your car is running!
@@edwinsarmiento5494 I read something of pcm issues when the system has less/more than desired voltage. Do you have any codes? Some may not call the CEL,as it doesn't necessarily affect emissions or operation
@@widsm having same issue on my 2015 Passat. I believe a bad alt pulley started it all. My $400 alternator came in today and am going to start on this in the am. I currently have a rough idle and a few codes. Going to be limited on time so May take a few days to finish but will update you once completed.
Step 1: disassemble whole front end. Step w: remove alternator. Wow. Lol funny but that sucks. Have a 2012 tdi and the alternator is bad... yay. This is why I like early hondas, open up the hood and there's everything.

 Авто/Мото


LIKE SOME COMMENTS. this video should be really helpful for TDI owners thanks for watching and heling out.
I did this on a 2013 TDI SEL. I did not remove the front end.
Step one, disconnect battery terminal.
Step two, remove splashguard underneath.
Step three, remove fan guard from radiator. And place card board in its place.
Step four, loosen fuel filter and fold up on top of engine.
Step five, take off serpentine belt and remove from engine area. You don’t want to get antifreeze on it.
Step six, pop bottom radiator hose off and drain into pan for reuse. Place plastic bag over radiator hose barb with rubber band.
Step seven, remove the Heat exchanger from the throttlebody. Disconnect the two small hoses on the top and plug them. Remove the top radiator hose and let that follow the heat exchanger down the hole. Pull the heat exchanger down through the bottom, along with the hose that goes to the bottom of the radiator.
Step eight, remove the bolts from the AC compressor, but do not remove the compressor. We just want it loose.
Step nine, remove the bolts from the alternator. Use a screwdriver to pry the alternator towards the radiator. Remove the cables and connectors from the alternator.
Step 10, remove the alternator down through the bottom using the cavity created by removing heat exchanger.
Step 11 replace the alternator with new one. Add all connections to it before folding it into place.
yea that works too. one guy did it with the egr off. I think this was pretty easy the way I did it. the front end comes off very easily. Car is designed that way. thanks for the step by step it will help other people as well
yeah unbolting the AC compressor is way easier than removing the whole front end
Have a video of this process?
@@jeffschultz898 Sorry, no
@@TheJwebb7 NO IT IS NOT.....try service position. I didnt even remove the coolant. did the alternator in just over an hour. Some guys do service position with removing the whole front end and evacuating the AC in 20 minutes. Very easy to do.
This is another long term project. Do you ever get to sit down and put your feet up?
this is gonna be soo usefull for some people!
Hi Mike you always make really good videos 👍🏻 I like watching them. Cheers Stevie 😎🏴
Helpful tip!!! No jack needed to move bumper. Remove one bolt on each side of the bumper. Insert a long 1/4 socket extension bar onto the holes from the back side. Need at least 6 inches, longer is better. When you take out the other 6 bolts the bumper is now sitting on those extensions and you can slide the bumper assembly forward. No jack or additional people needed!!!
Thanks for the video. Just followed it to put a new alternator in an mk6 Jetta sportswagen. Some differences in taking the front off but otherwise saved me some time.
yea, master service position and these are much easer to work on.
Mike; your plate is definitely full with this and the single cab!!
Thanks for the video it really helped seriously. Although I would like to add just one thing to make it super easy. The bolts to remove the front end I did/but didn't remove. I found a longer bolt with the same thread and replaced 1 bolt on the left and one on the right which allows you to have the clearance with out any worries about the bumper being removed or falling out etc. Just enough room
Great IDEA....longer bolt like a really long one for the engine mout would work 1 on each end. I didn not have any issues with it falling off the jack. only that way for about 10 minutes.
Thanks for this. Not sure why I was avoiding service mode. More work than it should but but less than removing AC and intake stuff!
Oh yea for sure and so much easier physically. IT really probably took me an 1.5 hours to do the alternator which is not terrible. But yea it should be easier like the BRM....DId that one on the road in like 30 minutes.
Tackling this tomorrow, my alternator pulley failed and took the tensioner with it. Thanks Mike!
Job was not bad at all.
once you remove that front and move it back a bit EASY...IMO.
Great video. Similar set up to my 2012 Skoda Octavia 1.TDI CAYC engine. That second bolt is almost impossible to see with the engine in the car. I can see it now with your engine out! Thanks.
Every time I work on my 2012 TDI all I can think of is how much I fucking hate Volkswagen engineers.
Thaknks for making this video, almost no service information avaliable. About to embark on this now, wish me luck 😢
Ok I finally got the damn thing out. Had to take a break and get a low-profile 90* ratcheting screwdriver because the dumbasses at VW put the AC lines right in-front of the lower fan shroud bolts. Thus far I am probably about 5-6 hours in, but I honestly got stuck on removing the fan electrical connector for like an entire hour. Reinstall should be 2-3 hours tops.
Thus far I have
1. Disconnected battery, removed wheel well and bottom shrouds. Use a drill bit to pin the belt tensioner open and remove the drive belt.
2. Removed Fan Shroud (pain in the ass). Use a right angle low-profile screwdriver and just force it in there.
3. I broke the fan electrical connector when removing it (fml), so avoid doing that, mine was basically stuck and would not move
4. Unbolt the 3 bolts on the AC Compressor
5. Remove the intake tube going into the throttle-body. One T30 in the middle, disconnect the boost sensor and it should slide out easily. Pipe going to the intercooler is easy, just a clip and hose clamp.
6. Remove alternator electrical leads, and remove the alternator bolts
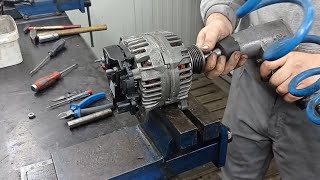
7. Use a pry bar and a hammer to get the alternator off the mount and loose.
8. Pull the AC Compressor down,, and you can get shove the alternator down, and between the AC Compressor and Frame. Just enough clearance
9. I hate Volkswagen Engineers (by this point it is a requisite step).
Going to be a PITA getting it back in but I think the hardest part is removal. I should be able to pack the fan electrical connector full of dielectric and just zip-tie it for security. One side is stabilized in the fan shroud clip, and the other side is hanging down.
thank you. my alternator lasted 390k miles i guess i cant complain
Mike your rocking the Covid haircut like all us here in the UK! None of us have been allowed to get a haircut since before Christmas because of Covid restrictions! 😂 💇♂️
Yea for sure. You should have seen Mustie1.....Ha ha. then my barber kept the closed sign up....and the lights on.....Blinds shut.....It was like getting a drink during prohibition.... No open sign but they were open. ha ha. My barber says F...This. I got RENT....I tipped LARGE.....
The Betta Getta Jetta now.
What is the oil pump update you are talking about?
How do I figure out what engine is in my car
Thk u sir
Old video, I know... I followed this video and got the alternator out. Trying to line it up to install new one... That metal pipe(hose) that's directly under where the alternator sits.. Is there a trick to lining up and wedging the new one back in? Can't for the life of me get it to line up to pug the long bolts back in. I believe its that pipe that is blocking me. Don't want to undo the air conditioning... Any tips/tricks?
Having the same problem, I can get it over the a/c line but can't get all the tabs to line up, like they became to close together somehow...
There is a sliding spacer in the alternator. I usually take a hammer and knock it back a little. This is on almost every make and model alternator. Before installing any alternator take a hammer and tap back the spacer so you have more room....NEXT TIME.
I have a 2011 with 200k what's the maintenance I should have done to keep it going for another 200k
Keep using recommended synthetic 507 spec oil. Change the trans oil every 40k miles. Timing belt every around 100k. be prepared to change the flywheel. very soon.. listen for the shutter when you shut off the engine. Replace the CP4 fuel pump (aka HPFP) asap to a CP3.....Other than that the rest is pretty random the car body and suspension will go very long miles I am near 300 on all mine.
so you dont have 2 remove coolant lines for mk6 either?
I didnt just moved the radiator back a little and there was plenty of room.
Does the cjaa models need the oil pump upgrade?
NO they are fine. I changed my engine to CJAA
no they are fine only CBEA early 2009
4:00 thats the throttle body in case your wondering. thats also a pain in the ass to remove because the 3rd bold is up underneath the bottom.
TDI don't have throttle bodies😂
EGR flapper. yea.....without service position they are really hard to reach. loosening the front end makes this car much easier to work on.
Is this the same for a 2015? EA288. Getting system voltage low and it seems like it has enough power to maintain itself when running but does not have the juice to restart it
Any update on what you did? Im having the same problem right now.
@@edwinsarmiento5494 I had a bad battery. Not even a year old everstart Maxx from Walmart, which is the only batteries I buy. The one in my truck is like 7 years old and it starts up no problem in the cold WI mornings. I do still get the system voltage low when I read codes after a new battery which concerns me but it runs fine now.
@@widsm well damn must be nice I put in a new battery and my car is still acting up, its starting to look like a failing alternator, but thanks for the update and glad to hear your car is running!
@@edwinsarmiento5494 I read something of pcm issues when the system has less/more than desired voltage. Do you have any codes? Some may not call the CEL,as it doesn't necessarily affect emissions or operation
@@widsm having same issue on my 2015 Passat. I believe a bad alt pulley started it all. My $400 alternator came in today and am going to start on this in the am. I currently have a rough idle and a few codes. Going to be limited on time so May take a few days to finish but will update you once completed.
Ac pump was only 3 bolts plus lines.
Step 1: disassemble whole front end.
Step w: remove alternator.
Wow. Lol funny but that sucks.
Have a 2012 tdi and the alternator is bad... yay. This is why I like early hondas, open up the hood and there's everything.
PIA yup VW....PIA.....Honda Easy.
pretty sure you can just lower th A/C compressor out a bit and then lower the alternator out without doing all that extra disassembly....
No fair, u need to show how u put it back in.... 🤷🏽♂️
Just play the vid in reverse