hi there Ron..I'm about to embark on a ceramic tiled Mosaic project for my back-splash above the stove..your tutorial is helpful, but, can l use this sort of glue for ceramic tiles onto mesh or should l use an adhesive like when your doing normal tiling on walls..??
The glue is just to put the tile on the mesh. When applying to wall, a regular adhesive for tiles is placed on the wall, or surface you want to put the design onto. Then the whole section of mesh is applied directly onto the adhesived area.


Thank you my Sir good job :)
Pls let us see your next work
thank you, well done and explained
👍
I really enjoyed your video! Now how do you stick it to the top?
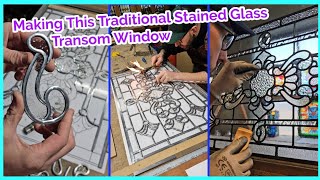
You are doing a very precise design. My design is much more artistic and free-flowing. But I still appreciate your process
hi there Ron..I'm about to embark on a ceramic tiled Mosaic project for my back-splash above the stove..your tutorial is helpful, but, can l use this sort of glue for ceramic tiles onto mesh or should l use an adhesive like when your doing normal tiling on walls..??
The glue is just to put the tile on the mesh. When applying to wall, a regular adhesive for tiles is placed on the wall, or surface you want to put the design onto. Then the whole section of mesh is applied directly onto the adhesived area.
thanks for that bonnie...
Could you please explain chamfered?
bonnie448 a chamfer means the edge is angled instead of having a sharp 90° edge where two sides meet.