Did my first ever 4 point saddle today. It was easy to do while following the video. You explained everything perfectly for beginners. I had a little dog leg but was able to fix it thanks to the tip at the end. Thanks for the video
Great presentation. I've been in the electrical trade for 40 years and watching you I picked up a couple ideas. The aluminum emt with the inner coating sounds interesting. On another note, we use dry erase markers for marking bend points. The different colors are easy to see, and they wipe off easily when you're finished.
Pipe guys are underappreciated. ESPECIALLY rigid guys. It's an artform for sure. I was capable in my day but by far not the best. Great video. You're almost out of bends to promote the aluminum company!! ha. More SERVICE CALLS please!!!
Well you better start learning in class and on job. Many have no cell phone rules and journeyman and foreman don't like seeing apprentices not use their heads to learn. Using the videos is a form of cheating. View them at home and take notes. What you need is a cheat sheet with the formulas you need. And info on your multiple bends and runs. This way you learn how to come up with the math and how to do it. I have turned apprentices around and sent back to the school by doing what you are doing. And the school is great with it. Why? Because it is unprofessional to look at your phone all day. And you should know how to do something without the help of someone telling you how to do it.
That’s really cool. I bent some conduit in an air handler a while back and got an education on it. It’s an art, for sure. I wonder if you could make a weighted block with a hole for the handle to sit in, so you don’t need to use your foot to keep it from sliding around when it’s inverted. Throw something soft in it and it won’t jack up the handle grip. Could also get some pipe to slide over the EMT to use as a cheater and be able to stand a little further back. Would that work? Love this channel. I was an electrician on commercial ships, and working on land is WAAAAAY different. No conduit or wire nuts, ungrounded system, no neutral leg. Armored cable for everything and everything is hot. Your channel is quite the translator for me and I appreciate it.
I usually will add for shrinkage on 4 bends. Especially on an obstruction that high. 30 degrees is a 1/4” of shrink per inch of offset. So you’re looking at 1.5” of shrink in a 6” obstruction. Just looks neater if the center of your saddle match the center of the obstruction.
@@estebanhernandez243You would add the shrinkage to both sides equally. Your obstacle measurement won’t change from point 2 and 3. So you add the shrink from 1 to 2 and 3 to 4. So 1.5 of shrink in total would be .75 per side. You remember how he said multiply by 2? You would just add the .75 for shrink so in reality he should of measured it at 12.75 away from the obstacle each side.
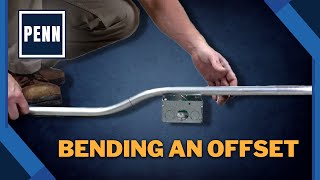
Lots of different techniques for pipe bending. I typically measure depth of offset needed, width needed. Then I chose the multiplier for the degree bend I want to use. Then I lay out all four marks on the pipe. I normally use the center of the bend arrow as my bending point and start with the first bend on the floor. Then flip and bend the second bend making sure the offset is square. Then I bend the third bend and flip and bend the final bend. I adjust any dog at that point if necessary. With emt I don't bother with figuring shrinkage. I know where I want my first bend and add a couple of inches and bend the offset. Then I hold it up, mark and cut to fit exactly. Unfortunately in today's workplace all the contractors are interested in is how fast you can do the work. Side note. Early in my career the shop sent me over to help some guys who had been residential hands and they had piped in this job. I got there and the lead guy wanted to show me their pipe work he was so proud of. We walked into the mechanical room and there was the panel with about a dozen half inch pipes coming out of it. They all offset back to the block wall the panel was mounted on. Went up a few feet and there was an i-beam sticking out of the wall so they saddled all the pipes across it. Continued up and then in the structure they offset on another beam and hung a 90, crossed the room and saddled another beam, went out into the hall way and turned a 90. Looking down the hall I could see two more saddles, then another 90 and there placed their first pull box. All the pipe work was going to be in a sheetrocked inaccessible ceiling. I looked at the guy and asked if he had any idea how many bends he could put into a pipe run and still pull wire through it. He said he thought you could pull through as many bends as you used.
i bent 4 point saddle once during my second year apprenticeship. at first, when i get the training for that, i thought four point saddle is a jumble mess to deal with since there's so many variables that needed to be addressed. after doing one more than a month ago, "oh it's just a sequence of checking" :O
So if u do a 4 pt saddle on ridged and want to cut and thread the pipe first , are u supposed to find the shrinkage to both offsets and add that to the pipe?
Hey! So I’m having to go behind other people that installed conduit and I have to make a 4 point saddle within about 10 inches of a 90, ideally I would have a 90 straight shot but since I’m last on the job and there’s two sets of conduit between me and my box I have to make a saddle with a 2” rise at 9 1/4 long, so my “2nd” mark as you refer to it is 5-6 inches away from my 90. With your experience I was wondering if you’ve had to deal with this type of scenario and what you’ve done if so.
It is always a good idea to put a 1900 box within 2 feet before and after the first and last band. That’s 120° of band right there; good luck pulling wire through it if you do not give yourself the proper leverage to do so
random not so random question what does code say about trunking/ raceways can u have electrical cables 120V/240V electrical wiring being surface mounted along the walls instead of behind the panels ?
You want to bend the less degrees in the pipe as possible so its easier to pull through. You only get 360° of bends in a run of conduit before you have to put a box in the run. Sometimes however, you dont have a choice on the degree of the bend 30,45,60 etc. What I'm saying is the less bends the better if u can get away with it.
You can purchase a rubber boot (Made by Ideal Electrical) for the top of the bender - so when the bender is inverted for hand bending it does not slide. Ideal 74-037 Bender Boot for Conduit Benders
Lol it called your foot to keep it fron sliding. Buy 1 for yourself. No shop will get you 1. And if your an apprentice, I guarantee it would disappear within 2 days.
I just bend my marks in order and I never have to take the conduit out and flip the whole thing around. You spin the conduit still obviously but I never take mine out of the bender. Makes it a little easier and quicker. Bend your first mark, then spin conduit. Bend your second mark, DONT spin conduit, then bend your third mark, spin conduit, bend 4th mark.
Because that’s what it’s for. The arrow tells you where the bend will start ( or end, depending on how you look at it) the notch is for the center of a 45 degree bend, and the star point is for where the back of the bend will be, when bending back-to-back 90’s
I want to watch the old guys, they have all the knowledge. You learn conduit by doing it not by watch someone with couple years experience. I know this because I am very competent in conduit after 30 plus years, I topped out of apprenticeship in 1993.
Love your videos. I learn so much every time I watch them. Could you make a video on residential dock wiring methods and codes? It’s something I haven’t done much of. Would love to learn more.
Imma be completely honest...for the time and pain you spend on a 4 point you could’ve bent two offsets. I’ve only bent like 2 of these things and I’ll probably never bend another one unless the foreman insists. 😎
@@fordkennedy2688 He's talking about two arbitrary offsets with no shrink taken into consideration and unequal distance on each side of the obstacle. Looks like crap to anyone that actually knows how to run pipe.


Did my first ever 4 point saddle today. It was easy to do while following the video. You explained everything perfectly for beginners. I had a little dog leg but was able to fix it thanks to the tip at the end. Thanks for the video
Shrinkage is really bad in colder weather. Don’t let girls see your conduit, especially if there are bends in it.
😂
I still smashed tho
🔵What you said doesn't make sense.🔴
@@auletjohnast03638 than your not a sparky
Shrinkage is the same in cold/ warm weather bro. Has absolutely nothing to do with temperature
Great presentation. I've been in the electrical trade for 40 years and watching you I picked up a couple ideas. The aluminum emt with the inner coating sounds interesting.
On another note, we use dry erase markers for marking bend points. The different colors are easy to see, and they wipe off easily when you're finished.
Pipe guys are underappreciated. ESPECIALLY rigid guys. It's an artform for sure. I was capable in my day but by far not the best. Great video. You're almost out of bends to promote the aluminum company!! ha. More SERVICE CALLS please!!!
*conduit
@@electricianron_New_Jersey Correction duly noted
second term apprentice here in Canada - I have used your videos ON SITE and they have saved my ass!! thanks!! - amazing content
Wish I had youtube in 1994 during my 2nd year apprenticeship! Keep learning kid. I've had an incredible career so far.
Well you better start learning in class and on job. Many have no cell phone rules and journeyman and foreman don't like seeing apprentices not use their heads to learn. Using the videos is a form of cheating. View them at home and take notes.
What you need is a cheat sheet with the formulas you need. And info on your multiple bends and runs.
This way you learn how to come up with the math and how to do it.
I have turned apprentices around and sent back to the school by doing what you are doing.
And the school is great with it. Why? Because it is unprofessional to look at your phone all day. And you should know how to do something without the help of someone telling you how to do it.
@@lm5085 thanks dad!!
When bending 30 degree, put your level on the handle of your bender. When the 90 degree reads level you are at 30 degrees
That’s really cool. I bent some conduit in an air handler a while back and got an education on it.
It’s an art, for sure.
I wonder if you could make a weighted block with a hole for the handle to sit in, so you don’t need to use your foot to keep it from sliding around when it’s inverted.
Throw something soft in it and it won’t jack up the handle grip.
Could also get some pipe to slide over the EMT to use as a cheater and be able to stand a little further back.
Would that work?
Love this channel. I was an electrician on commercial ships, and working on land is WAAAAAY different.
No conduit or wire nuts, ungrounded system, no neutral leg.
Armored cable for everything and everything is hot.
Your channel is quite the translator for me and I appreciate it.
Good ideas!!
Theres rubber boots you can put on the handle to prevent slipping.
I usually will add for shrinkage on 4 bends. Especially on an obstruction that high. 30 degrees is a 1/4” of shrink per inch of offset. So you’re looking at 1.5” of shrink in a 6” obstruction. Just looks neater if the center of your saddle match the center of the obstruction.
Would u add that shrinkage value when measuring from point 1 to 3?
@@estebanhernandez243You would add the shrinkage to both sides equally. Your obstacle measurement won’t change from point 2 and 3. So you add the shrink from 1 to 2 and 3 to 4. So 1.5 of shrink in total would be .75 per side. You remember how he said multiply by 2? You would just add the .75 for shrink so in reality he should of measured it at 12.75 away from the obstacle each side.
It has nothing to do with amount of degrees on a bend for shrinkage man, it’s the amount of offset. 1/8” shrinkage per 1” of rise.
@@maddawglynn wrong.
Did anyone notice he flipped the bender for no reason, it still ended up in the same position it was lol, just flip the pipe around and rotate
Lots of different techniques for pipe bending. I typically measure depth of offset needed, width needed. Then I chose the multiplier for the degree bend I want to use. Then I lay out all four marks on the pipe. I normally use the center of the bend arrow as my bending point and start with the first bend on the floor. Then flip and bend the second bend making sure the offset is square. Then I bend the third bend and flip and bend the final bend. I adjust any dog at that point if necessary. With emt I don't bother with figuring shrinkage. I know where I want my first bend and add a couple of inches and bend the offset. Then I hold it up, mark and cut to fit exactly. Unfortunately in today's workplace all the contractors are interested in is how fast you can do the work. Side note. Early in my career the shop sent me over to help some guys who had been residential hands and they had piped in this job. I got there and the lead guy wanted to show me their pipe work he was so proud of. We walked into the mechanical room and there was the panel with about a dozen half inch pipes coming out of it. They all offset back to the block wall the panel was mounted on. Went up a few feet and there was an i-beam sticking out of the wall so they saddled all the pipes across it. Continued up and then in the structure they offset on another beam and hung a 90, crossed the room and saddled another beam, went out into the hall way and turned a 90. Looking down the hall I could see two more saddles, then another 90 and there placed their first pull box. All the pipe work was going to be in a sheetrocked inaccessible ceiling. I looked at the guy and asked if he had any idea how many bends he could put into a pipe run and still pull wire through it. He said he thought you could pull through as many bends as you used.
i bent 4 point saddle once during my second year apprenticeship. at first, when i get the training for that, i thought four point saddle is a jumble mess to deal with since there's so many variables that needed to be addressed. after doing one more than a month ago, "oh it's just a sequence of checking" :O
Thank you for the lesson!
When will you be uploading a bonding gas pipe system to the first means of disconnect?
And second...I like your explanations. Thorough.
I add 3/16 to each side for shrinkage on a 30° offset.
Did I miss the offset for the first bend?
Keep up the great work 👍.
I only bend 90s on the ground. All others I do with the handle down (1/2” & 3/4”). 1”-1 1/4” all on the ground.
So if u do a 4 pt saddle on ridged and want to cut and thread the pipe first , are u supposed to find the shrinkage to both offsets and add that to the pipe?
How do I use saddles or my main question is what is the distance that is acceptable from an offset or 90 degree to a saddle?
Great video. Did you or will you release the residential mini split install? Thanks!
Hey! So I’m having to go behind other people that installed conduit and I have to make a 4 point saddle within about 10 inches of a 90, ideally I would have a 90 straight shot but since I’m last on the job and there’s two sets of conduit between me and my box I have to make a saddle with a 2” rise at 9 1/4 long, so my “2nd” mark as you refer to it is 5-6 inches away from my 90. With your experience I was wondering if you’ve had to deal with this type of scenario and what you’ve done if so.
It is always a good idea to put a 1900 box within 2 feet before and after the first and last band. That’s 120° of band right there; good luck pulling wire through it if you do not give yourself the proper leverage to do so
First day?
@@Tre16Ajajajajaja
random not so random question what does code say about trunking/ raceways can u have electrical cables 120V/240V electrical wiring being surface mounted along the walls instead of behind the panels ?
Cool video Dustin keep them coming back lol
You want to bend the less degrees in the pipe as possible so its easier to pull through. You only get 360° of bends in a run of conduit before you have to put a box in the run. Sometimes however, you dont have a choice on the degree of the bend 30,45,60 etc. What I'm saying is the less bends the better if u can get away with it.
You can purchase a rubber boot (Made by Ideal Electrical) for the top of the bender - so when the bender is inverted for hand bending it does not slide. Ideal 74-037 Bender Boot for Conduit Benders
Lol it called your foot to keep it fron sliding.
Buy 1 for yourself. No shop will get you 1. And if your an apprentice, I guarantee it would disappear within 2 days.
I fix my dog legs with some sturdy clamps to the wall. 🤣
Milwaukee markers generally come right off with alcohol
where do you find aluminum conduit?
Did you put the microphone in your mesuring tape?? 😋
I just bend my marks in order and I never have to take the conduit out and flip the whole thing around. You spin the conduit still obviously but I never take mine out of the bender. Makes it a little easier and quicker. Bend your first mark, then spin conduit. Bend your second mark, DONT spin conduit, then bend your third mark, spin conduit, bend 4th mark.
What code is used for burying an extension cord inside a wall?
It falls under NEC code hack 101
I knew there had to be a code for it
what are the torque of the 4awg cables and is there a key
Thank you
11:52
Why use the arrow, rather than the notch or star ?
Because that’s what it’s for. The arrow tells you where the bend will start ( or end, depending on how you look at it) the notch is for the center of a 45 degree bend, and the star point is for where the back of the bend will be, when bending back-to-back 90’s
Why didn’t you include the shrinkage value ?
If it’s 6” H)eight ; then you’d have to add 2 1/4 for your first mark.
I want to watch the old guys, they have all the knowledge. You learn conduit by doing it not by watch someone with couple years experience. I know this because I am very competent in conduit after 30 plus years, I topped out of apprenticeship in 1993.
Love your videos. I learn so much every time I watch them. Could you make a video on residential dock wiring methods and codes? It’s something I haven’t done much of. Would love to learn more.
Why do you use a tape measure?
Mini bandsaw and an eyeball
how long would this normally take to bend if you weren't making a video?
So I learned how to do it this way but does anyone else use the pass through method with saddles?
I was in the Pool!!
I was in the Pool!!
You can rub the sharpie off if you go over it again
No way. I'm first?? 🎉
👏 👏 👏 👏 👏 Congrats🎉🎉
@@bilithic7421 lol. I wanna thank electrician u for the opportunity to finally be first.
Excellnt
5:34
Aluminum is a bitch to work with, especially because magnet levels dont stick to it, and you have to thread it.
Do you guys ever notice your conduit is bowed really bad? Like straight from the supplier and it’s just bowed?
You mean like one of the conduit in the bundle ? If so, its usealy the delivery guy that uses one of the conduit as a handle to move them around..😣😣
All the time, unfortunately.
@@martf1061 no I mean I get a master bundle of 6000’ 3/4 EMT and every single stick is bowed.
7:12
Way easier to do this standing up with the shoe in the hand
2 bends, use a coupling, 2 more bends 👀
Let’s say you need your first two bends close to the end of the pipe. How do you bend it in the air if you don’t have enough ass on it ?
When it comes to bending conduit, I say you can't get 100% every time
I thought both bens 2 and 3 have to face each other shoe
1:26
4:21
4:44
5:11
6:42
8:14
🔵COULD YOU BEND WITHOUT THE COMMERCIAL ENDORSEMENT.🔴
Aluminum rusts in fast in quebec
This is not aluminum.
It's emt.
@@martf1061It’s aluminum EMT
Imma be completely honest...for the time and pain you spend on a 4 point you could’ve bent two offsets. I’ve only bent like 2 of these things and I’ll probably never bend another one unless the foreman insists. 😎
Being bad at bending conduit is not a very good excuse for not using the appropriate bends for a given obstacle.
A 4 bend is 2 offsets it takes the same amount of time
@@fordkennedy2688 He's talking about two arbitrary offsets with no shrink taken into consideration and unequal distance on each side of the obstacle. Looks like crap to anyone that actually knows how to run pipe.
@@zacharybob4336i think he's talking of doing 2 offsets with a cuppling in the middle of the saddle.
👍