Chevron End Grain Cutting Board | Great DIY Kitchen Project

HTML-код
- Опубликовано: 5 июл 2024
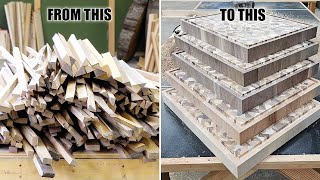
- My very first video on RUclips was a DIY video for a chevron pattern cutting board, but there were some critics that didn't like the end-grain to end-grain glue up used in that board (since they tend to be weaker). So, I made an end grain cutting board with a chevron pattern that only uses edge grain glue-ups.
Original Chevron Pattern Video: • Chevron Cutting Board ...
Etsy Store: www.etsy.com/shop/EigenDesigns
Instagram: eigen_desig...
TikTok: www.tiktok.com/@eigendesigns?...
-------------------------------------------------------------------------------------------
Time Stamps:
0:00 Introduction
0:48 Creating the Chevron Pattern
3:22 The First Glue Up
5:13 The Second and Final Glue Up
5:45 Routing, Sanding, and Finishing
8:00 Finishing Touches and Finish
10:04 The Finished Chevron Pattern Board
-------------------------------------------------------------------------------------------
Equipment & Tools:
10” Combination Saw Blade: amzn.to/3eFYGzv
Dewalt Planer: amzn.to/3itC6en
Shelix Helical Cutter Head: amzn.to/2Trtcpy
Titebond III Wood Glue: amzn.to/3BiUyzc
Titebond Original: amzn.to/3iqjBYp
DeWalt Clamps: amzn.to/3BiC5Ti
DeWalt 20v Cordless Drill Set: amzn.to/36Oe9ck
Bessey 18” Parallel Clamps: amzn.to/3hOmdjC
Bora 40” Parallel Clamps: amzn.to/3itiGq6
DeWalt 5” Orbital Sander: amzn.to/3hNIdLt
Abranet Sanding Discs: amzn.to/3rjeOMz
Microjig Push Block: amzn.to/3uPK2fT
CNC Accessories:
Amana 8 Bit Set: amzn.to/3rUUl0R
Drag Chain: amzn.to/3lPxymf
Makita Router: amzn.to/36OKxvs
1” Surfacing Bit: amzn.to/3n9koRC
1/4" Juice Groove Bit: amzn.to/3C4scbX
Dust Collection:
POWERTEC Downdraft Panels: amzn.to/2V055hR
Dust Right Small Port Hose Kit: amzn.to/3kBnAUK
Dust Right 4” Quick Change Set: amzn.to/3zhAueu
Powertec 4” Blast Gate: amzn.to/2VQbQDo
Powermatic 20” 2-micron Filter Canister: amzn.to/36K5Caz
-------------------------------------------------------------------------------------------
Music Credits:
Cosimo Fogg - Jazzaddicts
Damtaro - Nothing
Domiko - Refelection
Sappheoros - Willow
Song: Fredji - Happy Life (Vlog No Copyright Music)
Music provided by Vlog No Copyright Music.
Video Link: • Fredji - Happy Life (V...  Хобби
Хобби


Nice board ,great video! Thank you
Absolutely wonderful looking project, think I'll try it. Thanks for the details concerning the glue up
Thanks Ron, good luck on your build!
Great job with the cutting board. I am going to make one this weekend. Thank you for sharing. Also the filming and narrating was informative and to the point - no distractions.
Thank you. I work hard on the editing side to keep things moving and not drag on too long. Let me know how the board turns out!
First one was great. This is stunning dude. Love it.
Great job dude!
Okay, this is beyond bad ass! Not only does the board look stunning, I got to see my own product in a video! Thanks Mark for using my board butter!
It's incredible! I tried to do your product justice by doing a nice cinematic pan shot. :D
Where can i buy your version?
Great looking board!
Thanks Ana. We love it too and are getting a lot of use out of it :)
Great video I was looking to build something similar and this video helped a ton beautiful cutting board
Hey thanks! I am glad it helped :)
Great tips! Thanks
😃
Great board. Quick tip for your rubber feet. Instead of shimming with washers, you should use a forestner bit and inset all of them. Then if/when you have a slight rock, you just identify the two corners and drill a little deeper. Your customer might see the washer, but they’ll never see that the feet are slightly inset a little deeper on two sides. Been working for me for years.
That's a great tip Caleb, thanks!
Just don't use them. That way you can use either side
Awesome!!
Thanks so much :)
Good videos!! thank you!! Could I know which cutting table you use?
Wow that board looks sharp! Great job 👏. Your channel is really growing. I’m trying my darnedest to catch up with you 🤣
Thanks for the continued support Logan!
Mark how do you keep your shop so freaking clean?
Enjoyed the video! What are the final dimensions of the cutting board?
Nice job.
Thanks Matt :)
At 4:35, it looked like there were no sacrificial boards when you ran the strips through the planer, and also that the strips were already cut to length. What did you do about the snipe? Weren't there any? Did you just glued them as-is or was there a cleanup step you left out?
Nice board ! Got one question for you, in the last planer step, how to you prevent snip ? I image that a snip at this moment would make empty spaces between stripes in the last glue up ? I have the same planner and it almost always give me snips.
Hey Martin, that's a really good question. Sometimes I can avoid/minimize the snipe by taking really light passes with the thickness planer. If I do get any snipe after using the planer, one trick I use is do a light pass with the jointer (~1/32" or less) to remove it.
Great tutorial! I was wondering how to do an end grain Chevron board and this video got me all set! Curious if you found 65 degrees to be a particularly good angle from either an assembly or aesthetic perspective or if other angles have worked just as well for you. Thanks! Beautiful board :)
I would think that the more aggressive the angle, the more careful you have to be with the cauls during the first glue-up. Obviously the cut is longer also with a greater angle. He seemed to get a good 3-D effect with what he did IMO.
How did you end up with a warped board even after all the planning you did? Where did you go wrong
Like your work, nice, what cnc machine model you used. I like to buy one but not sure which one. Any recommendation? Thanks
Thanks Michael! I have a OneFinity CNC and I would highly recommend it for anyone looking to get one. They make a few different sizes, and they are all rigid and very reliable. I use mine daily and have never had any issues with it.
Good luck!
A great looking and functional board.What size is the finished board?
Hey Jeremy! The final dimensions are ~16x12.5"
Love this board. Great job and great video. What ended up being the final dimensions of this cutting board?
It was about 12" x 17" at the end
Hello, Mark! I wonder if you might help me. My husband has been interested in woodworking for sometime, but has not taken the plunge. He has recently been inspired by your videos. His 50th birthday is next week, and I thought I would surprise him with a few things to help him get started. He has some of the basics - a router, table saw, miter saw, palm sander, etc. I was considering a planer and/or jointer. If you were just starting out, what would be "must haves" in a garage/workshop? Thank you!
Hey Beth! That's a good question. If I had your husband's tool setup then the next thing on my list would be a planer for sure. Getting a planer is the next big "game changer" for a woodworker after getting a table saw. While a jointer is sure nice to have, you can actually build "jigs" and "sleds" to be used with your table saw and planer to achieve the same results as a jointer would provide. Furthermore, having a jointer without a thickness planer isn't very helpful because you're almost always using the planer right after you joint something.
I hope this helps! Happy 50th birthday to your husband. :)
@@EigenDesigns Thank so much, Mark! Super helpful!
olá! poderia passar as medidas ?
I had a question regarding the juice groove. Obviously there’s jigs to make a straight line around the board but to get that type of corner profile for the juice groove, is there any type of templates that can be laser made and double stick taped so the router or bearing can ride on and get that same look? Obviously it’s tough because not all routers or bits are the same but has someone figured out how to do this without a cnc?
Im sure you could figure out a way to do it, but I haven’t seen it before. If you don’t have a CNC it’s probably not worth the trouble to be honest.
ОЧЕНЬ ХОРОШО, ЗОЛОТЫЕ РУКИ!
будь ЗДОРОВ.
What part of texas are you in brother?
Hey Dustin! I am near the Houston area.
@@EigenDesigns i have my shop setup in league city man! Id love to meet you one day! Do you have Instagram?
@@Fixbuildflip-Dustin-Boettcher I do! You can find me at: instagram.com/eigen_designs
how do you get or make a template like this for the juice groove. ive never seen one like this in the corners. any way to make a template to look like this in the corners?
The juice groove was done with a CNC. I haven't seen a template to do corners like this by hand.
@@EigenDesigns yah thats what i meant. i havnt either. could be something interesting and new to bring into the market. fancy juice groove corner templates
@@eladsinay6914 That's a good idea. I am not sure how to do it with a jig, but it would be a good idea.
@@EigenDesigns im new to woodworking so i may be wrong but is there a way to make a sheet of acrylic at the size needed and use that to go thru it to create either the whole thing or just the corners? if its a template just for the corners, i suppose you can use the typical jig for the straight lines, then have a pre set line where to stop and then use the corner jig to make the corners.
@@eladsinay6914 Its certainly possible. A rigid acrylic template would probably work well, but would be fixed to a certain size. If you end up making something like this tag me on instagram or tiktok so I can see what you come up with. Good luck Elad!
Do you not finish the bottom and if so why do you install the feet first. I have seen this in your video's?
That's an interesting observation. I do finish the bottoms of my boards, but apply the finish once the feet are installed. I prefer to drill the holes for the rubber feet prior to applying the mineral oil finish so I don't get shavings on my finished boards. It's just personal preference I guess.
@@EigenDesigns What program is used to talk to the cnc machine?
@@reddsmorris7053 I use Fusion 360 to design my CNC tool paths, which is a free product. Once you have designed your tool paths you export them as "g-code", which is basically instructions for your CNC. The g-code files is what your CNC uses to actually carve your designs onto the wood. It's a bit of a steep learning curve, but once you get the hang of it, it's really fun!
@@EigenDesigns Thank you
Hello my friend, good night, thank you for sharing your knowledge and I will follow your videos, I am a beginner in woodworking, it is an honor to watch channels like yours, another subscriber here from Rio de Janeiro - Brazil - and an inspiration for me to post my videos on my channel, big hug, friend
Thank you for the support. I am honored to have subscribers like you 😊
What is te name of the router? Computerized router?
I have a OneFinity CNC. It's a great machine if you're looking for one.
@@EigenDesigns where can I buy the one finite router? I can see anywhere
I love when people cry about end grain glueing. Do they think the glue will be weaker based on the orientation of the wood?
Yeah i’ve done an end to end grain joint cutting board and it’s fine 🤷 I found that doing an initial thin layer of glue and letting that dry, then doing a regular layer of glue helped a lot
End grain most certainly can go through the surface planer. Just have to take tiny bites.
"make sure you have alignment with your chevron pattern" ....do as I say, not as I do ;)
you messed up on the alignment with the chevrons on the first from the left. never mind you will learn from it.
very poorly made though