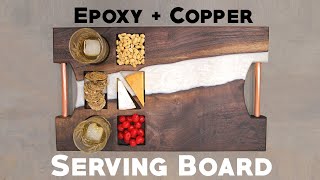
I watched this whole video just to see it set up as a charcuterie board. I wanted to see the end product with food on it. Well on to the next vide! Great job! I love the finish product.
i too use packing tape for my epoxy projects, i found the best success with the Duck brand tape, i get it in the 3" width online, i think their plastic film is thicker and easier to work with because it starts and tears cleanly, and the extra inch width of tape is nice.
Love that you give your friend a shout out on your video. Two things I'm always looking for -- a quality DIY channel, and a quality Christian apologetics channel. Got you both a sub.
Another idea for Tuesday. How to guesstimate how much epoxy you need for a pour. I’m not Einstein so I have a hard time making the right judgment. Also your draw string at the beginning of the video was setting my OCD off like the 4th of July.
Just found your channel and I subscribed, amazing work, great video's, positive vibes but the best part is you actually take time to answer people's questions!! Most people just post video's and never answer any questions!! After watching just a few of your video's I'm getting ready to try a few small practice projects!! Thanks for your time, you're a natural teacher!! You make it look so easy!!
After a wash or 2 you’ll need to apply more butcher block oil. After you repeat that more and more, less and less oil is needed. Eventually when the board is seasoned with oil you’ll only have to do it once a month if you’re using it regularly.
You are absolutely brilliant! I love watching your videos, so informative and easy to follow, keep up the good work and especially THANKS for sharing! ❤️
That epoxy has a pull apart strength of 22 thousand pounds per Sq inch...you can hit that epoxy with a sledge hammer and it may chip...good luck cutting it with a knife ...will dull it first
I had the same question. Beautiful piece soon to be marred with a knife. But I was wondering about the food safe part of the epoxy. Read that cured epoxy was non-toxic. So why are some graded as food safe and others not? The video on making it was great. Will look for more of his utubes.
My mom loves to cook and I want to make her something she can use everyday! Only problem is hiding it from her while I'm making it! It's beautiful, great video!
Short answer is no. Longer answer is none of the epoxies are food grade, at least none I've found. I'd use them more for serving boards, as long as nothing really hot goes on them it is stable.
Hey I took your advise and subbed. This is your first video that I've watch and i can tell that I'll like following your channel. The project was awesome, great job.
Nice project. I'm just starting out using epoxy. I got myself a beautiful piece of Manitoba cherry. Was 33x16 inch. Cut it to about 16 inches by 16 inches by 2 inch thick with live edge. Natural oranges and reds flow through it. My plans are to make a reverse river. I'm prepping the wood, removing bark. I'm noticing a lot of small surface cracks between the grains. My question is, how do you calculate the amount of epoxy needed? I don't want to waste more than I have to. If needed I'll post a quick video with the plans.
I was waiting for you to be in your gee and karate chop that board in half. Watching this I suddenly have a desire for a blue slushy drink from the gas station... Great job Nathan
Richard Weiss great question! I just take a paper towel and wipe it off after i let it sit and drip for a few mins. I had this drill mixer for over a year and haven’t needed to replace it yet.
Hi fun stuff lovin it! I also live that you give your friend a plug BUT chiming in because you mentioned In another video we don't have to worry about the wipe because it just helps get a better surface to mix everytime. Do we need to clean it each time?
Nice work! Would love to see a break down of cost of materials and total working time on projects like this. I'm going to try and get a wood shop up and running, ultimately I would love for these live edge projects to be my primary production. So it would be interesting to see the cost breakdown.
Finally a video that is explained from start to finish. Great video!!! Only question is do you plan the rough live edge before the video. I never made a epoxy board and I'm very interested in making one so trying to learn every step?
Question for you. I have watched a few of your videos working with wood and epoxy, like the 4 or 5 part coffee table build. I believe this is the first time I have seen you drill the hold on the inside of the boards so that the epoxy can act as dow rods. Why was it needed this time and not when you did the coffee table? How can I tell if my project I am working on is going to require me to do that? I am a complete beginner and looking to begin my first project soon. Thanks for the great videos!
Great question! The only reason you would need to do that is if you’re not going to encapsulate the entire piece. If you notice, in this video I didn’t pour a flood coat. Hope this helps!
Looks brilliant! ! One question though, how will it stand to actually being used ? Unless your mom has got a huge kitchen, it really looks too big to just sit around looking really cool.
does the heat trick only work on that epoxi or could you use it on others as well Im going to start making my own pen blanks and typically you put it in a vacuum chamber or pressure pot to get bubbles out
Hi Nathan! It's been a little over a year since you made this cutting board, I remember watching it and think I wonder what it would look like after it's been used. I'd love to know have you used it, how often, and what does it look like now? I think it would make a cool RUclips video "Before & After" just a thought
Marco Velez hey brother that’s a great idea. The only problem is I sent it to a fellow RUclipsr several states away 😅. I’ll try and see if he has any pics.
I wouldn’t seal the edges. The products a available these days are much better than they once were. Just make sure you keep the temp down and shouldn’t have any bubbles.
you use Different epoxy for different projects how do you determine what you're going to use? I'm looking to order but don't know which to order for my table
I had the same question. Also, this is the only one of his epoxy projects that I can recall seeing this "dowel" idea used. I'd like to know if that's because it causes problems or because it's just unnecessary.
It’s because it’s unnecessary. If you use the correct type of epoxy (slow setting casting epoxy) the dowels are not needed because the epoxy has time to soak into the edges creating the strongest bond.
Since you're doing multiply pours you don't have to color the bottom pour. Mineral oil from the drug store is cheaper than the butcher block oil. I just let the cutting board soak for 30 minutes or so in a mineral oil bath. Let it drain off until there is no standing oil than rub it dry. Mix up some melted bees wax and mineral oil in a 2:1 ratio. Apply the wax for a final coating on the cutting board. Tell the customer only hand wash and clean it with half a lemon and kosher salt once a month then rub it down with some mineral oil. I also tell the customer that I'll resurface the board once a year. That way you stay in touch with a customer. If they bought once, they'll buy again.
I'm still in the watching videos learning as much as I can. I want to make a cutting board that can be cut on a not leave knife makes. I'm kind of confused watching videos of how to make a cutting board but you can't cut on them.
David Pond you can cut on them. You just will get scratches. One thing you can do is; epoxy one side and then pour oil on the other side. Then use the oiled side to cut on.
Do you find that the sandpaper discs need to be tossed after one use on the resin? The white resin residue seems to stick to the pads and make them useless after one use.
Help!!! I thought I was ordering the right stuff!! Anyway I wanted to make serving boards with the epoxy in the center. I ordered some Total Boat epoxy resin. Now I see that it is table top so needs to be done in 1/8 increments. Not what I thought! What should I have gotten?? Thank you in advance!
@@GoodViewWoodworks Thanks so much! I have this now so have to use it. How dry can it get before you put another thin coat over it? Tacky I believe they say but can it get dry. It would take all day and night to do only a little depth. You do a great job in your videos and I watch them over and over wishing I could do that! Thanks again!


I had to re-watch this video after a year. It's the cid that got me hooked on Goodview, Nathan and resin crafting. Still lovin' it all.
Lost Sailor thanks bro!!! I appreciate that!
I'm just a beginner and your video was the best I've watched thus far...awesome...thank you.
Great job at doing a step by step tutorial. Most videos just do it without explaining. This was very educational.
King Leo thanks! That’s one of our goals here on RUclips, to teach people. Thanks for watching!
I watched this whole video just to see it set up as a charcuterie board. I wanted to see the end product with food on it. Well on to the next vide! Great job! I love the finish product.
Best tutorial I've seen sooooo far. It is even better than the ones from the "big channels" thank you so much ☺️
GoodView Woodworks
Very Good !!!
Thank you!
@@GoodViewWoodworks Nothing, I have to learn a lot from your videos
Hey love your work .... thank you for your time....God bless you, your friend from Canada....
Thank you so much!!
You freaking help me so much. Your so simple not all these crazy tools I don’t have lol you the best!!
Dustright has a 5micron bag that fits your planer. It's less than $40 and works. Great videos, keep it up
Thanks! I’ll check them out!!
Beautiful job Nathan
I really like the translucency of the epoxy
Great video! You make me feel like I can really do this myself with the steps you demonstrate. Thank you for taking the time and effort.
I’ve been having a hard time clamping my form to my table but I see how you raised it, that a great idea, thanks!
Nice job. I didn't know you could use clear packing tape for the mold. Thanks for the learning experience.
Thank you! You’re very welcome 😉
Your Videos helped me finish my first river table. Thank you. Your work is fantastic 👍.
Great job and you’re a hoot
WELL DONE!!
Thank You for your fast reply!
Wow! Great job and great job at showing us how to do this! Thanks! Can't wait to make one!!
Thanks so much!!
Oh I want one of those. I love your creations.
Thank you!!
I like your tutorials...... you are good.
i too use packing tape for my epoxy projects, i found the best success with the Duck brand tape, i get it in the 3" width online, i think their plastic film is thicker and easier to work with because it starts and tears cleanly, and the extra inch width of tape is nice.
Nice! I’ll check it out
This was a fantastic tutorial
Thank you!
Love that you give your friend a shout out on your video. Two things I'm always looking for -- a quality DIY channel, and a quality Christian apologetics channel. Got you both a sub.
That’s awesome man! Thanks!!
The dowel holes are game changing
Nooice!! Great job and I love the color!
thomas heroux 🤣 thanks bro!
Wonderful gift from the heart 👍
Thanks Mike
Another idea for Tuesday. How to guesstimate how much epoxy you need for a pour. I’m not Einstein so I have a hard time making the right judgment. Also your draw string at the beginning of the video was setting my OCD off like the 4th of July.
Great idea! Bro you are hilarious! 🤣😂
You just need a little multi-variable calculus.
Great video. Iv been planning on doing something similar and your video is extremely helpful. Thank you from the U.K. 🇬🇧
Just found your channel and I subscribed, amazing work, great video's, positive vibes but the best part is you actually take time to answer people's questions!! Most people just post video's and never answer any questions!! After watching just a few of your video's I'm getting ready to try a few small practice projects!! Thanks for your time, you're a natural teacher!! You make it look so easy!!
Thank you so much. If you have any questions please don’t hesitate to ask.
Question, wouldn't the dowels be more efficient if the holes were drilled after the sealing epoxy? 🤔
Amazing end result, keep up the great work
I’m in love with your cutting board!! It’s beautiful!!
Thank you!!!
my friend. very nice. thank you so much. be happy.. bravo
Thank you!
Appreciate the hard work! After watching several of your videos, this is, by far, the best music (to me)... Thanks for sharing!
Your last name is one letter away from mine
That was a really great tutorial, thanks 😁
Thank you!
I agree!!!
Great job!
What about cleaning that stuff with water after use, doesn’t it leave water marks?
After a wash or 2 you’ll need to apply more butcher block oil. After you repeat that more and more, less and less oil is needed. Eventually when the board is seasoned with oil you’ll only have to do it once a month if you’re using it regularly.
Really nice!
You are absolutely brilliant! I love watching your videos, so informative and easy to follow, keep up the good work and especially THANKS for sharing! ❤️
Nice job Nathan. Now I need to find some live edge wood and try it. 😊
Am I really the only person that has modest concern about cutting into, then eating food from an epoxy cutting board?
There shouldn't be any such thing as an "epoxy cutting board," only "epoxy serving boards."
Yes...
That epoxy has a pull apart strength of 22 thousand pounds per Sq inch...you can hit that epoxy with a sledge hammer and it may chip...good luck cutting it with a knife ...will dull it first
I had the same question. Beautiful piece soon to be marred with a knife. But I was wondering about the food safe part of the epoxy. Read that cured epoxy was non-toxic. So why are some graded as food safe and others not? The video on making it was great. Will look for more of his utubes.
Epoxy when cured is a plastic cutting board totally safe
My mom loves to cook and I want to make her something she can use everyday! Only problem is hiding it from her while I'm making it! It's beautiful, great video!
Awesome thanks!
what a great job. I will be making one now, Thanks and keep it up
Awesome video.
You the man
Question: how does the epoxy stand up to sharp kitchen knives? Thank you. Beautiful work!
RMG CBG great question! Sharp kitchen knives will score the surface. But you can always scuff and recondition the surface.
Is epoxy safe to use on a cutting board? It scratches and chips when cut on? I don’t think resin is something you want in your food.
Short answer is no. Longer answer is none of the epoxies are food grade, at least none I've found. I'd use them more for serving boards, as long as nothing really hot goes on them it is stable.
@@TheRealCartman1 Stone Coat Epoxy is food safe. You should check them out.
@@frankiekimberlin148
Food safe yes, but fails as an actual cutting surface. So the term "cutting board" isn't accurate.
Hey I took your advise and subbed. This is your first video that I've watch and i can tell that I'll like following your channel. The project was awesome, great job.
Thanks a lot!!
What was the name of the oil you used on it at the end?
Nice project.
I'm just starting out using epoxy.
I got myself a beautiful piece of Manitoba cherry. Was 33x16 inch. Cut it to about 16 inches by 16 inches by 2 inch thick with live edge.
Natural oranges and reds flow through it. My plans are to make a reverse river. I'm prepping the wood, removing bark. I'm noticing a lot of small surface cracks between the grains.
My question is, how do you calculate the amount of epoxy needed?
I don't want to waste more than I have to.
If needed I'll post a quick video with the plans.
ruclips.net/video/yB0zLPwDO9k/видео.html
Check out this video. Hope it helps.
@@GoodViewWoodworks Perfect. Thank you for the link.
Side note,
Subscribed.
Keep up the awesome work.
Ok any dude who is so nice and has an awesome dog oh yes and the art is amazing I’m going to subscribe now 💫💫💫💫
😂 thanks Tracy!!!!
Thanks for the info and great looking project.👍🔨
No problem, thanks for watching!
Awesome work !
Thank you!!
Great board, why did you have to do 2 pairs instead of one?
Wow!
I was waiting for you to be in your gee and karate chop that board in half. Watching this I suddenly have a desire for a blue slushy drink from the gas station... Great job Nathan
It may be too pretty to touch with a knife.
😂 I thought the same thing!
Wow, what a beautiful cutting board.Lots of work though. I'm jealous of all your cool toys :)
im wondering what the epoxy looks like after you have cut stuff up on it over time? Im guessing it gets pretty scarred up.
Yeah it gets scratched up. The cool part is that you can just sand it down and re apply butcher block oil.
Awesome!!!
Wow, I love it
That will be a great butcher block in a month.
🤣😂 what do you mean
Cure time, maybe not a month but 2-3 weeks fir sure.
Not trying to take anything away from your project, just saying.
Mark Puckett it’s all good! Thanks for lookin out!!
Beautiful job!!!
Hey thanks Jennifer!!
You used a drill with a stirrer to mix the epoxy. How did you get the epoxy off the stirrer or do you just throw them away ? TIA
Richard Weiss great question! I just take a paper towel and wipe it off after i let it sit and drip for a few mins. I had this drill mixer for over a year and haven’t needed to replace it yet.
Hi fun stuff lovin it! I also live that you give your friend a plug BUT chiming in because you mentioned In another video we don't have to worry about the wipe because it just helps get a better surface to mix everytime. Do we need to clean it each time?
Nice work! Would love to see a break down of cost of materials and total working time on projects like this.
I'm going to try and get a wood shop up and running, ultimately I would love for these live edge projects to be my primary production. So it would be interesting to see the cost breakdown.
Thanks so much! It cost me about $37.50 to make this board.
@@GoodViewWoodworks how much do you charge for a piece like that? BTW excellent channel, love it, keep up the good work!!!
Finally a video that is explained from start to finish. Great video!!! Only question is do you plan the rough live edge before the video. I never made a epoxy board and I'm very interested in making one so trying to learn every step?
Hey I posted on my channel a cutting board I made with 1200 color pencils and epoxy cool as hell. Thanks for your advice on Facebook
No problem bro!
Do you get snipe on the end of your board when you run it through your dewalt planner.
Can this be done without using a planer?
Yes it can. You can use a router to flatten the piece as well.
Looks amazing!
How do I clean the edges up after I take it out of the form? Can I use a power hand saw?
ur the man
Thanks Jack!!!
Question for you. I have watched a few of your videos working with wood and epoxy, like the 4 or 5 part coffee table build. I believe this is the first time I have seen you drill the hold on the inside of the boards so that the epoxy can act as dow rods. Why was it needed this time and not when you did the coffee table? How can I tell if my project I am working on is going to require me to do that? I am a complete beginner and looking to begin my first project soon. Thanks for the great videos!
Great question! The only reason you would need to do that is if you’re not going to encapsulate the entire piece. If you notice, in this video I didn’t pour a flood coat. Hope this helps!
Hi Nathan. What is the material you poured at 16:28?
Is it epoxy?
It looks something like gel
It’s a butcher block conditioner
good work👍
Thank you
Nice one!
Looks brilliant! ! One question though, how will it stand to actually being used ? Unless your mom has got a huge kitchen, it really looks too big to just sit around looking really cool.
😂 it will get scratches from the blade. It will be the same as any wood cutting board. It’s really not very big. The finished size is 12x20
Can you use a pre-built cutting board from Walmart and cut it in half and then do it that way
Yes you can!
I thought you said not to seal the sides in another video . . . 🤔
Yep 👍🏻 this is an older video. I have since changed the way I do things.
Nicely done sir, enjoyed watching this video :)
Thanks D1
does the heat trick only work on that epoxi or could you use it on others as well Im going to start making my own pen blanks and typically you put it in a vacuum chamber or pressure pot to get bubbles out
It works on most epoxies
How would you clean this board after having food on it
Hi Nathan! It's been a little over a year since you made this cutting board, I remember watching it and think I wonder what it would look like after it's been used. I'd love to know have you used it, how often, and what does it look like now? I think it would make a cool RUclips video "Before & After" just a thought
Marco Velez hey brother that’s a great idea. The only problem is I sent it to a fellow RUclipsr several states away 😅. I’ll try and see if he has any pics.
Won’t the cutting board get scuffed when cutting on it? Great job!
I used fomwood apoxy for cutting board is it safe to cut on it ,chemical wise ,did not look into ,nice looking board u made ,thx in advance
Question did you add the second layer of the same epoxy on the second day
Does a blowdryer produce enough heat? Instead of a heating gun or torch?
I think it does. You can always try before buying a heat gun, but the heat gun I listed in the description is only about $20. 😉
20$ i Think i Can find that. Thanks! And great video! Beautifull board😍
Is there still a layer of epoxy on the wood after planing? Or do you plane down to the surface of the wood?
Great question. I plane it down to the surface of the wood.
any tips for uneven sided tray sealing
I’m not sure what you mean
@@GoodViewWoodworks I’ve got a piece of wood that the sides are not even ‘or square but I still need to seal them right
I wouldn’t seal the edges. The products a available these days are much better than they once were. Just make sure you keep the temp down and shouldn’t have any bubbles.
What was the finish you used at the end. Food grade oil? Which kind? Appreciate your videos and an answer :-) Great work!
It was butcher block conditioner. It is linked down in the description. Thanks for watching!!
Do you use the Cups more than once ?
Yes I let the epoxy cure in the cup then pull it out and it’s good to reuse.
@@GoodViewWoodworks thank you for answering my dum question
you use Different epoxy for different projects how do you determine what you're going to use? I'm looking to order but don't know which to order for my table
The countertop Epoxy is just to coat the surface and the casting resin is for thick pours. Thanks for asking!
Great job Nathan - quick question - I like the “epoxy dowel” idea but doesn’t it create more air bubbles sources, just as you precoat the live edges?
I had the same question. Also, this is the only one of his epoxy projects that I can recall seeing this "dowel" idea used. I'd like to know if that's because it causes problems or because it's just unnecessary.
It’s because it’s unnecessary. If you use the correct type of epoxy (slow setting casting epoxy) the dowels are not needed because the epoxy has time to soak into the edges creating the strongest bond.
Great job as always Nathan good idea about putting holes in the sides do u think that would work on bigger things like tables maybe?
Nick Garza absolutely !!!
Since you're doing multiply pours you don't have to color the bottom pour. Mineral oil from the drug store is cheaper than the butcher block oil. I just let the cutting board soak for 30 minutes or so in a mineral oil bath. Let it drain off until there is no standing oil than rub it dry. Mix up some melted bees wax and mineral oil in a 2:1 ratio. Apply the wax for a final coating on the cutting board. Tell the customer only hand wash and clean it with half a lemon and kosher salt once a month then rub it down with some mineral oil. I also tell the customer that I'll resurface the board once a year. That way you stay in touch with a customer. If they bought once, they'll buy again.
Thanks mike! I really appreciate that!!!
Actually you do need to color the bottom pour because you will see that layer on the end.
I'm still in the watching videos learning as much as I can. I want to make a cutting board that can be cut on a not leave knife makes. I'm kind of confused watching videos of how to make a cutting board but you can't cut on them.
David Pond you can cut on them. You just will get scratches. One thing you can do is; epoxy one side and then pour oil on the other side. Then use the oiled side to cut on.
@@GoodViewWoodworks cut on the oil side or the epoxy side?
Cut on the oil side just like a normal cutting board
Looks amazing man, I’ve always been told you never want to change your grip more than twice so 80/220 100/320 etc.
Looks great 😁! You are an amazing artist! Which resin do you use so it doesn't get damaged by cutting on the cuttingboard?
How much epoxy did that project take?
Do you find that the sandpaper discs need to be tossed after one use on the resin? The white resin residue seems to stick to the pads and make them useless after one use.
Yes however if you pause periodically and wipe the dust from the surface of your project while you sand it helps them last longer.
Awesome job can it be used as actual cutting board ?
Help!!! I thought I was ordering the right stuff!! Anyway I wanted to make serving boards with the epoxy in the center. I ordered some Total Boat epoxy resin. Now I see that it is table top so needs to be done in 1/8 increments. Not what I thought! What should I have gotten?? Thank you in advance!
If you’re going to use total boat, then you need to get their “thick set” epoxy.
@@GoodViewWoodworks Thanks so much! I have this now so have to use it. How dry can it get before you put another thin coat over it? Tacky I believe they say but can it get dry. It would take all day and night to do only a little depth.
You do a great job in your videos and I watch them over and over wishing I could do that! Thanks again!
You can just wait until it’s the consistency of thick honey.