How to Build a Raised Garden Bed. THE ULTIMATE Pallet Wood Vegetable Garden.

HTML-код
- Опубликовано: 17 сен 2024
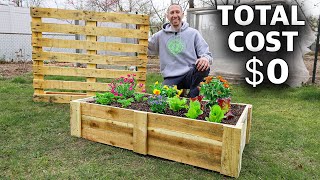
- How to Build a Raised Garden Bed. Easily build this raised garden bed out of wooden pallets for free! ...Well almost free. Building a raised vegetable garden with pallets or reclaimed wood is a really rewarding experience. The garden bed idea out of pallets came about from the fact that l wanted to build a rustic looking raised garden bed. A vegetable garden bed that not only provides delicious food, but looks good at the same time. The recycled wood has come from hardwood timber pallets that have been sourced totally FREE of charge!
I've always wanted to build a raised vegetable garden bed so stay tuned to this video.
The garden beds will be approx. 2.4 metres (8 foot) long x 1.2metres (4 foot) wide.
Before l go on...
Link to All My Woodworking Plans: DiyForKnucklehe...
DIY For Knuckleheads Website: diyforknuckleh...
-------------
SUBSCRIBE to DIY For Knuckleheads and never miss a video again!
/ shaneconlan1
-------------
Tools l Use: diyforknuckleh...
-------------
Mailing Address:
DIY For Knuckleheads
P.O. Box 152
Sawtell,
NSW, 2452
Australia.
-------------
Check out the Latest Swag from our New DIY For Knuckleheads Clothing and Accessorie Store!
shop.spreadshi...
------------
Check us out on Facebook;
/ diyforknuckleheads
------------
Music supplied by Jason Shaw at www.audionautix.com
Released under Creative Commons License 3.0.
Music Titles: Jennys Theme and Banjo Short
Materials and Tools Required for Constructing a Raised Vegetable Garden Bed out of Wooden Pallets with sides of 380mm (15 inches) high and 2400mm (94 inches) long are;
Materials:
Three to Four Hardwood Pallets. (Free)
Two Packets (100 screws per packet) of 40mm Outdoor Screws to build your Panels.
$14.00
One Packet of 65mm (50 per Packet) Out door Screws to attach your Panels to each other. $8.00
Tools:
Drop Saw, Hand Saw or Circular Saw.
Cordless Drill with size 2 Phillips Head Bit.
Drill bit for drilling pilot holes. The drill bit needs to be smaller in diameter than the screw you are using.
An Electric Planer (if you plan to dress your timber).
A Square.
A Bar Clamp (used for pulling the boards together if you want a tight fit prior to screwing together)
A Tape Measure.
A Nail Punch.
A Hammer.
A Pencil.
A Shovel and a,
Spirit Level.
Extras if Desired:
One length of 25mm Poly Pipe at 3 metres long and two 20mm lengths of 3 metre Poly Pipe (used for bird netting support). $20.00
One packet of 25mm galvanized pipe brackets (to secure the Poly Pipe). $6.00
Bird Netting. $15.00
One Roll of Garden Mat. $12.00
One tin (1 litre) of water based oil. $25.00
Don't forget to SUBSCRIBE & THUMBS UP!
Cheers,
Uncle Knackers.
• How to Build a Raised ...
Please Note:
All Videos produced by shaneconlan1's RUclips Channel are provided for informational purposes only.
All the content provided is for general guidance only. Because tools, products, materials, equipment, techniques, building codes and local regulations are constantly changing, shaneconlan1 cannot, and does not assume any responsibility or liability for the accuracy of the information contained therein. Further, shaneconlan1 (Shane Conlan) will not accept any claim for liability related to, but not limited to, omissions, errors, injury, damage or the outcome of any project. It is the responsibility of the viewer to ensure compliance with all applicable laws, rules, codes and regulations for a project. The viewer must always take proper safety precautions and exercise caution when taking on any project. If there are any questions or doubt in regards to the element of a project, please consult with a licensed professional.


You sir are a genius.
+ptrainingbytim Glad you liked it mate and thanks for the feedback. Cheers
Absolutely brilliant!
As a Perth boy living in the UK, it is great to see and use some good, old-fashioned Aussie ingenuity.
Keep up the good work.
Thanks Lloyd. Appreciate the comment mate. Hope all's well over there in the UK. Cheers
Best video of making a garden bed
Wow, thanks Jean. Your comment is much appreciated. Cheers
Love the humor. Got a smile on my face for it. Also, great use of pallets. I've a load of them myself and have been looking for inspiration to use them. You ought to do more videos like this when it's on your mind to do so. Cheers!
Awesome! Glad you found the video useful mate👍😁 I actually have a heap of DIY videos available to watch. You could start with these if interested. Cheers diyforknuckleheads.com/simple-pallet-wood-projects/. 👍
No worries engelsseele2. Glad you watch them. Cheers mate
I think this was your OG pallet project. What a ripper!
😂.....It was indeed mate 👍 I had that Garden Bed for a few years until we did our Reno and had to get rid of it......bit of a shame as it worked really well 👍👍
Great job! Not sure how cold it gets in your part of the world, but I live in SW Virginia...at the end of winter, I would stretch some clear plastic sheeting over those hoops and you'll have a nice mini-hot house to start your baby plants. Thanks for sharing your ideas and taking the time to make these videos.
G'day Josh. Thanks for the comment mate. I live in a Semi Tropical Climate but your idea of stretching some plastic over the hoops to create a mini hothouse for cooler climates like yours is a great idea. Thanks for that. You could also attach some drippers or sprinklers to the plastic hoops and then connect them to a water source for a watering system. I'd love to see someone do that. cheers mate.
Thanks Jon Jon. Appreciate the comment mate. Cheers
Cheers Stuffy. Yeah old timber does scrub up well.
What a ripper idea.
Thanks Hank :-)
Did anybody else notice his bloody finger there toward the end? That looks about like mine when working with nails and wood! This is a great project, and considering the fact that I'd already drafted my garden beds as 4'x8', this was a perfect fit. Thanks for sharing your knowledge, mate, and I can't wait to start disassembling pallets and making this happen.
Thanks Robby and can l just say that bloodied fingers and knuckles, are just par for the course when working with pallet wood :-) Good luck with your garden beds. Cheers
Love your videos!!!! So easy to follow and awesome projects for those of us that are "thrifty" LOL!!! Thanks for doing these!!!
Thanks Robin. Glad you like them and thanks for taking the time to let me know. Cheers
Great job enjoyed your easy going video style
Cheers mate :-) Glad u liked it.
Uncle Knacker we loved 💔 this....def a Rippa TY for the vid 👍
No worries at all JT! Thanks for watching 👍🇦🇺😁
Love it , absolutely love it.
Thanks Kyle.....appreciate the comment mate 👍😁🇦🇺
Super cool and easy enough for the average guy.I really wish I'd found your chanel sooner, but hey found it now and look forward to new stuff. Thanks mate.
+Barry Norman No worries Barry. I'm glad you found the channel,as well. Cheers
G'day Norbury. The garden bed was all hardwood apart from the slats on the back of the full pallet where the tool holder was. In regard to the worms, l intend to release a tub full of them into the garden bed when l fill it with soil.
Thanks form the questions. Cheers mate.
This project had so many amazing features
Thanks Foolally! I was really happy with it. Cheers mate 😁
Mate, there are so many birds in my back yard. We have a couple of big trees and the birds love them. Mental note....don't hang the washing under the tree for obvious reasons :) Thanks for the comment. Cheers mate.
Liked the pillows and blankets funny funny!!!
Oops. A little late to build this now. The main summer crop is a month or more past planting time on zones 5 +... most of the US. You'll have to wait until late July/ early August to plant a fall crop of lettuce, peas, broccoli, etc...
***** It was actually pretty comfy :-) Cheers
Leo Walsh That's ok Leo. At least you know how to make one for next season. Cheers mate
shaneconlan1 Already have a large, intensive organic garden using raised beds and self-watering containers. I got it all, Lettuce, tomatoes, peppers, zucchini, beets, carrots, rashises, kale, broccoli, chard, watermelon, cukes, etc...
Just waiting to harvest... :-)
Leo Walsh You need to try kohlrabi, skin it like a cucumber, slice it, a little salt, crisp like a radish but tastes like a turnip but much better.
Wow that's exactly what I've been looking at doing for my patch. I'll be giving this a go this veggie season and maybe install a poly pipe tubing around the Bed and connected to a hose for automated watering system.
Thanks 80'smad! When you're done, how about you post a pic or two on my DIY For Knuckleheads Facebook page. I'd love to see the result. Here's the link;
facebook.com/DiyForKnuckleheads?ref=h
Cheers mate:-)
shaneconlan1 No probs, i stopped by Facebook and also liked your page, i will share this video on my page.
80'smad Cheers mate, much appreciated.
I'm going to combine your "building a work bench" base, and add the planter bed on top, so I have an elevated bed, since I want to be standing to garden. Using re-cycled wood for each portions that way they look like they're meant to be together. I don't have an electric planer, but, I like the old wood look anyway. Thanks for your great ideas and easy to follow instructions.
Thanks Penny and good luck with your project. Sounds exciting! Cheers :-)
Nice craftsmanship. You da' man! Thanks Shane
Thanks Lisa. Appreciate the comment. Cheers
Using pallets for your Veges is a great idea, there are numerous ways u can cut them and put them together, having a shape that suits your outdoor area.
I gave a small outdoor area and have used raised pallets to avoid having dirt in the outdoor area,as we use it as an indoor/ outdoor area...having large quantise if Veges growing at table height really adds to the ambience and serenity of the space.
BUT....if considering using pallets in this way( or any other scrap material) check how the pallet was treated....ensure there was no use of toxic chemicals. You want healthy plants that are nutritious.
:)
Thanks Susan and you're right about the type of pallet to use. Appreciate your feedback. Cheers
Another great idea! A must do.
Thanks Teresa. :-)
Thanks Dano. Give it a go mate. Any questions just message me. Cheers mate
shane another great project. some good lateral thinking. great job knackers!!!!!!!
Thanks Bob. Cheers mate.
Another winner!
Cheers MrSlodez.
I love how I didn't notice the birds going crazy in the background until after you mentioned the bird netting!lol
Hahahaha...must have been some subliminal messaging Delbert 😁
Love it.Happy Days
damla sengul Thanks Damla. Glad you liked it. Cheers :-)
This is brilliant
Thanks Ryan 👍👍
Awesome craftman and a funny guy. Nice job on raise bed.
Thanks Jaime...glad you liked it mate 👍😁
Great video. I'm turning 1/2 of my backyard into an area for garden beds and will use your design. Great idea w/ the poles and netting!
Thanks David. The poles and netting work a treat. Would love to see some pictures when you're done. Cheers mate
Woow .. keren banget...👍👍👍
👍😁
I thought this was a raised bed! looks to be on the floor to me!! you made a fantastic job of it and some of your ideas are great ! but it's still on the floor.
+Ron Valente no.....it is still a raised bed hahahah!
Once you add your soil....
Between this and the wine rack project I'm going to be very busy. Nice work mate, keep it up.
Absolutely brilliant, I love it. The little fella must be your height by now, a chip off the old block. Great stuff, I'm off to make one ready for autumn sowing. Many thanks!
Hahahhahaha..yeah little Billy is not so little now 👍😁 Good luck with it Bruce and thanks for watching 👍
Epic mate just what i was looking for!
Good stuff Radlyspain. Glad you found it useful. Cheers
Great idea...however, shouldn't there be a concern with the chemicals in the wood from the pallets leaching into the soil and absorbed by the vegetables? Most pallets used in international shipping must be either heat treated or chemically treated. One should be prudent to avoid using the chemically treated pallets for reclaiming the wood. For international shipping, pallets require an IPPC logo which certifies that the pallet was heat-treated or fumigated with Methyl Bromide. The standard is a 2 letter country code (xx), a unique number (000) assigned by the National Plant Protection Organization (NPPO), HT for Heat Treatment or MB for Methyl Bromide, and DB to signify debarked. One should only use the pallets marked HT for vegetable gardens. Hope this helps!
+pjdiamond63 Thanks for the heads up. Cheers
It looks like the plastic liner would stop your leaching problem. Definitely something the think about while cutting and sanding the wood though!
BRILLIANT..!
Great job... love it!
Thanks ISENTRY. Appreciate the comment. Cheers
I just really liked your enthusiasm
Cheers Alan
Great Job Knackers!
Thanks Ryan
Excellent!! Just what I needed!!
Oddly enough I was breaking down a load of these today, once I'd done in my head I said "Nice one Knackers!"
😂😂...Cheers mate 👍
Great job Mate!
+onofrio53 Thanks mate
Setting out to build mine 5 x 10 today!!! gunna build one, see how it goes, hope to have at least 2 if not 4... lots of work ahead! thanks for the great video!
Thanks Jon Tom and good luck!
Beautifuly designed! I love the hoop addition it could also work for people in colder climate to throw over a clear plastic tarp. Oh and if you want to keep it really natural you can protect the wood with coconut oil.
Vegan Sabina Thanks Sabina. Great idea re the coconut oil. Cheers :-)
Great Job! love it...
Thanks Deb...glad you liked it! 👍😁🇦🇺
VERY NICE!
Thanks Jo 👍😁
Building a chicken coop out of pallet, and found your video very helpful just for breaking them down and looking rustic. Definitely a subscriber! Cheers mate!
+Gregg Schaffer Thanks Gregg. I appreciate the comment and good luck with the coop! Cheers :-)
Wow, nice job Shane. I was going to build a couple raised beds using 2x6 cedar, until I saw how much that was going to cost. I live on the Texas coast and I'm sure I can get all the pallets I want at the docks on the Intracoastal waterway. Great design, and I'm going to build me one or two. Thanks for the material description, that will help a bunch. Cheers!!
Bill
Brewing Great Beer in South Texas
Good luck with it Bill. Have a beer for me. Cheers mate
I like your style mate!
Cheers for that...l appreciate the comment 👍
Great idea! Used a raised bed at a community garden this year, have access to pallets, so maybe build one or two for home next year. Thanks!
Looks great. Thanks for sharing.
Another beut video thanks mate
Cheers Steve
Brilliant
Thanks Gordon 👍😁
I love that outfit. Cheers.
This was a very informative well put together video thanks!
+redbennyweb Thanks Benny. Appreciate the comment mate. Cheers
Loved this video! Entertaining and very informative! Thank you!!! Going to make one of these for my mum :) Keep up the great work buddy
I pretty much only watch this in anticipation of you saying "Great tip, knackers!"
hahaha just kidding you rock man. Can't wait to make some stuff.
you're a genius
thanks for the video..
Lp Fakalata No worries Lp. Thanks for taking the time to watch it and for the feedback. Cheers
Cheers Lp:-)
fantastic!
+Wiratni Hopkins Glad you liked it Wiratni. Cheers :-)
why the hell do you not have a tv show already. your videos are good and informative.
That would be nice :-) Thanks for watching Devien and for taking the time to leave a comment. Cheers mate and have a great weekend. :-)
You would do good if you had it. Cheers to you as well. Keep up the good work
I'm a Perth lad too. Good to see a no stuff around video. I reckon it's a; Youripperbonzabeuty mate. Can you give us an update of the growth factor. Stop motion👍
Thank you for these videos :)
great video, I really enjoyed it and I love your garden bed design!
Thanks Caldwell. Glad you liked it. Cheers mate
Amazing, I like it!
🤣 I am going to try this! Your soooo funny!
Great to see some Aussie woodworking projects. great tips. ive been watching Steve Ramsey and Izzy Swan. Subscribed as soon as i saw your 1st vid... keep it up.
Sandgroper
+Ben Evans Good stuff Ben and Welcome Aboard mate! I hope you can stick around as there is plenty to come! Cheers
Nice job mate, that is the very fellow for me !!
perforated pipes set under the soil would be gud for watering system in the aussie climate.
very good m8, looks great
+malcolm lewis Thanks Malcolm
this is fantastic.. ill have to ask my dad if i can use some of his power tools :D sweet as! cheers mate!
Thanks Christine. Glad you liked it :-)
nice usage of palelet wood. I thought u were going to use the pipes as a watering system. That wouldve been pretty cool! u probably could still use it for both I guess. Anyways. Clever build!
Thanks Joe. The watering system is a good idea. I might implement it down the track a bit. Cheers mate
Very beautiful, I'm jealous... xD
Glad you liked it Jerard :-)
A very nice one 🌳🌿☘️🍀🌱🍅🌶🥕🍆
Thanks Omar 👍😁
awesome video!! good job mate ;)
Glad you liked it MrTORISSIMO :-)
Id worry about using pallets in food gardens. Alot of pallets are treated or carried harmfull and dagerous chemicals. And yes treated lumber or contaminated wood leaches out over years. Ive personally had non bio arsenic poisoning just from working with treated lumber. I would definitely look into the pallets manufacture and what was carried on them if you intend to use them. I use scraps from home builds no treatments and all is reliably clean. Dont get me wrong though I love the project.
Thats why you look for the HT symbol on the pallets...Meaning heat treated...not the chemical treated ones
drop some builders film between the soil & and boards
LOL. What a ripper, your hilarious,
Glad you enjoyed the vid Valerie!!
Hey Knackers, does the garden bed still stand in your backyard just out of interest? Would love to see some photos! Keep up the great work and keep the videos coming!
G'day Simon....no it went to garden bed heaven mate. We had to remove it when we renovated our house. It was really good l have to say and was sad to see it go. Thanks for watching 👍😁🇦🇺
Thank you so much for this video. It is really helpful. Because I am definitely a beginner, some things are not obvious to me. How did you attach the side panels to the end panel with the stencil on it? And how did you attach the tension boards to the side panels?
G'day Josh. Glad you liked the video mate. From memory (l actually knocked it down a few years ago to make way for our new house extension😊) every panel was just screwed to the adjoining panel.....nothing fancy. Same goes for the tension boards but l also think l screwed some blocks to the inside of the side panels to screw the tension boards to.....hope that makes sense mate and good luck 😁
Thanks alot for the video. I was able to follow along and make a really nice raised garden bed for my wife. Do you use the planer for sanding and smoothing down the pallet wood? I'm trying to decide which one to buy.
Thanks Terrell. What l tend to do is plane down first (make sure you've removed ALL of the nails otherwise your blade will be destroyed) and then sand with a sander. It all depends what type old finish you require. If you want it nice and smooth then you will need to use a sander. If the board is a bit cupped and quite rough you will to use a planer. Hope that makes sense. Cheers mate. By the way, l'd love to see some pics. If you want, you can post some on my Facebook page. Here's the link
facebook.com/DiyForKnuckleheads?ref=h
nice job Thank you
No worries Colin....thanks for watching mate 👍😁
You remind me of Rob Lowe. Similar features
Nice video mate ! Just a question. Is anyone worried about using pallet wood on their veggie patch. I just wonder about the treatments that would have been used on the timber and whether or not they could leech in to the soil. Thanks again for your videos mate
Thanks Killian. I use old hardwood pallets. If they were treated when made, by the time l use them, most, if not all of the treatment would have leached out. It's also a good idea if you aren't sure, to use pallets that are heat treated and not chemically treated. A stamp on the side of the pallet saying 'HT' will signify that. Cheers mate.
shaneconlan1 Awh mate thank you very much for your quick reply. I really appreciate it. That put's my worries to bed. I make a lot of pallet furniture but I've always just worried about putting them in my garden. Again, love your videos bro, Your energy and charisma is awesome. If your ever in Auckland you've got a few cold ones waiting for ya. :D
killian cotter No worries. I'll hold you to those beers mate :-) Cheers
Ripper! Tooooo easy.
Glad you liked it Horus. Cheers :-)
Honestly mate, you are awesome. My love to you and yours.
P.S. Even the Misses watches and loves you. This proves you are a very special man. KNACKERS!
shaneconlan1 you could take plastic sheets and turn it into a greenhouse to start seedlings
AS IT FUCKIN STANDS!!!!! Freakin eh thanks for your video!
Holy crap Brother!!...you are driving on the wrong side of the road!!!!
Hahahahahaha..yeah it can get a bit hairy at times DG 😂😂
Ha! Almost didn’t recognize you!😊
Hahahahahah....it was a long time ago Louis 😁🇦🇺
In the USA we call those things "crowbars", liking the ends to a crows feet.
*likening*
I can't believe I made that mistake. I thought that I was meticulous with that type thing. I must have been drinking.
Like his video
+john alonzo Thanks John :-)
Do you have a video with this garden bed fully planted? :-) I'd sure love to see that!
Hi S.O.S...unfortunately l dont but it went beserk! I filled the garden bed with this soil blend from our local landscape supplier called super soil. The vegetables loved it! 👍😁
DIYForKnuckleheads Too bad! For me, not you, lol. Take pictures if you plant it again this year. Please :-) or I guess I should say take some video.....
are pallet busters [Amazon] quicker, than using a reciprocating saw?
Both are pretty much of a muchness CJ. The Pallet buster is probably a little safer and you still need to deal with the nails once you have removed the boards. With the reciprocing saw you saw the nails off at the board which l kind of like as the nail heads look nice and rustic. The pallet buster is also a bit kinder on the back as well. Cheers
Nice video
Thanks mate
shaneconlan1 i would love to see and update on that garden bed.
Taskmaster Snow Yang The garden bed is doing great. It's held up really well. Cheers
Excellent project mate. The railings around the top of the bed. How did you make those angel cuts to piece them together?
For the railing l just cut a 45 degree on each piece. Thanks for the comment mate. Cheers
I didn't get around to making those railings. I did finish a few other pallet projects.
Terrell Johnson Good work mate. I hope they turned out ok.
Great stuff, for your next one (if you haven't already) you should make it into a wicking bed (see Rob Bob on youtube) :). Cheers from South Aus!
Thanks TheApothecarAus. I'll check out Rob Bob. Cheers mate
Hi mate I can only seem to find the pine pallets. Are the hardwood ones dying out?? Also whens the next vid coming out??
G'day Jonah....trying looking at businesses like tile shops, lawn mower shops, brick and landscaping supplies shops etc....these type of businesses need pallets to be really strong so often use hardwood pallets...good luck and the next vid is coming out soon. I just need to write a Blog Post for it first before l upload it...Stay tuned and have a great weekend mate 👍😁
Whos ya mate nag-gaz ... Go-nads? Like ya garden. Make a good funeral casket too lol. Plant ya upside down so they can plant some daisies too.
+Dave Dangerous LOL…Cheers Dave.
Did you say 'plastic to keep the worms out'? Why? Are aussie worms different to UK ones, which are valued for the contribution the make to soil quality?
No, he said weed fabric to keep the weeds out & another time he called it WeedMat. We need worms here too.
btw black plastic sheeting which many use in place of weed fabric, (& despite it being sold at garden centres), is generally not good for the earth - causing sterilisation of soil ... It is useful for long-term eradication of weeds via solarisation if ur climate gets hot enough & if u can leave it alone in situ for more than a year at a time ... I'm not that patient , as I don't have enough other land to keep me occupied.
Hi Have anyone tried to pound the nails in instead of Pulling it out. I think by pounding it you can avoid prying and cutting.
Let me know if anyone tried it.