How to build a trashcan forge

HTML-код
- Опубликовано: 21 сен 2014
- Version 2 of an ongoing research and experimentation project to explore homemade refractory materials.
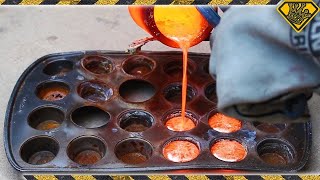
Perlite was chosen as an insulating aggregate, but it can't hold up on its own, here I coat the particles in aluminum oxide which can take the heat, all glued together with sodium silicate.
In this usage, the perlite is used to make an alumina forge lining less dense and more insulating. The perlite is sacrificial, it can melt within the alumina shell with no adverse affect, as it has done its job by bulking up the alumina, which alone conducts heat more than is ideal for a forge lining.
Music from RUclips library  Наука
Наука


holy mackerel, a short video with precise instruction. I nominate your video for a Emmy award
By far the best refractory forge/furnace making process I've seen on youtube and I've seen a lot!
Very impressive, and thank you for your lining and finishing recipes!
I like the step by step dialogue you provide for building the forge. However what I find most useful is your introduction of the ALO2 and Sodium Silicate. It has given me many ideas for creating various molds and tools for use in the forge also. Very well done!
Thank you for your well-moderated description and visuals.
I used your method here but on a slightly larger scale. I used a 55 gallon drum! Multiply all your ingredients x10. And I made a few mods along the way. It's on a cart because it's so friggin' heavy now (over 160 lbs) and I used a 20 lb MAPP gas tank and oxygen cylinder with a push button igniter from a gas grill. It burns so much hotter than store bought propane. And there is a gas plant very close to get cheap refills. I could not have made it without your video, so thanks. When I get it all finished, I will post a video response to show you how I did it. Thanks!
Danny Criss Cool, it's nice to hear others having success with this method.
It dose loose heat more than an enclosed forge, my plan is to make a set of doors that can open or close.
Danny Criss I'm looking forward to that response :)
Bill Milligan Sorry, it ain't going to happen anytime soon. I got most of the parts and then used them on another project in an in-ground fire pit. They don't allow open burning in my neighborhood. So I got fiberglass "logs" and use the parts to make a fake outdoor firepit. This is a great project to build though. I should give it another shot.
Charlie Foxtrot The 3rd were you serious about multiplying it all by 10?
Excellent demonstration of construction!!! I’ll save this to reference when I make my own this Spring 👍👍👍👍👍
the very best I've seen... flat out!! thanks much for the info sir. Blessings
Thank you for this informative video. I'll have you know I built a forge according to your instructions but it's three times larger and it turned out great. Although my sodium silicate was cloudy white not not crystal blue like yours. Also the weather here was in the 60's and cloudy so it took two weeks for the silicate to dry, I think adding heat would have helped speed up the process or direct sunlight. All in all it worked out thank you very much.
Whoa, I never thought about using one of those wastebaskets for something like this. That would make a pretty awesome little foundry too, and it already has a lid! 😀
Mate, I didn't even know that it was possible to build a homemade forge, I have just been watching and watching your videos, the content is amazing and the edition is quite professional.
Chapeau! and nice of you to share your knowledge to everyone :-)
Thank you for your kind words! I'm glad you're liking the videos!
I think I'm gonna make one of these out of a steel gas drum, like the one you keep your gas in. Thanks for all the advice.
Your videos are almost therapeutic :)
mattjm500 I just watched, "Making a Knife from Fish Hooks" by Green Beetle. If I didn't already know I have no life, I do now :)
Seriously, thanks for the referral. These sorts of videos are very relaxing and informative. Watching these craftsmen is almost like a meditation.
Again, many thanks, sir!
Bro that propane torch is badass
Great video. I am happy to hear that the Aluminum Oxide has helped with the perlite melting issue I was having on my foundry. I may have to revisit that foundry and line in the same manner.
It still has the problem of being a pain in the butt to work with, messy. Thanks for watching!
Hey Digitizer. Is the aluminum oxide mandatory? I have to special order it and its expensive
FYI, in any future projects its always a good idea to sand the plastic you want to glue/hot glue. It helps, especially if it's a slippery surface, like what you mentioned in your video. Anyways, awesome video, very informative. I've always wanted to learn about this and now I have, thanks!
This is generally a good tip, but in this case it seems better to me not to sand the plastic because the lid is just being used temporarily to form the cement, and then it is removed. It'd be a bit harder to remove if you sand first.
dude, fantastic job. thank you! I bought an old sand blaster at a garage sale for like 10 dollars and I am hoping to do something along the lines of this. maybe and extra burner.
Awesome! Thank you for investing your personal time to share your "how to" projects!
Stev G Thanks! Good to hear people appreciate the time and effort.
awesome recipe - thanks heaps for putting this together :)
I forgot to subscribe and managed to find this video in five years. Thank u~
Great Tutorial; Thanks For The Share.
hey there clkindred here goes some info for yourself that you might already know . but several things that might help this foundry .1 > if you do make the perlite smaller you can make a crucible out of it . 2> by adding in a mix of the alum oxide with fine grit play sand(run this thru an old blender) and make the mix a tad wetter (water glass/slica ratio)to compensate it will hold up better for higher heat ratios 3> the silica which you people cant find you can get cat litter (just make sure to read the package and if it has blue crystal in it it wont hurt it is just a color dye ) walmart has two styles of this usually about a dollar u.s. per pound.4 >by adding in a small amount of baking soda in this will amp up the curing time quicker( don't add it in till the mix is already done then add it in at the last minute before forming usually about 1 tbls per 100g of dry material) 5> two burners to look at one is done by Loongboow here on youtube and the second is what they call a mongo burner( originally desiged by Ron Reil) they both work really well and I have ran both off of propane as well as kerosense ,propan,and as well as old motor oil that was strained for debris.I hope this will help everyone out paul conroy
Robert Nightfright Thanks Robert for the additional info. I want to mold a pizza oven, and use heat tiles for the base.
Nicely done. The trashcan gave it a really nice finished look. Perhaps one day I will do this for a small knife forge and stop wasting so much gas on my big forge :)
Love the idea for the legs. I didn’t realise that’s what you were doing until the end though 😜
Awesome Video brother I must say I am very impressed !!!! I would love to be able to make this someday !!
Charles Black Thank you!
Awesome! Definately building this on my own time :D
though knowing my family I'll have to go to the pasture or something in case I catch anything on fire XD
***** Thanks, be careful!
Kershaw BLUR. Sweet knife bro!
That is just too cool!
Great video! i will be useing you're recipe!
Yet again clkindred well done on a great forge!!! My forge is almost done. Just have to build the stand, get some gas lines and the curing will be done tomorrow morning. I found that a two parts fire brick to one part Portland cement has great fire resistance and strength. You need to wait for the full cure of the cement and then bake it on a low or very low heat. If you do a high and fast heat the stuff kinda explodes on ya. I can't wait to what other things you have in store for us!! Keep up the great work!!!
Thank you! I have wanted to experiment with fire bricks, but can't bring myself to buy any. They are not available locally for me. If you have a source for fire brick pieces or off cuts, preferably for free, this sounds like a great way to go. +1 on the slow bake in the oven, unfortunately not a lot of people have the patience for this kind of thing and I expect a lot of frustrated people who tried to make something like this and it failed. I have a video lined up where I'm going to make up test samples of various mixtures of DIY refractory and fire them in the forge to see how they do. Episode 1 is plaster of Paris based mixtures. Thanks for the comment!
clkindred
Your welcome!! My inspiration for my Forge is based off of NightHawkInLight forge. Utilizing a lot of the same hardware and fire proofing that was was my first forge using a jumbo pineapple can. This one sort of my "mark 2" forge. That plaster of Paris and playground sand works really well but it is very fragile. But because of that it has a really cool feature, if you mess up the forge too much you can clean it out by spraying the forge with a water bottle while it's still very hot . It's quite the sight to behold!
TheBoeKing
Cheap and easy definitely play a big role in the success of a design, I tried a "five minute" disposable forge design using a simple stone wool lining, it lasted about ten seconds :-( A question though, did you plaster forge smell like sulfur / rotten eggs? Those test samples of mine did and it leads me to think the calcium sulphate is not just dehydrating, but decomposing.
clkindred
Yeah, mine did smell like that. But i just thought it was the propane. I'm not so sure about decomposing part though, the two I've made held up pretty well. Oh yeah if you try my "mark 2" forge, make sure to tap the side real well. So you can get rid of the air pockets, -.- did not see that coming......
Bravo ottimo lavoro.Marco
Of the 20 -30 videos I've looked at for making a homemade forge this is the best! Just wondering though if we could get any kind of materials and dimension list below this video. It might help with those needing to buy supplies they are not familiar with. Great video and thanks a bunch!
That is really cool
I have a chem exam I was supposed to be studying for... Time well spent! Cool video ^_^
Thanks! Good luck on your exam.
Dude, how is your channel not huge? Your amazing! This probably wont help much, but im putting you in the description of my videos from now on.
Excellent video!, Thanks. Do you know the max temperature this mix will resist?
awesome job
Thank you!
I want to ask, the aluminium oxide, it come whit quarz in it? or its just aluminium oxide?
Cuz in my country y only get aluminium oxide + quarz for sandblasting and idk if will work to make a little crucible.
Clkindred, thanks so much for this excellent design and video!
I've watched the video and looked through the comments but haven't been able to find a parts list.
Could you perhaps post a list of all the parts/ingredients (including the burner) used to make the forge?
Many thanks in advance.
Im in the process of putting my forge together now. I used a 20 gal propane tank as the base, welded on some rectangular stock for feet, and used a similar makeup for this forge- only I used no water, a ton of waterglass (may explain why it was so hard), Pearlite, and plaster of Paris. I dont know if I have to let this thing sit for a week... but I figure I'll give it until the weekend before I start messing around with it more. I have two burners made of 3/4" black pipe spaced about 6" apart from each other. My hope is that this will work and create some SWEET SWEET STEEL for forging.
Look really nice!
Ghθst Thanks! (I got Magpul stickers on my SUV haha)
Thank you! very good video!
How is this setup holding up these days?
clkindred: I would also like to know how well it held up. I'm especially interested in the effect of adding the aluminum oxide to the mix. Do you still recommend using it? I would think that it would conduct heat rather than provide insulation. Looking forward to your reply! :-)
Hey! That's an awesome project you have. Would you mind to tell us how much this forge weights approximately?
And how the insulation worked out.
Thanks for sharing your knowledge!
Alright. I'm off to Lowes.
Thank you for instructional video....what is the mesh of aluminum oxide particle? ( in micrometer)
Very nice video. Just wondering how has your refractory been holding up since you have built your forge? I'm going to build a forge but a larger one out of an old 10 gallon air compressor tank and I have been looking around for different types of refractories to use. Some say to use a mix of cement and fire clay, some say use k-wool and others say perlite mix. If you were going to build a larger forge, what type would you use?
I am planning to do a similar build soon. Out of curiosity how thick do you have to make the Insulating Agrigate, when using the mixture you have used in order to provide sufficent protection and insulation?
Great video
I am thinking of making one out of an old pc however would also like it to be a BBQ as well. so would the perlite / sodium silicate and aluminium oxide mix be safe from cooking food over it point of view?
thanks
G
Thank you for the great video.
I have a few questions about the forge. Could you tell me how durable this forge is? Does this forge from 2014 still work?
And the other question is what ratio of sodium silcat do you use? 50:50 or do you use the concentration you get from your sodium silicat making video?
It would be great if you or anyone else who made this forge could answer my questions.
Hi, amazing videos. Thanks for all the info. In this build, you leave out the magnesium silicate (baby powder) from the lining cement mixture. What was the purpose of the magnesium silicate, and why the change in recipe?
would 70 grit black aluminum oxide work too (instead of the whole 220 grit)?
Thanks for sharing your builds. Nice info channel, subscribed!
Question or thought: I see on this build and the Coffee can build you put the insulating "icing" on after. Have you considered or tried putting it on first to the inner tube, then the perlite mix? This would, in theory, give you more control on the thickness as well give you a finished look. And an additional 1/4" or so to the opening diameter. You can finish the top edge off as you do normally.
Another question, I saw a "planter" forge build that used a sand and plaster mix. What are your thoughts on that mix over the perlite mix you are using? Any thoughts on combining the two in layers, perlite on the exterior, sand/plaster then your "icing" mix on the inner most area and top?
New to this, and just looking and thinking of possibilities and combos to improve what's already been done.
Last question, if you were to build it over now that you've had it for a while, are there any changes you would make to the build?
tia,
- chase -
Very, very clean looking build, I have a question, how much insulation does this setup provide? can you get a reading on the outside of the forge for instance, i can tell it doesn't appear to turn red or heat up, but i was wondering how it is working long term, Also what temp can you get inside your forge? Thanks
I would be very curious to know how well and how long this lining lasted. At what point did it start to degrade? When did it need to be replaced? Thanks!
I would like to know also but since this post was 4 years ago, i guess we will never know
Great video! Before the cement is flame cured is the refractory material in the bin easy to saw through (for reshaping) like those porous refractory bricks?
I am considering making this forge. Could you give me some idea how it is holding up after a few years of use? Thanks!
Hi, I'm having troubles finding Aluminum oxide power 220 grit, and Sodium Carbide powder has been suggested. Do you know if that is an acceptable substitute?
Thanks.
this looks like a much more practical size than a coffee can size
hi
I was wondering how well this was holding up before I spend money and make one.
Thanks
thanks I appreciate the reply
Excellent project man! This is exactly what I need. Just a question, here were I live, it's really hard to get the WHITE aluminum oxide... can I replace it with the darker one? Would that be the same? Please answer me so I can start with this ASAP!.
Thanks!
i found online information for mixing perlite with refractory cement for an insulating layer, would that work just as well as the aluminum oxide and sodium silicate mixture?
Hey I was wondering if brown fused aluminum oxide will work just the same as white fused aluminum oxide which you used in your video. I've been having trouble finding white aluminum oxide in Canada so thought maybe they both work the same way.
clkindred can you put a item list up for making the updated version of the burner please! Thank you so much
what kind of Al2O3 did you use? I think it is very important.
Great video. I do have a question about removing the "mold" does the black pipe just slide out once the perlite sets up, or is there more to it than that?
thanks for the video. cool forge ( or should i say hot!)
why did you locate the burner so close to the end?
regards from John in Cape Town
Very cool! I would like to know the applications of this. Thanks for sharing the video.
Neil Camara Thanks, I have used it a few times to heat treat knife blades.
clkindred Got it. Thanks!
what brand blow torch did you use the valve from and what size plug.
Amazing.
hi there can Vermiculite be used instead of perlite
great video very impressed
thanks
What did you like better the high temp cement used in this build or the coffee can build?
CLKindred: at 6:27 the video shows inserting the new orifice into the torch body output. I have 3 of these torches purchased with the last 2 years and in all 3 the output thread on the body is not a NPT thread? My project is at a standstill until I can solve this dilemma? Any suggestions?
good job thanks for sharing
Thanks!
Hello. I used 80 grit black aluminum oxide. After a week the mixture is still moist and almost crumbling. Any ideas or suggestions as to what I may have done wrong?
I wanted to make one of these forges, but when I went to go buy the 220 grit white Aluminum oxide, they no longer sell it at Harbor Freight. They do sell a black 70 grit Aluminum oxide. Can that be used as a substitute? Also, when you use the adapter, do you need a regulator, or does the blow torch valve act as the regulator? BTW thank you for your videos. I appreciate your work.
*great, I also want to make one like you*
Where do i get the sodium silicate and aluminum oxide? specific brands and about how much i would love to do this and could i use transmisition housing for my inner tubing
Nice video! Your voice i exactly like Mike Birbiglia.
lemkil76 Thanks! I'll have to google Mike Birbiglia though.
could you make the entire insulating material out of the sealing cement? seems like it would be nice to run it for an hour VS waiting a week.
So I got all my materials together, and made the refractory lining, and put it in a stainless pot with a pvc inner form, and I ran out of lining about an inch from the top. I'm going to try and make more sodium silicate tomorrow, and get more perlite, but I only have one pound of aluminum oxide left, and about 100 grams of silica gel. So I might be waiting on amazon prime. What do you think are the chances of success with lining starting the curing process at different times?
How long does this refractory last?as good as wool
I'm about to make one and looking for the right mixture. Yours looks impressive.
Best narration mate. Easy to follow. Top marks!
How did you fab up the back piece to handle the heat since it was just plastic?
Was the finish layer of cement hardened fast from the heat of the torch flame or the co2 from the burning propane?
Heat since water evaporates causing the sodium silicate to precipitate
Beautiful thing.
very good video !! I am thinking of building a kamado type oven with this technique, do you think it is possible? Is there something that becomes toxic when cooking food with heat? Thanks a lot
Very good video. I have an unused 5 gallon steel paint can that I think I will make in to one.
why cant the container be galvanized?
+NwoDispatcher when heated to a high temp, galvanized metal releases noxious fumes that will make you ill.
Galvanized = zinc and inhaling zinc vapors is bad for your lungs.
what kind of perlite did you use? (construction perlite/agriculture perlite or perlite plaster)
If we use perlite plaster Is useful it?
You got the valve off a blow tourch right?? If so, did the 1/8 plug fit into it or did you have to tweak it a little?
Hey man. Cool videos.
So, I have the silica gel, and the NaOH... as well as some sand, plaster and perlite.. but I can't seem to get any Al2O3.
I live in Hong Kong, so getting hardware is quite tough. Any idea where I might find some, what kinda shop
Dillon Borges Can you find it on the internet and have it mailed to you?
Im in Canada and I can't get that brand of drain cleaner. What are some other options? Will powdered lye work?
Nice job :) very neat.
How did the refractory coating last?
i would like to know how much it cost i'm thinking about making a bigger one but same purpose some helpful tid bits would help thanks
Do the forge get to welding temperature and how has it held up so farr and how long do it take to heat up
how has the durability been for this forge?
thanks
E
How hot does the forge get?
Thx for the vid, I went to a plumbing supply and they said that the propane torch companies all made their own sizes, did you fill in the gap with the tape?
+Meticularius You are welcome and thanks for watching!
William Ponder If you look through the rest of his videos he has instructions for Sodium Silicate & his paint can forge shows how to go about building up the walls.
No, just about anything can be made to work, as long as it's big enough to allow a thick enough lining.
I think they stopped making those because I can't find them either. You can use a 1/8 to 3/8 BUSHING, threaded into a 3/8 to 3/8 COUPLER to make the part.
I show that method in my "building a bigger blowtorch" video
this is really cool could you make something like small knives with a set up like this?
What size trashcan did you use? Thanks for the video! You have a new subscriber
I'm having difficulty finding aluminum oxide in the quantity that this build calls for. Where did you find yours? I see the label says Central Pneumatic. did you buy it a Harbor Frieght?