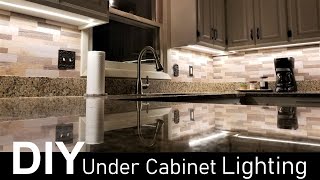
Thanks for this video! Surely helped in finalizing my decision which of their under mount kitchen light to get. I initially want to go ahead with this light but the mounting was just not aesthetically good to look at so I considered the other light options. But seeing how you made it flush to the panel makes its very pleasing to the eye. Can you give an update how it turned out after months of use? Really appreciate it!
Make sure you don't do as in this video and drill through both bottom panels. You don't want to add one more shelf just to hide the cabling. Just make holes in the bottom cover panel, before mounting it, and make channels for the wires, using a router or (carefully) with a drill.
@@gunnarliljas8459 yeah i get what you mean. I’m not using the same cabinetry so it will be a different installation but will use this as a guide. Thank you for the advise!
@@gunnarliljas8459 sounds fancy... do you mean, use a router to make half depth cut for the light? and a hole through the panel for the cable to thread through? is that the proper way of doing it? I would also like to achieve the flush mount look but not sure what's the best approach.. Please advise...
@@afterSHOcKsStudios Well, to use a router to make just a deep enough cut for the light and then drill a long hole horizontally through the panel, for the cable, is certainly the "actual pro kitchen builder" way of doing it. It allows you to have only one bottom panel, instead of wasting valuable shelf height by having double panels. Some cabinet suppliers will do this for you, but of course they have the luxury of using CNC machines. Let me tell you, doing it "manually" can be a bit tricky. I dit it. The routing was rather easy, using a template bushing, but drilling a perfectly straight 20 cm hole proved difficult, and I had to swap bottom and top panels on 3 (!) cabinets because of my hubris. Using a really solid pillar drilling machine is key. No, what I really recommend instead is to: 1. Use a hole saw for the lights. All the way through the bottom panel. 2. Use a router to create a groove for the cable, either on the top of the bottom panel (what would normally be the floor of the cabinet) or on the bottom of the covering panel. 3. While you're at it, make a groove on the backside as well, so that you can pull the cable sideways. Unless, of course, you'll have your cables behind the cabinets. Routing the grooves on the covering panel is probably easier (and less of an annoyance if you fail), but if you instead go for routing in the actual bottom panels, you will have to possibility to use a really thin covering panel. After all, its only purpose then is to hide the holes, grooves and cables. Something like an IKEA Lysekil Wall Panel (2mm) should work. I should mention that another nice option is to mount one large, continuous panel on the underside of all adjoining cabinets. In that case you would saw the wholes and route the grooves in that panel, and the actual cabinets will be untouched (except for the mounting of said panel). The advantage of this way is that you get a perfectly smooth surface under the cabinets. The disadvantage is that the doors will probably not align with the bottom of the cabinets.
@@gunnarliljas8459 Wow! great explanation! I totally get what you're saying now... I like your idea and I think I will try it! Thank you so much for your advice...
Does any know if the length of the wires for the lights can be shortened or lengthened? I don't know if it changes the function or output. It would clean it up if you could cut that extra wire out and solder and heat shrink the splice. Thanks.
@@prokitchenbuilders Thanks for the reply. I tried searching online for info on this. With the wires being 11.5' I would also like to lengthen a few so I don't have to use another driver. I believe it's 24volts.
Just in case anyone is wondering if the wires for the lights can be shortened or lengthened they can. I did both and it makes for a neater install. I used " 20AWG 2Pin Extension Cable Wire Cord Line for Single Color LED Strip Ribbon Lights 3528 5050. Perfect! www.amazon.com/gp/product/B01N42RLM1/ref=ox_sc_saved_title_1?smid=A1B9Y6W82NYEDM&psc=1
I was thinking the same thing lol. By the way, the hole size is actually 2 1/2". 2 3/8" might work, but Ikea suggests to drill a 2 1/2" hole for these lights.
It might have been my hole saw (or technique) being a bit off, but I found that a 2 1/2" cut created too loose a fit. The light stayed, but tapping on the panel can knock it loose. (Note: The actual hole size Ikea gives is 63 mm, whereas 2.5" = 64 mm, so that may be why.) Using 2 3/8", plus a little sanding, gave me a nice snug fit, but I did have to remove the little rubber inserts, as shown in the video. Note, I was using Vaxmyra lights, which could perhaps be slightly different, but they look identical (just different color temperature), and have the same hole measurement in the guide.

 Хобби
Хобби


Nice idea, I will copy that with a small improvement. I will hide the wires by cutting a small canal with a router.
Double bottoms and still you drilled right through both, for the cabling. WTF?
I came here to see if anyone else said the same thing.
“This isn’t a high use cabinet”. 😂
Where did you get your backsplash from? Thank you!
Thanks for this video! Surely helped in finalizing my decision which of their under mount kitchen light to get. I initially want to go ahead with this light but the mounting was just not aesthetically good to look at so I considered the other light options. But seeing how you made it flush to the panel makes its very pleasing to the eye. Can you give an update how it turned out after months of use? Really appreciate it!
Make sure you don't do as in this video and drill through both bottom panels. You don't want to add one more shelf just to hide the cabling. Just make holes in the bottom cover panel, before mounting it, and make channels for the wires, using a router or (carefully) with a drill.
@@gunnarliljas8459 yeah i get what you mean. I’m not using the same cabinetry so it will be a different installation but will use this as a guide. Thank you for the advise!
@@gunnarliljas8459 sounds fancy... do you mean, use a router to make half depth cut for the light? and a hole through the panel for the cable to thread through? is that the proper way of doing it? I would also like to achieve the flush mount look but not sure what's the best approach.. Please advise...
@@afterSHOcKsStudios Well, to use a router to make just a deep enough cut for the light and then drill a long hole horizontally through the panel, for the cable, is certainly the "actual pro kitchen builder" way of doing it. It allows you to have only one bottom panel, instead of wasting valuable shelf height by having double panels. Some cabinet suppliers will do this for you, but of course they have the luxury of using CNC machines. Let me tell you, doing it "manually" can be a bit tricky. I dit it. The routing was rather easy, using a template bushing, but drilling a perfectly straight 20 cm hole proved difficult, and I had to swap bottom and top panels on 3 (!) cabinets because of my hubris. Using a really solid pillar drilling machine is key.
No, what I really recommend instead is to:
1. Use a hole saw for the lights. All the way through the bottom panel.
2. Use a router to create a groove for the cable, either on the top of the bottom panel (what would normally be the floor of the cabinet) or on the bottom of the covering panel.
3. While you're at it, make a groove on the backside as well, so that you can pull the cable sideways. Unless, of course, you'll have your cables behind the cabinets.
Routing the grooves on the covering panel is probably easier (and less of an annoyance if you fail), but if you instead go for routing in the actual bottom panels, you will have to possibility to use a really thin covering panel. After all, its only purpose then is to hide the holes, grooves and cables. Something like an IKEA Lysekil Wall Panel (2mm) should work.
I should mention that another nice option is to mount one large, continuous panel on the underside of all adjoining cabinets. In that case you would saw the wholes and route the grooves in that panel, and the actual cabinets will be untouched (except for the mounting of said panel). The advantage of this way is that you get a perfectly smooth surface under the cabinets. The disadvantage is that the doors will probably not align with the bottom of the cabinets.
@@gunnarliljas8459 Wow! great explanation! I totally get what you're saying now... I like your idea and I think I will try it! Thank you so much for your advice...
Does any know if the length of the wires for the lights can be shortened or lengthened? I don't know if it changes the function or output. It would clean it up if you could cut that extra wire out and solder and heat shrink the splice. Thanks.
I think you could do that without changing the output
@@prokitchenbuilders Thanks for the reply. I tried searching online for info on this. With the wires being 11.5' I would also like to lengthen a few so I don't have to use another driver. I believe it's 24volts.
Just in case anyone is wondering if the wires for the lights can be shortened or lengthened they can. I did both and it makes for a neater install. I used " 20AWG 2Pin Extension Cable Wire Cord Line for Single Color LED Strip Ribbon Lights 3528 5050. Perfect! www.amazon.com/gp/product/B01N42RLM1/ref=ox_sc_saved_title_1?smid=A1B9Y6W82NYEDM&psc=1
I was looking for something exactly like this. It seems they discontinued the Omlopp though. Will this work with the MITTLED?
Yes they have the same lights just a different name now...
Where is the hack? IKEA has this option written in the installation manual.
Wow great, never read them!
I was thinking the same thing lol. By the way, the hole size is actually 2 1/2". 2 3/8" might work, but Ikea suggests to drill a 2 1/2" hole for these lights.
It might have been my hole saw (or technique) being a bit off, but I found that a 2 1/2" cut created too loose a fit. The light stayed, but tapping on the panel can knock it loose. (Note: The actual hole size Ikea gives is 63 mm, whereas 2.5" = 64 mm, so that may be why.) Using 2 3/8", plus a little sanding, gave me a nice snug fit, but I did have to remove the little rubber inserts, as shown in the video.
Note, I was using Vaxmyra lights, which could perhaps be slightly different, but they look identical (just different color temperature), and have the same hole measurement in the guide.