i've been swimming youtube for the last two days, couldn't understood more than 50 videos until now, UNTIL THIS MAN EXPLAINING IT IN ENGLISH, thank god for this mister
I used to be confused at how do you know what ISO to use but as long as one chooses the the correct shutter speed and aperture then to get a correct exposure just alter your ISO it’s so easy when you explain in John and it works everytime.
This video is over 6 years old... and I wish I'd seen it 6 years ago. This is really one the best video's I've seen on "the thought process" of taking a photo!!! Simply excellent!!!
This video changed my life. Thank you for breaking it down and also allowing people to give the wrong answers with grace. That's the best kind of learning environment for me!
I've taken weeks of photography classes and I learned more in this 5 min video than all of those classes combined. Such a perfect way to explain it to creatives. Thank you!!!
I knew everything about Iso, Shutter and Aperture from other videos but this video made me realise that there is a Light Meter and it blew my mind. I imediatly paused the video and, with this information, took a really good picture of a grandfather and his nephew from my window. It was such a simple thing literally blinking in my face.
This just taught me everything thing I need to know about ISO, aperture, and shutter speed in 5 minutes. Thank you for the no BS and awesome information!
I remember about 5 years ago I borrowed my aunts Nikon DSLR and putting it in manual and didn’t know what anything meant. Now I’ve been shooting for about a year and a half, even tho know I know how to shoot manual this still helps. I’m super slow at dialing my settings but like he said everything comes with practice. This is a great video for anyone, straight to the point without unnecessary explanations.
Thats why I usually set ISO to "auto" (and limit the auto range to what I am comfortable with). In most situations I can live with grainy photos but not with blurry or seriously underexposed ones.
The best, most clear and concise video on RUclips that explains, in simple terms, how to adjust each side of the exposure triangle to capture the best image possible . . . All in under 5 minutes. Thank you so much for this content and stay safe!!!
You made this amazingly simple!!! I want more! You truly teach the subject. 99% of the people on RUclips, just talk. They memorize words and have no idea how to explain the subject. Everybody on here are saying the same words and are not teaching, explaining, or asking questions so the listener can think. Everything on RUclips has to be super fast. There's no depth, there's only speed, there is no in depth learning. Only surface discussion. Thank you my friend for changing all of that.
Thank you, thank you, thank you. I have been watching videos on shooting in manual mode all week and this one made the most sense out of them all, explaining the holy trinity so much better than it had been explained before. The image demonstration was super helpful as well. THANK YOU JOHN! This has really helped me!
At last, a tutorial that doesnt talk to you as if you're dumb or someone who already knows about photography, thank you, it has given me the confidence to go out there and start taking photos.
I usually shoot aperture priority. I do not know how to shoot manual because I'm intimidated by shutter speed. This video was ridiculously helpful thank you so much!
Marquet Jones I do also the same but I mainly shoot landscapes and portraits.I find A mode more practical.For shooting manualy I would suggest you just to experiment.You could sit next to a highway and try to capture picture of cars.Just play with A ,S and ISO setting to find which fits best.
Thanks for the Video clip! Excuse me for chiming in, I am interested in your initial thoughts. Have you heard the talk about - Riddleagan Create Memories Remedy (erm, check it on google should be there)? It is a great exclusive product for mastering dslr camera and creating stunning photos without the normal expense. Ive heard some interesting things about it and my buddy after a lifetime of fighting got astronomical success with it.
this is the best explanation i have ever seen. What I learned Set iso to 100 depending on ur shot, set ur shutter speed Set you preferred aperture. Based on where you stand, tweak the iso to have a brighter photo.
I’ve been doing photography and videography quite a while and i find this the most shortest relevant and intelligent description of all 3 most important features explained in an amazing creative way for any beginner to understand
I had seen lot of videos . Every one explain about ISO Appaeture and shutter speed nobody explains how to get the correct combination. This is the best best way explained about combination for high shutter speed.
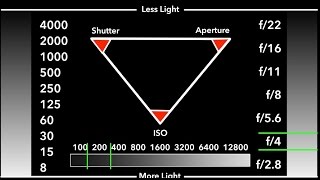
THANK YOU. This is by far the best explanation for the triangle I have ever seen. What an incredible difference it makes to see graphically the settings and stops. Less than five minutes and it was this simple. Thanks very much
This was extremely helpful! I've watched a lot of videos and none of them made it this simple and relatable. Thank you! Are there any more that give examples of this?
This is the precise reason why I love photography. Apart from the Exposure Triangle, various aspects like focal length, Light Meter , White balance makes it a very intellectual process. Hitting that Equilibrium along with seeing subjects with various perspectives. It absolutely annoys me when people talk as if phones can replace DSLRs. No, It can never replace it !
This is by far the best explanation I've seen on mtotion and settings of ISO, shutter speed, and AP. You are a fabulous teacher! Thank you for sharing your passion, knowledge and for the visual aids!
A well prepared crisp presentation; thank you. Also, excellent information for "ancient photographers too" ;) I'm 75 and given that with film; ISO wasn't variable from shot to shot; we'd typically carry two cameras with film of different ISOs. (The age of the walking toyshop) The addition of variable ISO as a third option is a very major change; it's time my headspace caught up :) ....
Yes I also have been a working pro since the early 70s. And today's digital capture is amazing I can now capture images that match my 6x7 film format using 35m DSLRs with all those lens selections. My only regret is digital images are so flat. My 6x7 positives when viewed through a 10x loupe had so much depth they looked alive. I don't ever shoot auto even auto i.s.o. because auto camera settings are fooled by the tones being read by the cameras meter. I can adjust in manual mode faster and better than any artificial intelligence built in my camera.
@@forsterstewartphotography2950 It's a truth that analogue in both images and sound systems had qualities that digital just does not have, and of course the same in reverse.
@@beachbum4691 oh totally when a digital image is magnified the the resolution is outstanding . Plus the lens selection, ability to change capture media speed on demand and not having to drag the larger 6x7 camera around and all that film, We bought in blocks to get the same batch number for color matching. I feel blessed to be alive today.
@@forsterstewartphotography2950 Some years ago, online; there was what amounted to a "learned discussion" by a group of Hollywood cameramen involved with high-budget actors, locations, and film stock. They spoke of the difficulties of colour matching, and in common with yourself did what they could to buy film of a given batch number, they had a further difficulty being the need for common exposure levels between today's work and the work of a fortnight ago. It absolutely had not occurred to me that the director and producers would need to get all the scenes involving a given group of actors, wearing the same clothes, with the same make up, with the same lighting all done as close together as they possibly could, for me, it was a phenomenal insight into the difficulties major studios have that go far beyond the headspace of us mortal photographers who aren't working on big-budget blockbusters. thank you for your comment, Very best wishes - John - Perth - Australia.
I got all right, but at the end, for the more light issue, I was thinking auto iso from 100 to 2500..but if you're using a ND filter, u wanna shoot manual for best result. Excellent video.
I would like an entire “class” video of this! Help with trying to figure out the exposure settings and not being embarrassed to be wrong, and to learning why a setting works or doesn’t would be such great mental practice.
I need more videos like this. I have a really hard time understanding people until they put them into real world scenarios where I can see and justify my own guesses.
This is explained more simply than any other video i've seen. Makes things easier when you realize there are only so many combinations. There are alot of playlists on this channel. Are there other videos in this series where they pick manual settings for other types of pictures?
I don’t understand why there’s too much thumbs down 👎🏾 in this video...I guess some people will always be again what’s really been said well. This is so simple and great to watch, thanks a bunch for sharing. Much love from Australia 🇦🇺
geez, i didn't know that meter is called a light meter. I'm glad i found this video .... uninvited content but most welcomed .... Now that's all I need to completely know my manual mode.
I've I had a dslr for 3 years, amateurly taking pictures as a hobby, I did not know how helpful that metering thing is for correct exposure, thanks so much !
If I had seen this from the first day, it would have saved me hours of intros and needless promos to buy repackaged luts from someone, and personal vlog stories about their lives.
I just started and got my first 6400 Sony and I knew more than those volunteers . That’s why it’s a good idea too play with your camera . Know the sweet spots for the kind of day and light. Practice on long range check how crisp pictures are in certain settings. It’s almost like practicing shooting a gun .
@CreativeLive John, I really appreciate your clear-cut explanations and examples! So many instructors (especially on RUclips) fail to give any examples, so it's difficult for new photographers to actually connect the information with real-world situations. This video was enough to convince me to buy the course, and so far I'm really enjoying the course (currently on Lesson 4 as I write this) and have already learned a lot. The one groan I have, in the course, is where you start to explain about ISO. Sorry, John, but ISO is NOT the "sensitivity" of the digital sensor. That misconception is left over from film days (and still applies in the film photography world), but digital camera sensors don't work that way. As director and cinematographer Adrian Galli says: "Changing ISO in digital imaging does not change the sensitivity of the sensor. That is impossible. To the chagrin of many, probably due to the language used and the analogy to film, one can not change the sensitivity of a sensor. ISO adjusts the gain applied to the signal that comes off the sensor-this happens after the image is captured." (quoted from Adrian Galli's website) I'm surprised that someone who has been teaching photography for over ten years would still be perpetuating this misunderstanding, but it seems many do, simply because it's what gets bandied about. (Which does not make it correct.) Other than that, I'm loving the course thus far and your explanation of shutter speeds has gone a long way in helping me understand that part of the "mystery triangle." 😃 For anyone considering taking the course, definitely give it a go! John has a marvelous way of explaining things simply and clearly, with illustrations that clarify these confusing subjects in a way others (especially RUclipsrs) have not. The downloadable PDF that comes with the course is an invaluable reference for helping the information stick. ☺
This is something I have never seen. This meter kind of explanation is really going to help a beginner and the one who whats to move more. Really thanks so much for explaining with this style. Please keep sharing such pics with this style of explanation.
This is really helpful! Thank you! I started reasoning a bit better with these parameters! I just need more exercise! I don't have eagles here but I can try with squirrels!
Very well explained on how the Aperture, Shutter Speed & ISO plays their part in getting a picture with correct exposure. The demo with an example makes it easy for a beginner to understand the concept of exposure. Excellent way of teaching photography. MUST WATCH for every photographer who want to come out of AUTO mode. Thanks for the upload.
A good photographer has the mindset of a sniper-taking all factors into consideration, dialing it in and then wait for the best moment for that one shot.
This is amazing, ive got a good understanding of the exposure triangle from other videos, but this video was the only one that made me truly understand the concept and exclude all of my remaining doubts. All of this in under 5 minutes. Thank you so much for that
Wow! I’ve been struggling so badly trying to understand these settings for so long and have watched lots of videos but I still wouldn’t get it until now. Thank you so much this was so clear and understandable for my brain.
Pretty good. Practical and explaining why/what for. This bit of a lesson sets 3 actions, how they connect and we end up with a global vision of the process.
Excellent video. My camera is Canon 5D Mk III and I don't recall seeing it make any exposure suggestions like what you have in the video at 2:54. I wonder if you know if such setting exists for my camera.
Is not a suggestion, is the light meter, it will tell you if the exposure is correct. In this case first they tried to guess the right combination, but then he checked the light meter to see what was the correct combination. ( sorry for my english :) )
This is the best explanation I've seen to date. I can now have the confidence to spend more time shooting, than thinking and spend more time off Av and on M.
Keeping ISO as low as possible would add more details. Try decreasing the shutter speed or decreasing the F - stop value to get the required amount of light that u want
If you are recording under sunlight, between 1:00am and 04:00pm, you can pretty much let your ISO as low as possible. I'd say 200-400 for cameras with 6400max ISO. With a f/3.5, let the shutter speed up to 2000 or more. If your lens is F/5 or higher, adjust to less shutter speed. And something important: It's better to decrease the exposure during editing than increase it. If you have no choice, let the exposure exceed a little to light up darker areas, then you edit the RAW file and remove the overexposure highlight spots.
@@barcangel22 The aperture is the problem on this one. You have no other choice besides decreasing the Shutter or increase the ISO. Set it to SS 1000 and ISO 800. Noises wouldn't still be a problem. If you see some little noises, use Gigapixel AI noise reduction or Photoshop on the post production.
I would test the shutter speed and try lower than 1/2000s. The Eagles are fast, but are they really that fast? Did you try 1/1000s shutter speed? If so, what was the result?
Digital SLR's also can vary between the 1000 and 2000. Like 1250 or 1600. I doubt I would go lower than 1600 in this instance. ISO 800 is no problem for great looking photos. I have shot 70,000 bird photos and never use ISO 100 Once in a while 160. My go to ISO 320, 640, 800. With 640 being my 'normal' setting. That eagle shot looks like a bit of a dull day, for sure I would be at 800+ ISO
when i started watching the video thats what i thought to myself - it looks quite dull/overcast so i was initially thinking iso 400/800. Am i right in thinking that if you have to shoot a higher ISO to compensate you have to increase the Aperture?
@@iamneallyons4263 If by increase you mean a wider aperature, then yes, but he did make it as wide as possible. If by increase you mean higher numbers, then no - higher numbered aperature means narrower aperature which means less light is let in. If you've widened the aperature as much as possible then to make the image brighter you can only decrease the shutter speed or increase the ISO.
I wish all photography videos were like this. I learned more in this video than I did watching 50 other videos. :D mostly because it’s been simplified so much
That's true, but it also seems very weird how they're so insecure or so reluctant to participate. It feels as if they gathered six strangers that just got their first DSLR and started asking them technical aspects about the camera settings...
My wife is finally interested in taking a better picture. I was going to put on a presentation that showed the correlation between the variables, but this video explains it far better than I ever could!
Now I would say shoot aperture priority - especially if you have two command wheels. I set the front wheel to aperture - you dont change this setting much but since it is your shutter finger that is fine. Set the rear wheel to ISO - watch the shutter speed in the view finder and if you need more bump the ISO up. So in that eagle situation, I would want to keep the shutter speed to at least 1\1000 and while tracking the subject if light changes all I have to do is bump the ISO with my thumb. This is just what I do and I am in no way making a definitive statement.
This really helped me understand what the heck I'm doing in my class. I also knew the answers before anyone answered so there's hope for me yet. Thank you!


i've been swimming youtube for the last two days, couldn't understood more than 50 videos until now, UNTIL THIS MAN EXPLAINING IT IN ENGLISH, thank god for this mister
He has a lot of great classes on CreativeLive
I concur!
I had to subscribe because of this
What is his name?
Clearest explanation (with real-life example) that I’ve seen so far. 😊
I learned more in four minutes than I have in four years. You made it so easy.
1
I used to be confused at how do you know what ISO to use but as long as one chooses the the correct shutter speed and aperture then to get a correct exposure just alter your ISO it’s so easy when you explain in John and it works everytime.
😂😂RUclips UNIVERSITY IS FREE.
This video is over 6 years old... and I wish I'd seen it 6 years ago. This is really one the best video's I've seen on "the thought process" of taking a photo!!! Simply excellent!!!
Same thought
This video changed my life. Thank you for breaking it down and also allowing people to give the wrong answers with grace. That's the best kind of learning environment for me!
I've taken weeks of photography classes and I learned more in this 5 min video than all of those classes combined. Such a perfect way to explain it to creatives. Thank you!!!
lol🤣🤣🤣
I knew everything about Iso, Shutter and Aperture from other videos but this video made me realise that there is a Light Meter and it blew my mind. I imediatly paused the video and, with this information, took a really good picture of a grandfather and his nephew from my window. It was such a simple thing literally blinking in my face.
This just taught me everything thing I need to know about ISO, aperture, and shutter speed in 5 minutes. Thank you for the no BS and awesome information!
Ok but there's actually a lot more to these things than just in this video though lol
I remember about 5 years ago I borrowed my aunts Nikon DSLR and putting it in manual and didn’t know what anything meant. Now I’ve been shooting for about a year and a half, even tho know I know how to shoot manual this still helps. I’m super slow at dialing my settings but like he said everything comes with practice. This is a great video for anyone, straight to the point without unnecessary explanations.
Thats why I usually set ISO to "auto" (and limit the auto range to what I am comfortable with). In most situations I can live with grainy photos but not with blurry or seriously underexposed ones.
The best, most clear and concise video on RUclips that explains, in simple terms, how to adjust each side of the exposure triangle to capture the best image possible . . . All in under 5 minutes.
Thank you so much for this content and stay safe!!!
When I watched this a year ago, I had no clue what he was talking about! Now I have a broad range or photography knowledge! Thank you!
Photographer's Quest same lol
You made this amazingly simple!!!
I want more!
You truly teach the subject.
99% of the people on RUclips, just talk. They memorize words and have no idea how to explain the subject. Everybody on here are saying the same words and are not teaching, explaining, or asking questions so the listener can think. Everything on RUclips has to be super fast. There's no depth, there's only speed, there is no in depth learning. Only surface discussion.
Thank you my friend for changing all of that.
Thank you, thank you, thank you. I have been watching videos on shooting in manual mode all week and this one made the most sense out of them all, explaining the holy trinity so much better than it had been explained before. The image demonstration was super helpful as well. THANK YOU JOHN! This has really helped me!
At last, a tutorial that doesnt talk to you as if you're dumb or someone who already knows about photography, thank you, it has given me the confidence to go out there and start taking photos.
I usually shoot aperture priority. I do not know how to shoot manual because I'm intimidated by shutter speed. This video was ridiculously helpful thank you so much!
Marquet Jones I do also the same but I mainly shoot landscapes and portraits.I find A mode more practical.For shooting manualy I would suggest you just to experiment.You could sit next to a highway and try to capture picture of cars.Just play with A ,S and ISO setting to find which fits best.
your profile pic is very professional
I use also AV mode. And the camera will use the fastest aperture
can i be your student in photography...?
Can you suggest a best external flash for Nikon d3500
the real mvp of the internet, teaching it and showing it to everyone. thanks
Excellent information for any new photographer.
Agreed! And thanks for watching.
Mark Rothenberg any photographer***
Thanks for the Video clip! Excuse me for chiming in, I am interested in your initial thoughts. Have you heard the talk about - Riddleagan Create Memories Remedy (erm, check it on google should be there)? It is a great exclusive product for mastering dslr camera and creating stunning photos without the normal expense. Ive heard some interesting things about it and my buddy after a lifetime of fighting got astronomical success with it.
U
💻
this is the best explanation i have ever seen.
What I learned
Set iso to 100
depending on ur shot, set ur shutter speed
Set you preferred aperture.
Based on where you stand, tweak the iso to have a brighter photo.
The most important piece of information in this video is at 3:55.
With the new cameras today, you can set the aperture and shutter speed and the ISO values automatically are corrected to 0 EV.
Be ready!
Was you on the photograph?
That was so helpful!!! I was struggling with this for awhile but this video made it very clear! Thank you!
Excellent short presentation of a workflow to determine your aperture, shutter speed and ISO settings!
Still impressed in 2020
I’ve been doing photography and videography quite a while and i find this the most shortest relevant and intelligent description of all 3 most important features explained in an amazing creative way for any beginner to understand
This was extremely informative for a beginner. Concise and direct to the point.
I had seen lot of videos . Every one explain about ISO Appaeture and shutter speed nobody explains how to get the correct combination. This is the best best way explained about combination for high shutter speed.
I have a very hard time understanding this at times, and the way you taught this, really helped me thankyou.
THANK YOU. This is by far the best explanation for the triangle I have ever seen. What an incredible difference it makes to see graphically the settings and stops. Less than five minutes and it was this simple. Thanks very much
So glad it helped!
Who is still extremely impressed by this in 2019?
Olusina 2020 still impressed
July 2020. I'm impressed.
Its 2020 & the answer is me.
Me in August 2020 and still impressive
2020 Yes 😊
This is the best when it comes to teaching camera. Far better than some I paid money to watch or read.
This was extremely helpful! I've watched a lot of videos and none of them made it this simple and relatable. Thank you! Are there any more that give examples of this?
Photographing eagles in Alaska is exactly why I watched this video. Thank you so much for making it the way you did.
Best teacher ever I seen in RUclips .
This is the precise reason why I love photography. Apart from the Exposure Triangle, various aspects like focal length, Light Meter , White balance makes it a very intellectual process. Hitting that Equilibrium along with seeing subjects with various perspectives. It absolutely annoys me when people talk as if phones can replace DSLRs. No, It can never replace it !
Mobile phones take photos, cameras make art.
This was short and right to the point. Completely simplified the process. Thanks! 🙂
This is by far the best explanation I've seen on mtotion and settings of ISO, shutter speed, and AP. You are a fabulous teacher! Thank you for sharing your passion, knowledge and for the visual aids!
This is by far the best video I've seen regarding exposure triangle!!! Loved the example and scenario. Thanks man!!!
I’ve just learnt more in 5 minutes watching this than months of scrolling through other RUclips videos. Great bloke to boot 👊
A well prepared crisp presentation; thank you. Also, excellent information for "ancient photographers too" ;) I'm 75 and given that with film; ISO wasn't variable from shot to shot; we'd typically carry two cameras with film of different ISOs. (The age of the walking toyshop) The addition of variable ISO as a third option is a very major change; it's time my headspace caught up :) ....
Yes sir , I was getting limited in my thinking because of this very fact of fixed ISO
Yes I also have been a working pro since the early 70s. And today's digital capture is amazing I can now capture images that match my 6x7 film format using 35m DSLRs with all those lens selections. My only regret is digital images are so flat. My 6x7 positives when viewed through a 10x loupe had so much depth they looked alive.
I don't ever shoot auto even auto i.s.o. because auto camera settings are fooled by the tones being read by the cameras meter. I can adjust in manual mode faster and better than any artificial intelligence built in my camera.
@@forsterstewartphotography2950 It's a truth that analogue in both images and sound systems had qualities that digital just does not have, and of course the same in reverse.
@@beachbum4691 oh totally when a digital image is magnified the the resolution is outstanding . Plus the lens selection, ability to change capture media speed on demand and not having to drag the larger 6x7 camera around and all that film, We bought in blocks to get the same batch number for color matching.
I feel blessed to be alive today.
@@forsterstewartphotography2950 Some years ago, online; there was what amounted to a "learned discussion" by a group of Hollywood cameramen involved with high-budget actors, locations, and film stock. They spoke of the difficulties of colour matching, and in common with yourself did what they could to buy film of a given batch number, they had a further difficulty being the need for common exposure levels between today's work and the work of a fortnight ago. It absolutely had not occurred to me that the director and producers would need to get all the scenes involving a given group of actors, wearing the same clothes, with the same make up, with the same lighting all done as close together as they possibly could, for me, it was a phenomenal insight into the difficulties major studios have that go far beyond the headspace of us mortal photographers who aren't working on big-budget blockbusters. thank you for your comment, Very best wishes - John - Perth - Australia.
I got all right, but at the end, for the more light issue, I was thinking auto iso from 100 to 2500..but if you're using a ND filter, u wanna shoot manual for best result. Excellent video.
THE BEST vídeo of photography ever! That's what I was looking for, somwthing more practical. Tks a lot!
I would like an entire “class” video of this! Help with trying to figure out the exposure settings and not being embarrassed to be wrong, and to learning why a setting works or doesn’t would be such great mental practice.
This really is the most clearly I've heard these explained. Thanks so much!
I need more videos like this. I have a really hard time understanding people until they put them into real world scenarios where I can see and justify my own guesses.
You explained in the best possible way so simple.. Thank you
This Guy is outstanding.. Gone through many videos but he stands out with his unique and easy way of explanation
This is explained more simply than any other video i've seen. Makes things easier when you realize there are only so many combinations. There are alot of playlists on this channel. Are there other videos in this series where they pick manual settings for other types of pictures?
I don’t understand why there’s too much thumbs down 👎🏾 in this video...I guess some people will always be again what’s really been said well.
This is so simple and great to watch, thanks a bunch for sharing.
Much love from Australia 🇦🇺
you made me understand those 3 features, in just 5 minutes.. thank you!
If you can not anderstand so far ,how come you can now?
geez, i didn't know that meter is called a light meter. I'm glad i found this video .... uninvited content but most welcomed .... Now that's all I need to completely know my manual mode.
Best explained! thanks a lot!!
Syed Kollol Glad it helped!
CreativeLive thanks for sharing really helpfull
CreativeLive
So helpful!!!
I've I had a dslr for 3 years, amateurly taking pictures as a hobby, I did not know how helpful that metering thing is for correct exposure, thanks so much !
If I had seen this from the first day, it would have saved me hours of intros and needless promos to buy repackaged luts from someone, and personal vlog stories about their lives.
One of the best videos I've ever seen that explains manual camera settings for #aperture #shutterspeed and #iso Kudos CreativeLive
What an incredible video. Concise and to the point. Very helpful.
You are a great teacher. I'm sure that I won't forget this lesson never ever. Now I feel like everything is so easy, makes sense.
I was searching for microphone because I was sitting on the left. 😶
😂😂😂😋
😂😂 hey shreya r u from Maharashtra?
I couldn't find one, so I gave up looking.
I looked around my couch too
i too also..😅
I just started and got my first 6400 Sony and I knew more than those volunteers . That’s why it’s a good idea too play with your camera . Know the sweet spots for the kind of day and light. Practice on long range check how crisp pictures are in certain settings. It’s almost like practicing shooting a gun .
2014: waiting for eagle
2019: still waiting
Get a plushie eagle and throw it into the air
Excellent thought
Keep waiting
2020 still waiting and gets coronavirus lol
2021: still waiting
@CreativeLive John, I really appreciate your clear-cut explanations and examples! So many instructors (especially on RUclips) fail to give any examples, so it's difficult for new photographers to actually connect the information with real-world situations. This video was enough to convince me to buy the course, and so far I'm really enjoying the course (currently on Lesson 4 as I write this) and have already learned a lot.
The one groan I have, in the course, is where you start to explain about ISO. Sorry, John, but ISO is NOT the "sensitivity" of the digital sensor. That misconception is left over from film days (and still applies in the film photography world), but digital camera sensors don't work that way. As director and cinematographer Adrian Galli says: "Changing ISO in digital imaging does not change the sensitivity of the sensor. That is impossible. To the chagrin of many, probably due to the language used and the analogy to film, one can not change the sensitivity of a sensor. ISO adjusts the gain applied to the signal that comes off the sensor-this happens after the image is captured." (quoted from Adrian Galli's website) I'm surprised that someone who has been teaching photography for over ten years would still be perpetuating this misunderstanding, but it seems many do, simply because it's what gets bandied about. (Which does not make it correct.) Other than that, I'm loving the course thus far and your explanation of shutter speeds has gone a long way in helping me understand that part of the "mystery triangle." 😃
For anyone considering taking the course, definitely give it a go! John has a marvelous way of explaining things simply and clearly, with illustrations that clarify these confusing subjects in a way others (especially RUclipsrs) have not. The downloadable PDF that comes with the course is an invaluable reference for helping the information stick. ☺
Very easy to understand, great instructor and information.
This is something I have never seen. This meter kind of explanation is really going to help a beginner and the one who whats to move more. Really thanks so much for explaining with this style. Please keep sharing such pics with this style of explanation.
This is really helpful! Thank you! I started reasoning a bit better with these parameters!
I just need more exercise! I don't have eagles here but I can try with squirrels!
This is a 9year old video that gets to the point thanks again for the content.
Can you make more practice videos like this? This helped me immensely
This 4 minute video just made so many things so much clearer.
its 2019 and this is still great content
Very well explained on how the Aperture, Shutter Speed & ISO plays their part in getting a picture with correct exposure. The demo with an example makes it easy for a beginner to understand the concept of exposure. Excellent way of teaching photography. MUST WATCH for every photographer who want to come out of AUTO mode. Thanks for the upload.
A good photographer has the mindset of a sniper-taking all factors into consideration, dialing it in and then wait for the best moment for that one shot.
This is amazing, ive got a good understanding of the exposure triangle from other videos, but this video was the only one that made me truly understand the concept and exclude all of my remaining doubts. All of this in under 5 minutes. Thank you so much for that
Ok I'm a pro photographer now
Best explanation of the balances between Aperture, Shutter Speed, and ISO that I've seen - IMHO. And I've watched a bunch of YT videos..
You have no wonder how much you help me! Amazing video!
Clearly articulated. Very creative way of teaching, rather than throwing lots to numbers. Really helped.
merhaba aziz bey 4.1 ayari nasil yapabilirim sony dsc w 710 a?
Very nicely explained
I wish there had been someone to force me to shoot in manual when I first started and watched this video. This one is such a masterpiece
Great "Learning by example" video!
Can we have more of this, please!
Best explanation of exposure triangle and how to shoot wildlife in manual mode on RUclips!
1:21 i think i was jhonny sins starting a lecture again 😂😂😂
Wow! I’ve been struggling so badly trying to understand these settings for so long and have watched lots of videos but I still wouldn’t get it until now. Thank you so much this was so clear and understandable for my brain.
yay! Sometimes it's just how the info is delivered. Glad it made something click!
The presenter is very good
finally a video that explains the balance between ISO, Fstop, and Shutter speed!
with f4,you may have only part of the eagle on focus, maybe this photo was f5.6 or higher
Pretty good. Practical and explaining why/what for.
This bit of a lesson sets 3 actions, how they connect and we end up with a global vision of the process.
Excellent video. My camera is Canon 5D Mk III and I don't recall seeing it make any exposure suggestions like what you have in the video at 2:54. I wonder if you know if such setting exists for my camera.
Is not a suggestion, is the light meter, it will tell you if the exposure is correct. In this case first they tried to guess the right combination, but then he checked the light meter to see what was the correct combination. ( sorry for my english :) )
This is the best explanation I've seen to date. I can now have the confidence to spend more time shooting, than thinking and spend more time off Av and on M.
when i am recording in manual mode i noticed that everything that is dark or black looks darker or even details disappear, why is that?
Keeping ISO as low as possible would add more details. Try decreasing the shutter speed or decreasing the F - stop value to get the required amount of light that u want
Decrease your aperture
If you are recording under sunlight, between 1:00am and 04:00pm, you can pretty much let your ISO as low as possible. I'd say 200-400 for cameras with 6400max ISO.
With a f/3.5, let the shutter speed up to 2000 or more. If your lens is F/5 or higher, adjust to less shutter speed.
And something important: It's better to decrease the exposure during editing than increase it. If you have no choice, let the exposure exceed a little to light up darker areas, then you edit the RAW file and remove the overexposure highlight spots.
@@vagnersilva5465 I want to ask. I set F/5.6 , SS 1000 and ISO 200-400 in good lighting. But why the results are dark? :(
@@barcangel22 The aperture is the problem on this one. You have no other choice besides decreasing the Shutter or increase the ISO. Set it to SS 1000 and ISO 800. Noises wouldn't still be a problem. If you see some little noises, use Gigapixel AI noise reduction or Photoshop on the post production.
It's wonderful to be able to actually get the chance to answer and then have the explanation: feels like I'm there in the room with them!
I would test the shutter speed and try lower than 1/2000s. The Eagles are fast, but are they really that fast? Did you try 1/1000s shutter speed? If so, what was the result?
Digital SLR's also can vary between the 1000 and 2000. Like 1250 or 1600.
I doubt I would go lower than 1600 in this instance. ISO 800 is no problem for great looking photos. I have shot 70,000 bird photos and never use ISO 100
Once in a while 160. My go to ISO 320, 640, 800. With 640 being my 'normal' setting.
That eagle shot looks like a bit of a dull day, for sure I would be at 800+ ISO
when i started watching the video thats what i thought to myself - it looks quite dull/overcast so i was initially thinking iso 400/800. Am i right in thinking that if you have to shoot a higher ISO to compensate you have to increase the Aperture?
@@iamneallyons4263 If by increase you mean a wider aperature, then yes, but he did make it as wide as possible. If by increase you mean higher numbers, then no - higher numbered aperature means narrower aperature which means less light is let in. If you've widened the aperature as much as possible then to make the image brighter you can only decrease the shutter speed or increase the ISO.
Didn’t say anything about the lens, but it’s really important: to set up the shutter speed according to the lens
Automatic ISO solves this
I've had some bad auto iso shots in a controlled studio environment. But it does work 95%+ of the time
Straight to the point. This video really changed my life.
Is it just me or is the main presentation camera underexposed?
Bit ironic.
I wish all photography videos were like this. I learned more in this video than I did watching 50 other videos. :D mostly because it’s been simplified so much
This is odd. He only has 6 students and he doesn't even know their names and refers to the people as "the ones sitting on the left of the couch"....
That's true, but it also seems very weird how they're so insecure or so reluctant to participate. It feels as if they gathered six strangers that just got their first DSLR and started asking them technical aspects about the camera settings...
+Rodrigo Díaz...Everyone needs to learn...and these are not that technical
Johnny I Could Care Less What He Calls Them, That Was Gold Information Right There 😒
He's a photographer house. 😜
Johnny not odd, apparently all of us who watched the video learned from it. Class size isn’t important, we beginners learned from it.
this 4 mints video can save you 4 weeks time. it was very helpful! thank you very much
This guy John Greengo teaches well, but I bet he doesn't have many Latino students.
uh...
+starr shine Is that because of the surname? XD
;-)
+starr shine what a strange thing to say...
+starr shine LOL Now THAT'S funny!
My wife is finally interested in taking a better picture. I was going to put on a presentation that showed the correlation between the variables, but this video explains it far better than I ever could!
+Dennis Vitali Hi Dennis! Long time no see/hear! How have you been?
I'm still plugging along at Hamilton Standard now known as UTC Aerospace Sytems in sunny Phoenix! I recall your heavy glasses back on the day.
just go into shutter priority mode with F4, all problems solved.
Now I would say shoot aperture priority - especially if you have two command wheels. I set the front wheel to aperture - you dont change this setting much but since it is your shutter finger that is fine. Set the rear wheel to ISO - watch the shutter speed in the view finder and if you need more bump the ISO up. So in that eagle situation, I would want to keep the shutter speed to at least 1\1000 and while tracking the subject if light changes all I have to do is bump the ISO with my thumb.
This is just what I do and I am in no way making a definitive statement.
This really helped me understand what the heck I'm doing in my class. I also knew the answers before anyone answered so there's hope for me yet. Thank you!
This explanation clicked for me, very good example of how these settings work together.
Bar none the most useful explanation I've ever heard of pretty much anything. Thank you for this.