How To Cut Recessed Light Holes

HTML-код
- Опубликовано: 8 фев 2021
- 6 3/8" Hole Saw: amzn.to/2YXKEB8
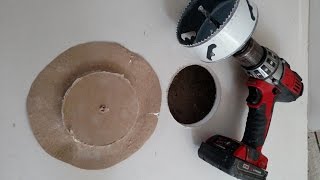
I am installing LED ultra-thin recessed lighting in a living room on a renovation project and will demonstrate how to cut holes while minimizing the mess and ceiling damage. This ceiling is plaster which consists of 1/2" of drywall and 1/4" of plaster. Also included is what happens if one of the holes has a wire mesh which is seen in plaster walls and ceilings. Finally, I will show you how to make a DIY dust/debris collector from a roast pan lid you can get for $3.00 down at your local grocery store.
Tools and Parts Used
6 3/8" Hole Saw: amzn.to/2YXKEB8
Roast Pan for Dust Collector: amzn.to/3tH3uKT
Oscillating Tool Drywall Blade: amzn.to/2YXoGhw
Tools Every Weekend Warrior Needs
Makita Corless Drill Combo Kit: amzn.to/2Jsw78j
Dewalt Drill Bit Set: amzn.to/2w0xAA4
Dewalt Screwdriver Bit Set: amzn.to/2UqTvK9
Craftsman Screwdriver Set: amzn.to/3bAsNEG
Eklind Allen Wrench Set: amzn.to/2wKDu8M
Pliers (4-Piece Set): amzn.to/2JlYUM7
Stanley Utility Knife: amzn.to/2Us2pqG
Stanley Tape Measure: amzn.to/2WPzr5K
Studbuddy Stud Finder: amzn.to/38MdzfV
Johnson Torpedo Level: amzn.to/3dzx5Ot
Stanley Hammer: amzn.to/39tudPL
Buck Bros Wood Chisel Set: amzn.to/2QTebYO
Klein Voltage Tester: amzn.to/2XMa1I2
Klein Outlet Tester: amzn.to/39GyO33
Wire Strippers: amzn.to/2NHHKuS
Little Giant Ladder: amzn.to/2UrFmfG
DISCLAIMER: This video and description contain affiliate links, which means that if you click on one of the product links, I’ll receive a small commission.  Хобби
Хобби


![Gunna - one of wun [Official Video]](http://i.ytimg.com/vi/w_JtBYqMgk8/mqdefault.jpg)


Awesome idea for keeping mess to a minimum. Worked like a charm. I found a clear, plastic salad greens container in the recycle bin that was perfect for catching debris. Thanks.
Thank you for making this. My house uses the exact materials yours does. Super helpful
I always use my Milwaukee rotozip tool instead of a holesaw. I’ve used a shop vac to suck up any dust as I cut. Works pretty good
Great dust collecting idea!
Great video, no BS just straight to the point. Job well done!
Thanks!
Thank you for making this video, I’m about to take on the same light project soon, still need to watch your other video to understand how to plan where the lights go👍
Hey Darak, I will have 1 more video covering the whole project including wiring coming out probably on Thursday this week 👍 Best of luck on your project!
I should've thought of that before I made a mess all over the place. What a great idea.
Outstanding tips, thank you!
Trade tricks!
- Start with your hole saw in reverse, then switch to forward once you're a ways in.
- Use a carbide tipped 6 1/4 hole saw (Spyder, Lenox, Milwaukee)
- Once you get into that metal mesh, swap your hole saw back into reverse, and work her around. She'll eat through relatively fast.
Thanks for the tip, The trouble with this hole saw is the limited number of teeth which are the same profile both directions. It works well for simple 1/2" but can be a bit tougher for plaster / wire mesh. Appreciate the feedback and might invest in a more traditional hole saw to be able to use the reverse direction 👍
Was gonna mention start in reverse, it scores the drywall paper and help make a cleaner cut. Can also do this trick for drill8ng just about anything, and also helps on wood if close to edge where may split the wood. Going in reverse will help score before going forward to drill a hole.
I would recommend the Milwaukee carbide abrasive hole saw. In my experience it delivers a clean hole, cuts right through metal mesh and doesn’t get ruined if you have to cut through plaster. The little stones in plaster will destroy most hole saws. The only down side is that you can only cut one size hole, but personally I only have two different sizes which covers the cans that I buy and the round cut in boxes I use as well.
Thanks for the tip John, if it can cut through the mesh it is worth every penny. Will snag one for the next project 👍
Great idea… love it!
Awesome job thank you so much
Nice video! Thanks! As a suggestion, instead of making a large hole in the clear plastic cover, make a small hole the same size as the shank of the cutter to minimize the drywall dust from falling out. If the shank is too short versus the depth of the cover, you could always use an extension to get the extended depth.
Hey Bill, nice suggestion and appreciate the feedback!
Great video.
Best! Thanks!
Hello, Scott. I'm ready to take on the same light project soon, still need to watch your other video to understand how to plan where the lights go, only issue I have is what will happen if my studs are running in the wrong direction, I don't have suitable tools for that task.
Good stuff!
Thanks Anthony 👍
Excellent
Thanks!
Hey Scott, Nice video. Just a suggestion: Your audio would be a lot better (less reverb) if you were to wear a clip-on, lavalier microphone.
Is it possible that my drill is not powerful enough to do this job? I pressed against the ceiling and the drill literally cut off. I tried to start it by holding it a few inches away then went into it and it just sorta bounced off and really messed up the ceiling. I have a craftsman drill and was using the second more powerful setting
Scott, do you still use that green hole saw from Menards? I need to pick one up, and wanted to get your thoughts on it.
I made a mess around the holes, is there a way to fix them or anything I can buy to cover the edges? Thank you.
Hmmm, unfortunately I don't think there is a trim extender. Is your ceiling textured and do you have some extra matching paint? Probably will need to perform a little drywall or plaster repair and paint.
What do I do if i have the stud as well like in the 6:03 mark of this video? did the light fit into place? Will it be a problem if i drill and have the stud there?
Thee ultra thin LED type lights work perfectly, they will straddle the joist.
Do you have to replace entire recessed light if the LED light bulb goes bad or just the LED💡 light bulb?
Yes, the LEDs are "supposed" to last for decade(s) but when I do projects like this I usually keep 2 or 3 extra units for myself or future home owners to easily swap out just in case one unit fails.
@@EverydayHomeRepairs Thank you so much for a prompt response.
@@genevelis6075 Happy to help!
Did you put the insulation back over the lights once they were installed?
Most of these type of recessed lights are IC-Rated which means they can be in direct contact with insulation without any issue.
I have 4 floor lights in our kitchen. And, I am seriously considering similar to those lights, the 'retro' fit ones. But, I am thinking I might wait till my floor lights start to 'fail', then replace them all. This is a new build, and the house is only 1 & 1/2 years old. So...
PS: I wonder if a microwave food cover would suffice, too.
Hey Ivan, do you have flood lights in your kitchen? If so and you already have the cans in place but want to upgrade to LED I would go the route outlined in this video. You can find retrofit kits super cheap now. ruclips.net/video/e7bg8fRZP4I/видео.html
@@EverydayHomeRepairs Yes, I watched your video last week. And thus I have it on my agenda to buy those. Albeit, some of the reviews of the hardware are almost 50/50. Hence, why I was thinking of waiting till my current floods died or something. I just installed undercabinet lighting and installed light sensors for the pantry, washing room and master closet. So, making sure I am paying attention to expenses :) Thanks for the tips...
@ Ivan,
Sure! Also, any large enough bowl can be used.
Don't cut both layers just the dw. Than cut a hole to put the box in I put two small holes for the 3 clips.
Nice video, but what if you don't have an attic but only the small "space" between floors?
This method still work, no insulation to deal with and you can get the super thin recessed light that can be installed anywhere. I hit my trusses 3 spots while adding the ultra thin recessed type lights, they straddle the truss or joist.
You forgot to mention asbestos. If you have an house built before 1980, the drywall and/or compound may have asbestos, so you should get it checked before starting this project.
That sir is a precursor To drywall after plaster. A sub-strait named Button board plaster.
what happens if you run into a joist? just like your last hole
The saw catches and spins out if you aren't ready for it / easing off the speed. If you're concerned about light clearance - moat of these lights are just a hair thinner than your 1/2" drywall so they fit under joists.
ugh, the whole reason i clicked on this video was to see how to assemble the bit that holds the "saw"
Thank you for the flag idea 💡
I am using microwave plastic food cover for a $1 😁
Great idea! Decide to do hallway light and forgot to buy the bowl. Saw this comment and I have extra microwave clear plastic cover too. Let’s give that try Vs going out by one tomorrow lol
What lights where those
I used these and overall they worked well especially for the price amzn.to/3q4mDnP
I don't know this for a fact, but I wonder if the reason your drywall is thinker is because it has to have a 15 min fire rating to meet code?
For this property that was just the way homes were built in this area during that time period, not necessarily anything to do with fire rating 👍
I am in china and this just save me!
Yeah but there's a really good tool already for this, sometimes ignorance isn't bliss
Don’t be cheap and buy the plastic cover
Those hole saws are useless. They break after one or two uses.