Well im 75 and cant follow it as fast as he is saying it its a pain to keep having to pause all the time Maybe if you guys slow down a bit you might make it to 75 also
Most instructional videos on youtube remind me of looking up recipes online where you have the entire life story of the person writing the article before you get to what's actually in it. This was the opposite, great pace and a lot of value. I'm far from a novice shooter and I took away a lot from this. Love it!
The 4 main tips: 1. Use a wide angle lense 2. Keep the horizon in line in the shot 3. Try to keep the ISO at 3200 or below 4. Use the 500 rule for shutter speed 500 rule: 500 / lens size (mm full frame equivalent) = seconds of capture before you get before you see star trails. e.g 500 / 28 = 17.8s exposure However I've got a Canon 600D and 7D which aren't full frame so need to convert from APS-C to the full frame equivalent. So 28 * 1.6 = 44.8mm 500 / 44.8mm = 11.16s
You only need to convert to the full-frame equivalent if you're using an EF lens on a crop body. EF-S lens at 28mm is the same as 17mm EF lens on a crop sensor.
If you're going for APS-C, I think it would be worth mentioning, that the APS-C should be below 1600. So like somewhere between base iso and 1600 because ... Yeah, for my Canon EOS 600D / Rebel T3i 3200 is way too much (for astro photography) and noise reduction is a pain (at least for me). ^^
Tutorial was fast, comprehensive and easy to understand... something about other youtubers i dislike is that they like to lowkey brag about how good they are by gushing indiscriminately in their tutorials to make it seem like they have a fountain of knowledge in them
i looooooved this tutorial. 2 weeks ago was the first attempt ever to shoot a nightsky and to try to get the milky way. your tutorial brought so much out of my picture i was blown away. thank you
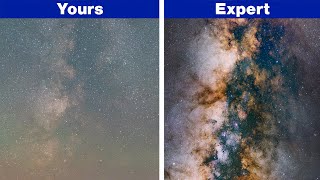
Thanks for this , all the tutorials I've watched previously, the image they were starting with was more like what I want to end up with, the first picture you edited are what my milky way shots generally look like so this video has been the most helpful.
Holy crap, this guide is f*cking awesome! Always thought my photos were shit, turns out i just needed to learn a few tricks! And as previously stated, short and concise. Very nice work Mark!
I hate everyone who adds additional colour to astronomical pictures. With all my heart. Correct curves all you want, but adding extra red where you feel like it is a sin.
I agree. I really try to stay away from doing this with any astrophotography I do. When I share a photo with my mother, the first thing she asks me is "touched up? or as is?" Shooting the milky way all over the country, I find that depending on the location you are at, the atmosphere varies drastically. Each place I've gone has provided different natural astronomical colors. East coast of the US has always shown deeper blues for me, where as the west coast has always come out more teal. Altering the colors really takes away the uniqueness of the shot location in my opinion.
It only bothers me if it’s lied about or not disclosed but if it is mentioned that the colors have been altered I say let let the photographer have their creative freedom
The 500 rule works only with full frame sensors. With APS-C sensors you have to divide the result by the crop factor to get the correct number of sec. Since most entry DSLR comes with an APS-C sensor it would be nice to specify it
Scott Diamond really appreciate that Scott. It’s my goal to make really concise videos, I believe people’s time is valuable. Long tutorials really bother me haha.
Great tutorial if you don't mind the milky way not actually looking what it looks like (personally not my preferred style, but it does look impressive), but don't forget that for above ISO 800 Sony Alpha cameras are ISO invariant so it doesn't matter what you choose to use as edits in post will ALWAYS produce the exact same noise figure.
Absolutly loved this video! I appreciate the direct step by step. It was just the right pace and super information. Especially for someone like me who has never done it before.
Absolutely love your videos because they're so precise and to the point and there's no waffling at all! I'm currently in Canada so I'm hoping to be able to get some cool star shots away from all the light pollution here :D
Thank you Allie! Long and annoying tutorials are a pet peeve of mine, so I to make mine as concise as possible. Good luck getting some star shots, i'm sure you'll do great!
I had to pause the video to say thank you! Thank you for dropping all those keys at once.....inspired me to continue. 🙏 #gracias......now back to the vid
On APS-C Sensors it‘s better to use the 300 Rule because of the crop factor of 1.6 or 1.5, depending on camera brand… On my Canon, when using the 500 Rule with my 16mm, I get first signs of star trails.
Hi Mark. Such an awesome video... Thank you. And this image starts so clean. Do you mind me asking what camera and lens combination was used for the shots you edit ? I would think an A7S or an A7II may be ? Thanks for all the great tips in your excellent video.
As an aspiring astrophotographer this video is so helpful. Thank you! I have a Sony A7iii and was considering getting it astromodified. What would you recommend? I have full spectrum or Ha mods to consider, which is "better" for milky way shots?
This is so awesome! I am already learning so much! I am trying to learn how to edit my astrophotography that I've taken over the last couple of months. I have a question, do you by chance have this tutorial in writing?
A little tutorial feedback : Please choose a font thats easier to the eye and aesthetic enough so even when you read them, its easier to take it in. Its kinda related to design but i wont go into that (you can look it up) Thats about it really. Loved the tutorial other than that. Subscribed and Liked!
Awesome tutorial. Normally I fall asleep but this was just so intriguing. Glad you did it fast paced. As an amateur I got sad learning that people add colors and fake the picture a bit (thought it was mostly adjusting contrast) but now I know, my whole life is a lie.
hahaha, well not you're entire life! If you have the absolute best conditions, for example an amzing camera and you're in the atacama desert in Chile (One of the Highest dryest places on earth, many countries star observatories are there)... Then you'll get these colours naturally. Remember our eye can't see this regardless, so even with the camera taking a "long exposure" it's all a sort of manipulation anyway.
Thanks for this video, i just started into astrophotography taking deep sky objects and needed to find a way to process. This was the ticket again thanks....to bad i can't load a photo here lol
The unedited raw file itself has quite a lot of information, so you have so many adjustment options left in lightroom. But for people like us who has cropped sensor cameras, the results are not that good
Great tutorial! There must have been an update which changed the “masking” interface because I don’t see it in LR 2020. I’d like to try the technique you used by holding down the “alt” key and sliding the “masking” bar but I can’t figure out how. Do you know where it may be hidden?
Hi Mark, what is the level, or what is the Photoshop version do you use here? Do I need to download it right from my computer? What is the name of the version that you use here? Please give as much info as you can. What do I type to find it? Thank you so much
Does the milky way only look as massive as that when seen from America? I can just about shoot it in England but it is always a long faint strip with none of those colours
Wait. When does it stop being a photo? When you added the red that became too much no? It's no longer an improvement on the original but an image that doesn't exist.
Mugiwara no Tom one does the trick, usually. Several exposures are handy for foreground/midground/sky, but you need to keep in mind that the sky keeps moving.
If you have a mac then starry landscape stacker is absolutely amazing. Load 10 shots into it, it finds the sky. Press align and save and bobs your uncle. In under 1 minute you have and incredibly sharp, clean, noise free image.


Lol how red is my face when I enter the room through the door!? haha wow 0:04
excellent video Mark, very helpful
Yeah because your alter ego self was mad about you not making a tutorial video in 4 months 😂
11/10 red
lol
The before photo still blows my mind. Even with longer exposures I rarely see people getting raw images like that
for real
concise quick and to the point...I loved this ...you said all you needed to say in 6 minutes...everyone else takes 20 ....great tutorial
Cheers buddy! I always try to keep them as quick as possible. I hate when people just freely hum and haa... gotta respect the audience's time :)
@@MarkHarrison4 will you run thru a quick radial filter adjustment for the Milky Way?
Well im 75 and cant follow it as fast as he is saying it its a pain to keep having to pause all the time
Maybe if you guys slow down a bit you might make it to 75 also
Most instructional videos on youtube remind me of looking up recipes online where you have the entire life story of the person writing the article before you get to what's actually in it. This was the opposite, great pace and a lot of value. I'm far from a novice shooter and I took away a lot from this. Love it!
ruclips.net/video/urS2tSMAfn8/видео.htmlsi=VuEO3WQudwTkdgCq
The 4 main tips:
1.
Use a wide angle lense
2.
Keep the horizon in line in the shot
3.
Try to keep the ISO at 3200 or below
4.
Use the 500 rule for shutter speed
500 rule:
500 / lens size (mm full frame equivalent) = seconds of capture before you get before you see star trails.
e.g 500 / 28 = 17.8s exposure
However I've got a Canon 600D and 7D which aren't full frame so need to convert from APS-C to the full frame equivalent.
So 28 * 1.6 = 44.8mm
500 / 44.8mm = 11.16s
thxx
@@adriantiamson8063 I have a 450D, finding out how to convert for a crop sensor was like a needle in a haystack, thanks for the comment.
double thanks :)
You only need to convert to the full-frame equivalent if you're using an EF lens on a crop body. EF-S lens at 28mm is the same as 17mm EF lens on a crop sensor.
If you're going for APS-C, I think it would be worth mentioning, that the APS-C should be below 1600. So like somewhere between base iso and 1600 because ... Yeah, for my Canon EOS 600D / Rebel T3i 3200 is way too much (for astro photography) and noise reduction is a pain (at least for me). ^^
Tutorial was fast, comprehensive and easy to understand... something about other youtubers i dislike is that they like to lowkey brag about how good they are by gushing indiscriminately in their tutorials to make it seem like they have a fountain of knowledge in them
Respect :)
I can't stand long tutorials
i looooooved this tutorial. 2 weeks ago was the first attempt ever to shoot a nightsky and to try to get the milky way. your tutorial brought so much out of my picture i was blown away. thank you
Glad it helped!
Thanks for this , all the tutorials I've watched previously, the image they were starting with was more like what I want to end up with, the first picture you edited are what my milky way shots generally look like so this video has been the most helpful.
Literally one of the best night photography tutorials ever!! Keep up the good work man!
Thanks so much for that, really appreciate it!
The video was already a detailed one, but you gave more details in the comments... Hats off manh... Really glad that i came accross this video.
To make it easy, if you use crop sensor, its a 300 rule :D
or a 250 rule for MFT
Thanks bro didn’t know tbat
Thanks for the tutorial;
Learning how to use your camera reduces or eliminates your need for software.
Film was the greatest learning curve ever.
Just seen this. Hands down the best tutorial video. Concise, to the point and with techniques not shown by anyone else I have found. Top work! Thanks
Holy crap, this guide is f*cking awesome! Always thought my photos were shit, turns out i just needed to learn a few tricks! And as previously stated, short and concise. Very nice work Mark!
Thanks for making this. Learned something new with the colorizing tip, going to have to revisit my old milky way photos and try it out!
Adventures with Joe cheers Joe! I was stoked when I found that out too
great tutorial . i never knew about the new brush and masking feature. so good
I hate everyone who adds additional colour to astronomical pictures. With all my heart. Correct curves all you want, but adding extra red where you feel like it is a sin.
And also people who don't credit anyone co producing their video + music credits..
Who cares what u like ?
I agree. I really try to stay away from doing this with any astrophotography I do. When I share a photo with my mother, the first thing she asks me is "touched up? or as is?"
Shooting the milky way all over the country, I find that depending on the location you are at, the atmosphere varies drastically. Each place I've gone has provided different natural astronomical colors. East coast of the US has always shown deeper blues for me, where as the west coast has always come out more teal.
Altering the colors really takes away the uniqueness of the shot location in my opinion.
It only bothers me if it’s lied about or not disclosed but if it is mentioned that the colors have been altered I say let let the photographer have their creative freedom
Milky way season starting soon, such a great timing for this video. Thanks for the tips Mark! You are a star 💕
My pleasure, stoked that you're going to be shooting the milky way soon !
Thanks Mark, I've always been more stuck on astro photos
Rangenoah glad it helped!
Brilliant tutorial. Thanks very much.
Awesome vid! Thanks for keeping it simple. Do you do all of these adjustments before photo-stacking as well? or is this only for a non-stacked image
The 500 rule is true for full frame sensor, for APS-C the rule to aply is 350/focal lenght :)
Cheers for that update, I shoulda mentioned that
The 500 rule works only with full frame sensors. With APS-C sensors you have to divide the result by the crop factor to get the correct number of sec. Since most entry DSLR comes with an APS-C sensor it would be nice to specify it
Wonderful video! Very crisp. You covered very well in five minutes what other videos try and cover in 30 minutes
Scott Diamond really appreciate that Scott. It’s my goal to make really concise videos, I believe people’s time is valuable. Long tutorials really bother me haha.
Great tutorial if you don't mind the milky way not actually looking what it looks like (personally not my preferred style, but it does look impressive), but don't forget that for above ISO 800 Sony Alpha cameras are ISO invariant so it doesn't matter what you choose to use as edits in post will ALWAYS produce the exact same noise figure.
Nice! Quick, clear, concise. Thumbs up & thanks, I've learned a few things.
I really enjoyed seeing this tutorial. Have been shooting the Milky Way the past few months a lot and needed a new way to edit my images...Thank you!
Kathys Outdoor Adventures cheers :)
Very quick and effective tutorial!
Thank you so much! I have just started to learn about astrophotography! this is perfect for editing!
Great video!! Exactly what I was looking for, no stacking BS.
Nice tutorial; btw the 500 rules is valid for Full frame only and it is possible to go at higher ISO by stacking photos
Noted! true I was using the 500 rule for cropped sensors too but that doesn't make sense, cheers!
It's valid for the equivalent focal length. On full frame it just happens to be the easiest one because your number to calculate is on the lens
@@Hypekickerz thanks for confirming, this is exactly what I thought
Absolutly loved this video! I appreciate the direct step by step. It was just the right pace and super information. Especially for someone like me who has never done it before.
I've seen tons of tutorial but this is the best! Thanks a lot!
I really enjoy your Tutorials and wanted to thank you for them. They always motivate me to go out and take some photos :D
Thanks a lot man, it's comments like these that really make me want to keep creating them. Cheers!
Amazing, I learned so many tools! Thanks man
Glad to hear it!
WOW. you explained what you did and how you did it. Thank you for this.
My pleasure :)
Mate this was terrific
Thanks!
Absolutely love your videos because they're so precise and to the point and there's no waffling at all! I'm currently in Canada so I'm hoping to be able to get some cool star shots away from all the light pollution here :D
Thank you Allie! Long and annoying tutorials are a pet peeve of mine, so I to make mine as concise as possible. Good luck getting some star shots, i'm sure you'll do great!
I had to pause the video to say thank you! Thank you for dropping all those keys at once.....inspired me to continue. 🙏 #gracias......now back to the vid
really appreciated!
🙏🙏
Unreal 🔥
On APS-C Sensors it‘s better to use the 300 Rule because of the crop factor of 1.6 or 1.5, depending on camera brand… On my Canon, when using the 500 Rule with my 16mm, I get first signs of star trails.
Nice and simple
Awesome tutorial, thanks!
No worries!
This was really useful - thanks very much.
Fantastic!!!!
Great tutorial. Fast, effective and to the point. Thanks!
Cheers!
daaaa hell.!!! been looking for a tutorial like this since long time and you got me so easy and clear.!! buddy you are great.!!
thanks Eduardo!
Very cool tutorial
Excellent! Exactly what I was looking for!! Quick and to the point 👌
cheers dude!! great!
Hi Mark. Such an awesome video... Thank you. And this image starts so clean. Do you mind me asking what camera and lens combination was used for the shots you edit ? I would think an A7S or an A7II may be ? Thanks for all the great tips in your excellent video.
As an aspiring astrophotographer this video is so helpful. Thank you! I have a Sony A7iii and was considering getting it astromodified. What would you recommend? I have full spectrum or Ha mods to consider, which is "better" for milky way shots?
This is so awesome! I am already learning so much! I am trying to learn how to edit my astrophotography that I've taken over the last couple of months. I have a question, do you by chance have this tutorial in writing?
Really nice job! A crisp workflow with great results! Thank you
Thanks Chris!
A little tutorial feedback : Please choose a font thats easier to the eye and aesthetic enough so even when you read them, its easier to take it in. Its kinda related to design but i wont go into that (you can look it up) Thats about it really. Loved the tutorial other than that. Subscribed and Liked!
Awesome tutorial. Normally I fall asleep but this was just so intriguing. Glad you did it fast paced. As an amateur I got sad learning that people add colors and fake the picture a bit (thought it was mostly adjusting contrast) but now I know, my whole life is a lie.
hahaha, well not you're entire life! If you have the absolute best conditions, for example an amzing camera and you're in the atacama desert in Chile (One of the Highest dryest places on earth, many countries star observatories are there)... Then you'll get these colours naturally. Remember our eye can't see this regardless, so even with the camera taking a "long exposure" it's all a sort of manipulation anyway.
Hei Mark, really awesome video tutorial! A question: where is that place with mountain and lake at 0:24? I want to be there one day, haha
Great video 👊
Such an amazing tutorial!!
Brilliant video thanks
To the point, quick and simple! Helped a lot, thanks!!
U are the best man! very thx !
Na Marra thanks!
Fantastic video! 😍
I wanna grab my Camera this night and shoot some Stars 🌠
I realy enjoy this kind of videos!! Stay like this 🤗
Glad you found it helpful! Got another lightroom video coming up this week I think you'll enjoy
Great job and love that your a Sony user as well
Thanks man! I actually only own the rx100iv in the sony series... these were my friends photos.I need to get the A7iii though
*cries in Nikon*
@@MarkHarrison4 Maybe after tomorrow's announcement you can get a new A7Siii.
I've been shooting with a astro-modified A7S and love it.
Excellent, thank you
Perfect tut man
Appreciate it pal
You’re the best! Enjoyed the vid! Love you
Dayton M cheers! 🙌🙌🙏
Great, thanks for that tutorial !
Thanks for this video, i just started into astrophotography taking deep sky objects and needed to find a way to process. This was the ticket again thanks....to bad i can't load a photo here lol
The unedited raw file itself has quite a lot of information, so you have so many adjustment options left in lightroom. But for people like us who has cropped sensor cameras, the results are not that good
simple and effective tutorial! thanks for sharing!
Awesome. Solid review!
Thanks! Glad it helped :)
Cool! Very helpful tutorial. Thanks!
Ciele Cervania my pleasure!
Great tutorial! There must have been an update which changed the “masking” interface because I don’t see it in LR 2020. I’d like to try the technique you used by holding down the “alt” key and sliding the “masking” bar but I can’t figure out how. Do you know where it may be hidden?
Amazing tutorial! Well done!
Came here for tips on how to edit my photos. Wish I had seen your tips first! I did everything wrong haha!
Lana Dare better late than never! Did you see the other tutorials?
@@MarkHarrison4 I will check them out, thanks! :)
Hi Mark, what is the level, or what is the Photoshop version do you use here? Do I need to download it right from my computer? What is the name of the version that you use here? Please give as much info as you can. What do I type to find it? Thank you so much
Best damn quick guide for editing i've seen so far. This is a keeper for sure!!!
New sub.Straight forward videos all around!
Amrita Rampersad thanks!! Glad they can help :)
Liked that, thank you
Thanks !!! I have to try it !
amazing!
:)
Does the milky way only look as massive as that when seen from America? I can just about shoot it in England but it is always a long faint strip with none of those colours
you got any tips for astrophotography on phones and how to edit them?
So cool
Great, which software you used for Milkyway editing
Thanks for the tips 👍👍
Pleasure!
Great tutorial, thank you!
Glad it helped Veronica!
Thank you so much for the tutorial! :D
Wait. When does it stop being a photo? When you added the red that became too much no? It's no longer an improvement on the original but an image that doesn't exist.
Great video Mark! Danke! :-)
Thank you Sir. Appreciated.
Hey bro, what font have you used at 0:18 to write "Travel", "Experience" and "Create" ?
Something wild :)
Nice, nice, nice - about to shoot some stars with starguider, and your post will be very handy!
Thanks mate 🎉
Cheers!
"Try to keep ISO below 3200"
*laughs in a7siii*
Do I need to stack few images or one image is enough to get a mesmerizing result ?
Mugiwara no Tom one does the trick, usually. Several exposures are handy for foreground/midground/sky, but you need to keep in mind that the sky keeps moving.
Yea one is usually enough
If you have a mac then starry landscape stacker is absolutely amazing. Load 10 shots into it, it finds the sky. Press align and save and bobs your uncle. In under 1 minute you have and incredibly sharp, clean, noise free image.
Awesome quick tutorial, to the point!
Ha at last man.Editing stuff 👌
Lazar Catic haha yea man, more to come!
Is there an iOS app that makes all these things automatically or at least let you do it without going through a pc
so good! cheers mate :D
Glad it could help!