Yes, they’ve changed it around a bit since I made the video. It also depends on the camera you use. Today, the easiest way to find out which profile to use is to select any of Adobe’s creative profiles (like the Artistic section) and turn their intensity down to zero. Then, see which one of the “Adobe Raw” profiles at the top gives you the identical look. For me, it’s now Adobe Standard, although Adobe Color is very close. Hope that helps! I’ll pin your comment so that other people who see the video find the solution, too.
One of the many things that impress me about your channel is that you take the time to answer questions/comments from your viewers. I'm sure it is a lot of extra work but it means a great deal to us. I just wanted you to know that your extra efforts are immensely appreciated and valued by everyone watching your channel. Thank you.
That’s very kind of you to say, thanks, Brian! I do my best to answer everyone, but particularly if they have questions. Really frustrating to ask something and not have your concerns addressed.
@@briansquibb999 Yikes, Brian, I’m very sorry about that, what a weird mistake on my part. I just edited the comment to be correct. I don’t know if I somehow was thinking of someone else, or what.
This channel is an absolute Godsend. I watched a few of your other tutorials and went out to shoot the other night and I was so happy with the results I was getting by following your advice. You're an absolute legend mate, thank you for sharing your knowledge with us all.
That’s a fantastic tutorial step by step. Recently I went to Arabian deserts to shoot milky way. I was stuck up how to edit. This video is very useful to me to do the post processing. I shall exactly follow these steps and want to see how it comes out. Thanks Spencer. You are an amazing tutor. Hope this will be useful for me.
Spencer, thank you so much for taking the time to go through LR Classic and a Milky Way Edit. I've been into Astro-Landscape Photography for years, and I've followed many tutorials on how best to edit the images. Yours is not only the best I've found, but also the most up to date! The Colour Grading Wheels are a revelation to me, I'd been scared to use them prior to your tutorial, so thank you. I'm only using mid range Canon kit, a 70D body with either my 17-40 L series, or my Sigma 10-20mm f/4. Using a cropped sensor body, I know I'm not using the best lens, but it's the best I have. If you could recommend one lens to add to my kit, what would it be and why? Thanks so much.
Very impressive and I love how clear your explanations are. I am pretty handy with Lightroom but you have given me so many new ideas so I really cannot thank you enough.
Great tutorial. I am new into Astrophotography and just learning Lightroom. Your tutorial is lightyears :O better than anything else I have seen, thanks!
My Hero, this is exactly the best thing with Internet. When some nice soul that takes the time to explain howe to do. i would give you 1 billion thumbs up if I could 😊 Hats of and thanks alot sir.
Thank you for this. Made a big difference to my before and after, though I couldn't find the range mask in the version of CC I had. But I had a lit foreground so went a slightly different route in the end with the masks.
I recently came across this video. Very useful and provides lot of great tips and insights! Thanks for putting it together! One question I have is about Noise Reduction. Have you used the new AI Denoise in LR or perhaps plugins like Topaz and do you recommend them over the standard noise reduction in LR that you show here? I've used Topaz quite a bit for other subjects, but seem to prefer the new LR AI Denoise for night sky shots. I was wondering if you have any experiences to share. Thanks.
That image is a treat for the eyes. Only a few minutes in but have you a video or place where you describe how you got it? I'm struggling getting images where the MW really stands out
Great video, definitely helps me push my astro photography further! One thing though, I can't seem to find the "Adobe Standard V2" profile in my Lightroom, I updated it to 2021 but it's still not there, any ideas anyone?
@@williamwood3653 I asked on reddit and this is the response that I got, so we probably won't have to worry about it: "The v2 profiles were made to fix a white balance bug in certain cameras. Most cameras only have one profile, so it's probably that your camera doesn't have a v2 profile as it wasn't affected by the bug."
I presume if the image I start with is very noisy I would want to address that first, right? I am shooting with a micro 4/3 camera at 1600. I was thinking of using Topaz DeNoise. Thank you for this tutorial and the other related videos
Can you tell me whether you would consider bringing out any of the details of the foreground through masking? I did some MW photos the other night,, but even though the outline of the trees/forest looks good,, I thought the odd highlighting , or bringing out details of surroundings , along with doing what you did with just the MW is nice for a change, but I admit, so far tricky to do. Thanks for comment,, and I like your video
Fantastic video. Thank you for this. I was looking for a way to tweak my photos to get rid of the light pollution around the core area...( left-right) sides. I do have a question. How do I make the trees that are illuminated by the bright lights around where I live, go from an almost lime green color to a more natural color to match the rest of the trees that aren't illuminated (Which are dark) ? Any suggestions on this. Thank you once again for posting this video.
In Lightroom, it’s not super easy, but it’s probably possible with careful use of the brush tool for local adjustments, with lower saturation and darkening. You may have good luck using the luminance range mask option in order to select the overly bright trees without adjusting their surroundings. In Photoshop, you might have better luck with those complex selections - I have a video on Milky Way editing in Photoshop that you may find useful for selecting a foreground at night without halos around it.
Thanks for the video. Should the Milky Way always appear in the night sky? I shot many different angles of the night sky and all I got were stars. No Milky Way.
Thwarted at the first step. Were do you get Adobe Standard V2 from? My latest version (9.2 release - Camera Raw 12.2 Sept 2021) has Adobe Standard only. What's the difference, if any to V2?
Not all cameras will show the V2 profile, you’re not doing anything wrong. Standard should be good in your case, but test it by picking any of the special profiles (like the “modern” set) and putting their strength to zero. The profile you use by default should be whichever of Adobe’s built-in profiles looks the closest to that!
@@PhotographyLifeChannel Thanks for the very prompt reply. I kept going with the Standard profile and it worked a treat. Thanks for the video and instruction. Very helpful for a newbie. Cheers.
Doing super resolution in Photoshop, via Smart Object -> Median, using 10 raw files, takes a long time on my decently quick PC. Are there other software that does the same thing quicker? Thanks.
No worries. I tried Affinity Photo. It does the stack, align, and median filter much faster than Photoshop. I need to do more testing to see if AP's final results give me the super resolution I'm looking for.
It’s not a profile that shows up with all cameras. If you don’t have it, Adobe Standard is probably the way to go, but you can test it easily by picking any of the Modern/Artistic/Vintage profiles, setting their value to zero, and seeing which ordinary Adobe profile matches the zeroed look.
Sure thing! All the Capture One sliders are quite similar overall, but you do have some more color editing options at your disposal. I'd still like to do C1 videos at some point if there's interest in it.
It’s only been six months since I published this, there are hardly very many changes! Lightroom doesn’t change very quickly. If you’re concerned, I can confirm that none of the features I cover in this video have changed appreciably in the six months since I published it. Nor are there any newly-released features since then that matter much for Milky Way photography. The basics of editing this type of photo are always the same.
@@PhotographyLifeChannel @Photography Life Thank you for your gracious reply. I became frustrated because the new version of LR does not have the same options or fine details, or if these options are available, they are hidden. This is not to blame you. Your video is excellent. I can follow the gist of your corrections made in LR. Thank you for your work.
great video! i followed this tutorial to make a shitty photo i took with my iphone XR look a lot better (i don’t have a better camera :/ it did OK but not very good)
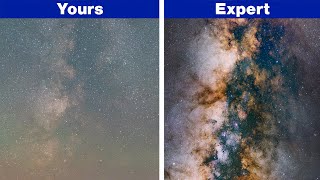
Good question. The truth of the subject is a very tricky thing to capture. For example, in person when I took that photo, the Milky Way seemed far brighter than all the stars around it, because my eyes weren’t sensitive enough to detect the surrounding stars. But my camera was. So, the out-of-camera raw file had not enough separation between the Milky Way and its surroundings based on what I remembered. In this case, which version is closer to the truth of the subject? The one that’s closer to what I saw, or closer to what the camera saw? I’m not trying to say there are zero exaggerated edits in this photo or that I edited it to match what I remembered. Particularly with color details, I did plenty of “artistic interpretation” edits here (since our eyes mostly see the Milky Way as black and white). You can certainly tone down those edits if you want a more subdued look. All I mean to emphasize is that “the truth of the subject” is not as straightforward a concept as some people think.
As a beginner I am working through the philosophy of whether to accurately record, or to produce something other than what I and the camera combined can evidence. Thanks for your insights into methodology and concepts.
Even if I'm not using LR, I think the procedure can be translated in almost every set of develop/retouching software. Your explanations are always very clear and complete. Thank you!
Sure thing! You're absolutely right. Almost all post-processing software has these same tools, just with slightly different names and algorithms behind them. The actual step by step process for editing Milky Way photos wouldn't change much regardless.


Very interesting, but there is no Adobe Standard V2 in the current version of LRC..........any recommendation as to what to use instead.
Yes, they’ve changed it around a bit since I made the video. It also depends on the camera you use. Today, the easiest way to find out which profile to use is to select any of Adobe’s creative profiles (like the Artistic section) and turn their intensity down to zero. Then, see which one of the “Adobe Raw” profiles at the top gives you the identical look. For me, it’s now Adobe Standard, although Adobe Color is very close. Hope that helps! I’ll pin your comment so that other people who see the video find the solution, too.
Thanks, will check that out.........................Keep the videos coming!
Same I have the exact issue.
I selected Artistic 08 since it had the bluest sky
@@karenperry1397 Thanks, will give that a try as well.....
One of the many things that impress me about your channel is that you take the time to answer questions/comments from your viewers. I'm sure it is a lot of extra work but it means a great deal to us. I just wanted you to know that your extra efforts are immensely appreciated and valued by everyone watching your channel. Thank you.
That’s very kind of you to say, thanks, Brian! I do my best to answer everyone, but particularly if they have questions. Really frustrating to ask something and not have your concerns addressed.
@@PhotographyLifeChannel David? Thanks for the reply, though!
@@briansquibb999 Yikes, Brian, I’m very sorry about that, what a weird mistake on my part. I just edited the comment to be correct. I don’t know if I somehow was thinking of someone else, or what.
@@PhotographyLifeChannel No worries at all, Spencer. It made me laugh!
@@briansquibb999 Thanks, I mean, there’s not even a David who replied to this video! Man. I need more sleep 😂
Another Great Video Spencer.Thankyou for all your advice and help.J
This channel is an absolute Godsend. I watched a few of your other tutorials and went out to shoot the other night and I was so happy with the results I was getting by following your advice. You're an absolute legend mate, thank you for sharing your knowledge with us all.
This is the best Lightroom tutorial I have seen for processing Milky Way. Thank you for sharing.
I'm just getting into astro photography and it was really nice to see someon elses workflow. thanks for sharing
That’s a fantastic tutorial step by step. Recently I went to Arabian deserts to shoot milky way. I was stuck up how to edit. This video is very useful to me to do the post processing. I shall exactly follow these steps and want to see how it comes out. Thanks Spencer. You are an amazing tutor. Hope this will be useful for me.
I'm so glad I found this! Thanks very much
A great step by step guide with explanations for each action.
Spencer, thank you so much for taking the time to go through LR Classic and a Milky Way Edit. I've been into Astro-Landscape Photography for years, and I've followed many tutorials on how best to edit the images. Yours is not only the best I've found, but also the most up to date! The Colour Grading Wheels are a revelation to me, I'd been scared to use them prior to your tutorial, so thank you. I'm only using mid range Canon kit, a 70D body with either my 17-40 L series, or my Sigma 10-20mm f/4. Using a cropped sensor body, I know I'm not using the best lens, but it's the best I have. If you could recommend one lens to add to my kit, what would it be and why? Thanks so much.
Another outstanding video Spencer. Highly educational, easy to follow and always worthwhile. Thank you so much!
Very impressive and I love how clear your explanations are. I am pretty handy with Lightroom but you have given me so many new ideas so I really cannot thank you enough.
Awesome tutorial! I love it when you explain the reasoning behind every tweak in Lightroom.
Thanks!! Glad you liked it.
Great tutorial. I am new into Astrophotography and just learning Lightroom. Your tutorial is lightyears :O better than anything else I have seen, thanks!
This is an excellent tutorial - many thanks for sharing.
My Hero, this is exactly the best thing with Internet. When some nice soul that takes the time to explain howe to do. i would give you 1 billion thumbs up if I could 😊 Hats of and thanks alot sir.
This is fantastic. Thanks so much for this video and your hard work in teaching us.
Excellent tutorial! Clear, concise, and did *wonders* for my Milky Way pano. Thanks for this great content!
this was one of the best tutorial that ive seen 👍 thank you
Thank you for this. Made a big difference to my before and after, though I couldn't find the range mask in the version of CC I had. But I had a lit foreground so went a slightly different route in the end with the masks.
Best tutorial yet. Thank you very much!! 😍✨
I found this tutorial helpful and pleasent to watch. Thank you!😉👌
Great tutorial, very helpful!
I recently came across this video. Very useful and provides lot of great tips and insights! Thanks for putting it together! One question I have is about Noise Reduction. Have you used the new AI Denoise in LR or perhaps plugins like Topaz and do you recommend them over the standard noise reduction in LR that you show here? I've used Topaz quite a bit for other subjects, but seem to prefer the new LR AI Denoise for night sky shots. I was wondering if you have any experiences to share. Thanks.
That image is a treat for the eyes. Only a few minutes in but have you a video or place where you describe how you got it? I'm struggling getting images where the MW really stands out
Great video & excellent info! 👏
This is a fantastic video. I have learn a lot from you.
This is a wonderful tutorial. Thank you so much!!
Great video, definitely helps me push my astro photography further! One thing though, I can't seem to find the "Adobe Standard V2" profile in my Lightroom, I updated it to 2021 but it's still not there, any ideas anyone?
Its not there for me either
@@williamwood3653 I asked on reddit and this is the response that I got, so we probably won't have to worry about it:
"The v2 profiles were made to fix a white balance bug in certain cameras. Most cameras only have one profile, so it's probably that your camera doesn't have a v2 profile as it wasn't affected by the bug."
I presume if the image I start with is very noisy I would want to address that first, right? I am shooting with a micro 4/3 camera at 1600. I was thinking of using Topaz DeNoise. Thank you for this tutorial and the other related videos
Another great tutorial - thank you!
Thankyou so much great advice and help.John
Really nice explanation. And I love the result!
Thank you, Natalia! Glad you like it.
Can you tell me whether you would consider bringing out any of the details of the foreground through masking? I did some MW photos the other night,, but even though the outline of the trees/forest looks good,, I thought the odd highlighting , or bringing out details of surroundings , along with doing what you did with just the
MW is nice for a change, but I admit, so far tricky to do. Thanks for comment,, and I like your video
Thanks for great content! Subbed!
Thank you, Kurt!
Perfect dude, best MW tutorial I've seen. Keep up the good work.
nice one bro. I might have to revisit my latest milkyway edit and make sure i've done these helpful tips. cheers
Fantastic video. Thank you for this. I was looking for a way to tweak my photos to get rid of the light pollution around the core area...( left-right) sides. I do have a question. How do I make the trees that are illuminated by the bright lights around where I live, go from an almost lime green color to a more natural color to match the rest of the trees that aren't illuminated (Which are dark) ? Any suggestions on this. Thank you once again for posting this video.
In Lightroom, it’s not super easy, but it’s probably possible with careful use of the brush tool for local adjustments, with lower saturation and darkening. You may have good luck using the luminance range mask option in order to select the overly bright trees without adjusting their surroundings. In Photoshop, you might have better luck with those complex selections - I have a video on Milky Way editing in Photoshop that you may find useful for selecting a foreground at night without halos around it.
Excellent tutorial! Thank you!
Great work Spencer
This is awesome thank you
Is there still a way to use the range mask within linear gradient in current release?
Lovely Excellent tutorial :)
Thanks nice your explanations
Thanks a lot, very instructive!
Sure thing!
Thanks for the video. Should the Milky Way always appear in the night sky? I shot many different angles of the night sky and all I got were stars. No Milky Way.
what exposure and ISO did you use here?
how do you find spots with a lot of stars and that milky way thing
Great video. 👍 subscribed.
Thank you, Richard!
Thwarted at the first step. Were do you get Adobe Standard V2 from? My latest version (9.2 release - Camera Raw 12.2 Sept 2021) has Adobe Standard only. What's the difference, if any to V2?
Not all cameras will show the V2 profile, you’re not doing anything wrong. Standard should be good in your case, but test it by picking any of the special profiles (like the “modern” set) and putting their strength to zero. The profile you use by default should be whichever of Adobe’s built-in profiles looks the closest to that!
@@PhotographyLifeChannel Thanks for the very prompt reply. I kept going with the Standard profile and it worked a treat. Thanks for the video and instruction. Very helpful for a newbie. Cheers.
Nice workflow. Is this at Mesquite Dunes?
Thank you, Ryan! This is Great Sand Dunes National Park in Colorado.
Thanks
What lens are you using here?
This was the Nikon f-mount 20mm f/1.8 G.
Thanks. I have a 14mm 2.8; that extra 1.8 aperture definitely makes a difference in bringing out the core.
I couldn't find V2 Adobe Standard just Adobe Standard
Doing super resolution in Photoshop, via Smart Object -> Median, using 10 raw files, takes a long time on my decently quick PC. Are there other software that does the same thing quicker? Thanks.
I’m afraid that if there is, I don’t know about it. Sorry, wish I could be of more help.
No worries. I tried Affinity Photo. It does the stack, align, and median filter much faster than Photoshop. I need to do more testing to see if AP's final results give me the super resolution I'm looking for.
Mine hasn't got colour profile at the top.
I dont have Adobe Standard V2... Anyone know why?
It’s not a profile that shows up with all cameras. If you don’t have it, Adobe Standard is probably the way to go, but you can test it easily by picking any of the Modern/Artistic/Vintage profiles, setting their value to zero, and seeing which ordinary Adobe profile matches the zeroed look.
@@PhotographyLifeChannel thank you
Now the same with Capture One 🤣 thanks for the video
Sure thing! All the Capture One sliders are quite similar overall, but you do have some more color editing options at your disposal. I'd still like to do C1 videos at some point if there's interest in it.
What was your iso here (I guess f2.8?)
My settings here were a 20 second shutter speed, an aperture of f/2.0, and an ISO of 6400. I was in manual mode. Hope this helps!
Can i have the same results with lightroom mobile?
I appreciate your video, but the current version of LR is very different. Version 4.3 is the most current version as of July 2021.
It’s only been six months since I published this, there are hardly very many changes! Lightroom doesn’t change very quickly. If you’re concerned, I can confirm that none of the features I cover in this video have changed appreciably in the six months since I published it. Nor are there any newly-released features since then that matter much for Milky Way photography. The basics of editing this type of photo are always the same.
@@PhotographyLifeChannel @Photography Life Thank you for your gracious reply. I became frustrated because the new version of LR does not have the same options or fine details, or if these options are available, they are hidden. This is not to blame you. Your video is excellent. I can follow the gist of your corrections made in LR. Thank you for your work.
great video! i followed this tutorial to make a shitty photo i took with my iphone XR look a lot better (i don’t have a better camera :/ it did OK but not very good)
I don't get why not using the camera profile. It is much more precise
Why don't i have adobe V2? it just says color and monochrome
Maybe you opened a TIFF from other software? In any case, Color should work the same way for you!
Dont you think this somewhat fakes the truth of the subject. It is pretty, but it's a work of the imagination rather than of nature.
Good question. The truth of the subject is a very tricky thing to capture. For example, in person when I took that photo, the Milky Way seemed far brighter than all the stars around it, because my eyes weren’t sensitive enough to detect the surrounding stars. But my camera was. So, the out-of-camera raw file had not enough separation between the Milky Way and its surroundings based on what I remembered. In this case, which version is closer to the truth of the subject? The one that’s closer to what I saw, or closer to what the camera saw?
I’m not trying to say there are zero exaggerated edits in this photo or that I edited it to match what I remembered. Particularly with color details, I did plenty of “artistic interpretation” edits here (since our eyes mostly see the Milky Way as black and white). You can certainly tone down those edits if you want a more subdued look. All I mean to emphasize is that “the truth of the subject” is not as straightforward a concept as some people think.
As a beginner I am working through the philosophy of whether to accurately record, or to produce something other than what I and the camera combined can evidence. Thanks for your insights into methodology and concepts.
.
..
@@PhotographyLifeChannel Maybe "." is the new "first!" :D
...
Even if I'm not using LR, I think the procedure can be translated in almost every set of develop/retouching software. Your explanations are always very clear and complete. Thank you!
Sure thing! You're absolutely right. Almost all post-processing software has these same tools, just with slightly different names and algorithms behind them. The actual step by step process for editing Milky Way photos wouldn't change much regardless.
So cool