Thank you amazing, I have strange problem i used the same material from mega scan but the color of texture is darker and not the same like your result. Can you help me with that ?
This is handy. I really hate making my own procedural stuff. Nodes are probably the most boring and time-consuming thing about these types of renders, and the less I deal with them, the better.
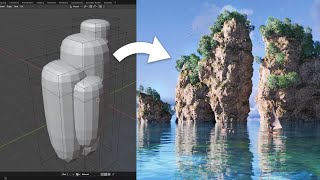
I've been really struggling with hand sculpting rocky cliffs recently, so this is well timed. Though I feel like simply using mega-scans assets is a bit deceptive 🤣
@@RichardGiovanniNainggolan very much enough. I am using 8 gb ryt now, although it can be limiting at times, but if you are a beginner 12 gb is more than enough. but dont they usually have laptops in 8, 16, 32 configuration......
I wish that there was an easy way to bake in displacement into the actual mesh. I don't know of any straightforward ways of doing this, at least if you require tiling.
You can bake the high poly to a low poly mesh. But downside is if you are wanting a close-up of the rocks then the low poly won't cut it. It will always lack the intricate detail/geometry that will be needed to view at close-up angles.
So, this is probably something basic that I"m just not getting, but when I switch from sculpt back to layout, my rock sculpts seem to disappear, and I'm left with just the flat plane. Any ideas?
hello im new to but i figured out my mistake so right before you unwrap cube projection u need to press a to select the extruted faces whats going on is your selecting only one
@@kazushisaku5786 hello im new to but i figured out my mistake so right before you unwrap cube projection u need to press a to select the extruted faces whats going on is your selecting only one
You can use a decimate modifier on your final result to reduce the amount of vertices, edges and faces. Obviously, this reduces some of the quality but very little, not a lot.
In case you didn't find out by now: Select your object with the stretched faces, and press Tab to enter Edit Mode Press A to select all vertices/faces Press U > Smart UV Project to unwrap all faces on your model. That worked for me at least! :)
hello im new to but i figured out my mistake so right before you unwrap cube projection u need to press a to select the extruted faces whats going on is your selecting only one


This is exactly what I was looking for - thanks!
Nice, exactly what I needed, well done!!!
Absolutely amazing, thank you!
nice work, looks great!!
Wow! Great video, I thought at the beginning of the video that it was a 3D scan. Thanks, I will have to give this a go!
Hi im curious is 12gb of laptop ram enough for doing these kind of things ?
clear and concise, thanks!
Great tutorial, thanks, I have learnt alot!
Bro plz make tutorial on cloud texture. Easy to follow
Thank you amazing,
I have strange problem i used the same material from mega scan but the color of texture is darker and not the same like your result.
Can you help me with that ?
This is handy. I really hate making my own procedural stuff. Nodes are probably the most boring and time-consuming thing about these types of renders, and the less I deal with them, the better.
I've been really struggling with hand sculpting rocky cliffs recently, so this is well timed.
Though I feel like simply using mega-scans assets is a bit deceptive 🤣
Hi im curious is 12gb of laptop ram enough for doing these kind of things ?
@@RichardGiovanniNainggolan very much enough. I am using 8 gb ryt now, although it can be limiting at times, but if you are a beginner 12 gb is more than enough. but dont they usually have laptops in 8, 16, 32 configuration......
what did you press at 3:50?
im using Blender 4 i dont know what changed but its mostly a sculpt of a giant sphere and completly destroys the mesh, very frustrating
I agree. Happening with me too. Please help !
maybe if you go to the fallout and use "smoother" and then use less radius and strength it will fix that ! :)
@@necrogon473 I HAVE SAME PROBLEM I TRIED TO MAKE IT SMOOTHER BUT IT DIDNT WORK
'great tutorial - ty
I wish that there was an easy way to bake in displacement into the actual mesh. I don't know of any straightforward ways of doing this, at least if you require tiling.
Can you create structure like Indian ancient temple piller or temple which has vegetation on it ?? 🤌💛💛💛💛
great vid ... but i would like to see more from the shaders - thanks a lot
Thank you
IS there a lower poly way to do this? To get hyper realistic results, my blender starts to crash after making one rock.
You can bake the high poly to a low poly mesh. But downside is if you are wanting a close-up of the rocks then the low poly won't cut it. It will always lack the intricate detail/geometry that will be needed to view at close-up angles.
Forest tutorial 2.0 please ❤
Primo...Thanks
So, this is probably something basic that I"m just not getting, but when I switch from sculpt back to layout, my rock sculpts seem to disappear, and I'm left with just the flat plane. Any ideas?
I'm new at blender, but could it have something to do with the view you're in?
hello im new to but i figured out my mistake so right before you unwrap cube projection u need to press a to select the extruted faces whats going on is your selecting only one
@@kazushisaku5786 hello im new to but i figured out my mistake so right before you unwrap cube projection u need to press a to select the extruted faces whats going on is your selecting only one
@@profesionalshitposter675k, cool. I'll give that a try. Thanks for the help!
Is this 3d printable?
but how the hell do you import it??
I'm obsessed with rocks,
mega geil
Make mıoooreeee pleaaaseeeeee! 😢😢😢😢😢
cool
Those brushes don't work well with Blender 4.1 sadly
to me this is not very useful since the model has trillions of polys and is a huge file
You can use a decimate modifier on your final result to reduce the amount of vertices, edges and faces. Obviously, this reduces some of the quality but very little, not a lot.
Bake a normal map
The texture for two thirds of my cliff face looks stretched. How can I fix this?
In case you didn't find out by now:
Select your object with the stretched faces, and press Tab to enter Edit Mode
Press A to select all vertices/faces
Press U > Smart UV Project to unwrap all faces on your model.
That worked for me at least! :)
hello im new to but i figured out my mistake so right before you unwrap cube projection u need to press a to select the extruted faces whats going on is your selecting only one