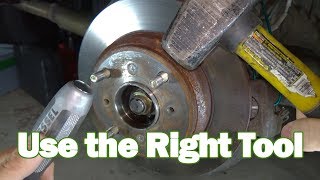
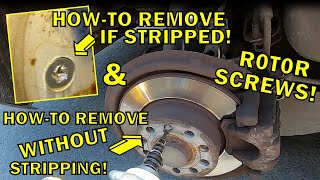
How to remove rusted seized brake rotor screws

HTML-код
- Опубликовано: 8 июн 2014
- How to remove seized honda brake rotor disc locating screws
Disclaimer
Due to factors beyond the control of backstreetmechanic, It cannot guarantee against improper use or unauthorized modifications of this information. backstreetmechanic assumes no liability for property damage or injury incurred as a result of any of the information contained in this video. Use this information at your own risk. backstreetmechanic recommends safe practices when working on vehicles and or with tools or equipment seen or implied in this video. Due to factors beyond the control of backstreetmechanic, no information contained in this video shall create any expressed or implied warranty or guarantee of any particular result. Any injury, damage, or loss that may result from improper use of these tools, equipment, or from the information contained in this video is the sole responsibility of the user and not backstreetmechanic.  Хобби
Хобби


I realize your video is 9 years ago, BUT still very relevant as, on one side on rear of Hyundai Elantra (2016)I had a rusted, stripped screw , tried heat , hammer method, impact driver etc etc and ended up drilling out and new rotor screw luckily partially took. So off to the other side, again rotor screw rusted in place, tried handheld impact driver and it simply sheared the screw, so put tire back on and took the night to review my options as worried may not be as lucky trying to drill out without damaging the threads. In the same evening found your channel and video, went out following morning, followed your technique and son of a gun if not after about 10 minutes did it not start turning, so a big thank-you !!l for sharing your expertise and taking time to video it. Much appreciated from…. (Now subscribed :-)]
Lou in Ottawa,Canada.
I had successfully used an impact driver in the past to remove the screws holding on the rotor, but this time the screws wouldn't budge. I tried for 30 minutes to remove a single screw. I figured I'd have to drill and tap them out. I found this video along with a couple other videos on removing seized brake rotor screws. I seriously doubted that this method would work, but figured I'd give it a try. To my surprise this worked great. It only took 20 to 30 light blows with the hammer on each screw, and the screws broke free. No drilling, No tapping. Thank you for saving me a lot of time and effort.
I watched the video, I haven’t done it yet, but I’ve dropped you a like. Good show, man.
I watched your video, tried the technique, and it worked like a charm! I had a punch that was too fine, and took it to the grinder to flatten it out, but no big deal. Thanks for the great tip!
Proper technique + Patience + Persistence = Success! Thanks for the great video! It really helped me!
Brilliant! I didn't have an awl, so I used my worst flat head screw driver and within about 3 taps with the hammer the retaining screws started backing right out! This after putting some serious torque on them by hand and giving them the torch for half a minute. Great technique that doesn't involve more tools - just common sense and tools I already have...thank you.
Scott Cler
Worked like a charm. was getting frustrated so i went to youtube and your video saved me from a lot of frustration. Driver side screw came off easy using your method, the passenger side screw gave me a very tough time but it came off using a bigger hammer. thank you so much for sharing this tip.
This worked so well. I'd tried heat, impact driver, a two hammer technique, plus gas. Non of those worked. Your idea did. So here's the biggest thank you. :D
Thanks for uploading this video!!! I was finally able to change my front brake pads & rotors.
Worked like a charm. Thanks for saving my sanity.
Thanks Mate! Son was struggling with this on his Honda CRV and this did the trick! Good on ya for helping us Yanks out!
Patience is a virtue, this worked a treat, thanks. Just need to source some replacement screws for future fittings.
Nice tip mate!
One of my retaining screws was badly rounded so I jammed a chisel between the disc and the hub carrier to stop rotation, drilled a small hole for the punch to fit in and gave it a fair few whacks, finally started rotating and came out.
Thank you. so much. saved me loads of cash buying tools i didnt need. excellent worked just as you showed. took 5mins like yours.
I was able to get a stuck rotor locator screw out using your cold chisel method on a 2006 Hyundai Elantra. Thank you!
Thanks very much. It worked well with me. I used my dremel tool make the groove longer and it made this so much easier.
Well done! You are the rotor screw whisperer.
Well done, you got there in the end,its well worth a try.
I've used this method and it worked, not a easily as shown her, but it worked. It was most effective when I used a nail set whose point I ground down to a flattened point, truncated at an angle. That sat further down in the recess, allowed the application of force with more control, allowing a lighter touch.
I've learned that the rust causing the problem is under the tapered screw heads. That rust has expanded and wedged the head firmly in place. Breaking up the rust is the key to getting the screws loose. The video method tries to shear through the rust, The ball-peen method compresses it. I use both, adding a good solvent oil (WD-40 is NOT one) to lubricate the internal contact surfaces.
My method is now: clean off the rust, clean out the groove, use the 2-ball peen hammer trick(1-2 light blows), apply PB Blaster, wait 15 minutes, try using the right driver, then try the tapping method. Done with a little patience, the screws aren't destroyed.
If the screws are replaced with new, anti-seize under the heads works well for at least 3 years. applying anti-seize OVER the tops as well keeps the heads recesses from rusting.
On my seized brake rotor screw BMW E46 (internal hex) I tried socket with hex bit then impact driver which just rounded the hex slot then I tried WD40 and heat then more wd4. Then I though I would have to drill. I googled to your You Tube page here and thought, I'll try that. After 20 or 30 taps nothing I though this isn't going to work. I kept trying and trying. Eventually I thought I saw it move. I tried a couple more times and bingo - starting rotating out!. Just needed to persevere. Thanks for the tip, that's great.
patience: the zen master
The problem might be that you are not using the right screwdriver to unscrew those screws. I heard that those are not Philips screws but JIS (Japanese Industrial Standard) cross point #2 or #3 screws.
Most better quality "Phillips" drivers made since 2000 are to an ISO standard indistinguishable from JIS.
I used JIS 3 impact driver and it is not working.
This works perfect. Thank you.
This worked great. Thanks for the tip
I tried this method yesterday and it totally worked for me, unfortunately I don't have a drill which it would've been alot faster and I did the mistake of buying the impact screwdriver from harbor freight and the bits broke in 30 sec but thanks for sharing this old pal
Worked!, I really cannot believe it worked, I had a 40 year old truck, and they came right out after just a few hits.
Thank you pal, but your method is my second last choice, my plans would be like this
1) Always spray with penetrate oil first, WD-40 is okay, let it soak for few minutes
2)Use normal right size Phillips screw driver, but be careful don't strip out the screws heads, this is how you estimate for next steps
3)Use impact driver, most of the times they will come out nicely and you can reuse the screws
4)Your method Pal, and thank you !!!
5)Drill & destroy the Phillips screw head
Just replaced my 17 year old rotors on my Honda.
You need the right tool for the job, I recommend a JIS Impact Screwdriver.
5 good whacks (smack it VERY hard) then twist with driver was enough to get all 8 screws out, no problem.
thank you brother!
Removing these screws is my favorite part of doing a brake job. In fact, I always hope that they are seized up so I can figure out how to get them out. First I give the Phillips head a try. Always use the right size and it frequently works. Otherwise, I use your technique except that I use a small chisel instead. The chisel should be sharp. The chisel bites into the screw better which allows you to move the screw around and it won't keep slipping off like the punch does. Just did 6 of them on my Mazda. Plus I love the look on the parts guys face when I go and get all new screws! lol
i had a good idea; you had a better one
Thank you !
Just get some Kroil and an impact screwdriver. Hitting those screws is the beginning of trouble. BTW, your method is also called the "army method"....and it works sometimes.....
nice job
nice work. This way you can still reuse the screw and havent broke off the head of the screw
Heating it is a better solution... I feel.
Try soaking the screws for a few hours with Plus Gas first. Then try an impact driver or a screwdriver with mole grips attached to the blade. If that fails, then try a little heat from a gas torch. If all those methods fail, then you can resort to butchering the screws out. :-)
Does this work on the allen key head ones on bmws?
Those JIS screws are put there during assembly, lugs will hold the rotor on, as they do with every other vehicle. POS Honda used drums on rear, in this day and age.
Was that car in storage? 17 years is a long time. Usually the rotor is fused to the system. To remove the rotor you have to drill a hole and tap it unless it has the hole already put there by the car maker or if the rotor had been replaced.
If they are stripped, just drill them out, pull rotor off. Once you have the rotor off you will be able to remove what's left of the little screws with a pair of pliers and put a new screw in.
Do you have any advice for getting pinch bolts out on a ball joint? What a nightmare those are!
I was surprised to see that he didn't use any kind of penetrating oil. How about some localized heating of the screw with a propane torch (not so much that you heat the bearings)?
The best way to remove a retainer screw is to. There are to holes on the rotor that are made for rusted rotor that dont wanna budge. Use 2 screws that fit & with a ratchet screw in to the to holes on the rotor. And the screws head will snap off. Remember wear eye protection just incase.
Do you have to put screws back in
Would work better to remove the hub bolt and used a jaw puller to remove the hub with the rotor?? My rear wheel bearings need replace anyways.
I wonder what would you recommend to prevent the same situation in the future? Would it be OK to use Anti-Seize on the rotor screws?
Yes or just don't put them back in, it's for assembly purposes only really, no added safety using retaining screws
I fitted stainless steel replacements and plenty of copperslip
think that would be the last option for me mate.
Hose pipe on mole grip --- nice tip
Get a 3/16" drill bit and start drilling till you see the head of the screw spinning on the bit. If you have a decent drill bit it should take less than a minute. Pull the rotor off, and the rest of the screw should come out easily by hand.
This would never work with mine, they had some torx crap which was soft as butter, rounded off before I even started trying. Drill's currently on charge :D
Will this work on a 07 mini cooper with the torx? I tried PB, heat, impact screw drive and impact.
My mini ones were totally seized, I even tried welding a nut to the screw head. Nothing worked so had to drill them out and clean up the thread with a tap
@@brettjustice7676 i paid a local shop $60 to use a pneumatic hammer chisel to get them out. Yeah ass rape but you know what I got it all done for less than a 1/4 of the cost of paying for BMW of Tampa to fo it all. Good luck in future fixes. I plan on K20 swapping in a few months. I absolutely love the Mini layout and handling...what fn platfotm
So how do I take the shit screw out?
Waste of time, drill it out and replace.
Drill it out and don't replace not needed
Spray with wd 40 plummers torch.out in a jiffy
Is it easy to get replacement screws ? Guess they do not come with new disc?
Yeah they normally come with discs. At least they do with brembos
this method was common back in 1400's
HAHAHAHA 🤣
I had this problem when I turned wrenches in the pits for Ben Hur's chariot race.
PB buster, spray back and front of screw numerous time. Let it sits for about 5-10 mins. Instead of doing this or using a manual impact driver, use a 1/2 impact driver (electric or air) with correct impact driver bit and voila. If that don’t work, drill it out. This is too much work when it doesn’t have to be.
So what if you snap the heads off? There only there for the assembly line
Exactly, keeps the rotor from falling off when the vehicle is rumbling down the assembly line. GM had those flat copper nuts on rear brake drums for eons.
You know they make a tool for that!
JUST LIKE A STUCK BATH TUB DRAIN... HIT IT UNTIL GROVE IT AND THEN ANGLE HIT IT...
Do you have to install back the two Phillip screws when a brand new Rotor is installed?
If you had a JS philips screwdriver you dont need to do all this!
That does not always work, i have that js driver and still could not get it out
urn should say burn :D
WOW. Looks like an intentional design to prevent DIY and take it to their $tealer$ship. I had a hard enough time removing my rear 17 yr. rotors without that crappy design.
The rotor is finish anyway so you can oversize the hole with a drill ,it's not like you goto save the disk to turn it no one's turn disk anymore ! If you charge your customers by the ours their the losing ones !
Do you need to put the screws back in so next time you won't have to go through this BS? Most cars don't use screws..
that looks painful i take the plasma cutter urn them out take rotor off and grind or remove screws. Dont newd screws for new rotors
cheers
Penetrating grease, my man.
Old head method.
keep the car, throw the mechanic away
just take it too a garage have them just take the screws out how much could they charge u? cheaper then buying a impack driver!
An impact driver isn't expensive, a cheap one is under £10. I suspect a garage is going to charge you more than that and you'll have a new tool in your box for next time.
The best way is to pay some one else to do it
Too much time messing with a punch and a hammer. 1/4 inch cobalt drill bit
10 minutes and done.
I did mine on my explorer.
I drilled all the way through.
The rotor is screwed to the hub.
It doesn't hurt when you go all the way through since you are just drilling out the screw.
Cobalt bits are brittle. Go slow and use lube. They are the best for drilling metal. They stay sharp.
don't need those screws once u get them out, their a pain in the ass!
Everybody that says this is basically fucking stupid. These screws being in-place does quite a bit to hold and center the rotor when you're trying to reinstall the pads & caliper.
i don't understand why you waste your time , drill them out simple as that because there is no need to replace them, these are intended to hold the rotor on the assembly line that's it.
Your butcher method is the last resort!