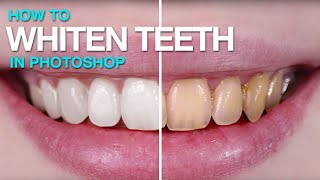
How to Remove Braces in Photoshop

HTML-код
- Опубликовано: 8 сен 2017
- Make amazing BOKEH images in Photoshop: goo.gl/4MJp22
No reason to wait for the orthodontist, get those braces off today! In this quick tutorial we will show you how to quickly remove braces from anyone's teeth.
Download Sample Image Here:
phlearn.com/tutorial/how-to-r...
VISIT PHLEARN.COM FOR MORE FREE TUTORIALS
phlearn.com
SUBSCRIBE NOW FOR MORE FREE TIPS AND TRICKS
ruclips.net/user/subscription_c...
LET'S BE FRIENDS!
Instagram ► / phlearn
Facebook ► / phlearn
Twitter ► / phlearn
Google+ ► plus.google.com/1167910980592...
Phlearn ► phlearn.com


![J.P., NLE Choppa - Bad Bitty (Remix) [Official Music Video]](http://i.ytimg.com/vi/rBDa6BCvw10/mqdefault.jpg)

That is one high quality pic
Thanks sir
tanks bebe
my problem is that the picture is extremely low quality so it just looks like paint on top of it
try blurring the add ons a bit
The new short intro style is awesome. Thank you!!
Amazing! Great job. Will try using the brush more in other situations to.
Great video as always look forward to more!
Long shot could you do a detailed lip retouch video maybe outlining what you would retouch and maybe what you wouldn't ! With how to do a simple detailed lip line gloss look
Wonderful! Very helpful and informative! Thank you so much Aaron! Maybe we can blend the different tones on teeth with Mixer brush with low flow?! Good luck!
Yet another awesome tutorial - thank you!
Hey! Great tutorial. Just wondering how would you go about a similar situation (populated area with lots of detail) but the object is textured. (ie. Painting colors will be lacking the texture)
Hell yea finally something I can really use. Thank you!
Yay I've been asking for over a month now
Thanks Aaron!
In this weekend I was using the same approach for retouching a silhoutte image of a person standing in front of a green gradient created by a speedlight. The clone stamp and healing brushes were just giving crappy results...
But I've worked with the opacity slider rather than with the flow, thinking that the flow is almost never having an advantage (since, eventually, the opacity level will be anyway reached after some strokes). Yet I wasn't very happy with how the brush behaved in that context.
Could you please explain again the difference between both sliders, or refer to a video in which you've pointed out when to use what?
great technique. A LOT of work. thank you.
Holy cow! Aaron fast forwarded some of his retouching! Whaaaat??? Come on Aaron, I need to see *every* *single* brush stroke in full time. ;-)
Seems like I only use the soft brush with varying degrees of softness or hardness. Do you ever use other brushes? If so, which ones and why?
very good tutorial with awesome video editing.. i love you make the notification down below on what tools you use.. Its help to people who didn't catch what you said.. It pretty fast.. But for me its ok.. like your style :) thanks so much with your help :*
having trouble with adjusting the brush size and hardness with the shortcut as it only works when I'm in caps lock but that also changes the cursor to a very uncomfortable one. Looking for solution without caps lock
First of all, nice tip, and I'll definitely be using this. But, I just tried it on a picture from a recent shoot on a subject with both top and bottom braces. A portrait, but not close-up, somewhat tight lips with a lot of metal in the mouth, and it quickly became evident that this is probably much better suited for either top or bottom braces, but not both. In my specific picture, you can actually see more braces than teeth and, on the bottom row, you can see the braces clearly but barely see any teeth due to a closed lower lip. So, I believe this technique is great if you have a close-up and just one row of teeth with braces (I am guessing preferably the top row). In this scenario, you'd have to be one helluva PS magician because you're basically building teeth from scratch.
You are a artist
That is perfect dude
Hai aaron, I've a question, how to put a person into a photo in photoshop. example there's a celebrity photo and have a space to put another person there, if we're already have a photo with same lighting etc, how to process it in photoshop? Thanks
YOU ARE MASTER OF PHOTOSHOP AARON NACE I FOLLOW YOU
YOU ARE THE BEST :)
hey Aron. would you please make a HDR toneing tuturial in photoshop it would be very helpful for me
really nice tutorial
well done. i love it
It`s really good tricks to remove Braces i want it in photoshop
you can combine clone stamp and spot healing for blending.
really great much help
Great tutorial!
However, I liked the old intro better, lol.
'Welcome to PHLEARN, where we make learning Photoshop and photography fun.' This intro just seems incomplete. ;)
agreed!
Yeah me too, the "[...] and photography fun." just feels right.
yeah the old one is awesome
I have used a lot of Aaron's painting technique's, and this is a great example.
I am wondering, though...why he didn't add a bit of texture back over the teeth at the end? I've seen him do this before, like just noise to make it look a bit more realistic....
You're the best!
which app?
What apps is this
thats simply amazing.. :)
Good video, very informative.
Which Wacom device are you using?
Wacom Intuos Pro S is the one Aaron uses :)
thanks for this...
thank you aaron very nice
thank you for the tldr intro!
I had braces for five years
A tutorial on how to ADD braces and other such "flaws" that usually get photoshopped away would be super interesting.
how to add one?
Hey Aaron what if we wanted to add back some of those spit highlights that you see above the braces? haha I thought for sure you were gonna add some reflections to make the teeth look a little less dry. Amazing tutorial as always though man. You're top notch and a true artist with the brush tool.
I think you mean either saliva, or moisture, not spit.
stegokitty mmm pretty sure I meant spit highlights 😘
Suppose the teeth isn't so white ?
Teşekkür Ederim..
A little bit of grain on the brush layer would help to let it look more realistic:)
Badass!
can you edit mine pls?
Exactly what I needed.
What tablet does use ?
Wacom Intuos Pro S
Mika Latokartano thank u
1:41 What is the girl behind Aron really doing?
Jokes on you. Those braces were added on in photoshop beforehand.
I am a complete beginner to photoshop and this assumed I knew things that I didn’t, so it was unhelpful.
I think you did a glare on the 1st tooth wrong. It should continue down from the top.
Did anyone else see the blinking picture in the background
Time code? Where? What?
it's a woman, not a picture haha
stegokitty 0:16
I believe Tyler Durden is working on the editing crew.
David Persaud yea I did
i love you
What's that floating head behind you? Is it Angela?!
The quick solution is to replace the mouth area with another image
i miss the old title and theme song
👍👍👏👏👏
that is very zoomed in, I need to remove braces on a family pic
REMOVE?? yalls i try adding them-
did noone notice the womans head in the background?!?
first 😜