How To Adjust & Set Timing On Common Motor Shockwave Electronic Ignition: Part 181

HTML-код
- Опубликовано: 20 окт 2024
- Sign up for the E-Newsletter!
www.keeponwrenc...
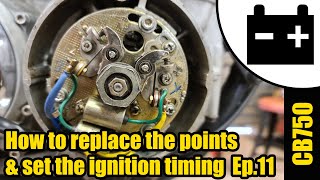
Here’s how to adjust the timing on the Shockwave Electronic Ignition from Common Motor. We’re getting close!
Subscribe for updates and follow along on social media!
/ bvmatson
/ bvmatson
This video series features the complete restoration of a 1972 CL350 Honda Scrambler motorcycle. The videos should help anyone whether working on a cafe racer build or a full-on original restoration. I'm definitely not an expert so please refer to your manuals for proper disassembly and assembly instructions. Please leave comments if you have any questions. I'll be happy to help answer questions if I can confidently provide solutions. Again, I'm not a professional. This is my 2nd Honda motorcycle restoration and I'm learning every single day. I'd love to hear your tips if you have better ways to do things. I hope you find the series useful and entertaining. I strive to show as much detail as possible so that the videos can be used as not only a how-to resource but also a reference for the placement and original set up of parts and systems.
If you don't have one already please get a manual for your specific project. There are many available online for download for free. Common Motor Collective, from which I source many of my replacement parts, has a fantastic resource on their website: bit.ly/CBManuals You can also join groups on Facebook and get involved in the community.
Keep on wrenching, Friends! b
Please consider supporting the channel by purchasing items that you’ll need to complete your vintage motorcycle restoration project. Any support is appreciated.
BUY & SUPPORT
WD-40: amzn.to/3hIzIzg
PB Blaster: amzn.to/2N9CVtR
JIS Screwdrivers (A MUST HAVE): amzn.to/2NasN43
Marvel Mystery Oil: amzn.to/2NfYMjj
Evapo-Rust: amzn.to/2YPF2Ix
Steel Wool: amzn.to/2YU0Anh
Colonel Brassy: amzn.to/2zMK1RX
Wizards Chrome Polish: amzn.to/3dcD7Tv
Turtle Wax: amzn.to/2zMTNDv
Feeler Gauges: amzn.to/2V39tdn
Anti-Seize Thread Lubricant: amzn.to/2Yg7rIB
Blue Thread Locker: amzn.to/2Yg7AM9
Red Thread Locker: amzn.to/2CixExK
Test Light: amzn.to/37IC10R
Compression Tester: amzn.to/3elhWAi
Snap Ring Pliers: amzn.to/3fH4sii
Multimeter: amzn.to/2YSjefj
Micro Fiber Towels: amzn.to/3elil5M
Shop Towels: amzn.to/3etBRg8
Your support is extremely appreciated. THANK YOU!


Great vid thanks for the help! Typically I'll hold the crank bolt with vice grips or an adjustable wrench, that helps loads with engine wanting to turn against the play in the wrench.
Totally!
Doing this at the moment so thanks for uploading this video today!!
I hope it helped you out. It’s finicky but you only gotta set it once. Would love to hear how it went!
put your thumb over the spark plug hole and feel for compression while moving your crank to verify that you're on compression stroke. the piston is up at the top for compression and exhaust strokes so just seeing it there is only 50/50 shot unless you can clearly see that the exhaust valve is closed
Thanks, man. This is really good.
So intricate ! Thanks
It really is but you only gotta set it once.:)
When adjusting the green sensor shouldn’t you be lining the notch on the cam back to the green sensor? Didn’t see you do that…thanks!
I was just following the directions from CMC. It worked when I was done.
bingo...........will be doing my shortly.....Ty
Good luck. I hope video helps you out.
So, Common Motor says to use the .010” (.3 mm) feeler gauge, but .010” is .25 mm - .3 mm is the .012” feeler. Which one should I use?
You can stack them to get it perfect…but err on the loose side. Don’t want them too tight!
@@KeepOnWrenching let me ask it differently. When setting the timing for the left cylinder, should I sandwich a .010” (.25 mm) feeler gauge between the sensor and the high point on the cam, or a .012” (.3 mm) feeler gauge?
I guess I would defer to what the manual says. I know that it’s better to have valve a little loose than a little too tight. By a little, I mean a little. CMC is trustworthy for sure, but referring to the manual is always the place to confirm. Do you have a manual? If not, message me via my website and I will hook you up.
@@KeepOnWrenching oh this question wasn’t about valve adjustment, it was about timing the shockwave😁
@@dustinthrush2941 oh!!! That’s a finicky bugger. Once it’s set you’re good, but it’s a bit of a journey. Go with the .010