Impressive work. I like the honesty of your commentary, which is refreshing to hear, and the safety tips are a useful and well considered element. Importantly, the bowl looks great!
Great job and I love the design. I have made several segmented bowls and would like to try this one. Are you willing to share the different ring dia's? Thanks for the video.
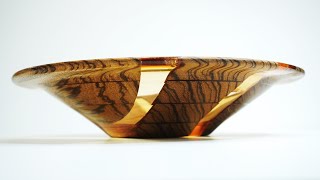
@brucebenoit480 ok, so you need 4 rings. top ring 320mm dia, 25mm wide 25mm deep. Feature ring 320mm dia, segments 30mm wide 25mm deep with 5mm joints. 3rd ring 300mm dia, segments 75mm wide 25mm deep. Base 230mm dia 25mm deep use solid timber. If you want segments 115mm wide. Hope that helps. All the best and good luck.
I tried this, and it reacted with sapele to give a white discharge that stained the wood. Manufacturers don't recommend it. I now use the grit from 220 sand paper, just rub two pieces together over the wet glue, it doesn't take much.
Maybe a bag of dry concrete (40 lbs) laid on top of a larger board for your segment stacking? I would also suggest salt in the glue to give some grip between layers.
Frank has been an inspiration to me for many years i really want to make a particular clamping jig he did a few years back. but mostly i've tried to find my own way of doing things and since doing this bowl ive developeed my technique and recentley upgraded my segment jig it will be in my next video. Thanks for the comment. 🙂


It worked out gorgeous, thank you !
Hi, I'm glad you like it and many thanks for watching.
That is a beautiful bowl! Nicely done
Thank you 😊
I get all of your comments. I have had all the same. Good job M8! Keep it going.
Thank you
Hermoso trabajo!!!.Saludos desde Argentina!!!🤗
Thank you so much for your kind words! Sending greetings back to Argentina! 🙂
СПАСИБО вам большое, вы настоящий МАСТЕР!!!
Thank you 🙂
Great bowl! Nice work!
Thank you 🙂
Wow very cool
Thank you 🙂
Très beau travail segment 👍👏
Thank You, I am glad you like it 😊😊
Very nicely done, I like the different colors contrast and how the segments set it off. Thank you for sharing your video.
Thank you, always a pleasure, thanks for your comment 🙂
Fascinating to watch from start to finish.....and a beautiful item at the end. Excellent!
Thankyou glad you enjoyed it
Beautifully done nice choices in the wood selection and design. Awesome tutorial
Thank you 🙂
Very impressive finishing, the sheen accented the beautiful segment work
Thank you so much 😀
Super work
Thank you 😊
Impressive work. I like the honesty of your commentary, which is refreshing to hear, and the safety tips are a useful and well considered element. Importantly, the bowl looks great!
Thankyou glad you enjoyed it
Beautiful Piece, interesting process. I hope to be at this level some day. Full View and Like 👍
Thank you very much🙂
Sensacional
Do Brasil
Thank you 😊
Gary, Thanks so much. I will give it a try and will let you know how it comes out.
Bruce
Great, I look forward to seeing your work 🙂
Great job and I love the design. I have made several segmented bowls and would like to try this one. Are you willing to share the different ring dia's?
Thanks for the video.
Hi. No problem, I'll have to dig out the drawing. I'll put the sizes on a reply. Many thanks for your comment and good luck with your projects 🙂
Thanks a bunch. I will send you a pic if it works out.
Bruce@@RestorationDIY
@brucebenoit480 ok, so you need 4 rings. top ring 320mm dia, 25mm wide 25mm deep. Feature ring 320mm dia, segments 30mm wide 25mm deep with 5mm joints. 3rd ring 300mm dia, segments 75mm wide 25mm deep. Base 230mm dia 25mm deep use solid timber. If you want segments 115mm wide.
Hope that helps. All the best and good luck.
Привет из РОССИИ, посмотрел ваши работы, восхищён очень КРАСИВО у вас золотые руки!
Thank you so much 🙂
МАСТЕР!!!
Thank you 😊
A sprinkling of kosher salt between the pieces will keep them from sliding while glueing up.
Thanks for the comment. I haven't tried using salt in my later projects I've used hotmelt glue, but I'll give the salt a try 🙂
@@RestorationDIY it's a Luthiers trick to keep the fret board from moving while glueing it to the neck.
I tried this, and it reacted with sapele to give a white discharge that stained the wood. Manufacturers don't recommend it. I now use the grit from 220 sand paper, just rub two pieces together over the wet glue, it doesn't take much.
Very nice work ,try a very small pinch off salt sprinkled in the layers of glue.
I find this stops the rings from slipping when clamping.
Thank you very much and thanks for the salt tip I'll be doing another segmental bowl quite soon 🙂
Maybe a bag of dry concrete (40 lbs) laid on top of a larger board for your segment stacking? I would also suggest salt in the glue to give some grip between layers.
I like the idea of the large board 👌 I'll give that a go, and adding salt is something I will also try. many thanks for your comment 😀
if you sprinkle a litlle bit of salt on the glue the rings don't slide so easy when you clamp them, and it don't effect the quality of the glue
That sounds like a good idea. I'll give it a go on an upcoming project. Many thanks for your comment 😀
Check Frank Howarth u tube Chanel for segment cutting sled and clamping jig.
Frank has been an inspiration to me for many years i really want to make a particular clamping jig he did a few years back. but mostly i've tried to find my own way of doing things and since doing this bowl ive developeed my technique and recentley upgraded my segment jig it will be in my next video. Thanks for the comment. 🙂