For any enquiries please contact me at Dtm321tube@gmail.com Or Instagram instagram.com/dan.theman321 Many thanks for watching and please don't forget to Subscribe.
I'm so happy I found your tutorial. My compliments for the design and thanks for sharing this very clever solution. I started building one for my camper based your video. :-)
Just listed a new video that goes into detail on this design ruclips.net/video/W1OSJxh9TJU/видео.html Hope this helps 👍 many thanks for watching and please don't forget to Subscribe
I used the rocker prior to baby delivery when I was up in the middle of the night due to heartburn and loved it! Little one is now 6 days old and loves the rocker ruclips.net/user/postUgkxXH3jIpsn6vpr3D26KWAriUejh7CSxVp7 , she gets great sleep when used. I had a 1st degree tear repair so sitting can be very uncomfortable and down right painful when the rx mortin wears off, however even then the rocker is firm enough for support but soft enough to feel comfortable. I'm 4'9" so I fit in the chair easily and my 6"3' friend also can sit comfortably in it with a little one. 💖 I would definitely recommend this rocker as a must have for any parent to be👍
Looks really good , the ball bearing runners are a great idea .Think I might incorporate that idea in my remodelling. The ends look really neat with the board on top and I think the aluminium wouldn't look as good anyway.
Hi dan just to let you know me and be have today hav been getting the van ready for a week away hopefully our van was the first to your how to convert on dtm at nu venture
Great video dan, always wondered how on previous videos you’ve done. Now I know how. This setup will be going in my doblo. Cheers Dan looking forward to the next part.
That’s great! Thank you for the video! Can you please reccomend where to get cushions / mattress? My bed size isn’t standard and I’m looking for options
Have you looked into using pocket holes for your work? You can pick a jig and setup pretty cheap and for carcass or cabinet work they are such much stronger and more durable than end fixing and look neat too 👍🏻
@@dantheman321 thanks for the content, forgot to say love the design and build quality of this you can see the thought that's gone into it. You don't happen to have a design or a blueprint you could email me? I've started a build on a transit custom lwb and don't fancy the rock and roll type bed. Cheers 👍🏻
@@kanosaunders I don't have a blue print no but I do have more videos on the Doblo micro campers I've done in the past on my channel. The layout is the same but I making some changes/improvements, hope this helps👍
How come pocket hole joins are stronger? In my mind you still have a screw joining 2 pieces of wood, but the pocket hole also means removing additional wood drilling a larger hole that the screw will slip into which would surely reduce the strength of the wood? Pocket holes to me seem like they would be good for some kind of cupboard unit etc but would not be as strong and better not to use in a bed which is supporting a lot of weight?
just spent all day working out how to do mine but i was going to use 44m x 44mm......... over kill by looking at yours did use 10 mm by what 4mm what size wood did you put on the ply to support the hinges.......................... thanks for your vid it helps a lot..........
This is exactly what I want in my Camper. Had very similar setup in my Bailey Pegasus and thought it was a great idea. Can you tell ne what router/ bit I need to do the edging strip on the board edges?
Yeah there are some legs that need to go on the front yet but the frames have to come back off to do the electrics under the bed first 👍 many thanks for watching
Hi Dan, I have been inspired by your video to make the bed of my campervan. Before placing the bed slats the runners worked well, but now that I have screwed all the bed slats I realize that the pull out staff doesn't slide easily.. It is a little stuck when I open it. I was wondering if you know what it can be? Thank you very much.
Hi Dan, an extremely useful video, thanks. I am thinking of using this as the basis of a bed for my E-NV200. I have a 190mm length and either 120 or 130mm width (not decided yet) Would you always divide the width down the middle giving, for example, 2x60mm/2x70mm laves or can you see any issues of having a 90mm wide base for the bench and a shorter slide out?
I will be making another video on the process of measuring and building these bed frames in more detail than the last video but these will be available to buy in kits form soon. Many thanks for watching and please don't forget to Subscribe
Great video, Dan. Have you experienced any issues with having the bed slats screwed into the frame rather then using bed slat holders? The slats in your video appear to be sprung? I’m building something similar and as a bit of an oversight have ordered sprung slats, so now weighing up my options of fixing them. Cheers
I haven't made the legs yet as the tops and front of the bed have to be taken out yet so I can do the electrics under the bed. They will probably be in the next video though 👍 many thanks for watching.
Hiya mate, I know this an old video but first off great work! Its looks amazing, I have to ask though as I'm currently fitting out my van, where did you source the wood effect panelling? it looks so good and high quality, I wouldnt mind having the same in my van. Cheers
Another cracking vid Dan, I'm on with my first unit build and I'm having trouble getting the corner profile for the wardrobe onto the 15mm ply... Any tips on how to get it on without battering it to death. TIA
Plane the edges on the furniture slightly that's going into the profile that should work. Failing that a little bit of silicone spray on your furniture board if it has a sealed laminate finish. Many thanks for watching 👍
Another fabulous vid Dan..excellent work. And giving trade secrets away that usually us diy'ers only find out by trial and error!! Just a quick question..I've followed your H3 conversion and wondered what ply the ceiling was..9 or 12mm light weight or normal weight?? 😘 Cheers again for some great vids!! 👍
Anyone else following this design and having issues with the wood splitting on the notch for the drawer slides? I've gone through about 10 lengths of wood now trying various different methods to screw them together, no matter what I do it always splits, so much so that even if i was to get one made without it splitting I have no faith in it lasting for the long run. Maybe the quality of wood has decreased drastically in the last 2 years but it seems like a major flaw with this design.
What width wood are you using? A few years ago I was using a smaller width and every now and again it would split that's why I started using the wider stuff. I've made hundreds of these and they have been fine 👍
I was originally using 70mm x 18mm but the last 2 attempts I was using 68mm x 21mm hardwood which I had high hopes for because it seemed stronger but it’s still split, the next size up would be 25mm width but I’ll have to remake the entire top as I will need to shorten the depths and resit the drawer sliders. You do mention in the video that you changed the timber in later builds because of the way it sat on the back lip, can I ask what size you finally settled on?
I’ve also been unpacking all the wood from b&q trying to check the grain direction as I feel like it was naturally weaker when the grain went across the 18/21mm width rather than following the longer edge, it’s always the same spot that it snaps in too, basically the little notch that is holding all the weight snaps off


For any enquiries please contact me at
Dtm321tube@gmail.com
Or Instagram
instagram.com/dan.theman321
Many thanks for watching and please don't forget to Subscribe.
Wigan?
@@sined726
Yes, many thanks for watching
Do you have a parts list?
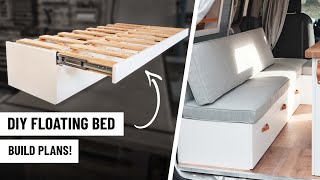
Finally found a sliding bed with sprung slats, everyone else is posting hard flat ones and saying how amazing it is. :P
Just the best Video about who to make the bead in your car. Thank you just a great work here.
You're a lifesaver! Thanks so much for the awesome tutorial.
I'm so happy I found your tutorial. My compliments for the design and thanks for sharing this very clever solution. I started building one for my camper based your video. :-)
Just listed a new video that goes into detail on this design ruclips.net/video/W1OSJxh9TJU/видео.html
Hope this helps 👍 many thanks for watching and please don't forget to Subscribe
And you even made a follow up video!!!
I used the rocker prior to baby delivery when I was up in the middle of the night due to heartburn and loved it! Little one is now 6 days old and loves the rocker ruclips.net/user/postUgkxXH3jIpsn6vpr3D26KWAriUejh7CSxVp7 , she gets great sleep when used. I had a 1st degree tear repair so sitting can be very uncomfortable and down right painful when the rx mortin wears off, however even then the rocker is firm enough for support but soft enough to feel comfortable. I'm 4'9" so I fit in the chair easily and my 6"3' friend also can sit comfortably in it with a little one. 💖 I would definitely recommend this rocker as a must have for any parent to be👍
Skilled craftsman at work.
I have been looking for a video that breaks down how to building the ball bearing rails. Thank you for making this video!
Hope it helps 👍 many thanks for watching
Great design Dan and thanks for sharing. Nice work
The best camper van builder by far top man great work keep them coming thank you
Thank you for your kind comments Donald, it is very much appreciated 👍
That's a super job. Just what I'm after
Many thanks for watching
Love the drawer runners. I've just used the same thing and what a difference they've made
Yeah they make a massive difference. Many thanks for watching
You're very talented. Great build.
Thank you very much 👍
Looks really good , the ball bearing runners are a great idea .Think I might incorporate that idea in my remodelling. The ends look really neat with the board on top and I think the aluminium wouldn't look as good anyway.
Thank you very much, I'm really happy with the improvements I've made and how it has come out.
Many thanks for watching.
amazing work buddy!
That is brilliant. I couldn’t figure out how to make a slat bed chest.
That is so impressive. On another level!
Many thanks for watching Phil 👍
your very skilled at what you do , great stuff
Congrats, it's incredible 🤩
Excellent design
This is brilliant. What a professional. Thanks for sharing.
Hope it helps 👍
Bloody nice smart finish that pal 👏 👍
Thank you and many thanks for watching 👍👍
It’s a family affair! Love it 😂
Thanks for the video exactly that I have been trying to find
Your welcome thanks for watching 👍
Excellent design could do with this in my T4
@@micro343 I've got an ebook coming out soon along with other plans for this setup 👍 Many thanks for watching
Great job, well done. 👍🏆
Love it. Wish I knew how to do it myself
Cracking job mate 👍🏻
Thanks buddy 👍 how's the van coming along ?
@@dantheman321 very well thanks pal 👍🏻
Hi dan just to let you know me and be have today hav been getting the van ready for a week away hopefully our van was the first to your how to convert on dtm at nu venture
Hi Robert, yes I remember you, hope you have a great time 👍
Very nice! Good luck✊✊✊
Looks great! Want my hubby to make the same😃
Thank you for this beautiful video
Great video dan, always wondered how on previous videos you’ve done. Now I know how. This setup will be going in my doblo. Cheers Dan looking forward to the next part.
Thanks Rob and many thanks for watching 👍
That looks really good damn
That’s great! Thank you for the video! Can you please reccomend where to get cushions / mattress? My bed size isn’t standard and I’m looking for options
Try NC Interiors in Bolton they make custom sizes cushions👍 many thanks for watching
Great job!
Thank you very much 👍
Have you looked into using pocket holes for your work? You can pick a jig and setup pretty cheap and for carcass or cabinet work they are such much stronger and more durable than end fixing and look neat too 👍🏻
I will have alook into that 👍
Many thanks for watching
@@dantheman321 thanks for the content, forgot to say love the design and build quality of this you can see the thought that's gone into it. You don't happen to have a design or a blueprint you could email me? I've started a build on a transit custom lwb and don't fancy the rock and roll type bed. Cheers 👍🏻
@@kanosaunders I don't have a blue print no but I do have more videos on the Doblo micro campers I've done in the past on my channel. The layout is the same but I making some changes/improvements, hope this helps👍
How come pocket hole joins are stronger? In my mind you still have a screw joining 2 pieces of wood, but the pocket hole also means removing additional wood drilling a larger hole that the screw will slip into which would surely reduce the strength of the wood? Pocket holes to me seem like they would be good for some kind of cupboard unit etc but would not be as strong and better not to use in a bed which is supporting a lot of weight?
@@Fromatic Yes and I think that pocket holes don't really look that neat either.
Question - does using the bed slats make that much of a difference on support/comfort vs flat pieces of wood?
just spent all day working out how to do mine but i was going to use 44m x 44mm......... over kill by looking at yours did use 10 mm by what 4mm
what size wood did you put on the ply to support the hinges.......................... thanks for your vid it helps a lot..........
I used 45mm x 19mm and 70mm x 19mm hope this helps 👍
Dude….beautiful craftsmanship. Loved this. Subd. D😎🇺🇸PDX
Thank you very much for watching and subscribing👍👍
What is the name of the small grey brackets that you use to screw the ply panels in place?
Very nice
Thank you very much 👍
Hi Dan,
Very helpful video - thank you.,
Where do source the aluminium edge trim from?
Thanks
Does fairy liquid stick wood better than glue?😀
Smart 👍
This is exactly what I want in my Camper. Had very similar setup in my Bailey Pegasus and thought it was a great idea.
Can you tell ne what router/ bit I need to do the edging strip on the board edges?
Hi Ian, I use a 3mm slotter but it all depends on the knock on edging you use 👍
Many thanks for watching
@@dantheman321 cheers for the info. I just need to buy myself a router now
dan as usual class, there is end caps for that profile ive seen it somewhere il try did out a link.
Thanks for that I've haven't seen any but thought someone would have made something by now 😂 Many thanks for watching👍
Great video will the pull out need any support cheers Simon
Yeah there are some legs that need to go on the front yet but the frames have to come back off to do the electrics under the bed first 👍 many thanks for watching
So talented, make it look easy. Where do you get the light weight timber
Furniture board comes from morlands, they have the boarding, corner profile and knock on edging too 👍
Many thanks for watching
Hi Dan, I have been inspired by your video to make the bed of my campervan. Before placing the bed slats the runners worked well, but now that I have screwed all the bed slats I realize that the pull out staff doesn't slide easily.. It is a little stuck when I open it. I was wondering if you know what it can be? Thank you very much.
Try adjusting the height of the section that slides out as it may be rubbing on the fixed slats 👍
Many thanks for watching
Great design, but can it support an adult's weight in the suspended part of the bed?
It's not suspended it will have a front leg fitted to the front for support 👍many thanks for watching
Great video. Can i ask how you cut the furniture board without getting splintering or damage?
Use a jigsaw blade made for metal you get a fine cut 👍
Hi Dan, an extremely useful video, thanks. I am thinking of using this as the basis of a bed for my E-NV200. I have a 190mm length and either 120 or 130mm width (not decided yet) Would you always divide the width down the middle giving, for example, 2x60mm/2x70mm laves or can you see any issues of having a 90mm wide base for the bench and a shorter slide out?
Do you offer blueprints for this? How can I buy them? Do you have step by step notes? Ty.
Do you have a link for them runners you used and the price please. As love the bed and looking to build one for my lorry
I don't have a link but they are readily available at screwfix or b and q 👍 many thanks for watching
Hi Dan, I like the look of those brackets you use to fix the sides to the floor. Do you have a link or the name of what they are?
Is that bed a kit or from a plan? I am in Australia and looking for some plans to build the same thing for my T4.
great bed system! What did you use for the slats?
Thanks
The bed slats are from IKEA 👍 many thanks for watching
As always Dan.. 👍👍
Thanks Mark, hope your well👍
@@dantheman321 No worries mate and yes im good thanks..👍👍
Where have you gotten the trims (wood effect with grey edging) from? looks ace!
this is just what I want. Do you build them in kit form ? I am now carpenter, so would have to find someone to do this for me.
I will be making another video on the process of measuring and building these bed frames in more detail than the last video but these will be available to buy in kits form soon.
Many thanks for watching and please don't forget to Subscribe
@@dantheman321 great thanks
Great video, Dan. Have you experienced any issues with having the bed slats screwed into the frame rather then using bed slat holders? The slats in your video appear to be sprung? I’m building something similar and as a bit of an oversight have ordered sprung slats, so now weighing up my options of fixing them. Cheers
Owdo, how tall do u make them? Which porta loo do u use?
How long is the bed?
Hi Stuart the bed will be roughly 6ft 4 inches long and about 40inches wide.
Many thanks for watching
No retractable or right size legs that fold in with the sliders?
I haven't made the legs yet as the tops and front of the bed have to be taken out yet so I can do the electrics under the bed. They will probably be in the next video though 👍 many thanks for watching.
@@dantheman321 I heard you say that 😉
I mean as a type of legg. Cause I thought you was talking of some other support.
@@RedBatteryHead A retractable leg sounds interesting, might look at that on the next van😂👍
Legend 👍
Hiya mate, I know this an old video but first off great work! Its looks amazing, I have to ask though as I'm currently fitting out my van, where did you source the wood effect panelling? it looks so good and high quality, I wouldnt mind having the same in my van. Cheers
Hi, it was from Morlands, they do the furniture board, corner profiles and knock on edging too. Many thanks for watching 👍
@@dantheman321 Thanks for the swift reply mate. Appreciate it.
Another cracking vid Dan, I'm on with my first unit build and I'm having trouble getting the corner profile for the wardrobe onto the 15mm ply... Any tips on how to get it on without battering it to death. TIA
Plane the edges on the furniture slightly that's going into the profile that should work. Failing that a little bit of silicone spray on your furniture board if it has a sealed laminate finish. Many thanks for watching 👍
@@dantheman321 thanks for that. It's proving to be a bit of a tight bugger👍
Another fabulous vid Dan..excellent work. And giving trade secrets away that usually us diy'ers only find out by trial and error!!
Just a quick question..I've followed your H3 conversion and wondered what ply the ceiling was..9 or 12mm light weight or normal weight?? 😘
Cheers again for some great vids!! 👍
12mm light weight and many thanks for watching 👍
Love this but wish the floor was lowered.
Fukkin badassed!!!
👍
Thanks John, hope your keeping well👍
How heavy can the rails take?
Honestly never tested one until they give but been building them this way for many many years on many different conversions. Many thanks for watching
Could I have the measurements please mate
Quais as medidas dos sarrafos
Do you sell these?
Not yet but will do soon
Onsdag modul
killer
Anyone else following this design and having issues with the wood splitting on the notch for the drawer slides? I've gone through about 10 lengths of wood now trying various different methods to screw them together, no matter what I do it always splits, so much so that even if i was to get one made without it splitting I have no faith in it lasting for the long run. Maybe the quality of wood has decreased drastically in the last 2 years but it seems like a major flaw with this design.
What width wood are you using? A few years ago I was using a smaller width and every now and again it would split that's why I started using the wider stuff. I've made hundreds of these and they have been fine 👍
I was originally using 70mm x 18mm but the last 2 attempts I was using 68mm x 21mm hardwood which I had high hopes for because it seemed stronger but it’s still split, the next size up would be 25mm width but I’ll have to remake the entire top as I will need to shorten the depths and resit the drawer sliders. You do mention in the video that you changed the timber in later builds because of the way it sat on the back lip, can I ask what size you finally settled on?
I’ve also been unpacking all the wood from b&q trying to check the grain direction as I feel like it was naturally weaker when the grain went across the 18/21mm width rather than following the longer edge, it’s always the same spot that it snaps in too, basically the little notch that is holding all the weight snaps off
If you pre drill your holes they are less likely to split
Holds more dodo than smaller ones