Casually Laser-Exposing 0.2 mm PCB features on a 3D printer

HTML-код
- Опубликовано: 23 ноя 2017
- Cetus 3D Printer: shop.tiertime.com/
Laser module: www.banggood.com/custlink/3vv...
Cheaper 3D printer www.banggood.com/custlink/3DG...
My patreon: / marcoreps
Holder .stl file: drive.google.com/open?id=19XB...
Test layout Eagle .brd file: drive.google.com/file/d/1sE2s...
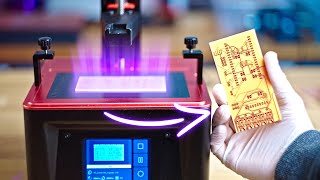
In this video I wanted to make a heated build platform for my cheap 3D printer, but got distracted by another interesting feature of the Cetus. It has an unused output on the print head, that can be controlled from within gcode. That opens up a ton of possibilities, but what I am most interested in is, as always, laser PCB prototyping. Will that work? Spoiler: Yes, it will. Incredibly well.  Наука
Наука


7:29 - Thank you for letting that sound ring out completely; that was very pleasant.
"warning labels are indicators of good tools"
I love this guy
Its kinda true though lol
The accent, tone of voice, plus lines like that one are exactly what I look for in this kind of youtuber. They always know what they're talking about, and the videos are always that one perfect style of video. Even getting some minor I Did A Thing vibes here, I love it!
Between this kind of calm, deliberate narration of technical videos like these and clips of TNG where Picard admonishes people, I'm in a very happy place right now.
You need a fan pointed at the work piece. The laser heats the air around the traces and that causes local refraction, so your laser accuracy is wobbly. If you keep a fan on, then that moves the hot air out of the way quickly, so you'll get more consistent lines.
I somewhat doubt that a few °C hotter air will have _such_ a drastically different refractive index that it bends "blue" light so much in such a short distance.
Not to mention it could damage the lens on the laser
Maybe is the plume created from ablation cause scattering? not sure just guessing
Leo Curious You say drastic, but we are only talking about sub .1mm vibration here.
@Blondie SL I know, how did we survive the stoneage 70's???
This is a really great presentation of laser PCB etching! I was looking at the Cetus3D because of the linear rails but had reasoned that it was of no practical use for my needs printing Ultem 9085, until now I see what can be done using it as a laser machine and only $299 plus parts that’s awesome! The download links, intelligent straight forward content that I can watch all the way through while enjoying the ever so subtle wit of the presenter is quite refreshing! Subscribed!
Looking forward for the next video on this topic. Great work ! Impressive workshop/equipment you have.
7:04 -- "It probably just uses the Google Translate feature." LOL! Looks like a great project. Thanks for the laugh!
Always a good watch! Thanks for uploading
Hey man, I know its a bit late, but if you use a raspberry pi with octoprint on it, and connect a camera, it has an option that will tell the hotend to move out of the way after every later and it'll take a picture and store it
I've seen a ton of your videos. finally subscribed! great videos!
and at 2:50 he just lets that laser drop and hang by the wire :D freaking comedy club, love it
I really like your humor!
Awesome work again!
Maan. I love your humor! Keep it up! 😉
YEAH! Thank you for such useful content.
Really nice, man. Looks promising.
0:24 the pause and the "huh?!" won me over 🤣
Hi Marco! I have a couple of questions to ask you, I'm building a multifunction 3D printer + laser/miller for PCB work, I found your video very clear and helped me already a lot with flatCam and other tricks, my setup is based on Marlin firmware, that doesn't (completely) support G0 rapid movement (G0 works but at the same federate set for G1, not rapid), how did you manage to move the laser faster in ''laser-off'' movements? other issue with Marlin is that M42 to control the laser output is not buffered, thus I need to put an M400 command every time a call the M42, are you using a different firmware or trick to sync the laser switch with the movements?
thanks in advance and my best compliments for your works!
best video ive ever seen thanks for sharing!
Amazing. Great video.
Warning labels are a sign of good tools..
I'm going to use this line often :)
Greetings from BlackSea! Good job!
Great video! Great humor
For a really good timelapse try attaching your camera to the build plate. I did it to my printer and you can see the part grow and it is really cool. I just attached some spare aluminum cut into a strip and screwed the aluminum to an unused hole using a nut and bolt. Make sure it is pretty stiff or you will get some wobble in the timelapse. Good luck!
Another nice and interesting video, good work once again.
You aren't too bad yourself :) Hope to see the Fluke working soon
There are some nice timelapses to find on youtube that use the method you discribed. They look very statisfying. Way more than the ones with jumping print heads
fantastic stuff -- subscribed!
Hey :) you can try whit a lower Acceleration, i believe it will fix the wave /shaking/ vibration problem
you can also Test your 3D Printer vibration whit that laser, draw square in each corner, then you can see if it shake more in some of the corner ( no it was not mean as a shaking joke ;)
"hmm??? what this tiny transistor for" Haha! i love all your small lovely detail in your videos : ) thanks
Some of the squiggles will always remain due to resolution aliasing.
How did you determine the "Tool dia" value in FlatCam for a Laser?
good touches of humor, like!
because of the nature of step motor(steps generates mechanical vibration), you will not be able to get ultra-precise lines unless you use high gear ratios on each axis with some renunciation of speed,
As you know, you can use bldc motors driven by sinusoidal or FOC control (like odrive) to reduce vibrations, it may be more costly but prototyping machine are also high priced
Excellent. I expect this can be done with other 3d printers. I have an anet a8 just in the mail. I hope its possible with it. Ill see once its assembled.
Very nice, great tip to convert the gcode
haha I thought so too...
I can’t wait to try this. How did you get the hot end bit to synchronise with the camera for the stop motion?
3:25 very nice Raft as well :)
Do you still have the test file you used in this? I want to run it on my new laser to see how it performs.
23bit absolute servo motors could vastly imporve the print. Also spring-loaded grounded ballscrews and of course pre-loaded B class linear guideways.
I switched driver boards on my 3D printer to one of the 'quiet' ones - I presume this shapes the drive current or does micro-stepping. In any case, the vibration level went way down. I was wondering whether this would improve the quality of the traces on your setup.
easily does 0.1mm features (65mA laser current, 405nm - 750mm feedspeed, careful with accel times) - ping me if u need some data (i burned a lot of bungard to get to right values ;)
maultrommel ping :P would you mind making your findings public? While i don't own this printer, i am sure others would appreciate it. :)
Excellent results. Perhaps bringing the laser diode closer to the bed would negate some of the wiggles. At least on the print head axis.
If you manage to tune the jerk and acceleration and decrease them from the firmware side, you could stop that axis dependent vibrations propagated because the small scale. that adjustment just eliminate the resonances.
A software dividing the plate in chess squares and 2 actuators moving some laser mirrors will increase the resolution a lot more, as there will be no vibrations in the frame. You could use multiple lasers as well for higher resolution - 9 smaller squares being burned at the same time, with 9 lasers, for increased productivity.
The hard part is not making small etched features - it is the drilling and vias that make a PCB useful for anything more than a blinking LED project.
me every time I plan to do something "im going work on the heated bed and whats this random transistor for?" 12 hours later... "Ill just work on the heated bed another day" lmao
hello, what power does the laser have?
what type of pbc is ?? does he put any paint on the pbc ?, engraver directly on the copper?
Hi Marco, thank you so much for this brilliant video!
Could you try using the laser to make a soldering stencil in this set up.
Also, you mentioned improvements that you made, could you go into more detail about that?
I meant improvements for the other machine (EleksMaker), but yes, I'll definitely show them! Stencils, maybe by the end of the year or early 2018
How did you make the onscreen text, "large" follow your movements? Did you do it manually or did you use some clever software? And if you used some clever software, did you write it yourself?
I had the same version from Eleks as yours only in the 2500mw version and I finally had enough as it just could not engrave all that well and I guess it was that electrolytic you showed is probably in it as well. I would have needed some way to be able to toggle the laser on and off much faster though it wasn't very good at greyscale either. I have an eBay Chinese laser 50w (really 40w) CO2 that will be here on Thursday thanks to that blue laser from Elek's being so crappy.
Is a 500mw 405nm laser powerful enough to do this? As that is what if offered for printers from crwality like the ender 3. Which is a 24v system and am having trouble finding a solution for this. Help please...
How would I find out what all would be involved in upgrading the laser to something more high powered? 3000mW, for example?
I'm a new subscriber. Just wanted to say like the way you explain.
Welcome, thanks!
Did you remove the inside PCB laser and connect diode directly to constant power source?
Nice mod, but I wonder if there is a more direct way to do this...
Given that the photo-resist is a layer that polymerizes when exposed to light, to protect the copper layer from the etchant, and you have a 3D printer which is designed to lay down layers of polymer anyway, perhaps there is a suitable polymer that could be directly printed in a single layer on a plain copper board, avoiding the necessity for the laser, photo-resist and developer?
Can't te laser be focused so you could place it closer to the board to reduce angular vibration?
I know this video's a bit old, but have you tried using Octoprint and Octolapse for your timelapses? That's what I use for my timelapses, and it works out alright.
Would it be fine to use 405nm with 500mW that has TTL/PWM control? I should be able to bring down the wattage due to controlling the duty cycle, right?
Bet the double sided tape woulda dampened it enough for nice straight lines 😃 love yer format awesome vid 👏
i waana ask a very basic question, lets say i want to have a cnc to drill pcb holes, how can get a correct orientation/alignment in order to make sure that the drill will go to the exact location where the drilling points actually are, without deviation ?
Synchronized capture is easily accomplished using the Octolapse plugin in Octoprint.
How is the PCB coated? I'd like to do the same, but no idea how to make these pcb sheets...
What kind of PCB are you using? Positive acting photosensitive ones?
Does anyone know what the laser wavelength range necessary to to etch the photosensitive copper clad boards this way?
I am confused by the fact this laser has a wavelength of 405nm, but near to far UV light has a wavelength range of 100-400nm.
Wouldn't lowering the printhead lessen all the angular deviation you are getting? As in: "less amplitude of the wobbles".
Also maybe try using the laser with a tiny masking dot right above the board?
Hi. Do you think only having 2 screws to fasten the surface of that whole module that carries the laser module is too weak? I saw construction of the cetus 3d - and I was curious why that bracket was so small.
Erich Stein No, those two screws are overkill, by several orders of magnitude. You could have used double sided tape.
Idea: Use the bed to "shake" and heat the board etchant etching etcher thing that etches..! :)
Great video, is your Cetus printer MkII or MkIII?
What's the linear rails brand on the Cetus 3D?
Vibration by X- axis, Y-axis is perfect, so diagonal lines are middle quality.
Get yourself some JST XH connectors and a crimping tool then, if you plan on doing mod stuff for electric from China it worth the money :)
you should use optical stabilizer attached to a laser diode to get rid of vibrations.
Congratulations on the beautiful videos, I wanted to know if I can machine PCBs with a 20 watt diode laser
Is the second board, the board with the zebra, with etching? Looks good!
Nice! What photoresist do you use?
whaoo thank you .. very good news...
I need to see what you will use with that other LED driver board!
One of many LT demo boards lying around. I don't have an application yet, and because it is from 2005, it's not that great by todays standards.
know its been a while but mind posting up some example codes what power that socket on in Gcode for us cetus users?
Very interesting video
Friend good night! wanted to know what paint you used to make a pcb
Thanks for sharing :-)
You mentioned creating 3D printing time lapses with the based on nozzle position, Octoprint will actually do that for you!
Awesome!
Marco I tried doing this with a TTL controlled laser and the pins on top of the extruder seem to only put out about + or - .3 volts??? Any idea what I'm doing wrong?
Sounds like open collector outputs. Take the outputs upto your positive supply rail (5v if your driving TTL) with a 10k resistor and then feed the output/bottom of the resistor to your device.
2300 mw/2,3 watt 450nm laser with TTL. I dont know if wavelength matter to cut somethink, but the Power does.
Maybe the lines are wobbly because of the stepper motors microstepping? (I also like the fumes theory as well)
Also maybe look into cheap LCD based SLA printer, the resolution is super high for something like this.
فكره جيده يا دكتور بالتوفيق
Wouldn't the circuit get exposed with the surrounding UV? What chemical did you use for the etching? Can u pleaaaase give out more info on your our diy PCB process pleaaaaase
I wanna make them with my own printer!
you could change the resistor to 15 or 20 ohms and decrease the speed.
Can you plz explain how laser could engrave(wash out) the copper layer on pcb. You cover the surface of pcb with a special coat right?
The board is coated with a film that, when exposed to light, will wash away. You can buy boards with the film already applied. Search for "presensitized PCB".
Why do you have a pic of micrometers on the front?
Thanks for your reply sir.. I didn't understand that you have exposed the board in chemical solution before laser engraving right.. After the chemical process you put the copper clad pcb under the laser engraving machine..
The PCB is made with a photosensitive layer. That layer reacts to UV light. If I point the laser beam at it I can expose areas that I want to remove later. After exposing it like that I have to remove the now exposed photosensitive layer. That is usually done in a sodium hydroxide solution which will remove only the exposed material. Then I have a board with remaining unexposed photosensitive layer and bare copper areas which can be etched away in the next step.
Where can I find that screwdriver? 1:22
From a computer to a projector for light the pcb, or a diy laserprinter
Where have you been bro we missed you...
What about through hole pcb, laser can't drill the hole on pcb?
Good morning Marco. Another great video, thank you sir. Quick question: On your bench, what is the device with the red, green, and yellow knobs?
Oltronix Power Supply B703 ruclips.net/video/Tr0FfZ-A3P4/видео.html
Thanks for the quick reply Marco and have a great weekend :-)
Change the marlin curve divider in firmware and set jerk to a low number like 5 it will clean up the tiny round pads also belts don't use the little spring like belt tensioner it adds springy-ness to the belts make the g#-tight
Hallo Marco, hast du die Idee mit der Fräse schon umgesetzt?
Weiter so ich schaue deine Videos sehr sehr gerne.
Try placing the Cetus on the ground. My results where MUCH better compared to the printing done on a table!
How do you drill the holes?
Repetier server pro has timelapse that you can sync with the layers