Glad I clicked on this. I'll be getting some neutral antique. A tip for beginners that I came across, Saddle tan with a light coating of Mahogany antique makes a great Autumn leaf color for oak leaves. Use English Bridle for a little more of a red in the leaves.
Thanks for the tip about putting paint into the neutral antique. I would have never thought to do that and now my head is brimming with project ideas!!
This is the best video in my honest opinion. when you mentioned the neutral antique with paint in the 6 part bag making video series, I knew that is what I wanted to do with all of my projects. The first time I did it I definitely failed at applying it properly but the project still came out amazing. you then released another video that has you already having the antique and paint mixed and it kinda clicked for me what needed to be done, but actually seeing you do the mix right then and there it put all of the puzzle pieces together. Thank you so much for this video
Question. 4 years ago I made a belt that the customer wanted thin and tooled. 4-6 oz. Now she would like the imperfections in the area where the belt holes go into the buckle. I'm planning on deglazing and re-dying. The area where the holes are, are not like the rest of the belt due to use. The question, is there a way to maintain or repair this area? Thank you in advance.
Im a novice when it comes to dyeing leather. If I use a dark burgandy color on the base of my tooled belt leather, whats the best way to get black antiquing on the tooled area? I used resist after the burgandy but I still didnt get a good contrast with the black antiquing gel. Are my colors Im using just to dark to use with each other? TIA
2 года назад+1
Also Angelus produce an antique finish, anyone try it? In my country is very difficult find fiebing's product...
Dang you'd cringe if you saw how I do it. I'll have to try it the right way next time. I grab a handful rub it in with my hands wait a few mins and wipe the excess. Very messy but it works. Thanks for the video.
for the true woodchuck chuck performance, watch at x2 speed, also if you listen carefully you could hear Steinbrenner from Seinfeld :D Thank you Chuck! you always make my day happier
I am in the middle of a project that involves metal and plastic that I now have decided to add a leather element to. I am already using a acrylic paint that is a particular shade of teal that would be hard for me to match using your paint. Is it possible to use normal acrylic paint with the neutral antique, using the technique you showed in the video?
My FAVORITE leather from Tandy “Pontedero Handstained Veg Tan” stopped using oil based dyes and I can tell! It’s just dull and awful. I’ve been frantically trying to find a finish to make it similar to the oil dye but I can’t figure it out. My question, how could someone attempt to get the oil dye look with a water base dye? I was thinking, after sheen, resoline, etc. what about neatsfoot oil? Since it’s “oil?” Maybe it could give it that deeper, richer color, with a kind of finished look.
The paint in the neutral antique opens up so many windows. I will say that when i add antique to anything, i ALWAYS put a resist down over the stain first. Then i know for a fact the only thing darkening will be the crooks and nannies. And of course top coat over the whole thing to fix it in place. Also new drinking game, every time Chuck says "All told" lmao
Hey Chuck, is there any chance you could do a tutorial for the BUSINESS NOTEPAD KIT. The instructions are a bit difficult for a beginner, or at least for me. Love your tutorials, thanks
Just curious if anyone has tried using the Neutral Antique Paste with Acrylic Paint mixed in it for the first layer and then the Antique Medium Brown Paste as a second layer? Or maybe switch the two around? I'm asking because I'm just getting into Leathercraft and I'm trying to figure out what works and what doesn't. I'm thinking about just taking a piece of leather and attempting different techniques and writing down the steps taken but there're so many combinations one can go (everyone has a different technique and some use resists while others don't. Some say that they use the antique paste and say stay away from the antique gel. It's definitely a bit confusing to some degree. Anyway, I really appreciate any advice anyone can give. Thank You All for Your Time and Help!! Sincerely, J Q
We haven't tried this but it sounds like a cool technique. We're guessing whichever color you add on the second layer will likely take over but it's worth experimenting. As far as antique finish and antique gel, the gel is a little more like a dye in that it won't wipe off quite as well as the paste. We hate to say it but personal preference plays a big part in leathercrafting and the final look you are going for. If you don't want the antique to color your leather very much, then definitely use a resist first. Hope that helps and we hope you enjoy leathercrafting!
@@WeaverLeatherSupply Thank You for Your Tips!! I'll experiment and see what happens. Don't know what will happen but at least I have a better idea how to go about it. hanks Again!!!
I used the antique to put a bit of color on a belt I am making, I love the antique for a lite but subtle look. What would you suggest for a top coat on the belt? I wished I saw this first I would have taped the back I did a small spot on the back ...oops my husband will be perfectly fine with that..
You can make it by mixing neutral antique finish and turquoise paint. Here are links to those items on our website, same as what is used in the video... www.weaverleathersupply.com/collections/edge-finishes/products/fiebings-antique-finish-4-oz?variant=40909237452940 and www.weaverleathersupply.com/products/angelus-acrylic-leather-paint-1-oz?variant=40909172244620
First Chuck, let me start by saying I love your videos, I love the way you interact with your viewers, and I love your excitement and enthusiasm you put into your teaching. With that being said my question is how do we determine what would be a good match of die color to antique color? I know some would be personal preference but I would think that would come with experience. I know with whatever dye I use the antique is generally going to make my dye color darker. But for the new guy just getting started is there a basic rule of thumb like for this color go 2 steps maybe 3 steps darker with your antique? I don't know if you have addressed this before because I have not yet seen all your videos. So if you could answer my question or point me to the video that talks about this or maybe this would be a good video for you to make. Either way thank you very much for what you do I have learned a lot and I look forward to the many upcoming videos. Thank you very much. Sincerely yours, Steve
First off, thank you so much for your comments! They make my day! There’s no rule of thumb though (not too dark, not too light) maybe two steps, a Dark Brown three and a Black probably four. My personal favorite is a Light Brown Pro Dye with a Medium Brown antique. I may say start there. And you’re exactly right, personal preference. If pressed I may say a Light Brown will go one step down (not terribly noticeable), a Medium Brown (my favorite) - others you may never use, and, I’m betting you’ll like the outcome. If you want to go darker then you can spend the money there and feel pretty comfortable that it’s a good buy. Once you get a feel for using these then you’ll start to fine tune the dye and antique combination.
This isn't something that we have tried yet but we have heard from a few others about using pro dye with the neutral antique finish and it worked great for them! Certainly something that you could try.
Hey Chuck, off topic here but I've got some wallnut pro dye for leather gloves, in your opinion what would be my best method to dye them, I was thinking dip but I'm worried that might be streaky
Hello! We recommend using whatever method you are most comfortable with. Dip dye would be a great option for this project. But if you are worried about streaking with dip dye... I would say get a good amount of dye on a sponge or dauber but not dripping wet and then apply the dye pretty quickly getting as much coverage as you can, then come back with a second coat to fill in and maybe a third coat to finish it off. If this is done all at once (not waiting between coats) then it should wick across consistently and look pretty good.
I could use a tip for removing the masking tape from the back of project leather. When ever I remove the tape after tooling the tape always comes off in small strips or pieces, is there something I'm doing wrong or is this normal.


No resist before the antique?
I was wondering about that as well....Chuck??
is there any reason to cut this antique finish with anything else before use, like tan coat?
Glad I clicked on this. I'll be getting some neutral antique. A tip for beginners that I came across, Saddle tan with a light coating of Mahogany antique makes a great Autumn leaf color for oak leaves. Use English Bridle for a little more of a red in the leaves.
Why did you not put resist on it first then antique. I find a better even coating of antique.
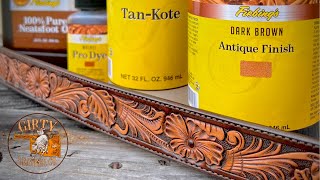
I do this too. I use a bit of Tan-Kote, let it dry and then apply the antique. Learned this from Don Gonzales.
WOW! I've never seen the color added into the antique like that! That just made me say WOW!!
Thanks for the tip about putting paint into the neutral antique. I would have never thought to do that and now my head is brimming with project ideas!!
Fantastic video. Does the neutral edge kote work the same with the Angelus paints? In fact a video on edge kote would be great 😁
This is the best video in my honest opinion. when you mentioned the neutral antique with paint in the 6 part bag making video series, I knew that is what I wanted to do with all of my projects. The first time I did it I definitely failed at applying it properly but the project still came out amazing. you then released another video that has you already having the antique and paint mixed and it kinda clicked for me what needed to be done, but actually seeing you do the mix right then and there it put all of the puzzle pieces together. Thank you so much for this video
You're welcome! Glad to hear it was helpful for you. :)
Question. 4 years ago I made a belt that the customer wanted thin and tooled. 4-6 oz. Now she would like the imperfections in the area where the belt holes go into the buckle. I'm planning on deglazing and re-dying. The area where the holes are, are not like the rest of the belt due to use. The question, is there a way to maintain or repair this area? Thank you in advance.
Another great video Chuck and perfect timing as my 1st tub of antique paste (mid brown) arrived today. Now eager to have a try since watching this.👍
Thank you so much for this video! Very helpful!
Im a novice when it comes to dyeing leather. If I use a dark burgandy color on the base of my tooled belt leather, whats the best way to get black antiquing on the tooled area? I used resist after the burgandy but I still didnt get a good contrast with the black antiquing gel. Are my colors Im using just to dark to use with each other? TIA
Also Angelus produce an antique finish, anyone try it? In my country is very difficult find fiebing's product...
Dang you'd cringe if you saw how I do it. I'll have to try it the right way next time. I grab a handful rub it in with my hands wait a few mins and wipe the excess. Very messy but it works. Thanks for the video.
for the true woodchuck chuck performance, watch at x2 speed, also if you listen carefully you could hear Steinbrenner from Seinfeld :D
Thank you Chuck! you always make my day happier
I am in the middle of a project that involves metal and plastic that I now have decided to add a leather element to. I am already using a acrylic paint that is a particular shade of teal that would be hard for me to match using your paint. Is it possible to use normal acrylic paint with the neutral antique, using the technique you showed in the video?
I never knew neutral paste existed. Thanks for showing the suit of armor example example, since I will be making black samurai armor with engravings.
And I just thought I would only use an antique to blend in a repair. Now I’m thinking tie dye!
I always learn so much from your videos. You explain things in a very clear way. Keep it up!
Excellent idea must try this one. Oh oh now another order. Lol
Mixing paint with antique, um not a bad idea Chuck!
Great idea with paint in the neutral paste. Never thought of that.
My FAVORITE leather from Tandy “Pontedero Handstained Veg Tan” stopped using oil based dyes and I can tell! It’s just dull and awful. I’ve been frantically trying to find a finish to make it similar to the oil dye but I can’t figure it out.
My question, how could someone attempt to get the oil dye look with a water base dye? I was thinking, after sheen, resoline, etc. what about neatsfoot oil? Since it’s “oil?” Maybe it could give it that deeper, richer color, with a kind of finished look.
The paint in the neutral antique opens up so many windows. I will say that when i add antique to anything, i ALWAYS put a resist down over the stain first. Then i know for a fact the only thing darkening will be the crooks and nannies. And of course top coat over the whole thing to fix it in place.
Also new drinking game, every time Chuck says "All told" lmao
Hey Chuck, is there any chance you could do a tutorial for the BUSINESS NOTEPAD KIT. The instructions are a bit difficult for a beginner,
or at least for me. Love your tutorials, thanks
Just curious if anyone has tried using the Neutral Antique Paste with Acrylic Paint mixed in it for the first layer and then the Antique Medium Brown Paste as a second layer?
Or maybe switch the two around?
I'm asking because I'm just getting into Leathercraft and I'm trying to figure out what works and what doesn't.
I'm thinking about just taking a piece of leather and attempting different techniques and writing down the steps taken but there're so many combinations one can go (everyone has a different technique and some use resists while others don't.
Some say that they use the antique paste and say stay away from the antique gel.
It's definitely a bit confusing to some degree.
Anyway, I really appreciate any advice anyone can give.
Thank You All for Your Time and Help!!
Sincerely, J Q
We haven't tried this but it sounds like a cool technique. We're guessing whichever color you add on the second layer will likely take over but it's worth experimenting.
As far as antique finish and antique gel, the gel is a little more like a dye in that it won't wipe off quite as well as the paste. We hate to say it but personal preference plays a big part in leathercrafting and the final look you are going for. If you don't want the antique to color your leather very much, then definitely use a resist first. Hope that helps and we hope you enjoy leathercrafting!
@@WeaverLeatherSupply Thank You for Your Tips!! I'll experiment and see what happens. Don't know what will happen but at least I have a better idea how to go about it. hanks Again!!!
This is sooo helpful to me! I just shared this link with my metal stamping group. Someone was asking how to stamp on leather instead of metal!
Thank you
I used the antique to put a bit of color on a belt I am making, I love the antique for a lite but subtle look. What would you suggest for a top coat on the belt? I wished I saw this first I would have taped the back I did a small spot on the back ...oops my husband will be perfectly fine with that..
We would appreciate if next time you zoomed it up, the finishes look beautiful but you could approach the camera so we can see it better.
“Absolute mess to apply” leather dying and finishing in a nutshell lol but the results can be awesome
I always love your videos. Antiquing is what I find the most difficult part of leathersmithing! Thanks for this fantastic video!!
You just opened up a whole new world to me. WAY too many combinations can be made... looks like I'll be spending some money here shortly lol
Were can i get a turquoise antique or how can i make it thanks
You can make it by mixing neutral antique finish and turquoise paint. Here are links to those items on our website, same as what is used in the video... www.weaverleathersupply.com/collections/edge-finishes/products/fiebings-antique-finish-4-oz?variant=40909237452940 and www.weaverleathersupply.com/products/angelus-acrylic-leather-paint-1-oz?variant=40909172244620
All told, thanks for making this great video!
👍❤️
🇧🇷
Love these videos! Do you have any videos on Pyrography with leather, and what dyes and finishes work best with it?
See if this helps! ruclips.net/video/758Tspm5yao/видео.html
First Chuck, let me start by saying I love your videos, I love the way you interact with your viewers, and I love your excitement and enthusiasm you put into your teaching. With that being said my question is how do we determine what would be a good match of die color to antique color? I know some would be personal preference but I would think that would come with experience. I know with whatever dye I use the antique is generally going to make my dye color darker. But for the new guy just getting started is there a basic rule of thumb like for this color go 2 steps maybe 3 steps darker with your antique? I don't know if you have addressed this before because I have not yet seen all your videos. So if you could answer my question or point me to the video that talks about this or maybe this would be a good video for you to make. Either way thank you very much for what you do I have learned a lot and I look forward to the many upcoming videos. Thank you very much. Sincerely yours, Steve
First off, thank you so much for your comments! They make my day!
There’s no rule of thumb though (not too dark, not too light) maybe two steps, a Dark Brown three and a Black probably four. My personal favorite is a Light Brown Pro Dye with a Medium Brown antique. I may say start there. And you’re exactly right, personal preference. If pressed I may say a Light Brown will go one step down (not terribly noticeable), a Medium Brown (my favorite) - others you may never use, and, I’m betting you’ll like the outcome. If you want to go darker then you can spend the money there and feel pretty comfortable that it’s a good buy. Once you get a feel for using these then you’ll start to fine tune the dye and antique combination.
Can I mix the antique neutral with pro dye as well? Or just the acrylic paint?
This isn't something that we have tried yet but we have heard from a few others about using pro dye with the neutral antique finish and it worked great for them! Certainly something that you could try.
Hey Chuck, off topic here but I've got some wallnut pro dye for leather gloves, in your opinion what would be my best method to dye them, I was thinking dip but I'm worried that might be streaky
Hello! We recommend using whatever method you are most comfortable with. Dip dye would be a great option for this project. But if you are worried about streaking with dip dye... I would say get a good amount of dye on a sponge or dauber but not dripping wet and then apply the dye pretty quickly getting as much coverage as you can, then come back with a second coat to fill in and maybe a third coat to finish it off. If this is done all at once (not waiting between coats) then it should wick across consistently and look pretty good.
@@WeaverLeatherSupply awesome insight thank you chuck
setting eyelets
I could use a tip for removing the masking tape from the back of project leather. When ever I remove the tape after tooling the tape always comes off in small strips or pieces, is there something I'm doing wrong or is this normal.
Stick it to your shirt first.
Can you darken a leather jacket from papaya to a brown color.