Schluter Shower Part 2: Schluter Shower Pan and Curb Installation

HTML-код
- Опубликовано: 3 июн 2019
- This video shares how to do the Schluter shower pan and Schluter curb installation. We cover a lot of important details. And you'll see step-by-step how to waterproof the entire Schluter shower.
For more home improvement tips visit www.homerepairtutor.com/👍🏼
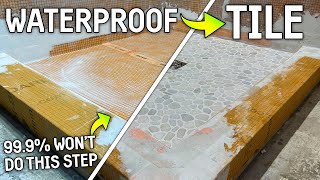
The first step was to cut out the old shower drain and center the new Schluter drain. This requires additional support underneath the 3/4" OSB. Keep in mind, the only thing being replaced in this bathroom was the shower.
Once the shower drain was positioned we added new 3/4" OSB over the new framing. Then the Schluter shower pan was cut to size, i.e. 32" x 47".
Both the Schluter shower pan and curb we set using ALL-SET mortar and waterproofed using four inside corners (Kerdi), Kerdi-Band at every wall/curb transition, and two outside corners (Kerdi).
Watch the video to see how to install the Schluter shower pan and curb
#schlutershowerpan #homerepairtutor  Хобби
Хобби


I never knew it was so much work in making a tile shower. Incredible.
Nice to see a real world video of an installation like this. The ones where the film it with a perfect-situation mock-up don’t relate to the real world.
Taking on a new tub to shower replacement and this video answered so many questions about using the Schluter System Kerdi kit that many other video's I have watched, failed to do. Great job. Thank you.
I want to give both of you kudos on your knowledge and expertise on shower installs. You both explain all phases of shower installation to a tee, you even give advice on different circumstances. I watch a lot of RUclips videos for repair and installation, you 2 are the best. I have never performed a shower install, but by the way you explain it, I feel that I have! Thanks, and keep up the good work. I bought all my Kerdi supplies after watching your video.
You’re videos are really informative 👍🏻
Such great stuff from you guys. To take the time to video your process is extremely generous. Keep up the good work. Love the videos. Consummate professionals.
Agreed! This is very clear and very helpful! Thank you!!
Very good narrating..clearly spoken and always using proper words to describe what's going on. Good voice for it!
Your videos are amazing, Thank you so much for all the hard work!
The shower pan and curb with Kerdi pre installed is nice. The way Steve had to run the plumbing for the drain was a little different. Great video, well explained.
thanks, the new shower pans have Kerdi pre-installed which is super nice. Same goes with Schluter's new curbs, no more wrapping the curb with Kerdi membrane
Ive had to go thru ducts and never had a problem
You guys inspire me to redo my own bathroom in the future.. many thanks 👍🏻
i also kerdi fix the the gap between the walls and pan before i run the band, love these videos
Re-Modeling my master bathroom here right now as a DIY´er. I use the Schlüter System. I am watching you guys and the Tile Coach. Both of you give me great insights into all this! Me, doing this the first time, I take my time. I can only mix one pound of Schlüter All-Set at a time when I install the Kerdy bands. Otherwise it would set up on me, HA! It takes me so much time to put it all in place and make sure it turns out right! Thank you for your tutorials!
You literally are me lol. Bout to do my master bath and also using these guys a Tile Coach lol
Same here. These guys all provide fantastic advice and techniques. I too am going slow as this is my first master bath gut rehab. Thank you!!!
Yyh
Wow, you guys did a great job. Really liked the video. 👍👍💚. Can't wait to get this product and have my wife pick out some tile.
Well... my night's complete now. Oh, and tomorrow I'm starting a Bathroom remodeling business because I have ALL the info step by step to succeed!!! Another fantastic video guys. Hope all is well, and Dirty Jersey out!!!
Lol, thanks man.
Great explanation as usual boys, I am getting older now and don't use mortar beds anymore, they are a lot of work and demand a lot of heavy lifting to install. I only use the Schluter pans now, simple and proven!!
thank you, these new pans are nice because the fleece is already pre-installed. One less step, same with the curb. Mortar is still good but like you said, getting older makes them a bit more challenging
So some of the pans come with preslope, others don't. Do they not need a preslope prior to installation. I need the pan 38x60 with the offset drain 10 inches from the short side. But it doesn't have a preslope. The pans with the drain in the middle have preslope
Do you use all that crap on the wall. I like the pans. Though, they make WaterproofFiber board that weighs only 2.5 pounds a sheet, That wall system is allot of work. And Money. The Fiber board is 1/2" screw right into the studs. Tape or caulk the seams.
I know this is old, but posting comment for later viewers after checking both install guides. The 2"x2" tile size minimum does *not* apply to Schluter shower pans, but to Ditra products. Use penny tile to your heart's content.
Great videos, guys, thank you!
I think they require you put down a coat of mud and let it dry first for penny tile. If the compression strenth is 57 pounds per square inch, you can easily exceed that with penny tile.
This is an excellent video! I demo my master bath in two days and will be converting a fiberglass tub surround to a walk-in shower using the Kerdi system. This video will be referenced a lot. Thanks for taking the time to do this. Love all your other vids too.
Norm Borger how did your bathroom turn out? I did demo my master last night and am converting to a shower using Kerdi
upoliaghi , came out pretty sweet. I had the glass splash screen in last week, all fixtures are in place. All in all pretty nice if I say so myself. Thanks for asking. Good luck with yours.
I,m an expert now! Very detailed and well explained video, thanks!
Fantastic job guys!
Great instructions! Thank you.
First, thank you for all of the great content! I recently installed my first full schluter system for a shower. I opted not to pour self-leveler after talking to a friend and tile contractor who felt the floor was plenty level. Back story, I should have seen the red flag that the contractor had never installed over pre-sloped shower pan (always does mud jobs). I did however check for plumb in the shower area and looked good. After installed the pan, I checked again for plumb and was looking good. After the tile was installed the plumber returned to install the fittings and notices a "high" plateau spot in the pan that caused standing water. 60% of the pan drains yet this one spot does not, which the contractor told me I must have installed the pan incorrectly. We did select a 2" hex ... not sure if that was a bad option for the pre-sloped pans or not. My main question is if anyone has ever run into this issue and the best way to fix. From what I can tell, it would be to tile overtop of the other tile and fix the slope issue. My fear or removing the old tile would be to ruin the pan and impact the membrane. Thoughts? Thanks again!
Schluter and wedi make solid 2” board with the membrane on both sides. I use this to make my own curbs. Complete flexibility in size. I usually double the board up and cut to desired height.
Great videos man. Feel like I could have taken a whole different career direction had such videos been available back in the day (pre internets). Alas, I only do occasional bathroom remodels for friends and family, but with professional results.
Love it, guys. Thank you!
Thanks for the great tips!
Great job guys
great video. couple of questions. did you do all the kerdi band, shower tray, and curb with just a half a bag of all set. also how did you ties in the existing wall on the right to the kerdi of the shower wall. thanks
Thanks so much and great videos. Just wonder if it's better to thinset bottom corners before the wall membrane? Seems to me it's more logical and have way less chance to have water get through the joint, since this way, water will always flow over the joint rather than into the joint
You guys are great..thank you !!
Thanks good video, why not put walls on top of pan or drape fabric onto pan?
I have read that penny tile is an issue for some people on the foam pans since the point loads are so small and it can compress them into it and anything under 2 inches is not recommended. However, I've heard others say it's fine, or to use an epoxy grout to make sure they stay put and become more of a monolithic piece. Thank you for the video!
True, do not use penny tile on a foam pan. The heal of a heavy person is enough pressure to fracture the grout, including epoxy. 2 inches is not only recommended but I believe it's spelled out in the warrantee, but I may be wrong about that.
@@tedspens you are definitely correct
Thanks for the video. Lots of great info.
Want to eliminate notching the curb?
I wouldn’t recommend putting the curb on existing tile. Existing tile floor will need to be replaced before the shower tile. With the existing tile pinned underneath the curb tile you risk breaking the curb tile when it’s time to replace the floor tile. I would suggest cutting the existing tile with a diamond blade on an angle grinder as close to the walls as possible. Dremel makes a 2” diamond wheel blade so you can use that to cut up to the wall. It’s ok if your cuts aren’t perfect. The new curb tile will hang down covering the cut tile. Looking down you won’t notice after you caulk that transition.
Very helpful 👌🏽
this was so helptful! we are currently gutting a shower because we saw that the baseboard trim was warped, and we start pulling stuff off and mold, mold, mold.......so the shower is being gutted, the ugly tile has to come off the floor of the main part of the bathroom and the subfloor has to be pulled up too....ugh.....I love the kerdi products..they make life so much easier...cuz I don't have 10-15k to pay someone, but I will pay for a plumber to make sure the drain is right. Thank God nothing leaked to the ceiling on the main floor, the shower we are gutting is on the 2nd floor. but we need to check the joists for mold and spray the hell out of them with mold killer just in case. This is a tiny shower so working in cramped quarters should be fun.....lol. I've seen other videos that say to use unmodified thinset for the membrane, but Shluter makes modified and unmodified and the bag of modified thinset says it's for used with all Kerdi membrane products.......so which is best. From what I read the modified is a newer and better product.
great video! i'm using the schluter shower pan and wrap.i'm building a bench seat also,so i was wondering if i put that purple wall board on the plywood before the wrap? thanks.
Very helpful videos, always nice to see the whole process. Btw, hate to be the guy who has to replace the floor tile once he realizes the curb is on top of the tile
Well explained.!
this was great- thanks
Nice work
Great Vid. I'd like to cut the width and Height of the curb so it's not so bulky. Any video on this. I have a pony wall the curb butts into. I don't want the finished tile outside the Drywalled pony wall.
Nice job on this vid! Thank you. Q: is dry/cure time required between _any_ of these steps?
This video is better than Schluters
Thanks for your videos! They are very informative and helpful. If the shower area is out of level how would you go about leveling? Would you place the curb first (leveled with extra thin-set) and then use that as a dam to level the shower floor? Would you use self leveler if so, do you have a recommendation that's available at big box stores? Thanks!!
You've probably got past this point but that's what I would do if using a pre sloped pan. If not you have to pack a mud bed which is a little harder. If you use self leveler make for sure it has no where to leak. At all because it will find a way
Could you tell me, does the curb come with the preformed kereck corners for the inside and the tops that are against the wall? Hope this makes sence.
Hi I love your videos and I have learned so much from them, thank you. I m planning to remodel my old bathroom that has a tub, I want to remove the tub and install a shower. I want to use pre sloped pan so I can tile right over it. I m a new DIYer so I don’t feel comfortable with the base. Now I am confused between three products- KBRS, Kerdi Board and Wedi system. Since you have used all three can you recommend which one would be cost effective and easy to work with that has better water proof for a long time. Please please help me with this I really appreciate it
sorry we missed your question, Schluter is very user friendly and can be affordable compared to other options. KBRS's Tile-Basin is the easiest to install but you'll need to fur out the walls. That can be inconvenient. Wedi is also very straight forward but carries a high price tag. Let us know if you still need help and we'd be happy to assist.
Thanks again for this great and informative video! Before I install my Schluter shower tray, I'd need to replace a 40"x36' rotten subfloor. Does it matter if the grain of the plywood is parallel to the joists as opposed to perpendicular? I thought since plywood is cross laminated and each layer is of different direction and this is just a small area, it should not matter much. Please advise, Thx!
Interested in the Kerdi system, only concerned about weight limit. Any ideas on weight limit. System will be installed over 3/4" plywood.
Wish this dude was close to me.... I'd have him do my bathroom.
Did you do a water test? I do a water test for 24 hrs. Then dry fit tiles and when ready to tile THEN set the grate in thinset so can adjust for height to tile while still wet? Just curious why grate was set prior or if you do not need to do a water test and can tile right away?
I always wonder why they roll out the membrane sheets vertically instead of horizontally.
I’d think having a horizontal seam with a roof tile overlap would be much more waterproof than an equivalent seam running vertically 🤔
I think you have done demos of both Wedi systems and Shlutter systems. It looks like Wedi is easy to work with. Do you have a preference between the two? I suspect Wedi is more expensive.
Thanks gor the great content! What are your thoughts on using schluter shower tray with a liquid waterproofing membrane on the cement board for the walls?
I'm having problems with installing tile on my Schluter curb . Do you guys have a video on that . I was cutting 45s and its kicking my butt . Is there a better way to do it without cutting 45s . My shower is done and thats the only thing holding me up from using it
Could you use larger tiles with this set up? Using the pre pitched tray and the curb? Ive only seen it done with curbless
Hello , when did you actual attach the drain pipe to the existing drain ???? Didn’t see that
Very informative videos, thank you guys. Is the thinset optional, tbe product manual states : Schluter®-KERDI-SHOWER-T/-TS/-TT
are sloped shower trays with integrated KERDI
waterproofing. The trays are made of lightweight,
expanded polystyrene for constructing mortar-
free shower bases.
Couple questions: The Schuter pan is pre-sloped to the drain, correct? Can you post the exact shower kit system you’re using? The Schuter site seems to indicate the drain and flange are not part of the kit. Also, if you are doing a very small shower stall, you’d still buy this larger kit and cut it down (possibly in half)?
yes, pre-sloped to drain at all four corners. We used the KERDI-SHOWER-T 38" x 60" shower tray and got the ABS drain separately. Schluter also makes the KERDI-SHOWER-TT (Thin Tray) in smaller sizes, those might be a good option for you if you're okay with the center drain - let us know if you have any questions though, happy to help.
nice work! but why not vacuum out that duct before gluing in your patch?
Thank you so much for posting this, but I have a question… does the system has pre set drop or angle for the water to run to the drain? I didn’t see this done!
When did you do the water test? That seems like a really important step.
you should flood test 24 hours after setting and waterproofing the shower
Good afternoon I also have recently put in a Schluter shower pan but I cut a piece on the side because I was an inch off Centre and added it to the other side. If I use tape 2 inch kerdi tape and thin set Will this fix the problem to the shower pad? I may need to send you a picture to explain.
Great video and really helpful. Just a question on the Kerdi curb installation. Why did Steve leave a gap between the tray and bathroom tile so he would make those custom cuts on the curb at 18:30? Could he not have made the tray flush with the tile and then rested the curb on top where they both (tile and tray) meet?
Sayfee Yousef
He would have needed to notch the curb anyway. A typical pan slope is around 1/4” per foot. A 2” gap would have been around less than 1/16” added towards the tile. The difference in height in the tile and pan was 1”, so if the pan was cut flash with the tile the difference would have been 15/16” still needing to be notched.
Want to eliminate notching the curb?
I wouldn’t recommend putting the curb on existing tile. Existing tile floor will need to be replaced before the shower tile. With the existing tile pinned underneath the curb tile you risk breaking the curb tile when it’s time to replace the floor tile. I would suggest cutting the existing tile with a diamond blade on an angle grinder as close to the walls as possible. Dremel makes a 2” diamond wheel blade so you can use that to cut up to the wall. It’s ok if your cuts aren’t perfect. The new curb tile will hang down covering the cut tile. Looking down you won’t notice after you caulk that transition.
They say not to put the kurdi band all the way into the corner. You should leave a 2 inch gap from the corner or you will have an excessive buildup in the corners with all the different layers.
great video!! but at the end you showed us how the drain is adjustable by pushing down to be flush with the final thin set penny tile!! but you just put thin set under it!! when that thin set dries how will it push down?? am I missing something??
Is just the thinset enough to hold that curb in?... seems like itvwould be flimsy if you step on it getting in shower?... also can you use glass shower doors /sliding type with Kerdi.. stop? Thx
You mentioned that if you don’t have access to the underside of the drain, and will have to connect the drain first, that you have to attach the material before you lay in the pan. But how will the pan go over the drain? Isn’t the opening smaller than the drain?
is it best to have the main floor tile done before the shower curb? or if you were re-tiling the whole room would it be best to bond the curb to new ditra?
Hi, quick question why the shower tray did no go flush with your title?
I have the same situation, but I haven’t put the shower floor kerdi board yet.
Please me let me know. Can I cut the shower tray flush with the ceramic title that is already installed?
I like your video only that I consider is curb that you set on old floor tile. What can happening if somebody demo that tile ?
What if you’re bathroom is on a slab? Does the 5 inch hole for the drain apply?
I'm installing my first shcluter shower pan/curb for my construction company up here in Boone NC. I ran into the same issues such as cutting out part of the bottom of the curb to allow for the existing tile. Your video has been very helpful. Question I have is does it matter if you install backer board after the pan to come down on the pan and of course tape and seal everything the same way shcluter recommends?
The board can be installed before or after the pan
Thanks!
Thank you 🙏🏼
I'm using a Kerdi pre sloped pan with Hardibacker on the walls with redguard...should I install the pan first or walls?
I have installed my walls (Kerdi board) but haven’t taped yet. I now think I’d feel better if I trim the wall bottoms to accept the pan after thin set, cut the pan to fit stud to stud, remove the pan and tape the walls, install the pan, Kerdi fix where the walls meet the pan and curbs, tape the pan and curbs (my kit uses membrane on the pan and curbs). Would you talk me out of this? If yes, why?
If you watch the Kerdi site you can do it either way the banding is water proofing so it doesn’t matter. Your just cost yourself time and aggravation.
All good until I saw the penny round floor tile at the very end. If I recall, they specifically tell you not to lay penny tile or other small format on a Kerdi pan.
I always install the base first so the base is crystal clean ! …. And the walls secure the perimeter base ..
Did I miss it or did you check the 32x47 area for level before putting in your preformed sloped pan?
Why use Kerdi band around the bottom at the pan? I just let the wall membrane come down 2-3 in and overlap onto the pan and seal with mortar. Same ???
I just had to pull off all my kerdi band and corner fleeces after seeing air bubbles when semi dried. I was so worried about buildup that i squeezed out all my cement. Nerve racking
Can you install part of the kerdi curb overtop of the kerdi shower tray instead of directly on the plywood? So half on the kerdi shower tray, and the other half overlapping the tile?
I did this, no problem
What about build up in the corners with the band overlap. Since you are installing their corners why the over lap at corners? I know Kerdi does not want the liner lapped when installing the kerti band. The band is thinner and reduces build up.
Can you cut the curb down in height? Thanks
Excellent video! I am wondering, when removing an old drain, are they often able to be easily removed without damage? Or, do you usually have to make a cut to the pipe below the subfloor? I realize you did that so you could re-route the drain pipe, but can they typically be removed easily if keeping the drain in the same location?
Depends on the type of drain but 99% of the time any glued (PVC/ABS) drain is going to need to be cut and retrofitted to the new floor height of shower or shower system. There are internal pipe cutters that mount in a drill that you lower into the drain from the topside and cut the pipe in a few seconds. Not expensive at all and very fast. Then you can rework the drain after the old shower is removed. Keeps you from tweaking and breaking pipe during demo if there is no access below.
@@mikez4132 Thanks for the insight, much appreciated!
@@danielfeldman7913 anytime...
@@mikez4132 thanks for the great explanation, those internal pipe cutters are great. We need to make a video showing how to use one
@@HomeRepairTutor glad I could have the chance. Keep up the good work. Yes! It's one of those simple tools you that don't realize the value of till you get one...lol..
I cannot find the KERDI membrane ring for the drain anywhere. Did yours come in the drain set? I cannot seemed to find one anywhere online. Any ideas?
Looks like you have 3 layers thick of Kerri Band at the corners. Please advise.
Hello, great video! Can I use the Schluter shower pan with cement backerboard walls?
I thought I heard somewhere that when you use the full Schluter Kerdi board system, it is not a good idea to use 2" or greater tile for the floor. Please advise
the minimum tile size is 2 inches on Kerdi tray/pan / floor.
is it ideal to put the walls up before installing the kerdi floor?
Can the shower pan corners and Kerdi Band be put in first over the pan before the wall membrane is hung so the membrane overlaps the corners and banding? Does it make any difference? My thinking is that it would be best to shed water over and not behind the corners and Kerdi Band. Thanks.
I like the bloody hand. Reality!
Is the pan sloped toward the drain?
At 33:14 Steve demonstrates how the strainer can be adjusted after the tile is installed. But the at 34:11 he puts thinset under the corners of the strainer bottom. How does this allow adjustment?
I thought it's recommended to have the walls on top of the pan too prevent leakage, that would develop mold behind the Kirby tall.
As long as the corners are properly seemed and sealed with kerdi band it doesn’t matter whether the walls are on top of, or adjacent to the pan. It will be water proof either way. Schluter’s instructional video for their pan show the walls up first and adjacent to the pan.
Yes, youre right. This install is really increasing the chance of a leak. Did anyone check to see that this cloth is truly waterproof?
@@scottspooner6070 It is NOT increasing the chance of a leak. It gets KERDI BAND, either way, along with preformed corners (typically come with a drain kit, or available seperately). As for checking to see if the fabric is "truly waterproof"? You are kidding, right?
@@CoyoteConstruction1 Not kidding at all. If it was as fool proof as you think there wouldn't be all these videos of failures. Homeowners want shower systems that don't fail period. Many installers leave the homeowners with a damaged home that ends up costing them a fortune. The KBRS system while expensive works. Do you guarantee your installation against leaks for 10 years?
Question, I have a seam where two pieces of my 3/4” Plywood Subfloor meet that will be underneath the Schluter Pan. Do I need to pull them back up to add short sections of 2x4 or 2x8 between each Joist Space along that Plywood Seam? Or would any deflection up and down along that seam not be a big deal since it’s Under my pan and wouldn’t transfer to my tile on top of the pan? Thanks.
Since it’s been 2 months you’ve probably addressed this. But for others, if you step on it and there’s any deflection then yes it needs reinforcement. These preformed pans are nice but their not structural at all and need a solid base.
Wouldn’t it be better to install the pan first, then pit the Kerdi on the walls? Seems like that would be much better for water runoff.
My drain sits more then an inch above the Kerdi pan. Can I use plywood to build up the floor under the pan?
You can cut it to make it shorter.
lower the drain
Do yall have a video on how to tile the shower curb. I have everything else done but the curb and I'm having a hard time trying to figure it out . I used Schlueter products and built my shower while watching y'all's videos from start to finish . The wife is getting on my butt too finish this bathroom and thats the only thing that is stopping me . Pls help
just checking to see if you still needed help with your curb? Sorry for the late reply
@@HomeRepairTutor no sir , i got it put in and we are enjoying the shower . Yalls video help me out alot , i watched them for hours learning how to tile. I can send you pictures if you would like to see
@@badassoz awesome!! We'd love to see some pics, send them to jeff@homerepairtutor.com
I’ve seen where you don’t overlap in corners but just run the band up to them.
You need at least two inches of overlap with banding and preformed KERDI-KERECK to make a Schluter shower waterproof
Styrofoam showers? What's next? Plastic car engines and snap together plumbing. Oh, we already have those.
what is the cost for a full shower using this system?