This video is perfect for what I want to do in my kitchen! I was specifically looking for a way to set up lights under my cabinets using Hue lights without wasting the excess cut off of the strips, all while being able to hide the wiring, and this how-to absolutely delivers! Now I just need to brush the rust off my soldering skills...
Meredith Reeves this is the way! It just didn’t feel right wasting the strips! I would practice on the soldering but it’s not that bad honestly. Just take your time and you’ll be good. Thanks for watching!
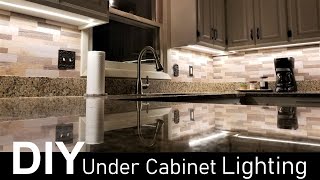
Pro tip: install the strips toward the face of the cabinets more, like on the furthest from the wall edge. Then you're less likely to see them when bending over.
Cool project. I just purchased 3 light strips to use in my kitchen. I wish I knew how to solder. I wouldn’t trust myself to do it right. So I’ll just use the three power packs lol. I will use the tip for the 3m VHB tape. I was thinking the stick tape would be a bit lame.
I would recommend desoldering the sections versus cutting since you are already planning to solder. This will leave you with a larger solder pad on each side to work with.
Corey Morreale thanks for the comment. You would still have to cut it to separate the sections after desoldering them since the strip is all one continuous strip.
I like your genius use if Ethernet cable , we all have spare Ethernet cables. I an a fan of LIFX , however getting an extension cable from them is like ridiculous, hence why I have 4 complete sets in my kitchen. Thank you for the tip 👍
Wow, thank you so much for this information. I genuinely didn't know that. I mean I knew that you could cut them to the desired length, but I was amazed that it could be rewired again using a Ethernet cable.
In case anyone needs to cut, split, or extend their Hue strips and you don't know how to solder, Litcessory makes tons of Hue extension cables and connectors. The steps are identical to this but instead of soldering you use snap pin connectors. Then you can attach their various extension cables or splitters. They even make a snap connector set with an RJ45 adapter so you can run your own ethernet cable. The only limitation is Hue strips start to fail after 33 feet in length on one single controller, including all of the extensions, so just keep your total distance in mind. This is obviously much lower cost and if you know how to solder then it's a no brainer, but for those who can't solder, the Litcessory options are excellent.👍
This is great! Thanks for sharing the info. I’m going to try it with two 2 meter shelves. I want to hide the wire between the shelves so I’ll have to chase the Ethernet cable into the wall, but it’ll be worth it I hope.
I appreciate the kind words! I’m not sure how the kasa strips look up close but if it has a similar connection you might be able to. Thank you for watching!
Thank you for your video. I realize that this hack was done 2 years ago, but I was wondering if you knew if this would also work with the Philips Hue Version 4 lightstrips? (Newer version that is bluetooth compatible) Thanks Again for your time!
Hi! I’m actually not sure if it works on the latest ones. As long as it has a similar setup it should work. I wish I could help more! Thank you for watching.
Very well thought out! Pre-wiring for these seems excessive. You would need the LV wire and an outlet at every location instead of a single transformer on a switch so what you did was impressive. Suggestion: stick tape to the front lip of the cabinet facing the backsplash. Makes it almost invisible, can’t see it in the countertop and emphasizes the backsplash. PS: Any idea how much tape you can put on one transformer?
So this was done with just 1 set of the lights strips without any extensions and just 1 plug? Is that correct? Can the new gradient light strips as well?
I used 2 sets of the strips and connected them to 1 plug. That’s what I had at the time. I would think you could use the extensions as well. I haven’t seen the new strips up close so I don’t know if this method would work. Sorry about that!
Awesome job!! Very cool project. I’ve been watching a lot of videos on hue lightstrips and you did a great job explaining the technical details of extending & reconnecting these lights :)
Thanks so much Shabzilla! This was a great how to video and very helpful. If I want to avoid solder, could I also use these splitters (www.amazon.co.uk/dp/B01N3NTCYU?psc=1&pf_rd_p=412e17bd-2d19-4af7-bd07-daea3c4821a4&pf_rd_r=GP1BMSH9VBRMG1Q9DXEH&pd_rd_wg=eJcKJ&pd_rd_i=B01N3NTCYU&pd_rd_w=k99Ex&pd_rd_r=526a8a1c-21c9-4ac3-9074-9aeba9240e66&ref_=pd_luc_rh_ci_mcx_mr_huc_d_02_04_t_img_lh) and extension cables? (www.amazon.co.uk/gp/product/B01M7XDZ5V?pf_rd_r=FB089M25DERQHGVT5H80&pf_rd_p=6e878984-68d5-4fd2-b7b3-7bc79d9c8b60)
Remember which correct side the cut strips connect back, to be same order it was originally, or it'll burn out a strip or all if even one is backwards. Trust me done it, and its easy. Plus there are 4 different hue light strips (v3, v4 still sold).
This is great. Thank you. Question - how did you determine where to place the strips under the cabinet? It looks like you placed them sorta in the middle. I've seen some where they place the strip toward the front of the cabinet underside so they are hidden by the cabinet front. Thanks again.
TOperspective I held them up in the front, middle, and back and my wife and I liked them the most in the middle. They light up the entire counter. I would try it out the same way. Depending on your cabinets, if you place them in the front, the cabinets could block some of the light. Thank you for watching!!
Nice idea to use a ethernet cable but does it ouput enough ampere to light up everything at once? You may want to reconsider when you plan to use meters of a strip at 100% brightness.. The thicker a single wire is the more amperage you would get.
dvdcase56 I’ve had them for almost a year no issues so I would use the same method if I had to again. I leave them on for hours everyday too. Thanks for watching.
An Ethernet cable has 8 wires (4 wire pairs) while the HUE strips use a 6-wire connection from one to the next. Did you do anything to the extra two wires to cover / protect them? Do you recommend a certain category Ethernet cable (5/6/7)? Also, are you using the newest Lightstrip Plus model? I have a pretty complex run bc of a window and microwave too, so this video has been very helpful in helping me understand my options to extend the HUE Lightstrip.
Rich Alot I’m glad you found this helpful! To answer your questions, I used cat5. The 2 wires you don’t use, you can leave in and cut them so they don’t stick out. They have no power running through them so you shouldn’t have any issues. Also, I bought mine in 2018 so I don’t know if there is a newer model available now. Hopefully that helps. If you have any other questions, please let me know.
Hi, good job! Can I ask you? Is it possible to have AC/DC Led power supply with adapter and connetction point to Led strips at technical room and connect with Led strip with UTP cabel to kitchen? Is there any delay to start? Thanks
These are the brightest LED lights I've seen in a video. Most are just a highlight, but those actually light the counter right up. I'm looking for just plain white strips to light up my counter area. Do you know if the Phillips Lightstrips are brighter than other brands?
I have practically the same cabinet layout. I am in question whether I have to put the light all the way to the corner, or diagonally as you did. Did you find the luminance of the corner a problem, or you are satisfied with the result that corner a little darker? Also, why didn't you put a strip under the microwave? Also, I am not looking to use extensions. I would like to have separate strips for each section of the kitchen and the brightness of each section will be controlled by a small Aquara motion sensor placed under the center counter to detect motion next to each section of the cabinets. I hope this will work.
The corner I am satisfied with 100%. I didn't put any lights under the microwave because my microwave already has lighting there and I didn't want any steam or heat messing with the reliability of the lights long term. What you can do is plug the strip in before cutting it up and test it diagonally on your setup and see if you are satisfied with it. Thank you for watching! I hope it all goes well :)
I appreciate that! I used the outlet in the cabinets above the microwave. It worked out perfect to hide the wires. Thank you for watching and good luck!
Thanks SHABZILLA for the idea. It worked out great. I was able to solder them and get them installed and they worked great. I had them on for hours and worked like a champ. Last night I noticed the light colors changed. They went to like 20% brightness and changed to a greenish-white. A minute later they returned to white and I chalked it up to some interference with the wireless signal. Then a half-hour later they went back to that and stayed permanently! The controller shows 100% brightness but they're only at about 20%. I can change colors but it is not back to where it should be. I don't understand why it's doing it as it was working perfectly. I spent about 8 hours soldering and running everything for this to happen. The adapter is still putting 24v out so it's not that. Any ideas on this or why?
T. Cowger thats interesting. I haven’t had any of those issues. I noticed that if I use the hue app some of the pre configured colors dim down to 20%. Are you using the app to change the colors or Siri/Alexa/google home?
SHABZILLA - I can change colors and dim fine when it works. I’ve found if I tap the white box the power plugs into, it will come back on! But it doesn’t last very long and goes back again...
@@travisc410 oh man, it almost sounds like you have a defective lightstrip. You can try opening up the white box and see if anything is loose in there. I would check that and double check the plugs just to make sure they're all the way in. Ugh, i'm sorry you're having issues with your setup!
Thanks for the video. Very helpful. I am in the planning phase of my install and have a question for you. You indicated that you can cut the strip in certain places. How long is each of these sections?
@@SHABZILLA Thanks for the additional info. I do have another question: It looks like you've used 2 sections under most of your cabinets. Now that you have lived with it for awhile, do you think you could have maybe used shorter sections under your cabs and still had the desired level of illumination and ambience? (I might be a penny pincher...)
Nochoke I would recommend using as many sections as you can. I’m a penny pincher too but since you’re gonna do this one time, it’s better to overdo it. Especially because you can dim them and change the colors. Its not an easy task either so you won’t want to go back and modify the lights. That’s just what I recommend.
@@TheCurlyFitChicOriginal yep i came to know that earlier..i haven't yet got it as my new house is not ready to move in...I will post how it goes for me thanks.
Thank you for the informative video. Be careful when you hold the wires closer to the camera and the focus point is on the wires and not on the counter below or your arm. Your wires are a bit out of focus, making the closeup video a little harder to see. Hope that is helpful.
Jonathan Martinez hey! I actually used the regular light strip. It looks like they changed the product I linked. Sorry about that. I appreciate you pointing that out. Thank you for watching!
Jeff Mercurio I purchased mine 11/2018 but I did check the hue website and they still look the same and have the same connections. I can get you a model number if you need. Thanks for watching!
Nelson E I’m glad this was helpful! Thank you for the feedback! This was one of the first videos I made so hopefully I won’t have that issue going forward.
cool job on your lighting.. But for me, I need to light 4 kitchen cabinet areas which cannot be physically connected, so can't really use this info. And I'll never be one of those "Hey Siri, or Alexus, or whatever"
Very nice hack to the Philips hue strips! However it's ridiculous how the company is managing the market of this product, don't buy it, they don't deserve our money.
Thank you for watching! Honestly, they should have came up with an easier way to reuse the strips you cut off. I do love the lights and if you can buy them on sale they are cool! I use them everyday.
@@SHABZILLA The product itself is super cool, but so much overpriced. If I have to spend so much money on a led strip then I'm going to choose LIFX which costs a little more but is the absolute best.
Why do you even bother soldering? Can’t you just use a 6 pin connector kit like this? www.amazon.com/dp/B07WFTS3KV/ref=cm_sw_em_r_mt_dp_EFJ40N7N2M6ZYFFFPZW3 Also couldn’t you have separate strips and the group them together so they act as one? Not sure strip lights work but that’s how separate bulbs work


I am deep in Phillip hue... I never thought to do under the cabinets this way... thanks for the idea!
This video is perfect for what I want to do in my kitchen! I was specifically looking for a way to set up lights under my cabinets using Hue lights without wasting the excess cut off of the strips, all while being able to hide the wiring, and this how-to absolutely delivers! Now I just need to brush the rust off my soldering skills...
Meredith Reeves this is the way! It just didn’t feel right wasting the strips! I would practice on the soldering but it’s not that bad honestly. Just take your time and you’ll be good. Thanks for watching!
Pro tip: install the strips toward the face of the cabinets more, like on the furthest from the wall edge. Then you're less likely to see them when bending over.
Good tip!! The way I installed them you really don’t notice them but I like it!
100 % got to.
Cool project. I just purchased 3 light strips to use in my kitchen. I wish I knew how to solder. I wouldn’t trust myself to do it right. So I’ll just use the three power packs lol. I will use the tip for the 3m VHB tape. I was thinking the stick tape would be a bit lame.
Nothing wrong with using the power packs! As long as you’re happy with the project and it looks great! Thanks for watching!
Best video that explains how to connect lights under cabinets in different locations
Walter Lugo thanks for watching!!! Glad you enjoyed it!
This was the most helpful video on this project I have found yet. Thank you!
I’m glad! Thank you for watching!
I would recommend desoldering the sections versus cutting since you are already planning to solder. This will leave you with a larger solder pad on each side to work with.
Corey Morreale thanks for the comment. You would still have to cut it to separate the sections after desoldering them since the strip is all one continuous strip.
I like your genius use if Ethernet cable , we all have spare Ethernet cables. I an a fan of LIFX , however getting an extension cable from them is like ridiculous, hence why I have 4 complete sets in my kitchen. Thank you for the tip 👍
Thanks for watching! I just try to save money when I can. I'm glad you found this helpful.
This is brilliant - just got back to it - wish me luck
Great video! One quick question.... How many Phillips Hue Light Strips can you run off of 1 power supply? Thanks!
That’s a great question but I don’t know sorry! I ran 2 in my video. Still running strong today too!
Wow, thank you so much for this information. I genuinely didn't know that.
I mean I knew that you could cut them to the desired length, but I was amazed that it could be rewired again using a Ethernet cable.
Alfredo Yapur I’m glad you found this useful! Thanks for watching.
In case anyone needs to cut, split, or extend their Hue strips and you don't know how to solder, Litcessory makes tons of Hue extension cables and connectors. The steps are identical to this but instead of soldering you use snap pin connectors. Then you can attach their various extension cables or splitters. They even make a snap connector set with an RJ45 adapter so you can run your own ethernet cable. The only limitation is Hue strips start to fail after 33 feet in length on one single controller, including all of the extensions, so just keep your total distance in mind. This is obviously much lower cost and if you know how to solder then it's a no brainer, but for those who can't solder, the Litcessory options are excellent.👍
Finally I could find the perfect video I needed thank you
Glad it was helpful!
Beautiful setup using only one plug. Thank you for the tutorial
That was the goal! Thank you for watching. Glad you found it helpful!
This is great! Thanks for sharing the info. I’m going to try it with two 2 meter shelves. I want to hide the wire between the shelves so I’ll have to chase the Ethernet cable into the wall, but it’ll be worth it I hope.
Thanks for watching!! Good luck! Let me know how it turns out.
How did it go?
Well done Shabazz! Excellent job explaining how to extend the light strip without wasting the LEDS.
Thank you!! It just doesn’t feel right wasting LEDs! Thank you for watching
Great video! Will i be able to do this with the Kasa lightstrip? I want to install them under the kitchen cabinets.
I appreciate the kind words! I’m not sure how the kasa strips look up close but if it has a similar connection you might be able to. Thank you for watching!
Thank you for your video. I realize that this hack was done 2 years ago, but I was wondering if you knew if this would also work with the Philips Hue Version 4 lightstrips? (Newer version that is bluetooth compatible) Thanks Again for your time!
Hi! I’m actually not sure if it works on the latest ones. As long as it has a similar setup it should work. I wish I could help more! Thank you for watching.
Thanks for this. Great video.
Glad you enjoyed it!
Very well thought out! Pre-wiring for these seems excessive. You would need the LV wire and an outlet at every location instead of a single transformer on a switch so what you did was impressive. Suggestion: stick tape to the front lip of the cabinet facing the backsplash. Makes it almost invisible, can’t see it in the countertop and emphasizes the backsplash.
PS: Any idea how much tape you can put on one transformer?
This is amazing. Great weekend project!
Awesome video!
Thank you so much!
This is genius! Thank you!!!
Thank you for watching!
if cat5 works in this way, then could it also be used to extend between the hue strip and transformer box? it’s all the same wiring right?
We did the same thing except with lights above cabinets also. Great vid thanks.
Steve B thanks for watching! I actually put them up top to see how they looked and they look amazing on top too. Maybe one day I’ll add some on top 😀
very nice video! i would like to ask you how many watts per meter is the led and also is 4000k or 6000k? thank you!
Thank you so much for this
No problem. Thanks for watching! Hope it helps!
So this was done with just 1 set of the lights strips without any extensions and just 1 plug? Is that correct? Can the new gradient light strips as well?
I used 2 sets of the strips and connected them to 1 plug. That’s what I had at the time. I would think you could use the extensions as well. I haven’t seen the new strips up close so I don’t know if this method would work. Sorry about that!
Great video! Do you think it’s possible to attach more than two light strips using Ethernet cable?
Awesome job!! Very cool project. I’ve been watching a lot of videos on hue lightstrips and you did a great job explaining the technical details of extending & reconnecting these lights :)
Thank you for the kind words! I’m glad you enjoyed the video!
Thanks so much Shabzilla! This was a great how to video and very helpful. If I want to avoid solder, could I also use these splitters (www.amazon.co.uk/dp/B01N3NTCYU?psc=1&pf_rd_p=412e17bd-2d19-4af7-bd07-daea3c4821a4&pf_rd_r=GP1BMSH9VBRMG1Q9DXEH&pd_rd_wg=eJcKJ&pd_rd_i=B01N3NTCYU&pd_rd_w=k99Ex&pd_rd_r=526a8a1c-21c9-4ac3-9074-9aeba9240e66&ref_=pd_luc_rh_ci_mcx_mr_huc_d_02_04_t_img_lh) and extension cables? (www.amazon.co.uk/gp/product/B01M7XDZ5V?pf_rd_r=FB089M25DERQHGVT5H80&pf_rd_p=6e878984-68d5-4fd2-b7b3-7bc79d9c8b60)
@@KevinQuincey you can!
Could you pull the wires from the strip and actually make a cat 5 male to female connection or are they embedded in the strip?
They are embedded into the strip
@@SHABZILLA your kitchen looks stunning. Buying mine tonight.
@@delaplanemusic appreciate that! Good luck with the install!
Remember which correct side the cut strips connect back, to be same order it was originally, or it'll burn out a strip or all if even one is backwards. Trust me done it, and its easy. Plus there are 4 different hue light strips (v3, v4 still sold).
Thank you so much!!
This is great. Thank you. Question - how did you determine where to place the strips under the cabinet? It looks like you placed them sorta in the middle. I've seen some where they place the strip toward the front of the cabinet underside so they are hidden by the cabinet front. Thanks again.
TOperspective I held them up in the front, middle, and back and my wife and I liked them the most in the middle. They light up the entire counter. I would try it out the same way. Depending on your cabinets, if you place them in the front, the cabinets could block some of the light. Thank you for watching!!
@@SHABZILLA thank you!
Nice idea to use a ethernet cable but does it ouput enough ampere to light up everything at once? You may want to reconsider when you plan to use meters of a strip at 100% brightness.. The thicker a single wire is the more amperage you would get.
dvdcase56 I’ve had them for almost a year no issues so I would use the same method if I had to again. I leave them on for hours everyday too. Thanks for watching.
@@SHABZILLA Good to know, I had this idea too once but abandoned it thinking about it not having enough current.
dvdcase56 you should be good to go! Let me know if you take a different route and what the outcome is 😀
An Ethernet cable has 8 wires (4 wire pairs) while the HUE strips use a 6-wire connection from one to the next. Did you do anything to the extra two wires to cover / protect them? Do you recommend a certain category Ethernet cable (5/6/7)? Also, are you using the newest Lightstrip Plus model? I have a pretty complex run bc of a window and microwave too, so this video has been very helpful in helping me understand my options to extend the HUE Lightstrip.
Rich Alot I’m glad you found this helpful! To answer your questions, I used cat5. The 2 wires you don’t use, you can leave in and cut them so they don’t stick out. They have no power running through them so you shouldn’t have any issues. Also, I bought mine in 2018 so I don’t know if there is a newer model available now. Hopefully that helps. If you have any other questions, please let me know.
Does it matter which 6 wires you use from the Ethernet cable or can you use any 6 as long as you match up colors on both sides?
Hi, good job! Can I ask you? Is it possible to have AC/DC Led power supply with adapter
and connetction point to Led strips at technical room and connect with Led strip with UTP cabel to kitchen? Is there any delay to start? Thanks
Where do the light strips get their electricity from? Wall outlet?
These are the brightest LED lights I've seen in a video. Most are just a highlight, but those actually light the counter right up. I'm looking for just plain white strips to light up my counter area. Do you know if the Phillips Lightstrips are brighter than other brands?
I’m not sure if other brands are brighter but I’ve been super satisfied with my setup. I mainly just use the white myself too. Thanks for watching!
Any suggestions on how I can wire three separate pieces of Hue strip together for my floating shelves? Will this method work?
This method would work but you would have to figure out how to hide the wires. There might be some other alternatives though.
Amazing! We have a similar kitchen configuration and this is the most helpful video I've seen. THANKS!
sampoir I’m glad it helps! I love my setup 😀
I have practically the same cabinet layout. I am in question whether I have to put the light all the way to the corner, or diagonally as you did. Did you find the luminance of the corner a problem, or you are satisfied with the result that corner a little darker? Also, why didn't you put a strip under the microwave? Also, I am not looking to use extensions. I would like to have separate strips for each section of the kitchen and the brightness of each section will be controlled by a small Aquara motion sensor placed under the center counter to detect motion next to each section of the cabinets. I hope this will work.
The corner I am satisfied with 100%. I didn't put any lights under the microwave because my microwave already has lighting there and I didn't want any steam or heat messing with the reliability of the lights long term. What you can do is plug the strip in before cutting it up and test it diagonally on your setup and see if you are satisfied with it. Thank you for watching! I hope it all goes well :)
Amazing but doesnt it will void any warranty tht comes with the lamp?
Abd Farid I don’t know the warranty policy but I am 100% sure this would void the warranty.
Haha. Tq. Noted on tht.
CAT 5e -- The useful universal cable to rule them all.
Great video, I cannot wait to try it Shabzilla. Quick question? What outlet did you use to plug lights into? I must have missed that.
I appreciate that! I used the outlet in the cabinets above the microwave. It worked out perfect to hide the wires. Thank you for watching and good luck!
Thanks
SHABZILLA for the idea. It worked out great. I was able to solder them and get them installed and they worked great. I had them on for hours and worked like a champ. Last night I noticed the light colors changed. They went to like 20% brightness and changed to a greenish-white. A minute later they returned to white and I chalked it up to some interference with the wireless signal. Then a half-hour later they went back to that and stayed permanently! The controller shows 100% brightness but they're only at about 20%. I can change colors but it is not back to where it should be. I don't understand why it's doing it as it was working perfectly. I spent about 8 hours soldering and running everything for this to happen. The adapter is still putting 24v out so it's not that. Any ideas on this or why?
T. Cowger thats interesting. I haven’t had any of those issues. I noticed that if I use the hue app some of the pre configured colors dim down to 20%. Are you using the app to change the colors or Siri/Alexa/google home?
SHABZILLA - I can change colors and dim fine when it works. I’ve found if I tap the white box the power plugs into, it will come back on! But it doesn’t last very long and goes back again...
@@travisc410 oh man, it almost sounds like you have a defective lightstrip. You can try opening up the white box and see if anything is loose in there. I would check that and double check the plugs just to make sure they're all the way in. Ugh, i'm sorry you're having issues with your setup!
The new generation makes it a lot easier
I’ll have to check it out for future projects!! Thanks for the information.
Nicely done!
Thank you!!!!
Nicely done! Thanks for the video.
Appreciate that Paul! Thanks for watching!
Do you have a working link for the 3m double sided tape or a model number?
Thanks
Sorry about that! I updated the link in the description. If you need anything else, let me know. Thanks for watching!
Very practical! Nice video. 🙏
Thanks for watching! I’m glad you enjoyed it 😎
Can it do different tones of white? Such as a warmer white?
Jim Avila it can. You can do a bluish white, yellowish White, or bright white. It’s very customizable. Thanks for watching!
Really good video thank you
92 Yankee i appreciate that! Thank you for watching!
Great video!
Thank you so much!
Does it matter which 6 wires you use in the Ethernet cable?
It doesn't as long as you make sure the same color wire is at the same position as the strip. Thanks for watching!!
Thanks for the video. Very helpful. I am in the planning phase of my install and have a question for you. You indicated that you can cut the strip in certain places. How long is each of these sections?
Glad you found this helpful! Each section is 13.5 inches long. That’s the shortest you can go. Let me know if you have any other questions.
@@SHABZILLA Thanks for the additional info. I do have another question: It looks like you've used 2 sections under most of your cabinets. Now that you have lived with it for awhile, do you think you could have maybe used shorter sections under your cabs and still had the desired level of illumination and ambience? (I might be a penny pincher...)
Nochoke I would recommend using as many sections as you can. I’m a penny pincher too but since you’re gonna do this one time, it’s better to overdo it. Especially because you can dim them and change the colors. Its not an easy task either so you won’t want to go back and modify the lights. That’s just what I recommend.
@@SHABZILLA Appreciate your responses very much. Good luck in your endeavors!
Nochoke any time! Feel free to ask any other questions. If you end up taking on the project, please share your results!
C by GE lights are the same way, but have 7 pins, vs. 6 pins
That’s awesome! I’ll keep those in mind for future projects. Thanks for watching!
Really helpful man, thank you.
Glad you found this helpful!! Thank you for watching!
isn't there any sort of connector that can be used instead of soldering ?
I think they do make some now. I honestly can’t remember the brand tho sorry.
Litcessory makes connectors for Hue and LifX.
@@TheCurlyFitChicOriginal yep i came to know that earlier..i haven't yet got it as my new house is not ready to move in...I will post how it goes for me thanks.
It’s not even my house but the charging cable on the Dyson kept bothering me.
Michael Hidalgo ughhh I know! I have no way to hide it! Thanks for watching
Absolutely right... that thing is hideous...ugh..
We hang our Dyson in the garage.
What was the total cost of this project?
Thank you for the informative video. Be careful when you hold the wires closer to the camera and the focus point is on the wires and not on the counter below or your arm. Your wires are a bit out of focus, making the closeup video a little harder to see. Hope that is helpful.
Thanks for the tips! I appreciate it. Also, thank you for watching.
Will this method work for the C by GE Led Strips? I find it infuriating that once you cut the cable you lose the connection end for the next cable.
I’m not sure honestly. I wish I could help tho! Thank you for watching.
I imagine it would. Most light strips are fairly standard with 3 to 5 contacts.
Any particular reason you used the outdoor strip?
Jonathan Martinez hey! I actually used the regular light strip. It looks like they changed the product I linked. Sorry about that. I appreciate you pointing that out. Thank you for watching!
SHABZILLA - oh ok cool. I’m actually gonna go pickup the strip tomorrow morning. Now I know which one. Thanks for the response and the video!
Jonathan Martinez awesome!! Good luck with the install!
Hold your hand flat under small, closer details for better focus
Thank you for the tip and for watching!
Ethernet cable ^^^^^^ YES ^^^^^ thank you!
John Wellman glad this helped! Good luck with your projects!
Are these light strips the latest version?
Jeff Mercurio I purchased mine 11/2018 but I did check the hue website and they still look the same and have the same connections. I can get you a model number if you need. Thanks for watching!
@@SHABZILLA It'd help me alot if you give me the model number. Thanks!
@@thecrazypuppeteria it says 71901A on mine.
Instead of using solder to seal the wires can I just use a connecter
Joanne Smith i think they sell some connectors now but this was the best way to extend the lights for me at the time.
@@SHABZILLA what kind do they sell? Any link?
Robert De Vivo I think the brand is Litcessory. When I checked it last it was way more expensive than using this method.
@@SHABZILLA True. But my only option since I don’t know how to solder and wouldn’t want to learn unless I planned to use it often. 😁
TheCurlyFitChic then this would be perfect! The soldering is a pain for real lol
This is super hard lol
You can do it! May the force be with you! I would recommend practicing soldering and watching a video on soldering if you are having issues.
Very helpful but you definitely have to get this video louder. I have to max out my volume.
Nelson E I’m glad this was helpful! Thank you for the feedback! This was one of the first videos I made so hopefully I won’t have that issue going forward.
Go to 4:40 at once.
cool job on your lighting.. But for me, I need to light 4 kitchen cabinet areas which cannot be physically connected, so can't really use this info. And I'll never be one of those "Hey Siri, or Alexus, or whatever"
Very nice hack to the Philips hue strips! However it's ridiculous how the company is managing the market of this product, don't buy it, they don't deserve our money.
Thank you for watching! Honestly, they should have came up with an easier way to reuse the strips you cut off. I do love the lights and if you can buy them on sale they are cool! I use them everyday.
@@SHABZILLA The product itself is super cool, but so much overpriced. If I have to spend so much money on a led strip then I'm going to choose LIFX which costs a little more but is the absolute best.
@@lucarenzi8033 I agree! I only buy Hue stuff on sale. Even then it might be overpriced now since there is a lot more competition.
Just skip to 4:30
Wtf why philips doesn't make extension cables to this expensive led strips? 🙄
I was surprised myself honestly... thank you for watching!
I believe I just saw a video of the unboxing of this product and Phillips does sell an extension kit for this purpose.
It looks like today's version of the Phillips Hue lights comes with extension clips.
Why do you even bother soldering? Can’t you just use a 6 pin connector kit like this? www.amazon.com/dp/B07WFTS3KV/ref=cm_sw_em_r_mt_dp_EFJ40N7N2M6ZYFFFPZW3
Also couldn’t you have separate strips and the group them together so they act as one? Not sure strip lights work but that’s how separate bulbs work
Too much talk?
Tip: Never say "hey siri" in a video, otherwise you just trigger other people's smart devices.