How to Replace Front Control Arm 05-09 Subaru Outback

HTML-код
- Опубликовано: 8 сен 2024
- Buy Now!
New Control Arm with Ball Joint Set from 1AAuto.com 1aau.to/ia/1ASF...
1A Auto shows you how to repair, install, fix, change or replace failing, rusted, rotted, or damaged control arms with ball joint. This video is applicable to the 05, 06, 07, 08, 09 Subaru Outback
This process should be similar on the following vehicles:
2005 Subaru Outback
2006 Subaru Outback
2007 Subaru Outback
2008 Subaru Outback
2009 Subaru Outback
🔧 List of tools used:
• Pry Bar 1aau.to/ohq/1AX...
• 14mm Wrench 1aau.to/ohY/1AX...
• 17mm Wrench 1aau.to/ohY/1AX...
• 14mm Socket 1aau.to/oAL/1AX...
• 15mm Socket 1aau.to/oAL/1AX...
• 17mm Socket 1aau.to/oAL/1AX...
• 19mm Socket 1aau.to/omS/1AX...
• 1/2 Inch Breaker Bar 1aau.to/ocC/1AX...
• Ratchet 1aau.to/oDe/1AX...
• Socket Extensions 1aau.to/oAL/1AX...
• Torque Wrench 1aau.to/orj/1AX...
• Floor Jack 1aau.to/oiT/1AX...
• Hammer 1aau.to/ohF/1AX...
• Jack Stands 1aau.to/oh6/1AX...
Subscribe: / @1aauto
Check out our playlist:
Subaru Repair videos from 1AAuto.com: • Subaru Repair videos f...
Subaru Outback 2005-2009 3rd Generation: • Subaru Outback 2005-20...
For More Info visit us at 1aau.to/h/Qn/
⚠ DISCLAIMER:
While 1A Auto strives to make the information provided in this video as accurate as possible, it makes no claims, promises, or guarantees about the accuracy, completeness or applicability of the content. No information contained in this video shall create any expressed or implied warranty or guarantee of any particular result. All do-it-yourself projects entail some risk. It is the sole responsibility of the viewer to assume this risk. 1A Auto is not responsible or liable for any loss damage (including, but not limited to, actual, consequential, or punitive), liability, claim, or any other injury or cause related to or resulting from any information posted in this video.


√ *Watch the Video*
√ *Buy The Part at 1A Auto* 1aau.to/m/Visit-1AAuto
√ *Do it Yourself*
√ *Save Money*
My daughter and I did this job based on your video. Simple, accurate, easy to follow. My daughter found it very engaging to have a woman doing the work.
I watch this video and think "how nice it must be to have a lift."
Me tooo
Right! 😆
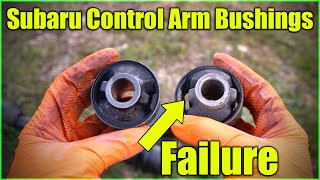
As another viewer pointed out, the service manual calls for the front and rear bushing bolts of the control arm to be torqued to factory specs after the vehicle is on the ground or the suspension is loaded to normal level. The issue with tightening those bolts without the suspension under load is that when the car sits on the ground, the bushings will experience immense load but can't move since the bolts were tightened without the load. This leads to premature failure. Good video overall.
yes that and poor design by subaru to have the ac drain hose almost directly above that rear rubber bushing on the passenger side. probbaly the side that fails most over time due to dry rot.
i think its safe to say that this car has never spent a winter in the Northern US or Canada
Believe it or not the office where they make these videos is in MA, i used to service this building for mice at my old job! have had conversations with the woman in the video before
ive noticed way fewer rust issues with the subarus, got a 2011 outback with nothing more severe than a little surface rust in chicago
to anyone about to do this make sure to preload! set vehicle back on ground THEN tight the bolts on control arm bushings and endlinks
A very good presentation by I have to ask if y'all have ever heard of a urethane dead blow hammer. It never takes of paint, dents or messes up threads.
Before tightening the UCA or LCA to the chassis, you should put a load on the part first. That ensures not over-stressing the bushings. Great video
+3rdzodiac Thanks for checking us out! 1aau.to/m/Shop-1AAuto-c
They do not read the factory service manual.
She's got the most delightful Boston accent I've heard in a long long time.
Just did this on my 2017 Forester XT. No lift needed as all the bolts and nuts are within arms reach. Did both sides left and right and brake pads at the same time under 2 hours.
Super great video, she explained procedures perfectly. It was a quick video that didn't leave anything out.
+Doug Vannier Thanks for checking us out! 1AAuto.com
Very good and thorough explanation. The video man did a great job as well. Makes the entire process look doable. Surely saving myself some money right there
Thanks so much, perfect how-to video. Torque settings saved me having to look them up. Great.
So much things to learn from you . Thank you sir . I’m in the army now, I wish 😘
Getting ready to replace the lower ball joint on my '06 Outback... thanks for the great advice on heating up the split part of the knuckle before trying to remove the pinch bolt. :-)
Good information. Just wish i had a place to work instead of out in the bitter cold...
Just got a set for my Forester from you guys, thanks for the video!
Thanks for checking us out! 1aauto.com +Ryan D
Did you have any trouble pulling down the ball joint? I banged all over my control arm it wont budge. Gonna try banging on the pinch
She is so gentle. I like seeing a lady mechanic
Love ya Sue! You give me the confidence to know that I can do this too!
+Mermaid Thank you! We love empowering our customers and showing how to perform DIY auto repairs with our high-quality auto parts. 1aau.to/m/Shop-1AAuto-c
I'm a little surprised that you don't use any antisieze compound when reassembling? Any reason?
When doing the rear suspension on our 2006 Outback, we had to hacksaw 4 bolts out, and of course we used antisieze for the new bolts, threads, and any other metal-to-metal interface.
car will probably never see any corrosion bad enough in its life time to need it
I use anti-seize on every applicable bolt going back onto my cars, I absolutely have had to go back in and am thankful every time.
FWIW, the front lower control arms that 1A Auto sold me for my 2010 Outback are steel. As of this morning that info wasn't in the item description and I needed to know for torque specs.
Thank you
The torque specs you have for the front bolt is 70.1 ft lb (95nm) not 81 ft lb (109nm), the rear control arm bolt isn't 111 ft lb (150nm) it's 64.9 ft lb (88nm) and the bolts to the body are 110.6 ft lb (150 nm), also noticed the ball joint isn't 37ft lb (50nm) it's actually 28.8ft lb (39nm), the sway bar links torque is 33.2 ft lb (45nm) though I've found that isn't tight enough for some sway bar links but tight is tight... please check the FSM properly before making "instructional videos". I've used your videos before and found that my aftermarket bushings are getting way to worn in a short period of time (you also have to torque them at ground level or with load on the suspension)... meaning pushing the control arm assembly up, otherwise there's increased load on the bushings when at ride height...
It's nice to see a women doing one of these videos. It gives women confidence that they can also do it... way to go. More videos with women doing installs...
Great video!
I had those go on my 2009 but it was rusty as well!
If your removing the complete arm are just the bushes available and replace them.
I could imagine the complete Subaru arm or the A1 Auto Parts being expensive compared to new bushes.
Yes, easily replaced
You would save yourself some hassle by using a jack/piece of wood to compress the hub. Put the wheel lug nuts hand tight direct on the rotor to keep it from moving around. Use bottom of rotor to compress hub. You just need a little bit. If you start jacking up the car you've gone too far. The install will go much smoother. And use a coated mallet if you have one.
If the vehicle was aligned before doing this procedure, is it necessary to do an alignment afterwards?
Hi, great video, used as a reference for me. everything went in well, torqued in correct. on driving, heard metal "snapping" intermittently, reset everything, still have it. it happens 2-3 times if car is off and shake car, move it, again. unfortunately don't have a second to do it so i can find noise> on 2nd re insert, set, and have not found it. thoughts on what to look at? Thanks
nice video. thank you! how about the rear control arm for 2011 forester? thanks
I need a second opinion. My '05 outback blew both front driveshafts at the inner CV joints after doing this front control arm replacement on both sides, local Subaru expert told me I may have shifted the driveshafts out away from the center a little bit and therefor caused premature failure. The failure points are identical on both sides, inner CV joints, and failed at the same time ~100 or more miles after the control arm job. Any ideas?
love your videos but it is disappointing that most of the times i check your parts you are out of stock!!
It looks like you have to drop the exhaust pipe to get at the front mounting point, correct? Is that only for the right side or is it necessary on the driver's side also?
subaru method is to put load on the shock so you dont have to bang that brand new control arm into place....
+mark walters Thanks for the feedback!
You sure about the torque specs for the rear plate? A mechanic told me the bolts are 110 like you said but the nut is 65. You said 110 on steel control arm. 81 on aluminum. Where did you get the specs I can't find any online.
Best way to do a ball joint replacement too
Thanks for checking us out. Shop here for high quality auto parts: 1aau.to/m/Shop-1AAuto-c +HennyBoostin
Unless you snap the head of the ball joint retaining bolt. Would NEVER touch that bolt for an LCA replacement on an older car unless you absolutely needed to.
Everybody needs to know that you are suppose to tighten the front control arm bolt when the car is on the ground!!! Smh
+MrJay-V Thanks for the tip!
Hast this car ever seen road use.....
All the cars in Florida where i am from look like this. My 06 Fozzy has zero rust whatsoever with 205k miles
Hello did not bother to read what's on the website I thought this was to good to be true and put hated over $1400 bucks worth of control arms components and cant find confirmation order number and can't track my order Canyon tell me what can I do can I retrieve some of the doe I spent or could you redirect to ebay thankyou verymuch
Everything is easier with a lift.
i cant get it to line up help!
How long is that brass punch?
I bought my control arm from 1A auto but unfortunately the ball joint wasn't set yet
+George Washingpun We apologize for the inconvenience! If you can contact us directly we would be happy to have this corrected for you.
Is the alignment affected when replacing lower control arm?
Maybe due to the play in the bush, but if your not loosing the camber adjustment bolt, or track rod it shouldn't be too far out
Make that look easy
+Cory Converse Thank you!
I know you guys try to make your vids accessible to everyone but please just use air tools, at least for wheels
+adam1885282 Thanks for the tip! We'll pass this info along to our production team.
Lug torque is 89 hah I torque mine at 115 just to be safe
This is a low quality run through because you didn't have any amount of trouble removing any of the bolts. Which is usually extremely unlikely for any subaru
+Bryce W Thanks for the feedback!
Why is my bushing going bad after only 60,000 miles on my Forester?
+Josh Patrick We wouldn't be able to diagnose an issue like that here, you may want to have a local mechanic take a look at it. Thanks for checking us out! 1AAuto.com
These tutorial videos are super awesome but I don’t suggest anyone buy 1A auto parts from these guys. Less than 15k (of very light driving) on a pair of struts and they’re already blown. Cheap china shit.
.Wait-there's no engine in there
She loves that hammer.
Sorry a couple of words were spelt wrong sorry have a good day
Why you not just replace those bhusing with new one at lower arm
+Nico Borneo Thanks for watching! For the price and cost of the new part it is usually easier to just replace the entire unit. If you can get new bushings then that is certainly an option! 1aauto.com
@@1AAuto plus you need access to a press
is the 2010 impreza similar?
+Germain At this moment, the closest how-to video we have to your request is for this vehicle, which is very similar to the one you have. The steps may not be 100% the same, but should contain an adequate amount of information necessary for accomplishing this task. The 2010 does have a different control arm but the same procedure should be the same.
@@1AAuto thanks
Y not just replace the Bushing? it's like $7
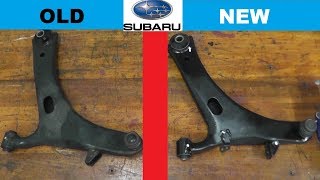
Complete arm from Subaru with ball joint and bushings is $175. From my local Subaru, Bushings are $7.53, and $8.15 and Ball Joint alone would be $29.43. So you could save about $130. While this may seem cheaper, you would realistically need good tools and a lot of time to replace these. If you had a shop do it for you, it would probably cost more after labor because it would likely be more than 2 hours of labor. All of this does not factor in a car that may have 150k miles on it where it may have spent its life in the Rust Belt. If this car was a daily driver in New York, you would have to be insane to want to press out the old bushings. If the car spent its life in Florida and/or had very low miles, then sure, bushings may be possible, but they'd still be difficult. Replacing bushings is something that could end up only a couple hours with little rust, a little luck, and a proper tool, or it could become several hours where you end up damaging the old arm anyway.
The control arms are $100 a pair. If you're going to the trouble, why not just replace the while thing? Hell, I'd replace the tie rod ends and sway bar links, too. It's pretty inexpensive if doing it yourself.