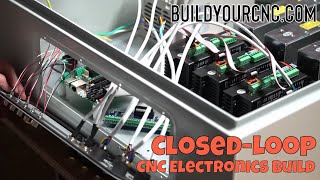
CNC Controller Build: Components & Topology - AC Section

HTML-код
- Опубликовано: 30 июл 2020
- Detailed description of the components and electrical connections for the AC (alternating current) section of the CNC controller I designed for my shop built 4x4 woodworking CNC Mill.
- www.phoenixcontact.com/online...  Наука
Наука


I spent the last two year going from being a woodworker that wanted to build a CNC machine, to a DevOps AI Engineer all without learning AC, gawd thanks now i know i need to have more conversations with robots about this, also your annotations really are a life saver! Thanks 🙏
Thanks for taking the time to make this video. This really helps out someone like me that is building their first CNC controller setup
Great series and explanation
Awesome video. I'm gearing up for this process on my build
spot on. Great video. Thank you!
This is great! I wish I had watched this a few weeks ago. As a mechanical tackling my own CNC mill (with somewhat intimidating 3.7kw servo spindle) this really helps provide an uninitiated person the vocabulary to know what all these parts are and how it might be accomplished with at least a glance at safety. Thanks!
Nicely done and well described. Appreciate this post and will use it as a reference to wire my panel.
Peter
I noticed that the circuit breakers for the VFD and D.C power supply are 25A (FAX-C25-2-NA). I believe that they should be much lower amperage like 10A as the power draw of these two devices is much lower than 25A even considering inrush current on power up.
First off, great video. I'm in the process if redoing out production equipment and think adding some breakers and contractors would be a good thing. One thing I noticed is that you reverse fed your Eaton breaker. I looked at the spec sheets and this is OK. It makes sense because if you cannot reverse feed these devices on a DIN rail, you've be looping wire back and forth from outputs to the next input. I did notice in the literature that Eaton advises against wire ferrules. Not sure why as I would think this would be a best practice. Maybe you cannot use a ferrule if you've opted for the largest gauge in the spec. I don't know.
Any plans for more videos in this series? They are the best out there and starting my panel this week.
My apologies, I had intended to do a few more videos on the DC bus of the controller but I kinda wandered off.
Hi, I have to say it is a nice explanation of your layout. I was just wondering why you put the contactor before the circuit breakers? Typically, the circuit breakers are powered up to feed the contactor. Same as in your house or industrial space where you have a circuit breaker in the wall panel and then that is feeding your machine or appliance contactor switch. Thanks.
This is a good question. At it's core, where you put the contactor determines what you think an e-stop button should do and what kinds of problems you think it is intended to address. As a safety engineer, if I could have the contactor be the first thing in my control cabinet I would. This would mean that no matter what kind of fault occurs downstream, if someone presses the e-stop button, the situation will be made safe (i.e. ALL motion stops, ALL power is cut from this machine/controller). This is the purest meaning of e-stop. Sadly this is not possible because I need some power to run the e-stop latching circuit itself.
At first glance it's easy to think that an e-stop button should just stop motion (after all isn't that where all the danger is coming from). But I believe the e-stop should serve a larger purpose and make the area as safe as possible when something happens that NO ONE expected. For example, what if there's a manufacturing defect within the circuit breaker itself causing the chassis of the machine to be energized (as well as fail to open the circuit). If the contactor is downstream it will do nothing to make this situation safer. In short, it's impossible to predict all the things that can/will go wrong with a CNC machine and it's controller, the role of the e-stop system is to make the situation as safe as possible both mechanically AND electrically.
Ultimately the design philosophy of your e-stop system is for you to decide but I use the following scenario to help guide my thinking. If my mother walked into the shop and found me on the ground and the CNC machine was making some horrible noise what do I want to happen when she presses the e-stop button. Sorry if that's a bit graphic but this is what I think a e-stop should be. This is also why I added a separate 'soft e-stop' button to my system which is really for the machine operator for the every day 'oops I forgot to do something', please stop motion so I can fix it type scenario.
What size is your electrical box? and what type and brand? I plan on doing the same exact setup except as I will be running 2 120v sets of wires my garage only has 120v 15amps but are 2 separate circuits and also doubling everything except the last fuse breaker the rotary disconnect will be a 6 pole and a second stack on the front panel switches the vfd daisy chained to a separate enclosure for a little added EMI interface thanks for the video it helped out alot
I believe it's a Hoffman A242406LP it is 24" x 24" x 6". I was lucky to find mine used at a surplus type store so it was on $45.00. I could not have bought this new www.alliedelec.com/product/nvent-hoffman/a242406lp/70303139/
the parts are not all from the company you mentioned, thy are from all over the place 😕