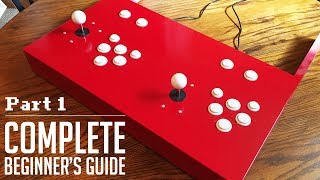
Make a Raspberry Pi Portable Arcade Console (with Retropie)

HTML-код
- Опубликовано: 4 окт 2024
- Find out how to make an easy portable arcade console (cabinet) using a Raspberry Pi. You can bring it anywhere, plug it into any tv, and play all your favorite classic ROMs. This arcade has 4 general buttons and a joystick, but you can also plug in any old usb enabled controller. We use a Raspberry Pi 3 in this video, but you can also use an A, B+ or any other Pi.
This project has a hackaday.io page. Find our parts, diagrams, and modeled case here : hackaday.io/pr...
All of the modified code and diagrams can be found on our Github project page: github.com/Hac...
Get our 3D printer: robo3d.myshopif...?rfsn=1004615.c5abe
If you have any suggestions or improvements to add, please leave a comment below. To Subscribe: / @hackershack
MATERIALS:
1 × Female to female jumper wires: www.adafruit.c...
6 × Arcade buttons
Amazon Affiliate Link - goo.gl/2zaows
1 × Joystick
Amazon Affiliate Link - goo.gl/iQ5fUy
1 × Electronics box (optional housing)
Ebay Affiliate Link - goo.gl/gMtW85
4 × 4mm screw and bolt
1 × Raspberry Pi 3
Amazon Affiliate Link - goo.gl/oVJcxK
1 × Mounting tape: www.homedepot.c...
OTHER PARTS/TOOLS USED:
Wiring
Wire heatshrink
Silver solder
Soldering iron
If no 3d printer available:
Clamps
1 1/8", 1/2", 1/8" Drill bits
Dremel
Raspberry Pi parts
HDMI cable
Micro USB power source
USEFUL LINKS:
Retropie Setup: github.com/Ret...
Retrogame: github.com/ada...
Super Mario World ROM: www.emuparadise...
Joystick pinout diagram provided by Adafruit
Subscribe to Hacker Shack: / @hackershack
Follow Hacker Shack on Instagram:
www.instagram....
MUSIC:
DJ Quads - Stop: / stop-vlog-music
Disclaimer
The methods shown in this video should be used
as a guide only.
HACKER SHACK ACCEPTS NO RESPONSIBILITY FOR
ACCIDENTS OR INCIDENTS ARISING FROM INDIVIDUALS
UNDERTAKING ANY OF THE TASKS DESCRIBED. IN
PARTICULAR, IF UNSURE YOU SHOULD ALWAYS CONTACT
A QUALIFIED TRADESMAN BEFORE PROCEEDING.


22:59 The moment he realises a SNES controller actually has 8 buttons, not 4...
When he looks at the camera, I feel like he is staring into my soul
Yeah! But there isn't anything bad about him. It's just the way he does it.
Yeah! But there isn't anything bad about him. It's just the way he does it.
Excellent tutorial, the part about how to get buttons to work in RetroPie was invaluable.
Thanks for this project. I tried it myself and it worked fine
i love how modular it is. Nice work
This is a great build. Perfect use for one of those electronics boxes. I never would have thought of such an ingenious idea. Looks super slick! Excellent work.
Too many replies to check if someone remarked it already: you labeled pin 4 as being joystick GND.
As joystick seems to have 2 GND's and no left, I understand what you meant, so thanks for the info that this works for you.
I love this box, but I am trying to figure out how to easily build a 2 player version (or a second 1 player that can work as a standalone and then tether when needed for a 2nd player). I see my kid really enjoying this, but then waiting to take it for sleepovers...thus the need for a "part-time" 2 player model.
that's fantastic! going to try this project myself.
I recommend using quick disconnects for the buttons. It makes it easier to replace microswitches.
Good morning, I'm setting up an arcade control, with 8 buttons, 1A, 1B, 1X, 1Y, 1L, 1R plus 1 Start, 1 Select where I turn on the board wiper raspberre pi
Great video! I myself am commenting this with a raspberry pi 3.
is like a plug and play, but a good one, I like it.
Deityfierezy that was the best thing in the world when i was a kid i remember i had a power rangers one
Cool idea, but why the hell would you not build a proper amount of buttons for the snes?
I agree. Needs at least six...
that would be six total including the 2 shoulder buttons?
Primary focus is not snes. There are tons of mame roms which only require 4 buttons. You can also add more buttons to the open gpio pins if you want. You would just need a bigger case :)
would it work with a snes usb controller?
+Alika80 I HATE GAMES THAT PLAY WITH SIX BUTTONS. WE USED TO START ON AN AMIGA JUST OHE FUCKING BUTTON. TWO IS FINE, FOUR IS THE MAX
You are Mr. Robot dude
Have you ever thought of doing this with a pre existing arcade joystick Etc? Maybe an old SNES one or even the recent Street Fighter USB ones?
I was actually thinking of doing that exact same thing, with an old arcade stick
That is actually very simple todo. The fight stick I had had zero input latency over USB. All I had todo was mount the pi on the back cover, and shorten the USB lead. The HDMI and power coming out of the existing hole that was for the USB before
Still got some stuff left todo but it works perfectly fine. I want to hardwire an on off switch and extend one of the USB slots over for rom input/second controller. I want the on off switch to be on one of the extisting switches on the fight stick that is not in use (360 to PS3 switch), honestly that is the hardest part of it for me. The on off switch, I might consider mounting the HDMI and power next to the USB extension also via extensions
Hey Larry, love your videos!
So cool. I wanna try and make one but might be a little ambitions for a 1st pi
Sweet build HH and thanks for putting all the information in the description. Definitely going to be giving this a try, although I think I'll printout a drilling template instead of doing all that measuring.
+ASMR Junkie If you do end up making one, send it to us and I'll credit you + link it in the description
post a link to your drilling template?
I'm amazed that you opted to not use any .110 quick disconnects for the buttons.
awsome project! for some one who never touched raspberry how to open this command line thingy
Not gonna lie... tiny, simple, awesome.
Nice idea need more buttons and more controllers for multi player
usb ports on the side for extra controllers
Hi Thanks a lot for the tuto, how do you configure "select" and "start" button as they are often required in some games. I'm still playing Retropie on my Raspi with PS* cotrollers via Bluetooth but will love to play with a box like yours! Cheers!
ok pro tip when using a "spade bit" start the hole in reverse then then forward for the rest of the cut for a clean hole plus scrap wood will also make it easier :)
Great idea, I had to make myself one. I tried, followed the video and the controls work fine in EmulationStation but are not recognised when the games are launched. Did anyone encounter the same issue?
Nice video, thanks for bringing the joy of watching it!
you should do a 6 button version, while I love snk fighting games, I also love SF
And he also showed Mario World, a SNES game. That controller had 8 buttons: A, B, X, Y, L, R, Select and Start. Truth be told this can only really play NES, Atari 2600, Master System and Genesis games, along with some arcade games.
Nice but I assume that the GPIO 4 is actually left and not gnd?
On the joystick wiring where does the left go
newb question alert! You need an SD card in the pi to install the OS / software on to, correct? You can't install software directly to the pi?
Scott Baker sd card is needed
So does the SD card get corrupted every time the power is pulled or does that hardly ever happen?
Scott Baker it will not get curropted
You could daisy chain all ground/chassis pins as one.
Great tutorial! Is there connectors to avoid having to solder in buttons? another question: to prevent the box moving, you could put some rubber caps underneath it ...
good presentation. some screen shots are just a tad small.
What button do you use to go back to main console menu? Or u still have to rely on keyboard?
Makes portable arcade console... plays super Mario world on it
MAME for the win!
mame seems to not always work
Lol first thing I thought
MAME works fine, it's just not set up by default.
and only has 4 buttons...
12,000th subscriber. Just one question: How come you installed RetroPie using the setup script instead of installing the standalone RetroPie image?
Awesome build but is there any way to make this a 6 or 8 button configuration?
Very nice man you have some talent. Thanks for cutting out the dremle sound btw. Headphones and dremle sounds dont go well together.
There is a typo in the diagram you have two Joystick Grounds? And you are missing Joystick left?
Nice project! How many buttons does it must have in order to play most retro games? (nes, snes, ps1 ps2, megadrive)
If I want to play another game, how do you go back to the main console menu?
This idea..it's amazing. Holy shit.
Thank you! Well laid out and very thorough.
Thanks for watching! :)
thank you so much for this video!
i just made my own today
so excited!
Can i make a second controlle for a friend to play?
I was wondering the same thing. I'm assuming here, but I believe you can plug another controller into one of the USB ports on the Pi. Even better, make another joystick box and wire it USB...if you find out, or if he reads this, let me know!
www.amazon.com/Arcade-Game-Controller-Interface-MAME/dp/B00F1YQ3DI
Gustavo Matos you can plug in any USB controller into one of the USB ports. Just have to assign the buttons in retro pie.
You're super coool man. Thaaank!!!
Love stuff like this. I built a full arcade cab with my Pi but I feel like I cheated a bit. I didn't use a the GPIO for the buttons I used a generic USB controller encoder and went via the USB ports. I feel like I should take it apart and do it the 'proper' way :)
How to config it to six buttons?
very nice build man.
can you please make a in depth tutorial for setting up gpio buttons ty
Nice job, love the simplicity of the build!
Approximately, how many grams is this? I ask because my library has a 3d printer and it charges by the gram
You can do the math yourself.Check what material they use, then google the density of that material, then, in a modelling software, you can measure the volume. Multiply the density by the volume and you got your weight.
Really cool vid, well produced. The only complaint was keeping the item of focus on camera at all times.
I'd love to see a way to keep those side cuts on the project boxes neat and tidy (as opposed to 3d printing a case)
hey very cool tutorial thank you!!
is it possible to build one with more buttons (like 8) using multiple times the same ground pins ?
Yep, definitely. You would just need a bigger case :)
Would one be able to just assign additional buttons (Start, select) to any of the unused GPIO pins?
What pins would be needed to connect to start and select buttons ? Just wondering for the future :)
is there a select and start button
You don't connect the left joystick to a pin? how does it work?
Most hdmi cables aren't that long, must be really annoying to use. I just personally use a wireless dual shock 4 on my Pi, or for arcade games a USB gamepad
The Diamond Pig there are 30 foot hdmi cables for $13.. works great for me.
I should think you'd really need to add a bunch of weight to that box to make it heavy enough to sit down and play.
Great Video!! God Bless!! Happy New Year!! :D
Can you plug in a usb controller into the Raspberry Pi for 2 player action?
Yes, but you might need to configure the retropie `retroarch.cfg` file. github.com/retropie/retropie-setup/wiki/retroarch-configuration
did you put the joystick in the wrong way? i saw when you were configuring the controls up was left and down was right. i know it doesnt make a difference to the controls cause they are programed to those keys but just wondering.
by directly connecting to GPIO pins, can I still connect a second controller via USB for local multiplayer?
This is really great and I'm looking to build my own but my feedback is that more parts, tools and materials are needed to build this than what you've listed: heatshrink for the wires, silver solder, a soldering gun, clamps, the drill bits to drill out the button and joystick holes, a dremel, an HDMI cable, a rasberry pi power source, etc.
This may be obvious to some but if this is a step by step these parts, tools and materials are important for the final product and people looking to make on of these for the first time and who is not a electronic hobbyist may not have these things around the house.
+Catherine Piroli good point. I'll add that to the description tomorrow.
+Hacker House Thank you for taking the constructive criticism on board. 👍🏻
Catherine Piroli You can buy a hori fight stick mini for about 30$ last time I checked.
This would obviously connect to any TV via hdmi cable correct?
One question: Is there a way to connect it wirelessly? I want to make this box for my son, but I'd like for him not to connect any cables. He's only 6 ya know.
Thanks.
i love the invention of your.
awesome build!
Another question how come in the diagram it all of the buttons and joystick has a ground except for Button B?
Wow cool! Thought i have to buy a USB encoder to recognize the buttons and joystick, so i don't. Thanx for the tutorial... now i have to find a german shop to buy these stuff. RPI3 already running with Retropie...:)
Just wondering why the amiga emulator can't or false interpret the joypad movement. With keyboard it's ok but with joypad it has a very strange behavior just like pressing all directions together at once. Maybe you can help me out. Thx
Hey guys,
I've put together my own one of these following this awesome guide :D
I wanted to give these out as presents to friends and family for this Christmas and was wondering if there was a way to launch straight into emulationstation without booting to the OS while still running Adafruit's Retrogame mapper during the boot sequence?
Thanks for these awesome vidoes guys :D Trying stuff I wouldn't usually
Is there a way to make it six buttons?
Good tutorial, one correction: Ctrl-Alt-F1 does not exit the UI
+NurchOK I think it depends on your OS. What Raspberry Pi/OS are you using?
It's a Linux thing. Ideally you should start the config utility and tell it not to start the GUI on startup. To check, if you press Ctrl+Alt+F1, keep going with ...+F2, F3, etc. Somewhere around F6-F8 you should be back at the GUI.
NurchOK yup, that's just move to tty1
How do i add more buttons? I need 2 more main buttons(fighters use 6 not 4) and really also a start/select and coin insert button for mame
You could move the buttons on the right side of the thing to make room for an extra two, and you could probably put start and select on the bottom if you have enough room. There's other videos that explain how to add buttons in general, not just this configuration. Good luck!
Awesome job! Would you be willing to upload and provide us with your Pi SD card image (minus the ROMS for copyright reasons of course). This would help us non-technical folks be able to just build the kit and boot up. THANKS!
the image is called retropi ,its a image with no roms you add the roms later via usb or ssh ,the retropi image is all you need to boot it up though,so why would you ask this guy for his image if he got it from the official website that made the retro pi image , the base images with no roms of course
Hi, Awesome tutorial, you are really good explaining step by step, I have problems with the sound, with HDMI - VGA converter, did you try something like that? or you just use HDMI direct to tv. cheers and thanks.
DVI and VGA are both incapable of supporting an audio signal.
Do you have measurements for this box? I loved the design, that's *exactly* how I want it, but I have no way to 3D print it, I would do it the oldschool way with MDF boards :D
Cringed a little when you soldered the buttons while they were in the top of the box, think you would have had an easier job doing it if you would had taken 'em out first, that just looked painful for your neck, back and posture.
Other than that, loving the video mate, good work.
Compatible with Raspberry Pi model 1?
(1st version)
how do I do this if my pi just has only retropie flashed on it?
(Short preface: I'm very new to this, as in this is my first project working on a pi) Anyways, I had all the parts I need gifted to me from my uncle but I also received a breadboard, I was wondering if it would make sense to use it for this or is there no risk in doing this without it?
do u need a Female to female jumper wires if you are using an usb encoder kit
what are you doing for cooling the pi? i would love to get thermal pads and find some thin metal and modify it to fit the pi 3 so it has a proper heat spread for cooling
hi, you can connect two pads to the same Rasperry ?
Hello Erin, excellent video tutorial. Very well explained. I only have one question, how do I got about getting into the raspberry pi 3 OS UI? Forgive my ignorance. I am new to the raspberry pi.
From the command line? Try `startx`. It's Aaron BTW :)
Awesome build! subbed.
What if I want none of the button (bumpers, start and select) to be on the keyboard? Would I have to go for an external USB encoder?
You could add more buttons to your console via gpio pins. You would just need to add a few more entries in the retrogame.c file. Ground pins can be wired together.
Why not use a 6 button config?
can shoulder and trigger buttons also be added?
I'm really new to all this and confused. I put retropie on my sd card and I just had the thought that now maybe I won't be able to install retrogame without a proper operating system??? or... at least I won't be able to cut and paste the code??? Another video I just watched said you needs noobs/raspbian to configure retrogame. I'm so lost, someone please help.
at 18.09 you say "I wanna make sure I can edit this file so I press" what is it you pressed to edit the file? Thanks,
dont you need an 8 way joystick??? to jump forward in fighting games for example! die you just not think of it or would it easily be solved by the Software?
Andreas Botterweck 4 way is correct cos.with micro switches to go diagnal you just push diagonal and it pushes in right and up... thats how joysticks work
Lewis Allan allright, didnt know that.
Hi! Is it possile to connect another set of controls and play two players games with just one raspberry pi? Do you kneed another item to plug the buttons or just the raspberry pi will do? Thanks!
Genius Hack!
is the link for the box is the same size as the one you use ??
Hey Dude! 4 buttons? Good Luck with games like Street Fighter!
Diego Coronel I was thinking the same thing
Diego Coronel eh, nes could work instead.
what about connecting two of them?
Very Good Bro !!
Can you do two players?
At 14:51 (When the directories are listed), it shows that you have one called "Facebook Newsbot". If this gives you the Facebook feed through the command line, how is this made?
Using this as a start, I want to build an xbox style controller with a built in retractable HDMI output cable.
using the pi zero some one built a retro gaming system completely inside a Xbox controller.
you will need a really small microcomputer. And the smaller you go, the less powerfull that microcomputer will be. While it is possible to make a 'console in a controller' you probably won't be able to play anything past the snes era...
Great job pal! Question ,can I use Raspberry pi zero instead? Thanx for your feedback! Cheers
I think you could use raspberry zero but it will affect games performance
can you make one two players?