Double Flip Top Workbench (Part 1 of 3)

HTML-код
- Опубликовано: 4 окт 2024
- UPDATE - Detailed plans with step-by-step instructions and everything you need to build your own are now available. Just follow this link: bit.ly/3ck9Ycs
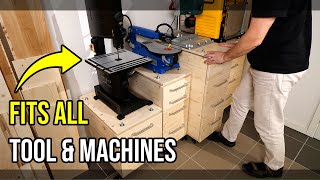
I decided to replace my old workbench with a fancy new one. The new design has dual flipping stations built in for stationary tools like my planer. This way, I have a big flat workbench most of the time, and access to some heavier tools within seconds when I need them.
Affiliate Link for caster wheels: amzn.to/2qBn8KY
As an Amazon Associate I earn from qualifying purchases. (shopping using these links helps support my channel & costs you nothing)
Some design inspiration came from: • Build A Woodworking Wo...
Check out Jay Bates’ Universal Router Jig here: • Universal Router Edge ...
Affiliate Discounts -
SurfPrep Sanding: bit.ly/41aGXWC
10% off code - GUNFLINT10
MagSwitch: bit.ly/3oxTVLj
10% off code - gunflintdesigns
Montana Tools: bit.ly/3TP8Dh2
10% off code - GUNFLINT10
Starbond CA Glue: bit.ly/2EjSRpC
15% off code - GUNFLINT15
Rotoboss Rotary: bit.ly/3OQysdD
5% off with GUNFLINT
My Basement Business: bit.ly/3OQJSht
15% off code - GUNFLINT15
Gunflint Designs is a participant in the Amazon Services LLC Associates Program.
Website: www.gunflintde...
Amazon Shop: www.amazon.com...
Patreon: / gunflintdesigns
T-Shirts: www.amazon.com...
Instagram: / gunflintdesigns
Podcast: webuiltathing....
Podcast Patreon: / webuiltathing


the author does like to from scratch, shaping and trimming wood from large blocks into fine finished products. ruclips.net/user/postUgkxD-QRFQz730FJEh4f9BYSf-nkIMIC9hL_ as another reviewer mentioned, most projects require a lot of high-dollar equipment that most of us dont have the room or budget for. But, knowing how to do these things, even if we wont be able to practice the full stack project, is still great.
This is the kind of guy you need in a project. He is accurate, careful, detail oriented, can visualize things way in advance, goes fast when speed is needed and slows down when necessary and, loves what he is doing. Congrats, excellent demonstration of craftsmanship.
Great looking table. It's nice to see one being built that isn't 100% plywood.
I really like this guy. No fluff and good demonstrations in a nice woodworking shop. Here lately I have been really disappointed in young people in this country. But after watching a couple of Mark's videos I see there IS hope for young men. Good job and I have subscribed. Thanks.
If you're disappointed in the young people perchance cast your eye upon those who raised them and reflect.
@@redramage Ok I'll play your game. Let's do some "reflection". Millions of young men in this country today are hooked on opiods. Millions more are living at home with their parents in their 20's and 30's with no job and no future and no desire to even try. Millions and millions more don't even graduate from high school and those that do can barely put a sentence down on a piece of paper. At some point some of these guys need to stop blaming their parents and take some personal responsibility in their life. There are young guys right here on RUclips who have done exactly that and I gave one of them credit for it. Then I get a negative comment from you. What i said is the truth.
@@dirtwhisperer658 And who destroyed the schools that failed them so? Who put these men on ultra powerful stimulants their whole childhoods? Who shipped the good blue collar jobs overseas? Who inflated college costs, made student debt non-dischargable in bankruptcy, then imported H1B foreigners to do office jobs? Who destroyed the institution of the nuclear family and stripped men of their primary motivation? You have accurately described the condition of many young men, but given no thought as to how they got there. You have much reflection to do, old timer, but your entire generation seems clinically unable to do so.
I used a similar idea to build 3 benches. 24’x5’, 42’x6’ & 68’x6’. Weight required 12”x12” legs every 12’ and forming the entire worktop using 8” dimensional lumber cut on my mill. With 30 workstations my shop finally has enough space for furniture restoration. Drawers, center tool gutter and holders complete my favorite tool benches ever. I liked to see someone else who doesn’t rely on screws and metal hardware!
my step dad would be so thrilled if I can pull that work bench off for him. His shop is so small so he could use fold up areas too, I am not experienced at all, but that would be a great challenge.
Excellent no nonsense instruction and not a music note or ridiculous sound track with in ear shot
My brother in law would love your attention to detail, your concise measurements and determination for perfection....me, not so much...it's just a work bench.
Mark, thanks a lot!!! So much appreciate help of people like you, because this is exactly what I want to build and did not have idea where to start.
God bless you, now I will build it and it will will make my life a bit better. I build beehives.
Thanks!
I had some friends ask me to build them a beehive and I didn't know where to begin! What kind do you make?
Something like this. Because my back does not like traditional hives.
horizontalhive.com/how-to-build/long-langstroth-plans.shtml
having a workbench does make it easier to build one. Nice job on the flip top, very useful info
You are an incredible craftsman. I learned so many things from this video. You’re so precise and I’m learning how important that is for every project.
Well thank you! I'm glad you got something useful out of this!
Very good proyect, congratulations
I work in a steel fabrication environment and would like to start building with wood on a hobby first basis. Watching videos like yours is helping me get the basic ideas of how you connect different pieces together.
Thanks- Great video!
A lot of the same principles.. just less heat.. unless youre Mr Chickadee and build a burnt siding building..
That is a very sturdy workbench, you are a Woodworking-Guru the way you joined it together.
Beautiful job. A planer is my next tool investment.
...and look at how clean his shop is! Good lord.
A true inspiration in watching your love of woodworking and craft.
Well done!
Great Design and Wonderfully executed Video Instruction. Enjoyed Immensely.
Thanks James, I'm glad you liked it!
All with 2x 4 I’m impressed ❤
Just 50 seconds in and you've shown me a simple way to make my unused RAW a more major part of my woodworking. I was surprised by the "shelf I saw so close to the blade. Looking again, I saw the terrific dust collection system you built. Way to go! I'm a new subscriber, and I'll be back again. Thank you for sharing. Mike
I’m definitely not building a workbench/table situation, but thanks to my RUclips suggestions here I am!!!! This came out spectacularly!!! I’m sure these techniques will come in handy when I build my daughter’s dresser. I just find furniture these days aren’t made very well. That’s completely off subject lol. Good job!!!
Hallo Mirjam.
De hele playlist ,, doe het zelf ,, spreekt me erg aan...zitten echt leuke dingen bij.
Greets...Walther.
I'm honestly impressed. I think this is the best work I have ever seen someone do with white pine. Soft shit came out looking awsome!
I really enjoyed this. I especially appreciated that you did not use any music. would rather hear sped up hammering than most of the background music other channels choose for their videos. thanks!
Great to see this build. I'm equipping a new shop soon and will likely reproduce this table. I have tons of room but efficiency is key not matter what size shop you have.
Thats a nice perswader you have there nice job on the bench.
Da sieht man mal, wieviel Arbeit in so einem Projekt steckt. Du hast das super gemacht!!!
Danke!
Nice joints! In the past I turned my legs vertically on its side and a cut then vertically with another cut.
The glue companies must love these guys.
With a complete workshop like this....who needs a crummy workbench? It's the only thing I own .
I don't write many reviews but I was looking for a workmate for my wife's wood projects and this one is perfect.its stands very tall so so bending and it's very sturdy. it has two sliding clamps that hold tight and it folds away to hang on our wall.it also has 4 table pop in blocks with lots of holes to ajust for projects. its kinds heavy so carefull when lifting to hang it.
that glue up station is pretty cool. PVC and some drop cloth. I may be adding that to my shop :)
I got the inspiration for that from MTM wood. You should check his channel out.
Nice design. I want one.
Fantastic and precise work! I learned a lot, especially about joinery from this video. Thank you!
That is nicer than my dining room table. I cant wait to see flip top
It's nice to see someone using a radial arm saw other than me. You can't beat them for cutting dados.
Very nice job so far
Nice job, I liked how you thought ahead on placing the lower quality wood under the equipment for the flip top and between better quality wood on the butcher block.
FREAK! I've been brainstorming a double ended flip-top bench too and thought I was so original.
Haha! if you thought of it on your own then you were being original. Maybe I can just help you refine your idea, or maybe your ideas puts mine to shame!
Nice video. Great work on the table. Wish I had a bigger shop.
Nice bench and thanks for taking the time to put this instructive video together.
Great video! Appreciate your attitude and how humble you are. Keep up the hard work!
Thanks Chad!
Excellent work
Pretty bloody cool. Saves space
This is great! I just completed a saw table that was somewhat similar to yours, and I certainly took some inspiration from your design. I too have a super small shop (10' x 25') so dead-space management is super important for me too. I cant wait to see how you handle the flip top design.. Thanks so much for posting this stuff!
I'd love to see what you did with your table saw. The flip-top part of the bench is all finished and I am about half-way though editing the footage. That will be my new video for next week.
I cant wait for your next video!
Ill try to get some pix or a video for mine up, and Ill shoot you a link. Its quite a bit simpler than yours currently, but I think it will be a good base to upgrade for the next few years till I can afford a proper cabinet saw :)
I've checked out a lot of great flip top benches, but for the work I do, this one is a perfect design! Thanks so much for sharing this. Subscribed!
You are very welcome. If you get one built I would love to see it.
Yes, glad I ran across your channel. You were talking about adding the storage underneath, which we all are looking for in smaller workshops. I drew out a design using your bench, incorporating the Paulk bench under the solid top side for my most used tools, then using the other corner of the flip side for drawers. Thanks, I can't stop racking my brain now! lol
Good use of a redial arm saw. I have an old DeWalt RAS and I'm thinking of rejuvenating it using your design. Thank you for the video. Todd in NH.
Impressive build.
Thanks Daniel.
Nice job. I'm looking forward to seeing how you build and use the flip top side of the workbench.
Very clean and professional. Respect! Subscribed!
Thank you, welcome aboard!
Absolutely "Bless You" for providing the plans for free. Material list and all is what I needed. You've earned a sub and I will use your affiliate links. Thanks!!!!!
Good video, good project. Nice joint at the leg/frame junction.
You might need fewer clamps on the end of your glue ups if you put two bar-clamps on the underside of the lumber “stack”
I was thinking you needed a sledge, great video!
Now thats a good one I can jump on all day and not be able to break !
Mark, super project design and joinery. Great stability to the workbench and nice style on the butcher block top. Looking forward to seeing future projects. Just subscribed.
Thanks Michael!
When you brought out that sledge I was rolling!
I love that hammering technique.
I really like your bench, I'm looking to build a work shed to do wood work. And I'm really liking your bench.
I'm currently making a brand new workshop studio and this would be perfect for it. Thanks for the tips I found so helpful.
So now you just learned an important thing about the circular saw...you can use it as a mill. I do this trick frequently. Also, one can use a drill for milling (mild materials). It comes handy now and then.
Wow! One day? I'm in.
"with a big enough hammer you can fix everything" :) that sentence reminded me of my physics teacher at the agricultural school, who always said: "It's one of the oldest physics laws: the bigger the hammer, the smaller the troubles!" :)
I like that version!
Great video
Cool idea. I like seeing different peoples ideas for non-traditional workbenches.
GREAT VIDEO. Love that flow.
Thanks!
Замечательный верстак. Удачи в творчестве.
Well done
Thank you.
cool design
Just discovered your channel. Great work! It's nice to see someone else using the porter cable pocket hole jig. It's miles better than the Kreg jig, imo. On to the next video!
I've never actually used the Kreg jig, so I don't know that for sure. But when I was shopping around I definitely liked the simplicity and the extra features of the Porter Cable - so I took a chance with that one and I love it!
It's got 1 major thing over the kreg. The ability to set the collar on the bit and never think about it again. You're constantly adjusting it with the kreg. The was the ultimate selling point for me. I love my P-C jig. I have no idea why they don't push it more.
Amazing job! Thank you for the plans and ideas!!
Absolutely! If you build something like this for yourself, I would love to see it!
Gunflint Designs sure I'll tell you if so!
Nice build!
amazing how just simple 2x4's can make such a nice top.. not sure how people live without a radial arm saw - i picked one up from craigslist a decade or more ago - some guy had bought one and his wife was making him sell it to make room in their garage... it's SO handy for so many things - nice to be able to see dados from the top side, rather than from the bottom with a table saw. i do exactly what you did, even though i have a dado set in it. just speeds things up.... just use the skill saw to make the cuts - they don't have to even be that straight as long as you get the depth right.
Nice shop
Thank you.
Great looking progress. My dads version is "if it doesn't work, hit it with a bigger hammer".
yeah, my grandad is similar, "if what ever you try first doesnt work, swear at it, then hit it with a hammer"
Claterpult Workshop john heisz thought so too
that's really cool so far.
Very enjoyable. Looking forward to part 2. I am spaced impaired as well. I like these flip top ideas. I have seen a few lazy susan ideas as well.
Nice radial arm saw fence similiar to frank makes,very 😎
Thanks, it is similar to Franks, but his is nicer. And I'm sure his dust collection works better than mine.
gotta love the lightweight wood they have in America
If that was made with norwegian pine, you'll need a hoisting device.
And if it was made of black ironwood, it would be heavier still.
Of course, the only question that matters is, "is it heavy enough to perform it's intended function?"
Americans put millions of tons of old growth hardwood into structures that have long been demolished.
That includes hardwood that otherwise could have been used in furniture and homes -
burned for heat. But some of it remains in courthouses and structures that live on today.
Awesome. I'd like to hear your follow up (pros and cons) after six months or so of use. Balancing, wracking, stability, etc...
Thanks! I'm almost counting on needed to make alterations down the road, I tried to think of everything, but only time will tell. I will plan on doing a follow-up later on.
I just finished watching all three videos on this subject. I can't tell you how long I've been waiting to build one of these for myself. after reading all the comments below that I could get through I noticed no one address your question on what to put on the top to seal the wood. my very best go to for sealing the wood is Shellac. you can use Amber shellac for that warm tone, or used clear if you want to see the pretty top you make. shellac is one of the best sealers you can use. almost anything that we use after shellac will work wonderfully.
Thank You again, Jim
i noticed that the saw came back out a little after you returned it, a positive return on the RAS would add safety, use a weight on a cable through a pulley on the wall, even adjusting the saw for level front to back would use gravity to hold the carriage back, I like the dust collection you put on it
Thanks for the reminder Tom. I used to have a bungie cord hold it back, but I never liked it and took it off when I redid the top and fence. I might have to try out your weight idea.
Good joinery :)
Thanks Jay Bates! I definitely took some inspiration from you in that department.
awwwwww
Looking great. Your Dad gave great advice
Looks great!! Nice job
Looks awesome man. Looking forward to part 2. I'm doing a workbench build right now so it's really cool to compare how we've done things!
Nicely done! Instead of multiple passes with the radial arm saw, I like to use the bandsaw to make the cheek cut. Quite a bit quicker once it's set up. Looking forward to part 2!
That's pretty slick. Can't wait to see part 2.
Interesting building... I can't wait to see more! Cheers!!!
On to part 2! Looks like some really strong joints!
I've had it over a year now and it is a beast! The thing hasn't budged at all.
with big enough hammer you could fix anything, so damn right 😂😂, your dad must be a philosopher
He is a smart man!
When I made mine I cut the mortises in the 2 x 4 before the glue up. Then hammered in the legs and added the runners.
THat's a good alternative!
Great job, I made a workbench similar to this one! Mine is nowhere as durable as yours! Mine will support a complete big block Chevy, Intake to oil pan. I love the flip stations, I am tempted to make a revised version and add them to mine.. better yet, I might build a complete new table with the flip top stations..
Looks sharp. Keep up the good work.
Thanks Derrick.
I subscribed the moment I saw the title of part 2, "The Flippening". :)
If that joke made one person smile it was worth it! Glad to have you aboard Jon.
Nice bench you designed there. I just today discovered your channel and must say I like your style of video. Keep em coming young man
Great work!
10:31 rugged man way, that's an amazing work bench.
Nice video. Good work. Might suggest the band saw to clear those tenons. Just a thought.
Thanks Pat. Good advice.
If you use a jigsaw for those blind cuts on the mortise joint, you'll be less likely to over cut your line. You can clean it up after.
awesome! looking forward to part 2!
Nice job! Can't wait to see part 2.