Common MISTAKES to AVOID when Installing Metal Roof Underdecking.

HTML-код
- Опубликовано: 30 сен 2024
- Next Video: • WINNER - Jennie & Davi...
Supply List: Saw Stop Professional: amzn.to/3pDKe3q
DeWalt Drill Combo Kit: amzn.to/44ZiAOl
Tight Bond III - amzn.to/3I4nzUj
Milwaukee Tape Measure: amzn.to/42qugYV
Little Giant Ladder: amzn.to/3OZFJeh
Lexel: amzn.to/3oLcy3L
Magnetic Hex Bit: amzn.to/3qfEaOL
Best Buy Metals: www.bestbuymet...
Instagram: / ben_vankirk_woodworking
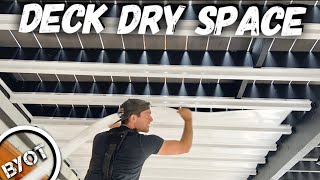
In this video we dry in the underside of a deck using metal roofing. This project was a challenge and there are many mistakes that can be made. Make sure there are no leaks and have your metal roofing company reverse the process when making roofing to ensure strength.
Other Cool Videos:
Epoxy Tips and Tricks: • 6 Tips - Achieve Your ...
Wood Ceramics: • How to Apply Durable W...
Epoxy and Walnut Chess Board: • Can you DUPLICATE this...
***WANT 60 DAYS FREE? GET COPYRIGHT FREE MUSIC AND COOL SOUND EFFECTS all while helping to support the channel. Use this link for Epidemic Sound: www.epidemicso...
Epidemic Sound offers 35,000 tracks and 90,000 sound effects perfect for your videos and content.
#epoxy #rivertable #liquidglass #resin #woodworking #games #jenga #samarabos #resin
Please "Like" the video if it brings you value so You Tube knows to share it with others.
Select the notification bell so You Tube can let you know when more content is uploaded.
Feel free to comment below and leave feedback on what you enjoy, what you learned, knowledge you can share with myself and others or how we can improve the content we develop for you.
DISCLAIMER: Links included in this description might be affiliate links. If you purchase a product or service with the links that I provide I may receive a small commission. There is no additional charge to you! Thank you for supporting my channel so I can continue to provide you with free content each week!


Best Buy Metals: www.bestbuymetals.com
Nice video. But i do not understand prioritizing the use of the screw over using treated lumber. Why not just get the right kind of screw. I also disagree that cedar does not rot. Cedar will rot much sooner that treated lumber.
Those screws are specifically made to hold metal roofing in place. They have a wider head and rubber gasket that allows the metal to expand and contract so it will not bend, warp and dent. We did put a heavy coat of water sealer on the cedar so it should last for a long time. Thanks for watchin!
Great video. How much did your panels overhang into the gutter? I assume 5in gutters? Any issues with heavy rains where runoff overshot the gutter?
We allowed about an inch of overhang on 5 inch gutters. We have not had any issue with overshot from heavy rains. Thanks for watchin!
Thank you sir for your video.
It’s PERFECT!🧐😀
I am 60 years old, 42 years in the remodeling trade and carpenters Union. I see the comments.. typical b.s. know it all’s.
It will outlast you and me and them!
It looks great! All your extras were really above and beyond !!
I’ve bought houses 120-30 years old thst have held up agsinst the elements with good old fancy do-it-yourself ambition and wisdom! The time it takes to simply make and edit a video will deter almost all of us in this world!
Great job!
Thank you for the kind words and encouragement. Sounds like you had a very successful career in remodeling and carpentry. I can only hope my career is as successful as yours! Thanks for watchin!
Ben, Your video has been VERY helpful and inspirational for my new roof under my deck. I have installed two separate roof systems since I have a beam in the middle of my upper deck. You did a great job describing your step by step process and had many helpful hints. I had been wanting to do this for a long time and you help me figure it out. I just need to get my gutters installed and wait for it to rain.
Thank you so much for watching! I am so happy to hear about your project! I hope you enjoy the underside of your deck as much as we do. Getting the gutters installed will give it a clean finished look. Thanks again!
Love your roll up door. Could you share what size it is and where you purchased it? Thank you
Thank you! This door has held up amazing over the past 3 years and was way cheaper than a large slider, although still pricey. It is double pane insulated glass and the door is hurricane rated. Very high quality. We custom ordered the door at optimizegaragedoor.com/collections/glass-collection (Not sponsored, just a good product) Thanks for watchin!
Curious your thoughts on joist longevity of the under mount vs. over joist mount systems?
I think this depends on budget. The over mount systems are quite a bit more expensive but are probably better in the long term. This whole project cost me around $1,200 for a 50x10' deck. Thanks for watchin!
Retired waterproofer here. Looks very nice and functional.
Scott - Thank you for the feedback and thanks for watching!
OMG finally found the easiest way of doing the waterproofing, so many videos making it so hard, but you dude, you are the MAN!!!! as a woman doing all the work underneath my deck, I’ved already rigged out about 1 food of dirt on a 20x10 space all by myself to make dipper and place pavers or gravels on it, you save my life 💕
Great job! Thank you for the kind words! I love hearing stories of people getting out and doing things on their own! Please keep me updated on your progress. Thanks for watching.
What are the dimensions of your deck? What gauge of metal roofing did you use?
Our deck is about 50 feet long and 10 feet wide. We went with a lighter gauge roofing material to cut down on weight and cost. It has held up great! Thanks for watchin!
@@BenVanKirkwhere did you get the metal roof from?
Store bought kits for this have you install supports parallel to the panels over the pitch rails so debris can flow down. Over the years i can't imagine this not being an issue with the panels being directly screwed to perpendicular supports. I see plenty of trees in the video. Wind will eventually blow a bunch of junk your way.
I saw the store bought kits too. This option was cheaper than those. We will see if junk gets stuck over time. Thanks for watching.
Hey Ben, you did a great job. Keep up the good work. I just uploaded a video of a on my channel installing Zip UP system. It is way more expensive than metal roofing but it is super easy to install. Your video just poped up after uploading my video:) Subscribed.
Thank you for the encouragement! Just watched your video on the Zip Up system. Looks beautiful and anyone wanting other options should check out your video!
I just found this video .. I’m curious how you prevent build up of leaves and debris from clogging the channels and I had a deck under-roofed with metal and entire deck is rotting including support .. I think the deck and under roof builder made a number of mistakes and I’m paying for it now..there is no way to get it cleaned out without taking down the entire under-decking or all the deck boards on top..probably a $50k rebuild now..😢
The cedar spacers do provide a gap for debris to wash away and keep them away from the joist. We also added joist tape on top of each joist when we built the deck. We used this system because it of cost. The only way to fully clean it out would be to take down a panel or 2 and power wash. So far we have not noticed much build up and the slope helps wash any build up away and the cedar strips should last quite a long time. Oh, and we added an extra heavy double coat of water sealer to each joist before we installed everything. Thanks for watchin!
Wait a second... so if I buy a similar metal roofing material from Home Depot or Lowe's and hang it painted side down, is it not going to work? I'm confused about why that's the case.
No, that will work too. When they custom make it they reverse the paint job so it will be a little more rigid. Thanks for watching.
Great video, not too long and to the point. Thank you.
Glad it was helpful! Thank you for the feedback. Thank you for watching.
Great video! Nicely done! What are the dimensions of your deck? And what spacing did you use between the end of the metal roof and the 2x6 cap to allow for proper drainage and gutter install?
Thanks!
My deck is about 35 feet by 10 feet for the bulk of it and 15 feet by 8 feet at the bump out section. The spacing between the 2x6 and metal roofing was about 4-5 inches - there as some overlap into the gutter but plenty of space for water to flow.
Great video and tips. Just finished the panels on my 28x14 with 2 bump outs by myself yesterday. Combination of 3 ladders, 2 jigs (2x4x48 with 2- 4”x4” blocks screwed to them) went a long way. My question is how did you attach the 2x6 to the posts? In between posts or inside face? Pocket holes, toenails, or other connection method? Thanks again
Edit- ok I see they’re between. How are they fastened and how about the sides. I couldn’t see a clear view finished. Did you rip the 2x6’s at same angle? How are they fastened. Thanks again
I used toe screws for the 2x6 between the post. On the ends I attached a 2x6 to the edge of a 2x4 then screwed the 2x4 to the bottom of my doubled-up end joist. Thanks for watching!
Great video! Very helpful! I have a question on the spacing of your strips. How far apart are they? I’m you did a 1/4” /ft slope and used 1” strips, are they 4’ apart?
I just went with even spacing. Since my deck is 10 feet out from the house I spaced my strips every 2 feet 6" apart. I used 1 by material which is actually 3/4" thick so each row dropped by 3/4". This is probably more drop than I needed but I also wanted enough support for the metal roofing when attaching it to the strips. Thanks for watching!
Thank you !!!! I was wondering how to get this type of metal roofing done.
You're welcome! Let me know how your project turns out. Thanks for watching.
The question that everyone always asks about this type of solution is about sealed in moisture and debris. I have not seen a system that solves this problem including the expensive commercials ones. You did a great job, but plan on attacking various problems again in few years (like 5 if you are lucky and dont live in the PNW.)
These panels are held in place with a few screws so they can be easily taken down every couple of years to clean things out if we see an issue. Plus the cedar strips give a few inches of clearance between the joist and the roofing so most of the small stuff washes down the gutter. I appreciate the feedback, all these systems have positives and negatives. The positive for this system is cost at under $1200 for a 50' deck. Thanks for watchin!
Great Video! I'm ordering my metal soon, this video will be super helpful!
Glad it was helpful!
Great video. I have a project like this coming up. My main concern is water getting behind the siding. Is that J trim enough? Is it sealed enough?
I ran a bead of Lexel across the top of the J-Channel to prevent water from running behind it. It is also pretty well protected from the deck above and the rim joist - which is also flashed. So far I have not had an issue. Thanks for watching.
Update! Has it leaked yet? I want to do this for a friend, but am scared water will get out somewhere. Thanks.
No leaks! I used roofing screws and they have a small rubber gasket on them. Just be sure to not over tighten them. Thanks for watching!
My daughter bought a house with under deck ceiling. It has those cross-strips. The strips collect debris which then traps water, thus rotting the joists. We are looking for a longer term solution that won’t trap water. After seeing the damage to her deck, I would not recommend anyone doing that.
We have removed most of the trees around our house and did add a heavy coat of waterproofing to each joist. I will be curious to see if this becomes an issue in the future. I don't think it would be too difficult to remove a few panels each year and clean things out if needed. Thanks for the feedback and thank you for watching.
Did you use the Tuff-Rib from Best Buy Metals or another product. The Tuff-Rib is most affordable it appears but only has .75 inch high channels.
Yes. We went with the Tuff-Rib. It has worked out well for us and was affordable.
This video was perfect, I've been doing a lot of research on how to do this project as a DIY and yours was the perfect level of detail. The supplier that I'm getting the panels from mentioned that many people also put joist tape over pressure treated purlins as another option to provide the weatherproofing while also mitigating the risk that you call out with the screws being up directly against the pressure treated wood. Of course, that option ends up being slightly more expensive, but do you see any issues with that approach?
If the manufacture said it would be ok then I would go with what they say. My supplier, Best Buy Metals, told me that the chemicals used to treat wood are highly corrosive to their roofing screws. We did put joist tape over the top of each joist when we built the deck and that has worked out good. Thank you for watching! Let me know how things work out!
Great Video! Just wondering if you had some tips on how to hang a porch swing after the ceiling is installed.
We have considered doing this too. You could find the deck joist and drill through the roof and attach your supports to the joist. Then seal around the support for the swing with Lexel. We actually added some additional blocking in some places for a possible future swing and ceiling fan. Thanks for watching.
Where did you get the j-channel? I can't find any that is wide enough for the roof panels.
Best Buy Metal had the roofing and the matching j-channel for this project. Thanks for watching.
Explain how you waterproofed the support rafter ? This is all good to catch water but it doesn't do anything to protect rafters above. \
This will not protect the joist. There are systems that will do that but those must be installed when the deck is being built. This was added to a preexisting deck. We did add a heavy coat of water sealer to each joist before installing the metal roofing. We also added joist tape to the top of each joist when the deck was built. Overall, we really enjoy having a dry space below our deck to enjoy and it keeps our outdoor furniture sheltered from the elements. We also like this look better than looking up at joist. Thanks for watching.
This is a very informative video. I’m thinking of doing the same thing under my deck. My first thought is my very active boys will hit the metal with a football, baseball, golf, ball, tennis ball etc and leave a dent. Was the thickness of the metal a consideration?
Aaron, thickness was a consideration. We went with a medium gauge material, and it has held up really nicely. Metal roofing is designed to hold up to a certain amount of weather ie.... hail... There are also other under decking solutions you may want to consider but those typically come at a higher cost.
Hi! Great video. Thanks!
Do you have gutters or something on the sides of the roof to stop water...not just the gutter at the bottom of roof?
Yes. Installed gutters at the far edge to collect the water and carry it away from the deck. Thanks for watchin!
@@BenVanKirk Thanks!
Your wife put the sealer in the water jug?.... good luck guy. It's iced tea for you. .
Good news! She let me know it wasn't iced tea. I think she needed me around to finish the project.
I did the same thing with clear plastic roofing, but after a few years the plastic became brittle. I'm switching it to metal eventually.
Thanks for watching. We have been very happy with our metal roofing system.
Using a chalk line is the only way to get a nice straight lineup. Using the string method you accidentally touch one spot on it or eyeball not perfectly and your stuff ends up out of wack as I can see it in yours.
Tie your chalk line the same way and go to the center of the line and hold the string line down and then pop the line on both sides. It’s much more efficient as well as you are not ever working around a string to do your install.
Thank you for the tips! I didn't have a chalk line long enough. I did keep the boards about 1/8" of an inch from the string line and most of the waviness is because some of the boards were warped. In the end by predrilling all the metal panels before installing them ensured all the screws lined up perfectly and the boards were wide enough to allow for some wiggle room.
#1 Mistake - putting the waterproofing under the decking. That’s the best way to trap water and rot your deck prematurely. ALWAYS install the system on top of the decking.
That would be ideal but for many like myself ripping apart my deck to install something like that would not have been cost effective. We did use joist tape and a heavy coat of sealer before installing. There are also spacers that keep water running down and away from the joist. Thanks for watching.
What do you mean on top of the decking?
I think main point from @482jpsquared is you must ensure good airflow underneath your deck boards (as well as water diversion) or you'll end up w/ mold/mildew attacking the wood, composites, etc. I'm no pro, but having attempted to create some dry storage area under my deck I really incited some serious mold issues. We live in rainy Seattle area so climate compounds our problems....as well as those regions w/ high humidity.
@@steveabsalonson931 thanks for the reply. I’m planning to do the same and worried about having those type of issues too. Did you install your roof with some ventilation space beneath the joists and still end up with mold issues?
I would add a rain collection system at the end. Since you live so far from the city, then likely you, like me, value extra water for a garden or animals. Since your upper deck is not sealed or protected from the rain.
Do you have any concerns about ventilation of the joists and potential molding?
I don't and haven't seen anything that would indicate that yet. The ends are not completely sealed and there is ventilation between the deck boards.
@@BenVanKirk - Nicely done. I have been planning a metal ceiling for under my deck. I haven't starting constructing it yet because I have noticed some joists in a special corner are already moldy, and I feel that covering with ceiling will only make it worse. Maybe I'll apply the over-joist solution there. I don't know yet.
Good tip on the cedar purlins instead of TP. I didn't know that the screws from the metal siding manufacturer were incompatible with TP.
@@rickerickson9377 Thank you! I also wonder if using a little water sealer on the joist will keep them from molding as well? Best Buy Metals was very reasonable, cut everything to length and were super informative. Let me know how your project turns out!
@@BenVanKirk - Can I ask how much Best Buy Metals charges for 16'x3'? I'm in Minnesota and Menards a local retailer sells a cut-to-length Pro-Rib Steel from Midwest Manufacturing at 16' for $48. Just curious to what Best Buy Metals charges.
@@rickerickson9377 They can give you a quote if you call. They have local offices in a lot of areas. For us it was around $800 for all the metal, j-channel, and screws for about 500 square feet of coverage AND that included about $150 for delivery because we live about an hour and a half outside of town. The other advantage is that custom make the panels so the paint or "color" side of the panels is on the opposite side of a typical roof panel keeping it rigid, plus it doesn't look like upside down roofing.
What did you use to cover the gaps of the sides of the deck ceiling when there is a slope coming down from the roof panels? It would have been nice to see the sides when they were finished
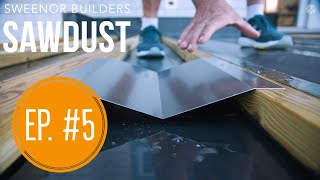
I added some J-Channel to the edge of the metal to give it a finished look and then added a 2x6 on each end to cap off the gap and provide a place to attach the J-Channel to. The 2x6 was just cut to length and secure to the deck framing with some deck screws.
Think the brown color is a good choice for this application. It looks like your gutter color is a close match. Did you purchase it from the big box store? Thanks again!
Yes. Gutters came from Lowes. The brown matches the trim on the rest of home. Thanks for watching!
What do you do when it fills up with pine needles and crap ????
We haven't had an issue with that yet since there are not many trees around our home. The panels are just screwed in place and I could remove a few from time to time to clean things out if I needed. Thanks for watching.
I liked your video I want to do the same for under my deck.
I have a question with the cedar boards that to mounted the the joist than you screwed the Metal roof. My questions what allows the water to pitch down the metal roof?
Would the water and small debris get stooped at all the cedar boards.
Thanks for watching. So far this has not been an issue for us. Any debris that are small enough to fall through the decking have been small enough to get under the ridges of the roofing. And our deck is pretty open from trees. This is a good point though and something I will keep an eye on.
Great video! Why did you decide to install the metal panels upside down?
This maintains the natural rigidity of the metal roofing because it is installed the way it was engineered to hold weight.
@@BenVanKirkIt looks like a better reason is that the way it’s installed allows a wide channel for water to flow under the supports. The ribs act as a stand-off between the supports and the flat area of the panel. IMHO
This is great. I’m excited to try it. What did you use for slope?
We did about 2 1/4" over 10 feet. You want to do at least 1" every 10 feet for good drainage. Hope your project goes well! You're going to love it!
The metal roofing screws I bought say right on the box that they're fine to use with treated lumber.
That is great! Using pressure treated lumber will save some money for sure. The screws I received from my vendor were not suitable for that application.
If your deck is 10 ft out from the house what are the spacing of the cedar strips?
I went with spacing that was about 2.5 feet each.
You have some great tips in this video! I was wondering if you installed J track on each end or sides also?
Yes. On each side too. It gives it a nice clean edge.
Very informative and funny sometimes, I liked your video a lot.
Thank you for watching!
This is great Ben. I'm going to do the same thing under my deck after watching this. Thank you for showing me how to do it. How much did you overlap the panels? It looks like you used Tuff-Ribb metal roofing and my question is did you overlap each panel 9 inches, from rib to rib? Thanks.
Thank you for watching. I only overlapped each panel by 1 rib. Then I can screw the ribs of one panel to the other. One other recommendation is to think about the direction that you install the panels so the "seams" between each panel are less visible from the spot where you will view them most often. So... start farthest away from the spot where you will see them most and work towards the most common spot you will see.
Thank you@@BenVanKirk, makes sense
Thoughts on doing this with a cantilevered deck?
Yes, this can be done! Without seeing it, I would typically recommend that you end the roofing at the beam holding the cantilevered deck. Then attach the gutters to that beam. This will give you a nice clean finished look.
Hi there, what's the thickness of aluminum panels
We went with the 29 gauge Tuf-Rib from www.bestbuymetals.com - it is holding up wonderfully and still looks great!
@@BenVanKirk Thanks. Are these aluminium panels right?
This is great. I am doing a project exactly like this and your deck is very similar to mine but I have some extra posts and more contour I need to work around. I'd love to see some pictures of the sides of your deck and how you finished it off with the J-channel. I have the same corner braces and I haven't decided exactly how to handle them yet.
I capped off each end with a 6x6 to give it a finished look just like I did where I attached the gutters. Then I put a piece of j-channel on the edge of end piece of metal roofing and screwed it to the 6x6.
@@BenVanKirkso you went on the inside of the corner braces?
@@davidjones663 Yes I did.
I've built the same set up 6 years ago. But my deck is surrounded with trees, so im dealing with leaves and small branches that fall thru the deck. Planning to remove everything and redo it again.
What will you redo it with?
Ben I will use the same metal sheets, but instead of wood I want to use drywall metal studs. Also want to do a bigger slope so I can blow the leaves out of there with the blower
@@andreipavlov5630I wonder if you couldn’t make one of the deck planks removable the entire distance of your deck so that you could easily blow out debris?
How does the water flow into the gutter from the metal? Looks like the metal is right up against the 2x6?
The metal is ribbed so the water flows through the channels.
My builder added a ceiling to my deck just like this 10 years ago. Just took it down due to wood rot on about 1/3 of the joists. The problem is that leaves, pollen and other dirt comes through the deck and clogs the drainage channels. Trying Trex rain escape this time to have the water drain above the joists. Check with me in ten years to see how it works out.
Do you have a video installing that siding?
I didn't install the siding on the house.
Any issues with bee or wasp nests?
So far we have not. I will be curious to see if this changes during the spring. Thanks for watching.
Great job with the roof and instructions on the video. Does it ever leak where you screwed through the metal roofing into the cedar? I would think it does if you didn't caulk it.
No leaks. It is watertight. The screws are actual metal roofing screws and they each have a gasket around the head of the screw to prevent leaks. And they are screwed into the "high point" of roofing material, so any water naturally runs down into the "valleys" and away from the screws which also helps.
@@BenVanKirk good to know. Thanks for the reply.
Also did you really need the first row of cedar strips? Couldn't you have just screwed the metal roofing directly into the joist?
@@SuitTV No you can't and that was the original plan going in. There are 2 reasons why this won't work. 1. There is no guarantee that the place I needed to screw the roofing material would land on a joist. 2. The most important reason - The roofing screws are designed to work with traditional non-pressure treated framing lumber. The chemicals in pressure treated wood corrode roofing screws very quickly. The manufacture told me the screws would last 1 maybe 2 years tops if they were installed in pressure treated wood.
@@BenVanKirk well that saved me a lot of headaches haha. Good points. Thanks again!
Could you tell me the type of metal you bought from Best BuyMetals?
We used the R-Panel because the ribs are slightly larger in the Cocoa Brown color.
Thanks so much@@BenVanKirk
Great video here. I am about to do a very similar job for a client of mine. Question for ya, if you may know. I think around here, 3/4” cedar is more expensive than 3/4” azek/pvc trim board. Plus I won’t have to treat and it’ll never rot. I would most likely do it in a similar fashion to yours, but planning on using the pvc trim nailing strips everywhere instead of cedar. You mentioned the roofing screws could not be used with pressure treated.. any idea if they’ll work/grab ok with the pvc trim board I’m planning on using? I’m also thinking if I’m using 2” screws, the pvc may ‘shield’ the PT chemicals from rotting out the screw heads. Thanks so much. Great and helpful video. -David
I think that could be a good option. PVC would have been more expensive for me. The issue with the pressure treated lumber is that it will corrode the non-coated roofing screws very quickly. Just be sure to not over tighten the roofing screws so they don't strip and dimple the metal roofing. Thanks for watching!
One day, I'll do this 😂😂😂
I put this project off because I thought it wouldn't make much difference. Now I regret waiting!
Curious, what gauge did you use?
I’m finding 29 gauge readily available but I’m not sure if it will sag
Any thoughts
It doesn't need to carry lots of weight and load like a traditional roof. You may want to add a few more screws to add extra support. Thanks for watching.
Awesome install.
Thanks for watching!
It seems that you are relying on the dimple in the metal for water channels. I would be concerned that the nice cedar strips will collect leaf litter and other deck debris and eventually make a dam to trap water and enhance rot. I built angled redwood strips that attach to the joists. Wish me luck!
That's a really good idea! Thanks for watching and thanks for sharing!
Great job man.
Thank you, Daniel. Thanks for watching!
Great video!
Thanks for watching!
If you are adding 1/2 inch to each of the cedar spacer strips to get the slope why are you sloping it 1/2 inch per 2 1/2 ft of spacing of the cedar strips? I mean typical water drainage should be only a quarter of an inch every 8 feet. Just asking and a reply would be greatly appreciated
You're correct, this is more slope than you need for proper water drainage. The reason I went with the 1/2" is because that is the thickness of the material I purchased and didn't want to mill it down any more than I had to. The second reason is that the screws are 1/2" in length so the first row needed to be 1/2" anyway.
Nice project, exactly what I’m looking for vs under deck kits. Good job on hiding the gap at the end, where the gutter is. Any tips on the side gap? Unless I have some type of skirting from the house at the end of the deck, I’m going to see an ever growing gap (from house to end of deck), correct?
Thanks,
Jim
Jim,
I had this gap as well. I decided to leave about a 1 1/2" gap at on the end of each side and filled that space with another 2x6. This not only gave it a clean look but keeps birds and bugs from getting into each side. I also ran some J-channel along each end to give the edge a finished look from the bottom. Hope this helps. Thank you for watching!
Ben
Why not just use vinyl soffet material? Wouldve been much cheaper and probley wouldve been just as effective keeping things dry.
I think that could also be an option. This meatal roofing is very sturdy and with the j-channel delivered it was only about $700.
Matter of preference. Metal would be a cool change. Vinyl bends, warps and sags.
Nothing like sitting under metal roofing in a lightning storm
Really
Hair Raising!