Texture & Grunge Essentials | Photoshop Tutorial with Free Textures

HTML-код
- Опубликовано: 28 июл 2024
- Learn the basic tools for using texture in Adobe Photoshop to create distressed type or logos and use textured backgrounds. Free texture links and more listed below. Thanks for watching and please leave your comments or questions below!
FREE TEXTURES USED IN THIS TUTORIAL:
texturelabs.org/tutorials/tex...
MORE FREE TEXTURES!
texturelabs.org
FONTS:
www.myfonts.com/fonts/redroos...
CONNECT:
Instagram - / texturelabs  Кино
Кино


Nice to see a tutorial by someone who actually knows how to do a tutorial. Thank you.
Yes, I totally agree. This is PRO level.
Never knew we could paste a texture directly into a mask - WHOAH!! That ids a serious game-changer, thank you!
I have been looking for the 'blend if' tool all my professional life!!!
Thank you so much!!!!!!!
This channel needs to blow up!
Brilliant. Quick and to the point, Brady. You are a masterful tutorial maker, and I hope you continue making gems like this.
Thanks again Brady. It never occurred to me to put something inside a layer mask. Your tutorials are very straightforward and engaging.
Loving your videos - excellent quality and explanations! I want to get better at using your masking techniques. Wondering how you think about Clipping Masks versus Layer Masks and when is the right time to use one versus the other…
Keep up the great work and thanks for the textures!
Thank you so much for these videos. You are a great teacher and I’ve learned more from your videos on textures and layering than the whole of RUclips prior to finding your channel. Liked and subscribed and bell notification set 👍🙏
There isn't a thumb-up big enough for this tutorial! WOW! I'm using Photoshop since version 4.0 but I have to admit there are gaps in my overall knowledge of it. At minute 8:00 I discovered the "blend if" layer style for the first time and it's really awesome. Also I wasn't aware of the existence of the double arrow you can split in half!!! It's totally AMAZING!!! Thank you very much for this. Today I've learned something of value.
Thanks for the awesome tutorial. These effects are exactly what I was looking for.
Photoshop always has these hidden Easter eggs 😂. I started teaching Digital Design 2 years ago and already have 50+ students industry certified and it’s because professionals like you. Students like to be taught techniques like this and not using photoshop to just place test like Microsoft Word.
Amazing! so much better than any tutorials i've ever seen... which is a lot. Thank you
I love your teaching type, you should tutorials for AE and PS for total beginners. I swear I will watch every single second of it. you are such a great tutor
Awesome tutorials,
Thank you very much.
I've learnt so much from your videos.
top notch tutorial look forward to watching the rest you make
I cannot believe the gold I have received in 11 minutes. Thanks, Sir and keep creating. Really appreciated.
Pretty amazing stuff, wasn't aware of 90% of these features, thanks friend
This video have improved my photoshop skills significantly
Great tutorial! Great explanations of the different tools that I have used but did not fully understand.
Thanks for sharing your knowledge and technique with us.
Nothing but love for you man. Thank you.
Another great tutorial and so easy to follow at a nice pace. Many thanks.
You're very welcome!
Amazing. Great tutorial, simple and concise but jampacked with useful information. Great quality of video and audio as well. Thank you!
thank you so much... my life it´s more easy now
This is the video I needed in my life, thank you!
Thanks a lot bro for the tuts and free texture links....
Digging the new name! Looking forward to more get tips. I need more help with my photoshop skills. Thanks guys.
Right on, glad to hear it!
As always, very useful!
Thank you very much! This video is so useful!
Thumbs up in all your videos I´ve seen.
Awesome! Thank you for the great tutorial
My pleasure, thanks!
And this content is totally free on RUclips!!! ❤️❤️
Very helpfull, simple and clear. thank you!!!
That's great, glad to hear it!
I've been looking for something like this; wanting to 'grunge up' some images ... fantastic! Liked and subscribed ...!
Excellent, thank you!
Wicked tutorial, thanks mate
Here is the rhyme "Black erases, white replaces". Been singing that tune every time I mask and it works lol
Hahaha that's great!
Adobe's famous "White reveals, black conceals" works too!
Photoshop is poetry itself, what an art
amazing content, thank you so much!
Great channel. very helpfull video!! thank you!!
after years of guessing, this was helpful.thx man
awesome tutorial , thank you :)
BRO THANK YOU for these videos and THANK YOU for the website GOD BLESS YOU.
Thank you for this tutorial!
Great tutorial, thanks :)
Great video! Thank you ❤ Greetings from Germany
why i didn't know your channel before :( awesome keep going and thank you for your free texture
that's really cool to hear, you're quite welcome!
Thank you so much, dude!
Thanks. Great video.
Great !! Thank you so much 😃
Great video, thank you
Quite Helpful...Thanks
Awesome tutorial. Hat on top of a hat is a great figure of speech lol
Such a good tutorial 🙏🏾
Thank you!
This is great content! Thanks for sharing.
Glad to!
Cool! Thx!
Fantastic!
Tremendous tutorial.
man thanks for everything
Wonderful!
thaaankss a looot !
Thanks sir !
Very useful! Thank you
:)
For sure!
THANK YOU!!!!!!!!
thank you bro
Great!!
bruh this is godlike
Ha thanks man!
love it
Cool thanks Damian!
Damn this tutorial is underrated
Thanks so Much
Thank you sir
is there a posibility to commit the fill options of the underlying layer to the types transparency? after rasterizing the type of course.
Hi Brady, I enjoyed this tutorial - I gave it a go by following your instructions and it worked well - thanks! I too am trying to figure out how to export or save just the text with the nice patterns in it - without the background. Is there any easy way you can recommend to do this?
I love this, only problem is that my weapon of choice is after effects 😢. Is there a way you can do this in after effects ? Or do you have tutorials on textures (still) in after effects ?
LOVE YOU
Thank you !
My pleasure!
What are the settings for the text with brick? Any tutorial for that one?
tHANK YOU
What would I do using this technique but ONLY want the text with a transparent background to add to other documents or for POD
I've been looking to make water, liquid from scratch in photoshop. Also how to make a glass picture look perfectly transparent against any backgrounds. That would complete some of my puzzles.
I like it... Gonna take a crack at it! Second half though, glass looking transparent, I'm having a hard time picturing what you mean...
Never used 'Blend If' before. How would that work with printed artwork on a t-shirt. Seeing the weave of the garment through the 'printed' artwork. Same technique?
youre amazing
ha cheers thanks!
Another way to apply a texture is, use a texture with a transparent background on top off you element/object (they have to bee in the a group together)
Then you go to Blending option and set Fill Opacity to 0% and Knockout to Deep (on the texture)
The texture will now knock out the part of the element there are below it (in the same group)
The good thing is that you can stack mulit textures layers (with the Blending Option) on top of you obejct and then turn on and of the eye on the diffent texture layer if you want to use the texture or not, and move the textures around.
(the transpart part/background of the textures work like White in a mask,
The soild coloured part of the textures work as Black in the mask,
The semi transpart part of the texture works as grey in the mask)
you are also able to turn the texture layer opacity down if you want less of a knock out.
Very cool, been meaning to do some more experimenting with knockout textures... I love this kind of stuff. Thx!
@@Texturelabs you are welcome.
it is 1 of my favourites ways too apply textures to a artwork.
Beacuse you can make a photoshop templet file with lets say 30 textures layers, that you can turn on and off, the finish result has never to be the same because you can make so many combinations
and therefore you can use the psd templet file again and again.
it should be in every print designer tool kit :)
Becuase you are able to apply textures fast to a atwork.
eg it is really good for freelance clinet work.
And what if I want to export the word without the background after all the textures are applied? How would I do that?
If you wanted to colour the text but maintain that texture, does anyone know how that can be done thanks
Can you do a tutorial for Xerox art?
i am unable to visit the website for the TEXTURE. Asking to sign how to open
I hate you! You're the best!❤
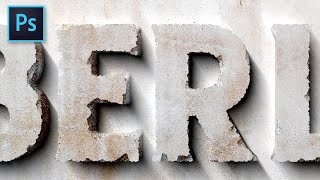
Working my way through these amazing tutorials and being from Belfast in N. Ireland I was surprised to see it pop up in this vid but I’m interested why Belfast is associated with Grunge?
Very cool! The first handful of tutorials I had this idea of doing city names of any friends around the world - so it was a little shout out to a friend in Belfast!
@@Texturelabs that’s such a great and pretty thoughtful idea to do as kind of an Easter egg type thing.
@@Texturelabs As soon as I saw this I thought it was inspired by the abandoned ship-building yard in Belfast, which would feature al of these concrete, decay, rust textures.
i cannot do option on windows keybaord
Great video, however when I go to copy an image into my mask (option click on the mask). It won't paste. Any idea what I'm doing wrong?
Texture Selection > Ctrl C >
Go to Text > Create Layer Mask > Alt+Click > Ctrl V
Could I ask what you/he means be “option click”? I’m using a pc, how do I do it there?
Alt click?
I wasn't able to apply the texture directly into the mask after pressing option :( it just doesn't work no matter how I do it
Would be nice to see common errors mentioned, because I'm running into them.
how i can open folder with free textures? i need write login and password, where i can find it?
wHAT OPTION ?
what can i do if i want the colors of the "bottom layer" will "come out" of or "show thru" the text?..
Using a layer mask should show through to the bottom layer... maybe the mask just needs more black to show more of the background, or maybe i'm misunderstanding the question...
@@Texturelabs cool tnx i'll try it! u guys r great!
The walking dead has a really cool text effect where the bottom is grassy and the top is rusty... how do we make that considering masking are black and white?
I like how they've made the logo more and more messed up every season... I think I know the look you mean, my guess is it's using a clipping mask to get some really nice grungy rust and grass photography into the letters
@@Texturelabsyes! The one towards season 9 or 10 i think have more green in them. would you be up for making a tutorial on that? It would be so popular!
My guess is it's pretty close to the clipping mask in this tutorial, just a matter of having the right image to paste in there! Will take an extra look at those ones though and see if I can figure out what else is going on...
@@Texturelabs I've been looking around for some textures that look like that. No luck yet
Amén
WHY THE IRISH THEME??
Texture Selection > Ctrl C >
Go to Text > Create Layer Mask > Alt+Click > Ctrl V
I got the crack