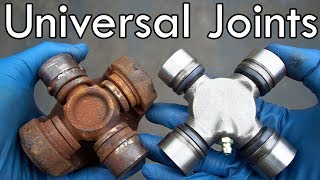
Staked U-joint Replacement -Part 2: Installation

HTML-код
- Опубликовано: 13 сен 2024
- Now that we got the original destroyed staked u-joints out of the driveshaft, let's install the shiny new ones!
I run into a bit of a surprise, but we still get the job done :)
The 2010 Nissan Rogue is back to its former AWD glory, just in time for the first snow storm!
Enjoy!
Ivan
Ebay u-joint for 2008-2012 Nissan Rogue:
www.ebay.com/i...


My front wheel drive Chevy does not even have u-joints, but I could not stop watching this repair to the very end. You and Eric O make the most fun and interesting car repair videos.
Yes,these two guys are top notch especially when it comes electrical and electronic diagnosis. They can do this in their sleep. What some dealerships cant figure out,it's Eric and Ivan to the rescue. In my mind these guys could fix the space shuttle.
DUH front wheel drive Vehicles NEVER had Drive shafts ,Without rear Differentials ! FWDs have CV joints on Axle shafts ! Get a CLUE before YOU COMMENT KID !'
I am 72 years old and all my life I have never bought a drive shaft when a u-joint will fix it. I have installed a few hundred u-joints in my time. I have never used a press until about five years ago when I bought a press. I happily went about using that new press and it only took me about 5 minutes to discover a vice and a hammer was the best way for me. I buy u-joints from Florida Drive Train and the last time I was in there I asked how they changed u-joints since they do it all the time. They said they use a vice and a hammer. Once you get the hang of it you can change a u-joint in about 15 minutes or less. I enjoyed your video, it was fun watching a young man getting his feet wet. Don't feel bad, I would be even more lost dealing with automotive computers any you would get the last laugh.
Thanks for the comment, Charles! I also love the hammer and vice method and have use it numerous times. These staked-in joints however were not really happy to come out so I decided to do it the "long" way with the press :)
You went through a lot of work but saving money is what being a DIY is all about. I hope the u joints hold up for you. Nice work Ivan.
Ha! Ivan you should watch some videos on installing U-Joints. Pressing 2 cups in at once increases the chances a bunch that you will dislodge a needle bearing. The dislodged needle will go one of two places, it will either end up laying flat on the bottom of the cup or find its way into the grease hole in the spider. The best way is to press in one cup at a time. The first cup is pressed in until the spider bottoms out on the opposite flange. Then you flip the drive shaft over and press the second cup in and recenter the spider. That way the spindle on the spider engages enough of the bearing cup to keep the needles in place as you are pressing the cup in.
You saved a lot of money doing this repair. You are very talented and patient person. Cheers my friend 👍👍
Hi Ramon! Good to hear from you :)
Pine Hollow Auto Diagnostics I watch your every video you make my friend. You are awesome. Keep up good work 👍👍
Way to go Ivan. Your poor wife can finally have awd again and not have to worry about being stuck in a pa snow storm. Excellent amazing video man.
Our hero triumphs again. Good job.
Mrs. T. is a lucky lady.
A mechanic's wife is his worst customer having learned to expect her car to always be in perfect condition.
I made her make some dinner for me as payment haha
Nice work, Ivan! Saved a PILE of cash there.
I'll never forget the first time I did u-joints. Had a needle bearing tip over, and as I forced the cap on, I blew the SOB right out the top HAHAHA! That was the end of that! Luckily only a $20 mistake on my own vehicle. Then, I managed to bend the ears of the shaft because I didn't know they injected nylon to retain them from the factory. I forced them out with no heat!! When I got the new ones in, I couldn't get the clip seated correctly. Out of frustration, I slammed it in as far as I could, and left it. Drove 200 miles up to NH and back, no problem, but there was a slight vibration that drove me nuts. About a month later, I was coming home from work at 10pm, of course on the one road where the speed limit is 45 (I'm doing 55+), truck starts vibrating BAD. I say WTF out loud, kept going, and then it got VIOLENT for about 1.5 seconds. Before I could get to the side of the road, BAAANG! Driveshaft let go off the rear joint, flailed around and smashed the crap out of my exhaust! I crawled under there - no flashlight, of course, yanked the shaft threw it in the bed as I swore at it, threw the truck in 4x4, and headed home.
The next morning I saw a trail of ATF about a half mile long, LOL - guess the transfer case was a bit full ... 😂
hahaha good story! It's bad design when the rear shaft splined end keeps your tcase fluid in...same with my XL-7 :)
I think I'm going to get a press next time I go to Harbor Freight. Every time I watch a video watching someone use one I realize I could really benefit with one. Good Job !!!
I have used mine so many times it's ridiculous! HF presses and floor jacks cannot be beat!
@@PineHollowAutoDiagnostics got one given to me works great.brgs bushing,etc.
You could work on my stuff anytime. Something to be said for someone that wants to replace only the part that is wore out.
Excellent job Ivan!!!
You can also use a vice as a press. My Dad taught me that method, it's worked for years. I like the press, no room in the garage, would have to put a press in my storage shed. With it's concrete pad, it would work real well!
Good Video! Best part is no noise or vibration! COOL ! !
WOW-putting them back in had me cringing the whole time!! There is MUCH EASIER/SAFER way to do put them back in to make sure the needles to not fall out! Place one cap in and put the u-joint into the cap.Press that cap in FURTHER then it needs to go!! You can then put on one of the locks. You can now lift the joint up so the end is sticking up above the other side of the flange. Now you can put the flange on and push down by hand while moving the joint up and down so that way everything will be lined up fine with no way for a needle to fall. I HAVE had a needle fall doing it the way you did! Now all you need to do is press the other cap all the way which will push the other lock against the flange. Push until you can get the second lock on. Then you can just take a hammer and give a few whacks on both sides of the flange and will free up. Much easier/safer and quicker. Just thought I would throw this out there to help others seeing as YOUR videos have helped me tremendously and I wanted to try to pay some back. THANK YOU for all of your awesome videos!!!!!!!
Well done hard work but you kept your head and didn't get stressed out. Thanks for video Danny from UK
The ebay part is probably a Rockford 430-11A. It's easy to install, but with the angled, unmachined surface of the driveshaft, only a small fraction of the snap rings touch, and on some driveshafts (like mine) there may still be a gap allowing side to side play. The Spicer 5-3201X has a larger cross with the proper cap size that extends deeper into the cap holes and probably would have prevented the failure that Ivan experienced in the follow-up video, and may have even worked on his damaged driveshaft, but since the grooves are spaced too wide, centering and securing the caps are up to you. The large cross is a very tight fit that may require light filing of the u-joint forging marks to install. I centered by sight, checked on the car with an angle gauge, then tack welded the caps. If you are comfortable doing this, I think it's a more robust part. A slightly smaller cross than the Spicer, maybe easier to find, and no filing is the Rockford 430-11, or the even smaller TUS-11. If you want the easiest install, check out the Rockford 430-11A and its rebrands and clones, possibly a Pronto PT430-11A or TUS-11A, but you may have the same failure shown in the follow-up video.
Yes. This is doable but not as easy as most suggest. The Rockford website even says that for staked replacement joints the inside ears of the yokes must be milled flat to accept the C-clips which bear against the flats and also center the cross between the yokes and control side play. The flats should allow no more than .002 side play of the cross trunion caps (space the flats at the lockup dimension +.002" /- 0.00"). The yoke flats should be made on a mill to ensure that the flats are parallel to each other and they must be centered and inline with the centerline of the driveshaft (otherwise vibration). The final shaft assembly should have .010" or less runout. Set up V blocks and rotate the shaft 180 degrees and check the depth of each cap with a dial gauge to make sure they are equally spaced from the shaft centerline. Have the shaft balanced when you are done. OR get an exact replacement joint and figure out how to re-stake it.
I have not done a U-joint in years but IIRC, I did the caps one at a time. If you have a big enough vise, you can use that or a large C-clamp or ball joint press.
the needle bearing are "falling" out, near the beginning of the video, in part, because you are on the magnetic tray. The caps slide off cleaner when the spider gear is not magnetized. CHEERS.
Nice video, especially for those of us doing this for the first time.
I had a 1968 Plymouth with same the U joint design. The factory U joint doesn’t have grease fitting. The replacement U joint comes with grease fitting, but the grease gun can’t reach the grease fitting because the yoke is too wide. I had to remove the drive shaft to bend the U joint more than normal so I can lube the U joint. What a pain.
common issue on most of the greaseable ones. often the one at diff can be greased with vehicle body/frame on stands and rotated just right, the transmission/tranfser case end, forget it. I was shooting fireballs the first set of them I put in, then went to grease after fully installing on vehicle..... nothing like have to drop the shaft halfway to grease.
Mabye the magnet tray is fighting the rollers???
yeah, the magnet tray was hosing him over, it was hungry for rollers =p
What a coincidence: I watched this video this morning, then I got in my 2004 Honda CR-V to go to work, and I notice it's making some unusual sounds and vibrations. It sounds and feels like I might have some bad u-joints in my rear driveshaft. I might have to do the same job you did soon.
Good luck!
What helps with the installation of the new spider, is to tap around the edge of each flange with a hammer, as you press everything into place. The pressure on the yoke (as you use the press) distorts and an out of alignment takes place. Tapping on the yoke flanges helps to reduce the distortion.... if that makes sense!!
Your a pretty resourceful guy Ivan. Pretty much covered the bases on how to remove and install the u joints and you also made sure they weren’t binding. One thing I do after installing them is I wack just below each cap with a hammer 🔨 it’s an easier way to loosen the joint so it doesn’t bind. I’ve seen Eric do this also. What you did works also but a few wacks causes the caps to to seat against their c clips and takes the binding completely away. Nice job Ivan, well done 👍 I’m sure your wife will be very happy with the results.
Thanks, Willie! I'm sure she will appreciate the AWD in the snow that we have coming up in a few days!
Willie beat me to that advice, also a decent secure vice can be used for those without a press.
Sure, as long as the vice jaws open up wide enough :)
Pine Hollow Auto Diagnostics yep and as long as you have the right sized sockets
Maybe I missed it, but what is holding in the new cups? Did you re-stake it or just rely on the interference fit? I would not trust an interference fit especially on a drive shaft u-joint. If that comes loose it would not be good.
Nice job sourcing the u joints, many driveshafts are similar to this with no replacement parts, Kudos Ivan!
We put press in parts in a freezer for an hour. Makes it easier to press in
not the first time i've seen two different sized bores in u-joint yokes. its never by much but just enough for a loose fit on one side. check the caps that come out and see if two are fractional and two are metric. thats what i usually find. it takes two u-joints from the same manufacturerer to make one as the crosses are the same. or ream the small side out to match the bigger. either way a lot less expensive that a whole shaft
Great patience ivan nice job muy bueno.
I'm glad my Nissan is a 2wd😉 We only get snow a few days a year so we'll manage!
haha some winters we don't clear the driveway at all...just make some tracks with the 4x4 :)
The fancy, soft American with an Arbor press is acceptable; the superior Soviet way- would be to use the weight of the vehicle and it's jack to press old & new.
The best Soviet mechanics would have this done in minutes using only a hammer.
@@rmr5740 Somebody took the hammer. They'd use a tire iron or the lug wrench.
hahaha my cousin who lives in a village in Siberia is a master with sledge hammers to do any sort of repair xD
Good job Ivan! I'd love to be able to work as fast as Scotty but alas I'm only a mere mortal 😂
Only Keith DeFazio can match Scotty's speed xD
Thanks man, about to do this job on the same vehicle. Been looking for just the u-joint and it seems no place carries them because they expect you to replace the whole thing. So I'm glad to know there is a part I can buy that I know will fit.
Just buy a new aftermarket shaft for $400 👍
My poor old mk5 transit has this issue! Near on impossibly to get a new drive shaft! I little hope here thanks
nice job, Ivan the frugal mechanic
How you gunna hold that joint in weld hammer dents,staks
I think Ivan is a reincarnated old schooler from back in the day.
Привет Иван! Хорошо ты выложился с этим карданом. Мне тоже надо менять.Посмотрел на свою сузуки ,не нашел у них . Сроки доставки конечно месяц плюс минус. Те крестовины которые у нас продаются, могут год проходить и всё. Я себе переваривать с контракта отвозил. Надо было длинну уменьшить. И балансировку ещё делали .
My kind of video Lets see if it can be done! Great job Ivan!!
assembly is easier using c clamps, you can feel it better if it isn't in alignment.
Watched your CVT replacement video as well as this U joint replacement. Boy she puts a lot of miles on that car. My wife's car is a 2003 Crown Vic. and she just turned 38,000 miles on the car this week. I have only had to buy one battery and one set of tires since that car was new! Luckily we live out west and we live a mile from her work, also don't deal with salted roads in the winter like you have back there. I doubt we'll live long enough to see a 100K on that car!
Wow 38k on a 2003!! Must be a peach :)
Yes we have a several low mileage vehicles. A '91 Ford F 150 that was my dads with only 89K and a 2008 Suzuki GV with 52K. Thanks to yours and SMA videos I tackled the ABS ESP fault and finally diagnosed it as a faulty pressure sensor in the ABS pump, found one at a local auto wrecker and replaced it and now it finally works great after not working for 6 years. Repaired it for $300 Suzuki wanted $3100 to fix it. Thanks again for the great videos!!! @@PineHollowAutoDiagnostics
Ivan you are so good at everything but I was struggling watching you smack that cap on the u joint with a hammer. I see Eric biting his lip!! Good job Power thru!!
I have a friend who owns a 4x4 shop. He can take a u joint off in two minutes but hitting a telephone post with the driveshaft yoke!! He changes ALOT of u joints!!
I will miss all this videos when Ice vehicles cease to exist and all we have are ecars
Great job Ivan.
I think for giggles the next time I get a Subby in, I'll try it. $1100.00 for a shaft! Chicago Driveline won't guaranty the replacement joints which scared me. But for that kind of $ and then labor, replacing 1 is worth more than the car! Got nothing to lose!
Great job m8
That's why you hold the spider up in the top cup while pressing it in. Lol
But then it won't align with the bottom! That was a really small spider haha
When I say hold it up I meant mid way or I usually hold it up till I get top cup set in far enough then flip it and do the same.
Iether way staked u joints suck. Lol I'm sure we can agree on that.
I was going to post the same comment about ensuring the spyder is into BOTH cups before pressing too far as to avoid any mishap with having any roller bearings shifting and ruining your day. Learned the hard way once resulting with shattering the cup and wound up buying another u-joint.
Ouch tinker that's never good.
Happy Wife , Happy Life !
10:35 Some guys are gonna say "why don't you use a hammer", but these joints require the finesse and control of a press... 5 min later: *whales away at joint with ball peen* lol.
I kid of course. Well done with the repair and for taking on a "non-repairable" part! Always a gamble. We could use that sweet AWD motivation here in Finland, too, with the winter fast approaching. Take care!
Great video. I like your determination.
Might be time to invest in a small lift!!! 3 feet or so!! QuickJack gets my vote!!! Carry on Mate!
You can bend the ears easily with a press. I never use a press.
Very im'press'ive job Ivan. Well done as always!
Thanks for the positive comments as always!
Nice job, Ivan.
now with the zerk fittings you can keep it properly lubed although I suspect you will promise to do it regularly but will tend to forget it.
I will keep my fingers crossed about the condition of that yolk, that press was making it's objections heard. so far so good. I haven't seen a staked in u joint before.
Hey Ivan any update to this shaft? Did the new joints hold up after many years?
Thanks
Sorry-needed to make a couple corrections--WOW-putting them back in had me cringing the whole time!! There is MUCH EASIER/SAFER way to do put them back in to make sure the needles do not fall out! Place one cap in and put the u-joint into the cap. Press that cap in FURTHER then it needs to go!! You can then put on one of the locks. You can now lift the joint up so the end is sticking up above the other side of the flange. Now you can put the other cap on and push down by hand while moving the joint up and down so that way everything will be lined up fine with no way for a needle to fall. I HAVE had a needle fall doing it the way you did! Now all you need to do is press the other cap all the way (while moving the joint up and down) which will push the other lock against the flange. Push until you can get the second lock on. Then you can just take a hammer and give a few whacks on both sides of the flange and it will free up like how yours did in the end. Much easier/safer and quicker. Just thought I would throw this out there to help others seeing as YOUR videos have helped me tremendously and I wanted to try to pay some back. THANK YOU for all of your awesome videos!!!!!!!
Some Ujoints are trivial to replace and some are a pain in the neck!
I just ordered a pair of the same ujoints from the supplier you provided the link to,$110.00 is a bit pricey for a pair but i have searched and can not find them anywhere else.If they hold up for a while its much cheaoer than the $1100.00 Nissan wants for a new driveshaft.
I use my BIG VISE for u-joints, also put them in the freezer the night before.
if replacing old-style bearing caps in yoke apply any common grease to hold needle-bearings
trying to do this on my 350z...... i will not buy a new driveshaft.... any advice?
What about replacing the carrier bearing while you got the drive shaft out?
Still smooth and tight :)
@@PineHollowAutoDiagnostics they dont stay that way forever lol
You are very lucky nothing exploded on that press! Safety glasses??????????????? Good job on the fix, but be careful man!
Dang did I forget them for Part 2? DON'T TELL MY WIFE!!!
Something could have popped out and hit you in the noggin. An explosion, I don't think so. You can do this job in a vise.
Nice work!
Great rebuild video Ivan. See after your comment, not to use a hammer to bash the caps in, you grabbed the hammer! I was surprised the needle rollers, did not move out of the grease held position, with all that bashing. Guess you could have drilled, tapped and fitted the grease nipple onto one of the Ebay caps?
It was just light precision hits :)
Spider? Cardan Cross. Where do you see 8 sides?
My 2007 Jeep Grand Cherokee has the same staked in U-joint 🤔
I've got one similar to this in my future. Except the caps are tack welded into the yoke. What's the concensus on the new Moog style dust boots? I think it's much nicer for install not having to worrying about cutting the dust boot.
awesome ivan the last one I did was on a Subaru and used a dorkman shaft
Hi Ivan you can use a Vice instead of a press, i guess not too many peopla have presses...at least you can with a normal joint, not sure on the staked ones...Fred in England..good video
I was about to say "what no bonus footage", then we got a test drive, perfect video !
:)
eBay 4 the win ...
Pretty straight forward with those clips .
You can use the ball joint kit on UJ joints which pretty handy ....
Your prop was borderline salvageable .
4wd back just in time ... was like an old land rover freelander with the rear prop removed lol ... a sitting duck to looking stupid in first snowfall :-)
Btw Ivan that plug in the front is for a 90 degree fittings or t fittings if you have deep yolk faces.
I like the ones on the end caps...simple and always easily accessible!
Thank you!
Now. A bit of grease once in a while and you may never have to do them again. The old ones looked a bit neglected. :-)
Thanks for the video.
Not all U-joints can be greased.
True. But his new ones (at least the ones he found to be the wrong size) had a grease fitting. Hopefully the finally installed ones did as well.
good intentions turned into a frustrating to watch tutorial on doing it as hard as possible the long way, with mistakes, once you had it free, a brass drift & engineers hammer would have been better & i was unimpressed when You knocked the needle bearings out in a new cap, sorry to rain on your parade, but if your wife has to drive it , You want it right, You don't want the uni joint destroying itself on a downhill road, ;) curious did it drive OK & is it still? I'm researching the same problem in a 2004 commodore & its looking like visiting Hardie's to get the uni i need , regards ;)
Good job on fixing the Japanese Renault Ivan :-) Hope it works good lasts long time :-)
Me too!
some call them the japanese chrysler
The rear one on my girlfriend's 2009 Rogue is seized; doesn't seem wallered out like yours. Think it's worth my trouble to try and change it? I have a press.
Also here in Canaderp that U-Joint is 80$...
A lot of the time I use my ball joint tool to do u joints.
A lot of tools will work that's for sure!
I still juggle sockets and the driveshaft into the big bench vice, beat on the vice with 4lbs drilling hammer while tightening. hammering using an arbor press while holding force works much the same. don't have to hit it that hard, nor crank tons of pressure and bend the flange ears all.
İf you did not use any threatlocker bolts are going to get loose.
ujoint fixed now bad gas milage is slowly come back or has nissan 2 weel drive option
Smashing repair ivan :-D, i bet your wife is very happy :-D.
I think a decent bench vise could work with patience, and a selection of sockets to torture of cause :).
I did wonder if those clips would move, but i'm sure if you were worried you would have put a single spot weld on each one to make sure.
Gotta be cheaper than a new drive shaft assembly :-D
So far so good, fingers crossed!
was there no zirk fitting hole? the bearings already come pre greased and theres no need to regrese them by hand.
You needed the a-team, disgruntled mechanic and bskorner and Eric o. .
Mate hows the uni on the driveshaft..is it still in good condition coz m curious to know ..
Since those are just pressed in, will they hold without retainer rings?
The hole in the middle was to let the air out when pushing grease in trough the other hole.
WHAT?...I don't think so!
it's probably not .946 but rather 24mm. A little known measuring unit in the US used by the rest of the planet
Ha you're probably right!
The hole in the middle is for a grease zerk
That was awesome
Why the plastic bags on the end when it was on the floor? Great fix man!
Just to keep the cobwebs off my fresh clean u-joints haha
How many hours did you put into this project Ivan?
if you couldn't find the correct size on ebay, what do you think about shimming the loose fitting ones to center them, then welding them in place? I mean, they can be greased so just flush out the old grease afterwards with new grease.
Too easy to create imbalanced mass. It is not a good idea to try and weld these, the heat would soften the steel of the bearing surfaces and they'll never last. The ears are usually cast iron, not easy to weld at all, and after welding you'll have an awful time replacing the joint again. The welding suggestion reminds me of a misadventure our friend ErictheCarGuy had with a poorly fitting ball joint replacement. Better to have a cup of coffee, take a big breath, and patiently wait for the right parts.
Shimming and welding sounds sort of sketchy on something that rotates at up to 6,000rpm IMO
Nice job Ivan the mid bearing wasn't dry, I would think that much miles on it...?
Eh as long as the seal is good those things are lifetime units!
Awesome
Saved by EBay!
I LOVE Ebay!
Awesome. I get to watch the ending b4 going to sleep!
Nope Ivan, you can't cheat... lol not 1st.
haha Cuba I couldn't beat those quick commenters!
I love watching Ivan. What have you been working on lately
Is it your bedtime already
@@PineHollowAutoDiagnostics lol... that's crazy.
I agree with using the press over the hammer on U-joints. Press is for precision. It's also my preference for many tranny bushings. Plus the impact of the hammer 'could' dislodge the pins from the cups. Great job.... on a "non-serviceable" driveshaft/part.
@@jeremyanthony9300 yes, it's been a rough couple days and late nights at work. The cold makes it rougher, at least while not acclimated yet.
put the joint in first, then put the cap on top and squeeze in abit, then add the bottom cup and put together,!PAT ATTENTON TO ME!