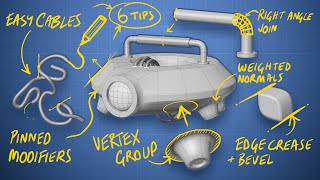
BEGINNER hard-surface modeling tutorial in Blender!

HTML-код
- Опубликовано: 21 авг 2024
- ►► Our Blender courses & resources - www.blenderbro...
Abandoned Slipway HDRI: hdrihaven.com/...
---------------------------------------------------------------------------------------------------------------------------------------------
SOCIALS:
💻 Our Blender courses - www.blenderbro...
☎️ Discord - / discord
🖼️ Instagram - / blenderbros3d
CONTACT:
📱 Inquiries/questions - info@blenderbros.com
►► Enroll in the most popular (and free) hard surface modeling course - www.blenderbro...


➤ Learn hard surface modeling with our FREE SciFi Terminal Design mini-course
(Hard Ops/Boxcutter workflow):
www.blenderbros.com/scifi-terminal-design-mini-course
I don't know why people dislike appreciate everything that's provided to you for free
@Honey Hive :)
4:01 - for anyone using Blender 4.1, 'Autosmooth' is now a Modifier that you can find under 'Add Modifier -> Smooth by Angle'
I really really loved the way you included an explanation on overlap clamping, normal orientation and how to see fix it. thanks for that, I've been trying to learn independently the last half a year and that's been a big missing piece for me. really cleared up a lot. Can't thank you enough
Happy to help!
Theoretically, all machine drawings have 0.003m Bavel I remember when I was learning for graduation. Love that subject. Manual drawing amazing. josh good video lot to learn.
learning this helps my modeling ocd so much, thank you!
wow! so glad someone has done the research on that topic, I always wondered about that. Thank you!
Thank you so much.
That is not entirely correct. 0.003m amounts to 3mm. 3mm being a quite big "bevel" or correctly put, radius. This radius is defined by two things. Convex edge or concave edge. Convex can be sharp as a knife, there are reasons why you wouldn't want that but from a technical point of view it is doable. Concave radius is defined by the machine head size, or if it is spark eroded. From a manufacturing point of view for say, injection molding, the smallest radius that is doable is actually around 0.3mm. Very few suppliers to the OEMs I've worked for and am working for can manage smaller than that.
This was pure gold! So much to learn here! Thanks
Thanks for the tutorial, really helpful! If anyone is stuck around 29:00 ie. trying to cut the curve into the face, i had to recalculate the normals (edit mode>mesh>normals>recalculate outside) before it would work without having jagged artifacts.
Damn, I missread the video length thinking it was only 4 minutes and didn't even notice for like 35 minutes. Captivating stuff, gotta say. :D
Thanks man!
You are one of the better blender instructors!
I've been using blender for 18 months now, and have been in search of a hard surface tutorial. Until I found your channel, the only tuts I could find were either done by people with foriegn accents who just learned english, or are done on an outdated version of blender from almost a decade ago.
So props to you.
Thanks man! Glad to help :)
You might need to refine your search because there are several people who also make quality Blender 2.8+ content on the topic (eg Gleb, Arrimus3D, Grant Abbitt, Ponte Ryuurui, Blender guru, CG boost, and MANY more). I don't have anything against Josh, his guides are top-notch and he dominates the hard surface topic but I feel you might be missing out on a big portion of what the Blender community has to offer. Also, don't limit yourself to RUclips and blender tuts/guides! There are countless professionals who make guides and blog articles on other platforms and with other programs. It might not teach you specifically how to use blender but the principles and best practices still carry over.
Awesome tutorial, I learned a lot about fixing shading errors/artifacts!
A few things that stumped me, that might help others:
- If you're having trouble with the reverse bevel, make sure that you're only selecting the front face of the cylinder, not the full object.
- If you can't see the world background (HDRI), make sure you're not in orthographic view
thanks!! last one help
@@Catherine-fr8vg you're welcome! 🙂
10:30, you also can just fix 1/4, then you just have to symetrize X first then Z
Every time he says "Intended Functionality" take a shot.
4 shots...
Is the profile pic a depiction of yourself?
we'll be on the floor by the end of the vid
ITS NOT A BUG, ITS A FEATURE
RIP OP
Great tutorial. Just love Vanilla well explained. Having the basics is so important.
And with the evolution & improvements of the software itself, it becomes even more.
Thanks, Josh!
No problem Ricardo, thanks!
I’m finally taking my first real steps into Blender.....this tutorial is awesome. Many thanks!
It's nice that you release great tutorials like this on a weekly basis.
I try my best.
@@JoshGambrell are you planning on taking a break?
@@davematteer5966 Not really, I don't need a break and like making videos so I'll only take a break if I have some big side project going on and don't have the time.
@@JoshGambrell thanks for the hardwork then.
For the first part, could have just selected the edgeloops that are closest to the boolean edge and dissolve it to create more space for the bevel and prevent the overlaps, then apply the bevel. 5 seconds and done.
This is my first successful hard-surface tutorial, it was all really well explained, step by step. Of course a beginner like must pause and go back a few times but everything went good!
Awesome!
great tutorial, thank you. You actually taught me about the modifiers rather than just showing me what to do. Your effort is much appreciated
@10:26
if you want to quickly merge/align vertices together without manually vertex sliding them into the nearest vertex one by one, you can choose the vertex you want them to be aligned with on a particular axis. Select that vertex in edit mode then press [SHIFT+S] then "align cursor to selection".
You can now select all the vertices you want to remove along that particular axis, then hit [S+ X/Y/Z] and then hit [0].
This automatically "scales" (or rather slides) your vertices along the axis you specified, and at the exact position of the vertice you selected and put the cursor to.
With auto-merge your redundant vertices will be automatically fused. This also works well when you need to selectively align certain heights than aren't necessarily connected together etc.
i just want to say thank you and thank you. my skills on hard surface has improved. i just bought the new course by blender bros just to listen to you again
Thanks Charles, really appreciate that! Enjoy it ;)
I don’t normally comment on YT videos, and I don’t normally sub to people based on a single tut. But you have just gotten yourself a sub and a massive thank you for such a to-the-point and clear video. Well done and keep up the good work.
Thanks a lot man!
Totally agree. Pure gold. So happy I support this talented team !
We really appreciate it Ulysses, thanks a bunch!
So that reversed bevel in manufacturing is called a countersink, it's generally used in places there's going to be a threaded hole for a bolt, or a hole for a pin to make getting them started easier. also to break the edge like a chamfer so you aren't slicing your hands working with the part.
source: several years in aerospace machining and many many accidental slices to my fingers.
This video is gold
I found a good strategy was prepping the bool'ed sphere BEFORE beveling by simply selecting all the edges nearest to the flat face and dissolving them, thus giving enough room on the corner faces to support beveling - no need to adjust any vertices. You can even wipe out entire edge loops with ALT + click. Takes seconds.
Yeah that's what I figured too. Maybe he just wanted to demonstrate a specific workflow and tools but it wasn't very efficient for this job.
Thank Josh,your and ryuuriu videos are the highlights everyday
Took the words right out of my mouth!
Another really great tutorial. Together with your paid tutorials this is a lot of great material to practice and get comfortable with Hard Surface modeling. Especially appreciate your focus on how to fix things and when you show both common issues as well as more unusual challenges when it comes to fixing geometry.
Thanks Mark, glad the videos are helpful! Common issues and explanations are key.
Man teachers like you are underrated
i’m only 11 minutes in and i can tell i’m gonna sub after this. you explain everything so well, and even explain the reason WHY which helps so so much. i’m tired of doing stuff and not understanding how or why it works. i would have never understood the normals and stuff had you not gone more into depth like that, now i feel like i understand it a bit more! i appreciate it so much!!
Thanks Jasmine, really glad it helps :)
This is just awesome. I can't wait for my exams to get over to watch all of your tuts
You taught me stuff I didn't expect to learn even! Awesome!
Glad to help!
You solved so many issues for me #1 that auto merge. I was never taught that so thank you!
yes "intended functionality"
11:00 instead of knocking out half the work, you can knock out 3/4ths of the work by working on one quarter of it and then applying *two* mirror modifiers, one for X and one for Z :DDDDD
outstanding move
Another great tutorial Josh! Feel reassured that I've gotten these basics down from watching your other videos. Always a good confirmation when having a idea of what's next and how to tackle occuring issues. Thanks 👍
No worries man! We’re in deep studies for some super cool stuff, so i might focus on beginner stuff for the next few days here.
As always, the best of the best! Your explanations are simple and easy to follow. Definitely, the teaching runs through your veins, my friend.Thanks a lot for this awesome material.
Thanks man! Teaching is a passion, and the fact that it comes natural makes teaching you guys that much easier :)
Been meaning todo this for ages and so finally did it tonight. There were some very good tips that were useful to know.
I liked the video the moment you said you think its important to learn the fundamentals before getting into the addons. I am all about that shit. Super good video mate. I think addons you use are great for when we already know how to create cool shapes without addons and want to do it faster.
I’m starting with hard surface modelling now and this video and channel is gold! Thank you for teaching us peasants! 🙂
Good video 😎 now the hard part trying to remember lol.
This is gold! So much useful information in the first 30 min! Thank you so much!!
You know it! Glad to help man.
best tutorial on blender for sure
This is a fantastic video. Love the explanations. Keep up the great work!
Thanks Keith! I plan to keep recording tuts for you guys daily
Hey man,i wanna say you make very good tutorials,it's helps us lot, thankyou.
Thanks Jay!
It's very disappointing to see such low view after high quality tuts,but when some videos will be famous and people find out that it's made by blender then people also come for this,afterall i don't find any good channel to fight blender booleans,other than this.
Great video, man. Lucid and concise explanations. Seeing this one video is enough to make me subscribe to your channel.
Thanks man, really appreciate it!
This man is doing a great tutorial! Thank you!
You are the best when it comes to hard surface modelling. Great work. I have been binge watching your videos and trying to replicate similar projects. Keep going. 👍👍👍
friken great it changes everything. thanks
This is incredible, one video answered so many of my hard-surface modeling questions! Thank you!
If you press ctrl, alt, numpad 0, it will automatically align the camera to view
Thank you Josh. By far the best tutorial I've found on the subject
Glad to help!
Great tutorial! So many super tips and tricks that I learned! Thank you
Thanks zac!
13:26 Doing the slice gives me weird shading on the flat side of the sphere as well as the cutting object. Any ideas what may cause this?
Resetting the scale of the cutter and recalculating normals didn't work.
Unchecking "Harden Normals" did the trick, but this would not be an option if the bevel modifier was already applied.
Help.
there is no ctrl+ numpad forward slash hotkey for blender for me at least.
I even checked the keybinds
@kavya ji oh k thanks
Thank you for sharing your knowledge❤, very interesting tutorial.
Man you are too amazing! For some reason when I flip the normals on the controlling array hole the others disappear.
Although it did not do that the 1st time around, it started that after I undid the bevel then scaled the cylinder down more and on the y axis alone to shallow the holes up more like yours.
superb video!
I love the idea of yours by making videos with vanilla Blender and with the Add-Ons.
Best hard surface modeling you can find!!!Great job, keep going and good luck for your projects!!!
Thanks!
if you dont have a numpad you can use ctrl shift b to access the bool tool menu
Once again, you improuved my knowledge about blender !!! Thank you again !!!
I might be super ocd but recording in windowed mode just feels weird. But really great video, I learned alot! keep it up man!
Really appreciate these vanilla tutorials. Thanks a lot!
You're welcome :)
Great tut!
Helped me get into hard surface really easy.
This was awesome!!! Thank you so much! Great explanations.
Hi, i just found your channel, loving these tutorials and the way they are presented. great job.
Appreciate all your tutorials, thank you! Check out the term 'kerning' in typography. That will strengthen your type work greatly. The V and A in vanilla are so far apart they read as two words.
great tutorial. i enjoy watching this and learned something new.
One of the most usefull tutorials I've ever seen!
Thanks Luka! ;)
Why would you manually move the vertices one by one and then symmetrize, instead of just alt clicking the entire edge loop, press g twice and slide it back?
That would overlap it with the slice. It’s not that easy unfortunately. I rarely do it this way anyways - mesh machine cleans this stuff in one click, but it’s a paid addon which I didn’t want to cover in this tutorial.
Josh gave me skill, Andrew Price gave me imagination. Thanks, sensei-tachi
try watching videos of Grant Abbitt, he will give you inspiration.
@@wrenchboy830 CGMatter will give you knowledge.
Thank you Josh!
hyper cool tutorial! keep creating similars please! thanks a lot for the effort!
Thanks Josh, this is fantastic has really helped me. The only issue I seem to get is when using the symmetry. It seems to create really wierd results when using the difference on the array. I tried it again without using the symmetry function and it came out as yours did.
Thank you, you explain everything very well!
Great tutorial! Got a question though, I've been in college for modeling now for about 2 years and "No N-Gons!!" has been drilled into our heads since Modeling 1. Obviously tons of n-gons here with the booleans. Obviously your model turned out fine so I'm wondering your take on if n-gons are ok or not
I'm wondering this same thing!
this is perfect thank you very much!
Awesome tutorial, thanks.
14:44 is around when you press F to fill in. When I do this it ends up making an almost invisible line down the middle of the object. It's not noticible until I make the cylinder array. You can then see clipping in the arrayed piece. Any ideas?
Also, at 33:17 you make the plane metallic. Mine shows up in render mode, but not in the viewport shader like yours. It isn't a make or break, but I am very confused why I can't see the planes material, but I can see the materials on my object.
Maybe a bit late...
But I deleted the two faces. Then I hid the outer sphere so I only had the cylinder visible.
After this, I selected all the outer edges (first press 2 to get the edges, then alt+ click one edge to get all the edges on the surrounding edge). Then I pressed f to fill.
Here I found that I had some vertices that had to be cleaned up.
When that was done, I selected the edges again and clicked f, and voila! A nice face ready to be beveled :)
Good luck!
very very good mate
Best tutorials
Can I ask for the reason why you opted for box to be converted into the sphere rather than the blenders in-house uv-sphere?
To confuse beginners and increase polycount with bad mod interactions
mirror can knockout half the work, merge by distance can knockout all of it.
Man, such a nice tutorial!
Damn it, you are a good instructor! Thank you!
thanks dude. This is super helpful.
I was wondering why you don't just get rid of those extra points so you'd have a clean loop? This is what's giving you that overlapping problem. I don't see the advantage of starting from a cube. It just makes the geometry wonky. I've seen a lot of people do this and it just causes problems down the line. Already with that boolean, you've got a huge Ngon, so you no longer have all quads. If you manually cut a sphere, you could do a grid fill on the empty hole.
Exactly, I really don't understand why I see this so often.
Perhaps we could've Merge By Distance before applying the Bevel and then select all the vertices of the face and Scale the X axis to the amount of 0 to align them all, then apply a Bevel, by angle, and voilà, clean :)
At 21:50 Josh performs Bevel and when I do it the flat surface of the main Cube is suddenly full of artifacts and ngons. Any solution to this issue?
When I do it, my whole sphere disappears.
Thanks for this!! I really wanna get into hardsurface modeling but due to personal reasons I can't afford hard ops. Thanks! I even figured how to do all the numpad stuff even though i'm on a laptop and my integrated numpad doesnt seem to work.
For some reason, I can only seem to use the boolean tool to make insertions such as Ctrl minus only after I apply the modifiers such as Array or the Bevel.
I know this is wrong since It's destructive and I can't go back to edit them. After 20 minutes when you start adding bevels to the array modifier I can't follow because of this
Was wondering if anyone on here would have any idea what would cause this.
Using Blender 2.91
Sorry if this is obvious I'm kinda a newb
Having the same issue
i find this tutorial very hard to follow as beginner, but at least it works most aspects for me
"Computer explodes, killing 15 people"
Josh : so this is actually intended functionality
Really good job.
I used edgesplit to get rid of the shading issues
Another Great video. Thanks.
I did this tutorial with boxcutter/hardops to train myself with the addons
Ah yes.. reinventing the wheel. Btw, remember me from insta? I mentioned u on my story! I have been waiting for you tuts!
Yeah man! Thanks so much for that, much appreciated :)
great job mate
Thanks for this great video !
Thankyou thankyou thankyou so MUCH