Endwall Flashing Installation On A Metal Roof. EASY Installation Video Wall Flashing On Metal Roof

HTML-код
- Опубликовано: 26 июн 2024
- Step By Step Endwall Flashing Installation Instructions On A Metal Roof. Install Metal Roof Endwall Trim At The Sidewall. Installation Instructions For Endwall Trim On A Corrugated Metal Roof.
This endwall flashing installation video will cover:
00:00 How to install endwall flashing for a metal roof
01:01 Cutting and finishing endwall flashing at the sidewall
01:26 How to cut metal with snips
01:52 Installing foam closures for endwall flashing
02:38 Overlapping endwall trim on a metal roof
03:20 How do I fasten endwall trim
If you already have not purchased your corrugated metal roofing give us a chance to bid your job. Save 15% to 50% with our manufacturer direct pricing and great customer service. Inexpensive delivery anywhere within the United States.
Visit Our WEBSITE
bit.ly/wsmr-website
Visit our LEARNING CENTER
bit.ly/learning-center-wsmr
Download Our Install Guides
7/8" Corrugated
www.westernstatesmetalroofing...
R Panel/PBR Panel
www.westernstatesmetalroofing...
Western Rib/7.2 Panel
www.metalforroofing.com/docs/w...
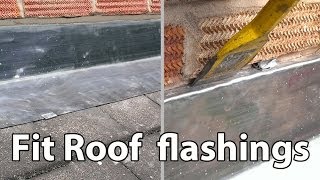
How To Install Endwall Flashing For A Metal Roof. Step By Step Guide
When planning your metal roofing project, if you have metal roofing panels that are running up into a wall, you’re going to need to install endwall to help control where water flows to protect your structure. Before we begin here is a list of the steps that need to be taken.
To begin, please note that if your roof has a sidewall condition, all sidewall trim must be installed prior to fastening the endwall.
How To Cut And Finish Endwall Trim At The Sidewall
1. Measure the width of your sidewall trim.
2. On the endwall, mark the width of sidewall and draw a line to the corner of trim.
3. With metal cutting snips, cut along the traced line.
How To Install Foam Closures For Endwall Flashing
1. Prior to fastening your endwall, double sided butyl tape should be placed 1” from the edge of the endwall.
2. Place the foam closure strips on top of the butyl tape 1” from the edge of the endwall trim
3. Apply silicone sealant to the top of the foam closures.
4. Next, apply silicone sealant on top of the sidewall where the endwall trim meets.
How To Overlap Endwall Flashing
1. Before you begin this part, make sure your overlaps are a minimum of 6”.
2. Mark your trim on the hem side 6” from the end and ⅛” up from the hem.
3. With metal cutting snips, notch out the hem of the endwall by cutting along the traced line.
4. On the adjacent piece, pry open the hem of the endwall by 6” to allow it to slide into the notched piece.
5. Place silicone sealant at all overlaps.
6. The top section should slide inwards onto the lower section of notched endwall.
How To Fasten Endwall Flashing
1. Pancake screws should be used to fasten the top section of endwall 1” from the edge and 12” on center
2. Lap screws should be used on the lower section of endwall 1” from edge following the path of the foam closures. Screws should fall on the high seams of your metal roofing panels approximately 12” on center.
3. Pancake screws should be placed on the top section on both sides of any overlaps.
4. Lap screws should be placed on the lower section on both sides of any overlaps on the high seams of your metal roofing panels.
5. Clean off all metal shavings. The shavings can easily rust overnight, staining your roof.
FOLLOW US ON SOCIAL MEDIA:
FACEBOOK: bit.ly/facebook-wsmr
INSTAGRAM: bit.ly/instagram-wsmr
TWITTER: bit.ly/twitter-wsmr
LINKEDIN: bit.ly/linkinin-wsmr
HOUZZ: bit.ly/houzz-wsmr
PINTEREST: bit.ly/pinterest-wsmr
RUclips: bit.ly/youtube-wsmr


I didnt want to remove my old gutter but was adding a simple semi stand alone lean to/patio cover/whatever you want to call it. I used that flashing maybe 4x6 or 7. I was able to slip it up into the drip edge then siliconed it. It went behind the gutter and extended just beyond the gutter underneatn. Idea being that any leaks will leak onto that flashing and down onto the roof. The roof fits right under that and add the foam with sealant and bend the flashing down held with a few screws covered with a caulking/silicone. To test I used a garden hose to flood the roof and watch the drip and drain. Worked surprisingly well.
I need a vid about the transition from shingle to corrugated metal
YES!!!
Have you got a video how to do a slip joint for this same roof flashing where the length is longer and requires that slip expansion joint ?
My barn has corrugated siding and I’m adding a little roofed pen next to it - now would I do the end wall flashing on an existing corrugated siding? I can’t put it over the flashing like shown here.
Maybe I'm not thinking about this right. Water will come down the siding, onto the flashing, then when it runs off the edge of the flashing, it will want to travel back toward the end wall because of surface tension. So you install the foam closure strips and sealant to break the surface tension, and allow it to travel down the roof. Right? But what happens when the sealant inevitably fails? Or what if water gets behind the end wall siding-how can the water out if it is trapped behind the foam closure and sealant? Does the underlying wall and roof assembly have any other WRB?
Wouldn't it be better to create a kickout lip on the flashing that acts as a surface tension break, but doesn't limit drying potential at the protrusion?
How do you seal and addition roof to an existing vertical wall? Adding an extension shed to the side of a steel building. Is there a transition that keeps rain from running between old building amd new roof or does the old wall need to be cut horisontally to slip a roof transition under the steel sheet maintaining the waterfall steps?
also curious how this would be done
And the water still penetrates from the vertical wall, even with sealant on stucco…….we had to add a second overlapping flashing on the Stucco flashing……
What is the name of this glue?
I hate flashing that don’t have the scribing lip. It looks so much better.
Dont forget how to cut and use your snips 😉
So what about water getting behind end panel and wall?
How's that sealed?
There is cladding over the top?
Near the end of the video they reference installing a Reglet, and they have a video covering that. Hopefully that's what you need. Cheers good luck
How can I seal it to a flat concrete end wall that will have no additional overlay (siding material)?
You cant. Thats not a impermeable wall
Grind a 1/2" groove second, first, hire a professional
Where do I get that double sided butyl tape and what width?
Here is the size, Tape, 3/32"X3/8"X45' Roll. This can be purchased at any roofing supply store such as ABC Roofing Supply.
I can't figure out why you didn't run that was flashing up under the lap siding 🤦
1:04
too much too loud music
get over it
Well you dont want to use silicone sealant. Never use actual silicone om anything exterior. Use a good sealant and adhesive.
Silicone is good ifnits covered and under compression, won't be exposed to UV..we mechanically seal these in my part of the world.
@@frankryan2505 Meh, yeah, it can be okay if not exposed to UV and under compression. It's still an inferior product in just about everyway as it's an all around good caulking but doesn't excel in anything. It is always nice when someone use silicone and I'm tearing their crap down though. Much easier to rip apart
@@jonny-b4954 jonny, they didnt do it right if you can yank ti out. they neeeded a backer rod or similar OR they didnt prep (dirty for example) or they simply put too much in
Honestly, they should be using a urethane of some kind in my opinion
@@CT_Taylor Nah, that's not what I'm talking about. I'm talking about when removing screen room framing, windows, siding etc. that's been caulked against a wall, mostly for aesthetics. The silicone is super easy to score with a knife and then rip the 2 things apart. Not to actually pull silicone off. Though even properly installed silicone can quite easily be pulled off like you're talking. It doesn't bond very well, unless it's an adhesive silicone, of course. That bonds a little better. Try scoring a urethane caulking though. It turns hard over time. Cracks. That is of course the downfall of non-silicone caulkings.